1. Introduction
This manual provides essential instructions for the safe and efficient operation, installation, and maintenance of your DCK TERRAINA KDRM105 Robotic Lawnmower. Please read this manual thoroughly before using the product and retain it for future reference.
The DCK TERRAINA KDRM105 is an intelligent robotic lawnmower designed for lawns up to 500 m², featuring LiDAR obstacle avoidance, multi-zone management, auto-charging, and app control for a tidy and well-maintained lawn.
2. Safety Information
Always prioritize safety when operating the robotic lawnmower. Failure to follow safety instructions can result in injury or damage to the product.
General Safety Guidelines:
- Read all instructions carefully before use.
- Keep children and pets away from the working area of the lawnmower.
- Do not operate the lawnmower in wet conditions or during rain.
- Ensure the boundary wire is correctly installed and maintained to prevent the mower from leaving the designated area.
- Regularly inspect the blades for wear and damage. Replace dull or damaged blades immediately.
- Turn off the lawnmower and remove the safety key before performing any maintenance or cleaning.
- Do not attempt to modify the lawnmower or its components.
- Use only original DCK replacement parts and accessories.
Obstacle Avoidance:
The DCK TERRAINA KDRM105 is equipped with LiDAR technology for obstacle avoidance. While this system enhances safety, it is not a substitute for proper supervision. Always ensure the mowing area is clear of small objects, toys, and debris that the mower might not detect or could damage.

Image: The robotic lawnmower actively navigating around obstacles using its 360-degree LiDAR detection view, scanning 5000 times per second.
3. What's in the Box
Before beginning installation, verify that all components are present and undamaged.

Image: A complete view of the DCK TERRAINA KDRM105 Robotic Lawnmower and its accessories, including the charging station, boundary wire, stakes, power adapter, and spare blades.
- DCK TERRAINA KDRM105 Robotic Lawnmower
- Charging Station
- Power Adapter
- Boundary Wire
- Boundary Wire Stakes
- Spare Blades and Screws
- Hex Wrench
- Wire Connectors
- User Manual (this document)
4. Setup
4.1 Charging Station Placement
Select a suitable location for the charging station. It should be on a flat surface, preferably in a shaded area, and close to a power outlet. Ensure there is enough clear space around the station for the mower to dock easily.
4.2 Boundary Wire Installation
The boundary wire defines the mowing area. It must form a complete and closed loop, starting and ending at the charging station. Secure the wire to the ground using the provided stakes. Ensure the wire is taut and flush with the ground to prevent tripping hazards and damage to the wire.
- Lay the wire around the perimeter of your lawn.
- Maintain a minimum distance from obstacles (e.g., walls, ponds) as specified in the detailed installation guide.
- Connect both ends of the boundary wire to the charging station terminals.
- Ensure the connection is secure and the indicator light on the charging station confirms a valid loop.

Image: An aerial view illustrating the layout of a lawn with designated mowing zones (Zone A, Zone C) and the boundary wire defining the operational area for the robotic lawnmower.
4.3 Initial Charging
Place the robotic lawnmower onto the charging station. Ensure the charging contacts align. The mower will begin charging automatically. Allow the mower to fully charge before its first operation.
5. Operating Instructions
5.1 Control Panel Overview
The robotic lawnmower features a control panel for basic operations. Refer to the diagram below for component identification.

Image: Labeled diagram of the DCK TERRAINA KDRM105 Robotic Lawnmower, highlighting the safety stop, control panel, bumper, cutting blade, cutting disk, charging port, handle, rain sensor, rear wheel, and front wheel.
5.2 App Control and Connectivity
The DCK TERRAINA KDRM105 can be controlled via a dedicated mobile application, offering advanced features and scheduling. The mower supports both Wi-Fi and Bluetooth connectivity for reliable signal reception.
- Download the App: Search for the "DCK TERRAINA" app in your device's app store.
- Pairing: Follow the in-app instructions to pair your lawnmower using Bluetooth or Wi-Fi.
- Scheduling: Set mowing schedules, define multi-zone mowing areas, and adjust cutting height (30-60mm) directly from the app.
- Monitoring: Monitor the mowing status and battery level remotely.
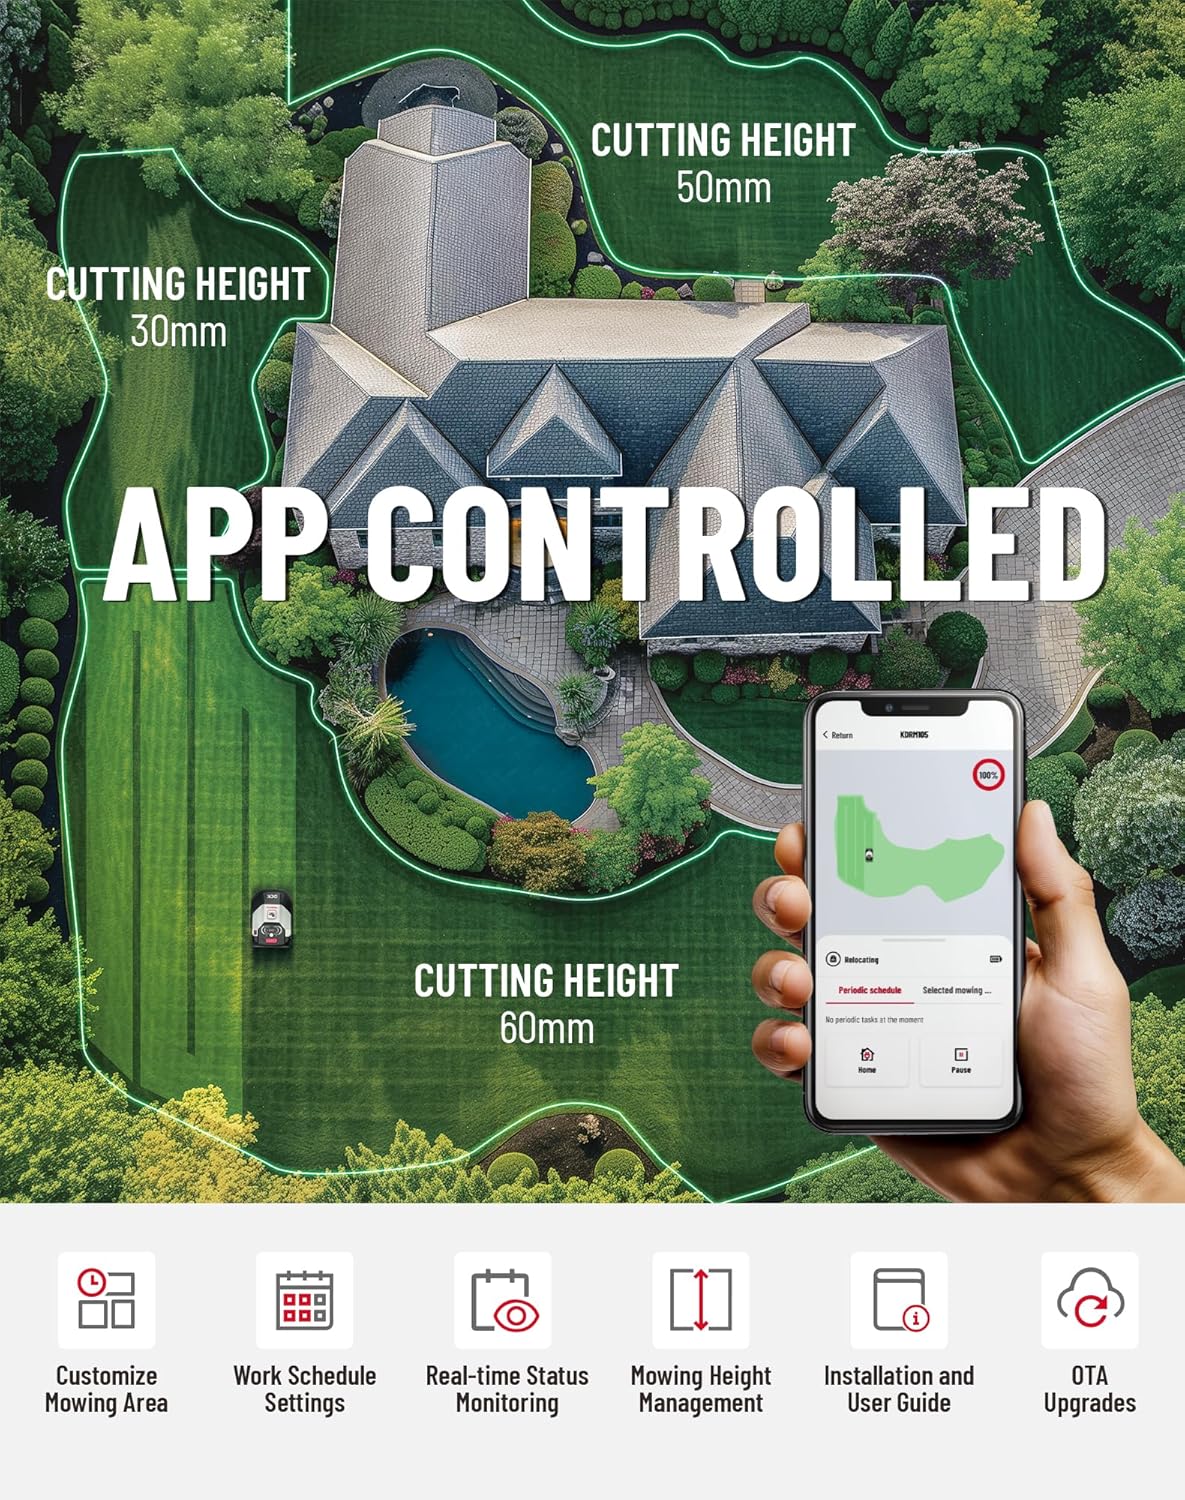
Image: A smartphone displaying the app interface for controlling the robotic lawnmower, showing options for customizing mowing areas, setting work schedules, real-time status monitoring, mowing height management, and access to the user guide.
5.3 Mowing Operation
Once set up and charged, the mower will operate according to its schedule or manual commands. It uses intelligent cutting path planning for efficient coverage (100 m²/h).

Image: An aerial view of a lawn being mowed by the DCK TERRAINA KDRM105 Robotic Lawnmower, illustrating its intelligent organized mowing patterns for improved cutting efficiency.
5.4 Auto-Charging and Optimal Return Path
When the battery is low, the mower will automatically return to the charging station. It calculates the optimal return path, unlike conventional robots that follow the boundary wire, saving time and energy.

Image: The robotic lawnmower automatically returning to its charging station when its battery is at 20%. Below, the mower is shown detecting rain and returning to the charging station.
5.5 Slope Handling and Narrow Passages
The mower can handle slopes up to 40% (22°) and navigate narrow passages as small as 80 cm wide.

Image: The DCK TERRAINA KDRM105 Robotic Lawnmower demonstrating its ability to operate on a 22-degree (40%) slope.

Image: The robotic lawnmower successfully navigating an 80cm wide passage between two garden beds, demonstrating its capability for narrow passage mowing.
6. Maintenance
Regular maintenance ensures optimal performance and extends the lifespan of your robotic lawnmower.
6.1 Cleaning
- Exterior: Wipe the exterior with a damp cloth. Do not use high-pressure washers or solvents.
- Undercarriage and Blades: Regularly clean grass clippings from the cutting deck and around the blades. Use a brush or a soft scraper. Always wear protective gloves.
- Charging Contacts: Keep the charging contacts on both the mower and the station clean and free of debris.
6.2 Blade Replacement
Dull or damaged blades affect cutting quality and can increase energy consumption. Replace blades regularly (e.g., every 1-3 months, depending on usage and lawn type).
- Turn off the mower and remove the safety key.
- Wear protective gloves.
- Carefully unscrew the old blades and replace them with new ones, ensuring the screws are tightened securely.
- Use only genuine DCK replacement blades.
6.3 Storage
For long-term storage (e.g., winter), clean the mower thoroughly, fully charge the battery, and store it in a dry, frost-free environment. Disconnect the charging station from power.
7. Troubleshooting
This section addresses common issues you might encounter with your robotic lawnmower.
| Problem | Possible Cause | Solution |
|---|---|---|
| Mower not starting | Battery low; Safety key not inserted; Error message on display. | Charge the battery; Insert safety key; Check display for specific error codes and consult the app or manual. |
| Mower not staying within boundary | Boundary wire broken or disconnected; Wire not properly installed. | Check boundary wire connections at the charging station; Inspect wire for breaks and repair if necessary. |
| Poor cutting performance | Dull or damaged blades; Grass too long; Cutting height set too high. | Replace blades; Mow more frequently; Adjust cutting height via the app. |
| Mower gets stuck frequently | Obstacles in mowing area; Uneven terrain; LiDAR sensor obstructed. | Clear mowing area of debris; Ensure terrain is suitable for robotic mower; Clean LiDAR sensor. |
| Cannot connect to App | Wi-Fi/Bluetooth signal weak; Mower not in pairing mode; App issues. | Ensure mower is within range of Wi-Fi/Bluetooth; Restart mower and app; Re-attempt pairing process. |
8. Specifications
| Feature | Detail |
|---|---|
| Brand | DCK |
| Model Number | KDRM105 |
| Power Source | Battery Powered |
| Recommended Lawn Area | Up to 500 m² |
| Cutting Efficiency | 100 m²/h |
| Cutting Width | 220 mm (8.66 Inches) |
| Adjustable Cutting Height | 30-60 mm (1.18 - 2.36 Inches) |
| Max Slope Endurance | 40% (22°) |
| Obstacle Avoidance | LiDAR Technology (360° scan, 5000/s) |
| Connectivity | Wi-Fi, Bluetooth |
| Noise Level | Less than 54 dB |
| Item Weight | 22.8 Kilograms |
| Product Dimensions (D x W x H) | 25.2"D x 10.8"W x 18.5"H |
9. Warranty and Support
For warranty information and customer support, please refer to the warranty card included with your product or visit the official DCK website. Keep your proof of purchase for warranty claims.
Online Support: Visit the DCK Store on Amazon for product information and support resources.
