1. Introduction
The Vanxse MB1808 is a compact CCTV mini bullet security camera designed for both indoor and outdoor surveillance. It features a 1/3 Color Super HAD CCD processor, 1000TVL resolution, a 3.6mm lens, and 8 infrared (IR) LEDs for day and night vision capabilities. This manual provides detailed instructions for the installation, operation, and maintenance of your security camera.
2. Product Features
- Image Sensor: 1/3 Color Super HAD CCD processor, HD 960H 1000TVL, 976(H)x494(V). Provides high sensitivity and definition for brighter, clearer images.
- Night Vision: Equipped with 8PCS Infrared (IR) LED Lights. Features automatic switching between day and night modes, restoring clear true color images. Auto tracking white balance adjusts the picture according to environmental temperature changes for optimal color.
- Ease of Use: NTSC Video Format. Capable of viewing objects without an external light source, offering low power consumption and high sensitivity. Designed for simple operation and installation.
- Durable Design: Miniature camera constructed entirely from metal and includes a mounting bracket. Features a discreet, hidden design.
- Wide Application: Utilizes analog modulation technology, offering high frequency electromagnetic radiation resistance and strong anti-interference capabilities. Ideal for residential communities, homes, hotels, parking lots, warehouses, factories, railway stations, supermarkets, and similar environments.
3. Package Contents
Please check the package for the following items:
- 1X Vanxse CCTV Mini Bullet Security Camera (Model: MB1808)
4. Specifications
| Feature | Description |
|---|---|
| Model Number | MB1808 |
| Image Sensor | 1/3 Color Super HAD CCD |
| Resolution | 1000TVL (960p) |
| Lens | 3.6mm |
| Night Vision | 8pcs IR LEDs, 30 Feet Range, Black and white night vision |
| Video Format | NTSC |
| Connectivity | BNC Video Cable (Wired) |
| Power Source | Corded Electric (DC12V) |
| Material | Aluminum |
| Indoor/Outdoor Usage | Indoor, Outdoor (IP66 Weatherproof) |
| Mounting Type | Wall Mount, Ceiling Mount, Window Mount |
| Dimensions (Camera Body) | Approx. 78mm (Length) x 29mm (Diameter) |
| Weight | 0.16 ounces (4.54 g) |
| Manufacturer | shenzhen kaixing Security technology Co., LTD |
5. Safety Information
- Ensure the camera is powered by a compatible DC12V power adapter. Using an incorrect power supply may damage the device.
- Although the camera is IP66 weatherproof, avoid submerging it in water or exposing it to extreme environmental conditions beyond its rating.
- Do not attempt to disassemble or modify the camera. This may void the warranty and cause damage.
- Install the camera in a secure location where it cannot be easily tampered with or damaged.
- Keep the lens clean to ensure optimal image quality.
6. Setup
6.1 Mounting the Camera
The Vanxse MB1808 camera comes with an adjustable bracket for flexible mounting. It can be mounted on a wall, ceiling, or window.
- Choose a suitable location for installation, considering the desired viewing angle and proximity to power and video cables.
- Use the camera's base as a template to mark the drilling points on the mounting surface.
- Drill pilot holes and secure the camera base using appropriate screws (not included).
- Adjust the camera angle using the bracket's adjustable knob to achieve the desired surveillance coverage.

Figure 6.1: Vanxse MB1808 Mini Bullet Security Camera with bracket and BNC/power cables.

Figure 6.2: Camera dimensions and port identification. The camera body is approximately 78mm long and 29mm in diameter, with a total height of 50mm including the bracket. It features 8 IR LEDs, a BNC video output, and a DC12V power input.
6.2 Connecting the Camera
The camera requires a DC12V power input and provides a BNC video output. There are several ways to connect the camera to a monitoring system:
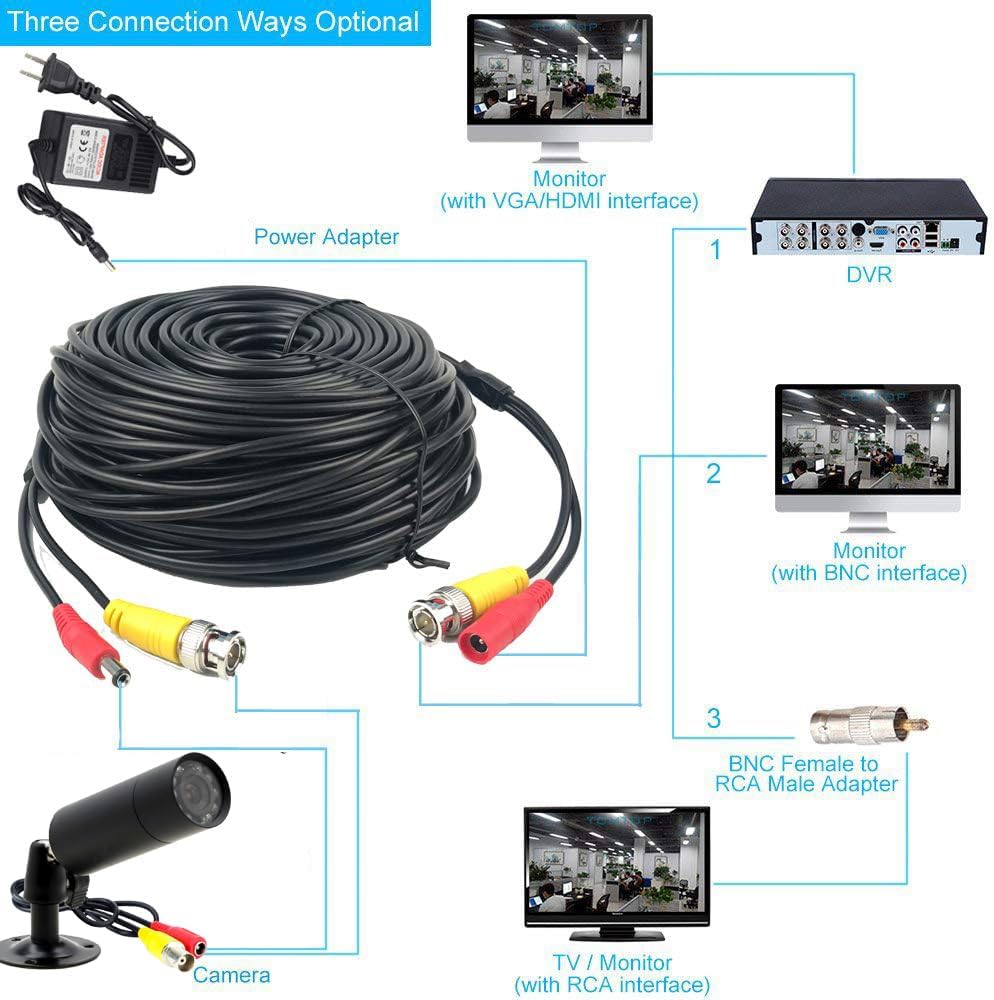
Figure 6.3: Three optional connection methods for the camera. The camera connects to a power adapter (DC12V) and an extension cable for video. The video signal can then be connected to a DVR, a BNC-compatible monitor, or an RCA-compatible TV/monitor via an adapter.
- Power Connection: Connect the DC12V power input cable from the camera to a compatible power adapter.
- Video Connection (Option 1 - DVR): Connect the BNC video output cable from the camera to the video input port on a Digital Video Recorder (DVR). The DVR will then connect to a monitor via VGA or HDMI.
- Video Connection (Option 2 - BNC Monitor): Connect the BNC video output cable directly from the camera to a monitor that has a BNC input interface.
- Video Connection (Option 3 - RCA TV/Monitor): If your TV or monitor only has RCA inputs, use a BNC Female to RCA Male adapter (sold separately) to connect the camera's BNC output to the RCA video input on your display device.
7. Operating
Once the camera is properly installed and connected to a power source and monitoring device, it will begin operating automatically.
7.1 Day/Night Vision
The Vanxse MB1808 camera features automatic day and night vision switching. In sufficient light, the camera operates in color mode. As ambient light decreases, the camera will automatically switch to black and white infrared (IR) mode to provide clear visibility in low-light or dark conditions.

Figure 7.1: Automatic Day/Night Vision switching. The camera adapts to lighting conditions to provide continuous surveillance.

Figure 7.2: Comparison of Infrared Vision (night) and Day Vision. The camera provides clear images in both conditions.
7.2 Viewing Footage
To view the camera's live feed or recorded footage, refer to the instruction manual of your connected DVR, monitor, or TV. The camera provides a continuous video stream to the connected display device.
8. Maintenance
8.1 Cleaning the Camera
Regular cleaning helps maintain optimal image quality.
- Gently wipe the camera lens with a soft, clean, lint-free cloth. For stubborn dirt, use a lens cleaning solution designed for optical surfaces.
- Clean the camera body with a damp cloth. Avoid using harsh chemicals or abrasive cleaners.
8.2 Checking Connections
Periodically check all cable connections (power and video) to ensure they are secure and free from damage. Loose connections can lead to signal loss or intermittent operation.
8.3 Weatherproofing
The camera has an IP66 weatherproof rating, meaning it is protected against dust ingress and powerful water jets. While designed for outdoor use, ensure that the camera is installed in a location that minimizes direct exposure to extreme weather conditions to prolong its lifespan.

Figure 8.1: The camera's IP66 weatherproof design allows for installation in various indoor and outdoor environments.
9. Troubleshooting
If you encounter issues with your Vanxse MB1808 camera, refer to the following troubleshooting guide:
| Problem | Possible Cause | Solution |
|---|---|---|
| No image on monitor/TV | No power to camera; Loose video connection; Incorrect input selected on monitor/TV. | Check power adapter connection and ensure it's plugged in; Verify BNC video cable is securely connected at both ends; Select the correct video input (e.g., AV, BNC) on your display device. |
| Poor image quality (blurry, distorted) | Dirty lens; Damaged video cable; Interference; Insufficient lighting. | Clean the camera lens; Replace damaged video cables; Ensure cables are away from strong electrical interference sources; For night vision, ensure IR emitters are clear and not obstructed, as reflections can impact clarity. |
| Night vision not working or poor | Insufficient power; IR LEDs obstructed; Environmental factors causing reflection. | Ensure stable power supply; Check for obstructions directly in front of the IR LEDs; Reposition the camera to avoid reflections from nearby surfaces (e.g., walls, eaves) that can cause IR fogging. |
| Camera not switching to night mode | Ambient light too high; Sensor malfunction. | Ensure the area around the camera is dark enough for the light sensor to trigger night mode; If the issue persists, contact support. |
10. Warranty and Support
Vanxse is committed to providing high-quality products. This product comes with a 100% satisfaction guarantee. For specific warranty details, please refer to your purchase documentation or contact your retailer.
For technical assistance or support, Vanxse offers 24/7 online technical support. Please visit the official Vanxse website or contact their customer service for further assistance.