1. Introduction
This instruction manual provides essential information for the safe and effective use of the yancinne HR10-10P-12P connector. Please read this manual thoroughly before installation and operation to ensure proper functionality and to prevent damage to the product or connected equipment. Keep this manual for future reference.
2. Product Overview
The yancinne HR10-10P-12P is a precision-engineered connector designed for reliable electrical or signal transmission. It features a robust construction suitable for various applications. Understanding its components is crucial for correct usage.
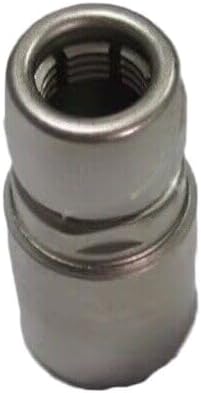
Figure 1: Front view of the yancinne HR10-10P-12P connector. This image displays the metallic cylindrical body and the internal threading designed for secure mating with a corresponding component.
Key features include:
- Durable metallic construction.
- Internal threading for secure and stable connections.
- Designed for specific electrical or signal interfacing.
3. Setup and Installation
Follow these steps for proper installation of the HR10-10P-12P connector:
- Preparation: Ensure that the mating component (cable or device) is compatible with the HR10-10P-12P connector. Verify that all surfaces are clean and free from debris, dust, or moisture.
- Alignment: Carefully align the connector with its mating part. Avoid forcing the connection, as this can damage the threads or internal pins.
- Connection: Gently twist the connector clockwise until it begins to engage with the threads of the mating component. Continue twisting until the connection is firm and secure. Do not overtighten.
- Verification: After connection, visually inspect the assembly to ensure there are no gaps and that the connector is fully seated. If applicable, perform a continuity test or signal integrity check to confirm proper electrical contact.
Caution: Incorrect installation can lead to intermittent connections, signal loss, or damage to the connector and connected devices.
4. Operating Instructions
Once the yancinne HR10-10P-12P connector is securely installed, its operation is passive, facilitating the transmission of electrical signals or data between connected devices. No specific user interaction is required beyond ensuring a stable and secure connection.
- Ensure the connector remains securely fastened during operation.
- Avoid subjecting the connected assembly to excessive strain, bending, or pulling forces.
- Regularly check for any signs of loosening or damage, especially in environments with vibration or frequent movement.
5. Maintenance
Proper maintenance ensures the longevity and reliable performance of your HR10-10P-12P connector.
- Cleaning: Periodically inspect the connector for dust, dirt, or corrosion. Use a soft, dry, lint-free cloth to gently wipe the exterior. For internal contacts (if accessible and safe), use a specialized electronic contact cleaner and a non-abrasive tool. Ensure the connector is disconnected from power before cleaning.
- Inspection: Regularly check for any physical damage such as cracks, bends, or loose parts. Ensure the threads are intact and not stripped.
- Storage: When not in use, store the connector in a clean, dry environment, away from extreme temperatures and corrosive substances.
Warning: Do not use harsh chemicals, abrasive cleaners, or excessive force when cleaning, as this can damage the connector's finish or internal components.
6. Troubleshooting
If you encounter issues with your HR10-10P-12P connector, consider the following common troubleshooting steps:
- Intermittent Connection:
- Ensure the connector is fully and securely tightened.
- Check for any debris or corrosion on the contact surfaces. Clean if necessary.
- Verify that the mating component is not damaged.
- Difficulty Connecting/Disconnecting:
- Check for thread damage on both the connector and the mating part.
- Ensure proper alignment before attempting to twist.
- Do not force the connection; if resistance is high, re-evaluate alignment or check for obstructions.
- No Signal/Power Transmission:
- Confirm the connector is fully engaged.
- Inspect the internal contacts for damage or bending.
- Test the connected cables and devices independently to rule out other component failures.
If problems persist after following these steps, contact customer support.
7. Specifications
| Attribute | Value |
|---|---|
| Manufacturer | yancinne |
| Part Number | HR10-10P-12P |
| Model Number | HR10-10P-12P |
| ASIN | B0DSB9NK1F |
| First Available Date | January 6, 2025 |
8. Warranty and Support
This yancinne HR10-10P-12P connector comes with a 180-day warranty from the date of purchase, covering defects in materials and workmanship under normal use. This warranty does not cover damage caused by misuse, accident, unauthorized modification, or improper installation.
For technical support, warranty claims, or further assistance, please contact your retailer or the manufacturer directly. When contacting support, please have your product model number (HR10-10P-12P) and purchase information readily available.