1. Introduction
This manual provides instructions for the Xlihob XK3190 A12E Digital Weighing Indicator. The A12E indicator is designed for use with various weighing scales, including platform scales, bench scales, floor scales, and livestock scales. It is compatible with standard analog load cells.
The XK3190 A12E features a 6-bit LED display with 8 state indicating lights, providing clear feedback on its operational status. It supports both kilogram (kg) and pound (lb) units.

Image 1.1: Angled view of the Xlihob XK3190 A12E Digital Weighing Indicator, showing its LED display and control buttons.
2. Package Contents
Upon unpacking, please verify that all items are present and undamaged:
- XK3190 A12E Weighing Indicator
- Built-in Rechargeable Battery (pre-installed)
- Power Adapter (AC100V-240V compatible)
- This User Manual
3. Setup and Installation
3.1 Power Connection
- Ensure the indicator is placed on a stable, level surface.
- Connect the provided power adapter to the indicator's power input port.
- Plug the power adapter into a suitable AC100V-240V power outlet. The indicator has a built-in rechargeable DC 6V/2.8Ah battery for portable operation.
3.2 Load Cell Connection
The A12E indicator is designed to connect 1 to 4 pieces of 350 Ω load cells. It uses a six-wire connection system with compensation.
- Load Cell Excitation Voltage: DC 5V
- Input Signal Range: -16mV ~ 18mV
- Load Cell Interface: Six-core shielded cable, copper material.
- Maximum Cable Length: 100m/0.5mm². For cables longer than 3m, it is recommended to add a magnetic loop (optional component) on the RS232 interface to enhance anti-interference ability.
Refer to the wiring diagram provided with your load cells for specific connection details. Ensure all connections are secure to prevent signal loss or instability.
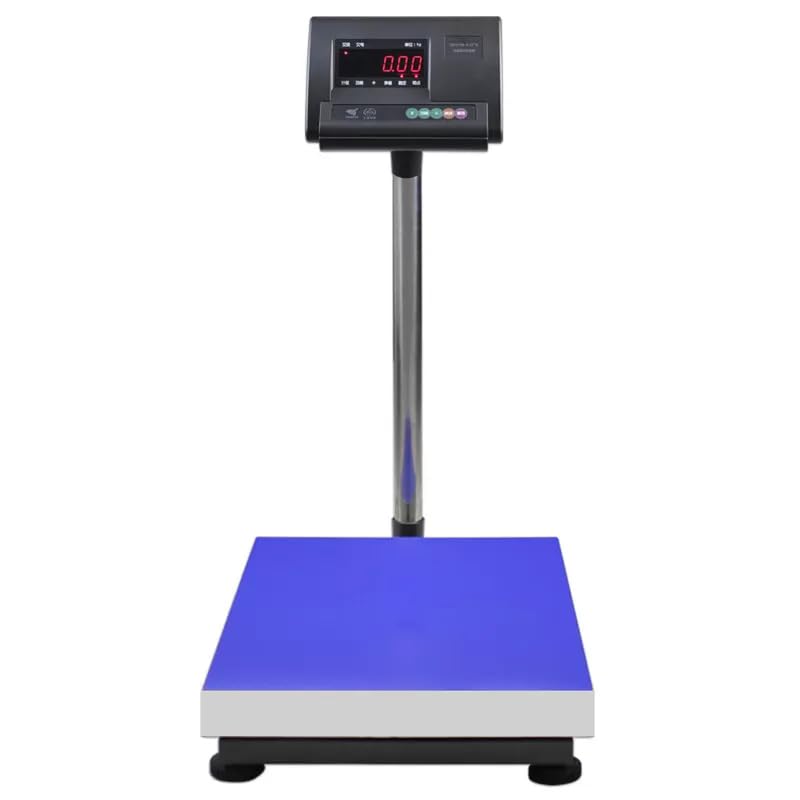
Image 3.1: The XK3190 A12E indicator integrated with a floor scale, demonstrating a typical setup.

Image 3.2: The XK3190 A12E indicator connected to a large industrial floor scale, showing its application versatility.
4. Operating Instructions
4.1 Display Overview
The indicator features a 6-bit LED display with 8 state indicating lights. Key indicators include:
- AC: Indicates AC power is connected.
- LOW VOLTAGE / Low battery: Indicates low battery power.
- kg / lb: Indicates the current weighing unit.
- ACCUM: Accumulation mode active.
- FUNC: Function mode active.
- TARE: Tare function active.
- STABLE: Indicates a stable weight reading.
- ZERO: Indicates the scale is at zero.
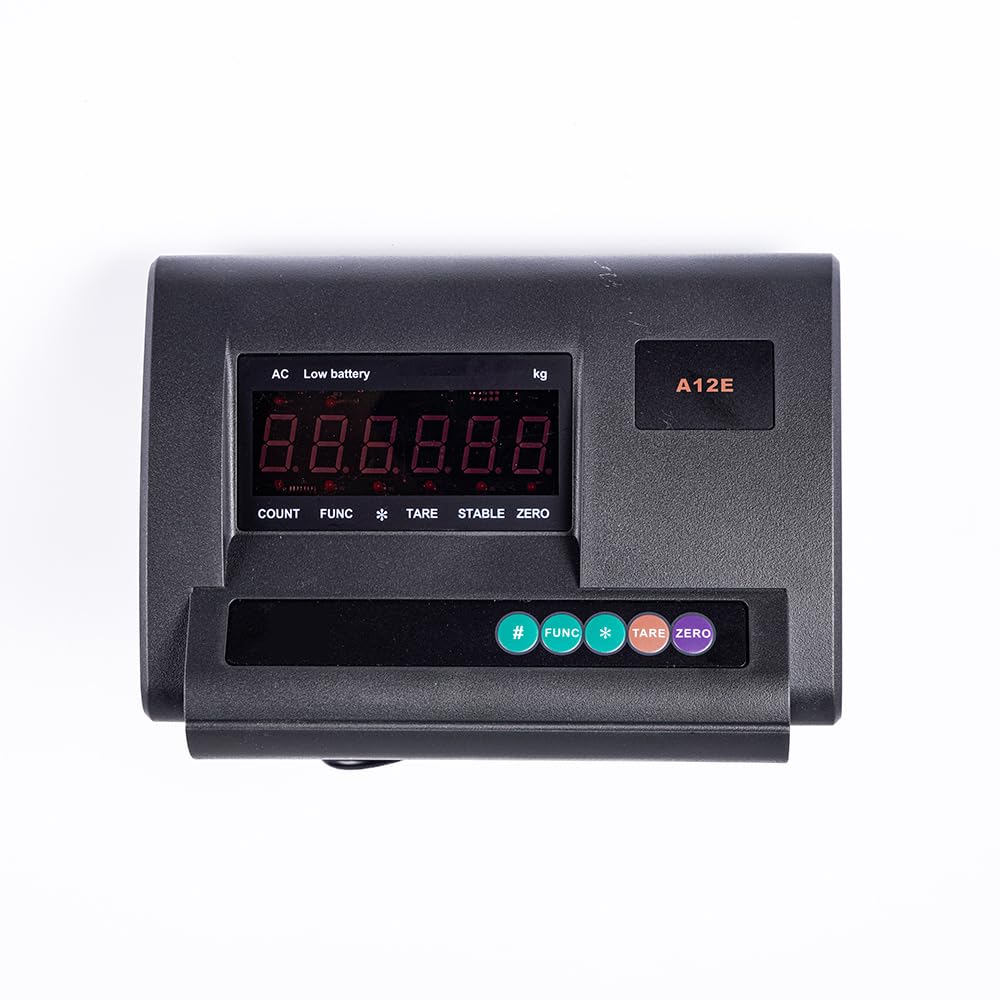
Image 4.1: Top view of the indicator, highlighting the display and control buttons.
4.2 Basic Weighing Operation
- Power On: Press the power button (if available, otherwise connect power). The display will perform a self-test and then show zero.
- Zeroing: If the display does not show zero when the scale is empty, press the ZERO button to reset the reading to zero.
- Weighing: Place the item to be weighed on the scale platform. The display will show the weight. Wait for the STABLE indicator to light up for an accurate reading.
- Unit Conversion: To switch between kilograms (kg) and pounds (lb), press the UNIT button (or equivalent, typically labeled 'kg/lb' or integrated into a 'FUNC' menu).
4.3 Tare Function
The Tare function allows you to subtract the weight of a container or packaging, so only the net weight of the contents is displayed.
- Place the empty container on the scale platform.
- Press the TARE button. The display will reset to zero, and the TARE indicator will light up.
- Add the items to be weighed into the container. The display will show the net weight of the items.
- To clear the tare, remove the container from the scale and press the TARE button again.
4.4 Accumulation Function (ACCUM)
The accumulation function allows you to sum multiple weight readings.
- Weigh the first item. Ensure the STABLE indicator is on.
- Press the ACCUM button. The weight will be added to the total, and the ACCUM indicator will light up.
- Remove the item and place the next item on the scale.
- Repeat step 2 for each subsequent item.
- To view the total accumulated weight or clear the accumulation, refer to the specific instructions in the full product manual or use the FUNC button to navigate options.
5. Maintenance
- Cleaning: Wipe the indicator with a soft, damp cloth. Do not use abrasive cleaners or solvents. Ensure no liquid enters the device.
- Battery Care: The built-in rechargeable battery should be charged regularly. If the "LOW VOLTAGE" or "Low battery" indicator appears, connect the indicator to AC power. For long-term storage, charge the battery fully and store in a cool, dry place.
- Calibration: Periodic calibration may be required to maintain accuracy, especially after relocation or prolonged use. Refer to advanced settings in the full manual or contact technical support for calibration procedures.
- Environmental Conditions: Operate and store the indicator within recommended temperature and humidity ranges to ensure optimal performance and longevity.
6. Troubleshooting
- Indicator does not power on:
- Check if the power adapter is securely connected to both the indicator and the power outlet.
- Ensure the power outlet is functional.
- If using battery power, ensure the battery is charged. Connect to AC power to charge.
- Display shows "LOW VOLTAGE" or "Low battery":
- The built-in battery needs charging. Connect the indicator to AC power using the provided adapter.
- Inaccurate readings or unstable display:
- Ensure the scale platform is stable and level.
- Check all load cell connections for security and proper wiring.
- Verify that no external vibrations or air currents are affecting the scale.
- Perform a zero operation before weighing.
- Consider recalibration if the issue persists.
- Display shows error codes:
- Refer to the full product manual for a list of specific error codes and their meanings. Common issues might relate to load cell overload or connection problems.
7. Specifications
The following table details the technical specifications for the Xlihob XK3190 A12E Digital Weighing Indicator.
| Feature | Specification |
|---|---|
| Model | XK3190 A12E |
| Display | 6 bits LED, 8 state indicating lights |
| Accuracy | C3, n=3000 |
| A/D Conversion Speed | 10 times per second |
| Load Cell Excitation Voltage | DC 5V |
| Input Signal Range | -16mV ~ 18mV |
| Measuring Range Minimum Voltage (UMRMin) | 6mV |
| Measuring Range Maximum Voltage (UMRMax) | 20mV |
| Minimum Load Cell Impedance (RLmin) | 87Ω |
| Maximum Load Cell Impedance (RLmax) | 350Ω |
| Load Cell Connectivity | Connects 1-4 pieces 350 Ω load cells |
| Sense System | Six wires with compensation |
| Power Supply | AC100V-240V, Built-in Rechargeable Battery DC 6V/2.8Ah |
| Unit Types | kg, lb |
| Housing Material | Anti-flaming plastic |
| Dimensions (L×W×H) | 248mm × 140mm × 156mm (approx. 9.7in × 5.5in × 6.1in) |
| Weight | 2.2kg (approx. 4.85 lbs) |

Image 7.1: Manufacturer's technical specifications table for the XK3190-A12(E) model.
8. Warranty and Support
For warranty information, please refer to the documentation provided at the time of purchase or contact your retailer. Xlihob offers technical support for its products.
If you encounter issues not covered in this manual or require further assistance, please contact Xlihob customer support through their official website or the contact information provided with your purchase.
Please have your product model (A12E) and purchase details ready when contacting support.