1. Product Overview
The Gotofine Automatic Liquid Soap Dispenser offers a hygienic and convenient solution for dispensing liquid soap. Featuring touchless operation, adjustable volume, and a rechargeable design, it is suitable for various environments including kitchens, bathrooms, hotels, and restaurants.
- Touchless and Automatic: Equipped with a highly accurate infrared sensor for 100% hands-free operation, dispensing liquid soap in just 0.25 seconds.
- 4 Levels Adjustable: Customize liquid soap volume with four adjustable output times (0.3s, 0.8s, 1.5s, 2s).
- Rechargeable Design: Built-in battery provides up to 5000 dispenses on a single charge.
- IPX5 Waterproof: Designed to withstand splashing water, suitable for wet environments.
- 500ml/17oz Transparent Container: Large capacity with a transparent design for easy monitoring of soap levels.
- Flexible Mounting Options: Can be used freestanding on countertops or wall-mounted with included traceless stickers.
- Versatile Compatibility: Suitable for liquid hand soap, dish soap, and other liquid detergents.
- Personalized Sticker Labels: Includes transparent sticker labels for hand soap, dish soap, and cartoon animal designs.

Image: Overview of the automatic soap dispenser highlighting its 0.25s response, high-quality battery, 17oz/500ml capacity, and IPX5 waterproof rating.
2. Setup Instructions
2.1 Unboxing and Initial Charge
Upon unboxing, ensure all components are present: the dispenser unit, liquid container, USB-C charging cable, and two traceless wall stickers. Before first use, fully charge the dispenser.
- Locate the USB-C charging port, typically covered by a rubber plug for waterproofing.
- Connect the provided USB-C cable to the dispenser and a suitable power source (e.g., USB wall adapter, computer USB port).
- The battery indicator lights will show charging progress. A full charge typically takes approximately 3 hours.

Image: The top part of the dispenser showing the Type-C charging port and battery indicator lights.
2.2 Filling the Dispenser
- Gently twist the top part of the dispenser counter-clockwise to detach it from the liquid container.
- Pour your desired liquid soap (hand soap, dish soap, shampoo, etc.) into the transparent container. The maximum capacity is 500ml (17oz).
- Note: If using thick liquid soap, it is recommended to dilute it with water in a 1:3 ratio (1 part soap to 3 parts water) for optimal performance and to prevent clogging. Shake gently to mix.
- Align the top part with the container and twist clockwise until securely fastened.

Image: A hand pouring liquid soap into the transparent container of the dispenser, illustrating its compatibility with various liquid soaps.

Image: The dispenser on a countertop with various transparent sticker labels for hand soap and dish soap.
2.3 Mounting Options
The dispenser offers both countertop and wall-mounted installation.
- Countertop Use: Simply place the dispenser on any flat, stable surface near your sink.
- Wall-Mounted Use:
- Clean and dry the desired wall surface thoroughly.
- Peel off the protective film from one of the provided traceless wall stickers.
- Firmly press the sticker onto the wall, ensuring no air bubbles. Allow it to set for a few hours for maximum adhesion.
- Align the dispenser's back slot with the hook on the wall sticker and slide it down until it locks into place.

Image: The dispenser displayed in both countertop and wall-mounted configurations, with an inset showing the traceless wall sticker.
Video: Demonstrates filling the dispenser, adjusting liquid levels, and wall-mounting the unit. (Source: DODO MEKIA)
3. Operating Instructions
3.1 Power On/Off
- To power on, press and hold the power button (usually indicated by a universal power symbol) on the top of the dispenser for a few seconds until the indicator lights illuminate.
- To power off, press and hold the power button again for a few seconds until the indicator lights turn off.
3.2 Adjusting Soap Volume
The dispenser features 4 adjustable levels to control the amount of soap dispensed:
- With the dispenser powered on, briefly press the power button to cycle through the four output levels.
- Each press will change the level, indicated by the corresponding light(s) on the top panel.
- Available output times: 0.3 seconds, 0.8 seconds, 1.5 seconds, and 2 seconds.

Image: Visual representation of the four adjustable liquid output levels (0.3s, 0.8s, 1.5s, 2s) from the dispenser.
3.3 Dispensing Soap
Once powered on and the desired volume is set:
- Place your hand flat under the dispenser's nozzle.
- The infrared sensor will detect your hand and automatically dispense the pre-set amount of liquid soap.
- Remove your hand once soap is dispensed.
Video: Demonstrates the touchless operation, adjusting soap levels, and a child using the dispenser. (Source: Ipefan direct)
4. Maintenance
4.1 Cleaning the Dispenser
- The dispenser has an IPX5 waterproof rating, allowing it to withstand splashing water. However, avoid submerging the entire unit in water.
- Wipe the exterior with a damp cloth. Ensure the USB charging port's rubber plug is securely closed to prevent moisture ingress.
- For internal cleaning or to prevent clogging, especially after using thick soaps, fill the container with warm water and press the power button three times quickly to activate the self-cleaning mode. The machine will pump liquid for 10 seconds. Press the button again to exit.

Image: The dispenser being rinsed under running water, demonstrating its IPX5 waterproof capability.
4.2 Refilling
Refer to section 2.2 "Filling the Dispenser" for detailed instructions on refilling the liquid soap container.
5. Troubleshooting
| Problem | Possible Cause | Solution |
|---|---|---|
| Dispenser not turning on. | Low battery or not powered on correctly. | Ensure the unit is fully charged. Press and hold the power button for a few seconds to turn it on. |
| No soap dispensed. | Container empty, soap too thick, or sensor obstructed. | Check soap level and refill if necessary. Dilute thick soap with water (1:3 ratio). Ensure hand is placed correctly under the sensor. Run self-cleaning cycle. |
| Soap output is inconsistent or too little/much. | Incorrect volume level selected. | Briefly press the power button to cycle through the 4 adjustable volume levels until desired output is achieved. |
| Indicator lights not working. | Unit is off or battery is completely drained. | Charge the unit. Power on the unit by pressing and holding the power button. |
6. Specifications
- Model: P4D
- Brand: Gotofine
- Material: Plastic
- Color: White
- Product Dimensions: 4.6"L x 3.8"W x 7.2"H
- Liquid Volume: 500 Milliliters (17oz)
- Item Weight: 12.6 ounces
- Battery: 1 Lithium Ion battery (included), Rechargeable
- Waterproof Rating: IPX5
- Sensor Response Time: 0.25 seconds
- Adjustable Levels: 4 (0.3s, 0.8s, 1.5s, 2s)
- Mounting: Countertop or Wall-Mounted (with included stickers)
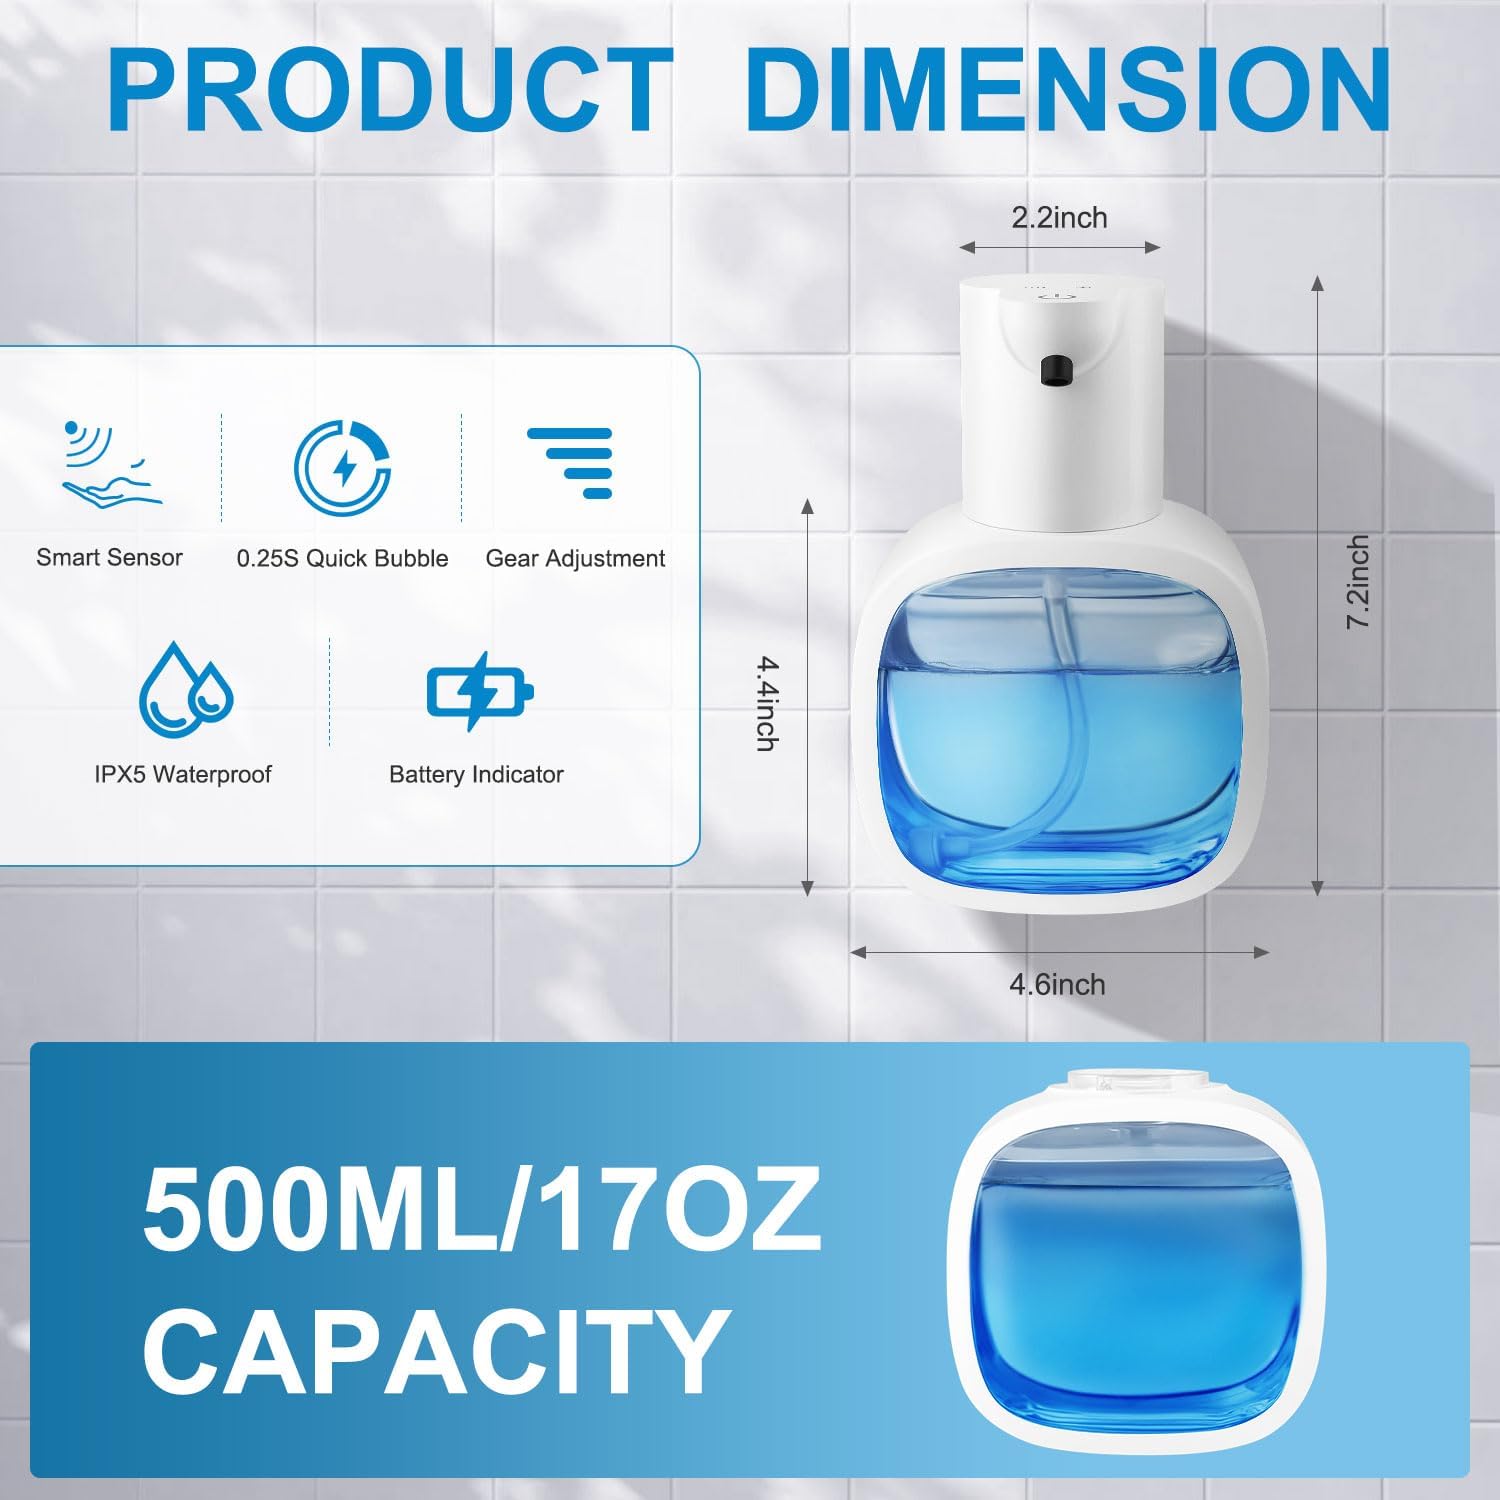
Image: The automatic soap dispenser with its key dimensions labeled.
7. Warranty and Support
For warranty information or technical support, please refer to the contact details provided with your product packaging or visit the official Gotofine website. Keep your purchase receipt for warranty claims.