1. Introduction
The BEBANG PM1000 Handheld Digital Microscope is designed for exploring the microscopic world with ease. Featuring a 200x-1000x magnification range and a 2.0-inch screen, this portable device allows users to observe various specimens, capture images, and record videos. It is equipped with a rechargeable battery for extended use and comes with a set of prepared slides for immediate exploration.
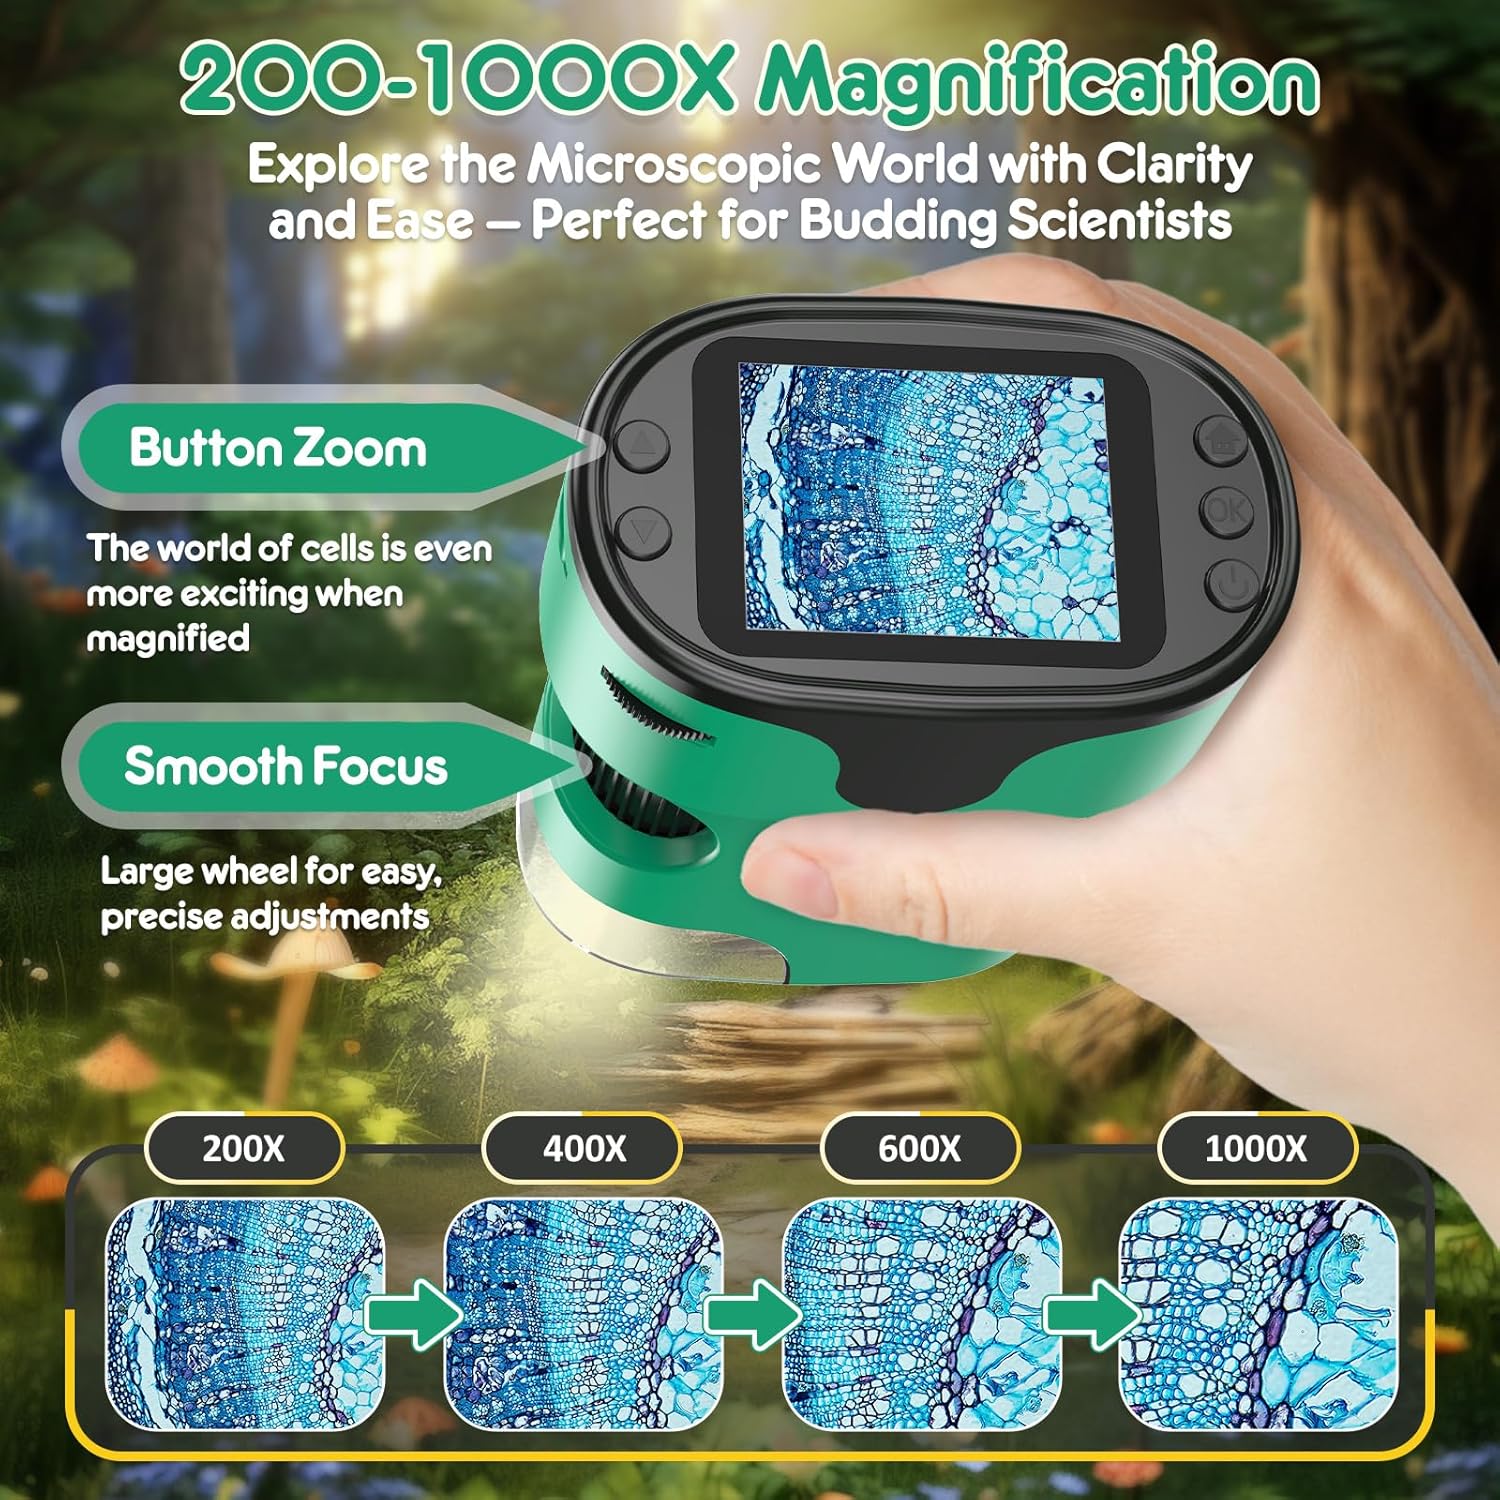
Image: The BEBANG PM1000 Handheld Digital Microscope displaying a magnified view of a specimen.
2. Package Contents
Verify that all items listed below are included in your package:
- BEBANG PM1000 Handheld Digital Microscope
- 32G SD Card
- Charging Cable
- User Manual
- EVA Hard Case
- Color Box
- Gift Box
- Neckstrap
- Slides Set with Case (5 lab-grade glass slides)

Image: Overview of the BEBANG PM1000 microscope and its complete set of accessories.
3. Setup
3.1 Charging the Device
Before first use, fully charge the microscope. Connect the provided charging cable to the device's charging port and a compatible USB power source (e.g., USB adapter, power bank, laptop, or car charger). The charging indicator will show the charging status. A full charge provides approximately 2.5 hours of continuous use.

Image: The microscope can be charged via various USB power sources and connected to a PC.
3.2 Inserting the SD Card
Locate the SD card slot on the side of the microscope. Gently insert the provided 32G SD card until it clicks into place. This card is essential for saving photos and videos.
3.3 Attaching the Neckstrap
Attach the neckstrap to the designated loop on the microscope. This allows for convenient and secure carrying, freeing your hands during outdoor exploration.

Image: The microscope with the attached neckstrap for portable use.
4. Operating Instructions
4.1 Power On/Off
To turn the device on or off, press and hold the Power button for 3 seconds.
4.2 Focusing Guide
The microscope features a smooth focusing wheel for precise adjustments and button zoom for magnification changes.
- Initial Focus Setting: Rotate the focus wheel counter-clockwise to its end to ensure the focus wheel is at its initial position.
- Low Magnification Focusing: Slowly turn the focus wheel clockwise until the image comes into clear view at a lower magnification. Choose the area of the object you wish to observe.
- High Magnification Focusing: Continue turning the focus wheel clockwise until the image enlarges and becomes clearer, achieving the desired high magnification view.

Image: Visual guide to magnification and focusing controls.

Image: Detailed guide on adjusting the focusing wheel for different magnification levels.
4.3 Photography and Video Guide
The microscope allows you to capture high-resolution photos and videos of your observations.
- How to Take Photos:
- Press the Home button, select "Photo" mode, and press the Confirm button to enter photo mode.
- Press the Confirm button again to capture a photo.
- How to Record Videos:
- Press the Home button, use the Up/Down buttons to switch to "Video" mode, and press the Confirm button to enter video mode.
- Press the Confirm button to start recording, and press it again to stop recording.
- How to View Playback:
- Press the Home button, use the Up/Down buttons to switch to "Playback" mode, and press the Confirm button.
- Use the Up/Down buttons to scroll through different photos and videos.

Image: Controls and steps for capturing and reviewing media.
4.4 Using Prepared Slides
The included set of prepared slides allows for immediate scientific observation. Place a slide under the microscope lens and adjust the focus to view the specimen.

Image: Examples of prepared slides for observation.
4.5 Exploring Other Objects
The microscope is versatile and can be used to examine a wide range of everyday objects. Simply place the microscope over the object you wish to observe and adjust the focus. For larger objects, the bottom cover can be removed to allow direct contact with the specimen.

Image: Examples of diverse objects that can be viewed with the microscope.
5. Maintenance
- Cleaning: Use a soft, dry cloth to clean the microscope's body. For the lens and screen, use a specialized lens cleaning cloth. Avoid using abrasive cleaners or solvents.
- Storage: When not in use, store the microscope and its accessories in the provided EVA hard case to protect them from dust, moisture, and physical damage. Store in a cool, dry place.
- Battery Care: To prolong battery life, avoid fully discharging the battery frequently. Charge the device regularly, even if not in use for extended periods.
6. Troubleshooting
- Device does not power on: Ensure the battery is charged. Connect the charging cable and try again.
- Image is blurry: Adjust the focusing wheel slowly until the image becomes clear. Ensure the microscope lens is close enough to the specimen.
- Cannot save photos/videos: Check if the SD card is properly inserted. Ensure the SD card has sufficient free space.
- Screen is blank or frozen: Try restarting the device by holding the Power button for 3 seconds to turn it off, then turn it back on.
7. Specifications
| Feature | Detail |
|---|---|
| Model Name | PM1000 |
| Brand | BEBANG |
| Magnification Range | 200x - 1000x |
| Screen Size | 2.0 inches |
| Light Source Type | LED |
| Material | Plastic |
| Product Dimensions | 3"L x 1.8"W x 4"H |
| Item Weight | 0.42 Kilograms |
| Power Source | Battery Powered (Rechargeable) |
| Voltage | 3.7 Volts |
| Compatible Devices | Laptop, Smartphone (for viewing saved media) |
| Objective Lens Description | Achromatic |
8. Warranty and Support
The BEBANG PM1000 Handheld Digital Microscope comes with a 1-year warranty from the date of purchase. This warranty covers manufacturing defects and malfunctions under normal use. For warranty claims, technical support, or any inquiries, please contact BEBANG customer service through the retailer where the product was purchased or visit the official BEBANG website.
Please retain your proof of purchase for warranty validation.