1. Introduction
This manual provides detailed instructions for the installation, operation, and maintenance of your ANKEWAY XBH-7702 Car Radio. This unit is specifically designed for Fiat Panda models manufactured between 2003 and 2012, ensuring optimal compatibility and stability with your vehicle's original configuration. It features Android 13, wireless Android Auto and CarPlay, RDS radio, and includes essential accessories like a reversing camera, microphone, and CANBUS adapter.
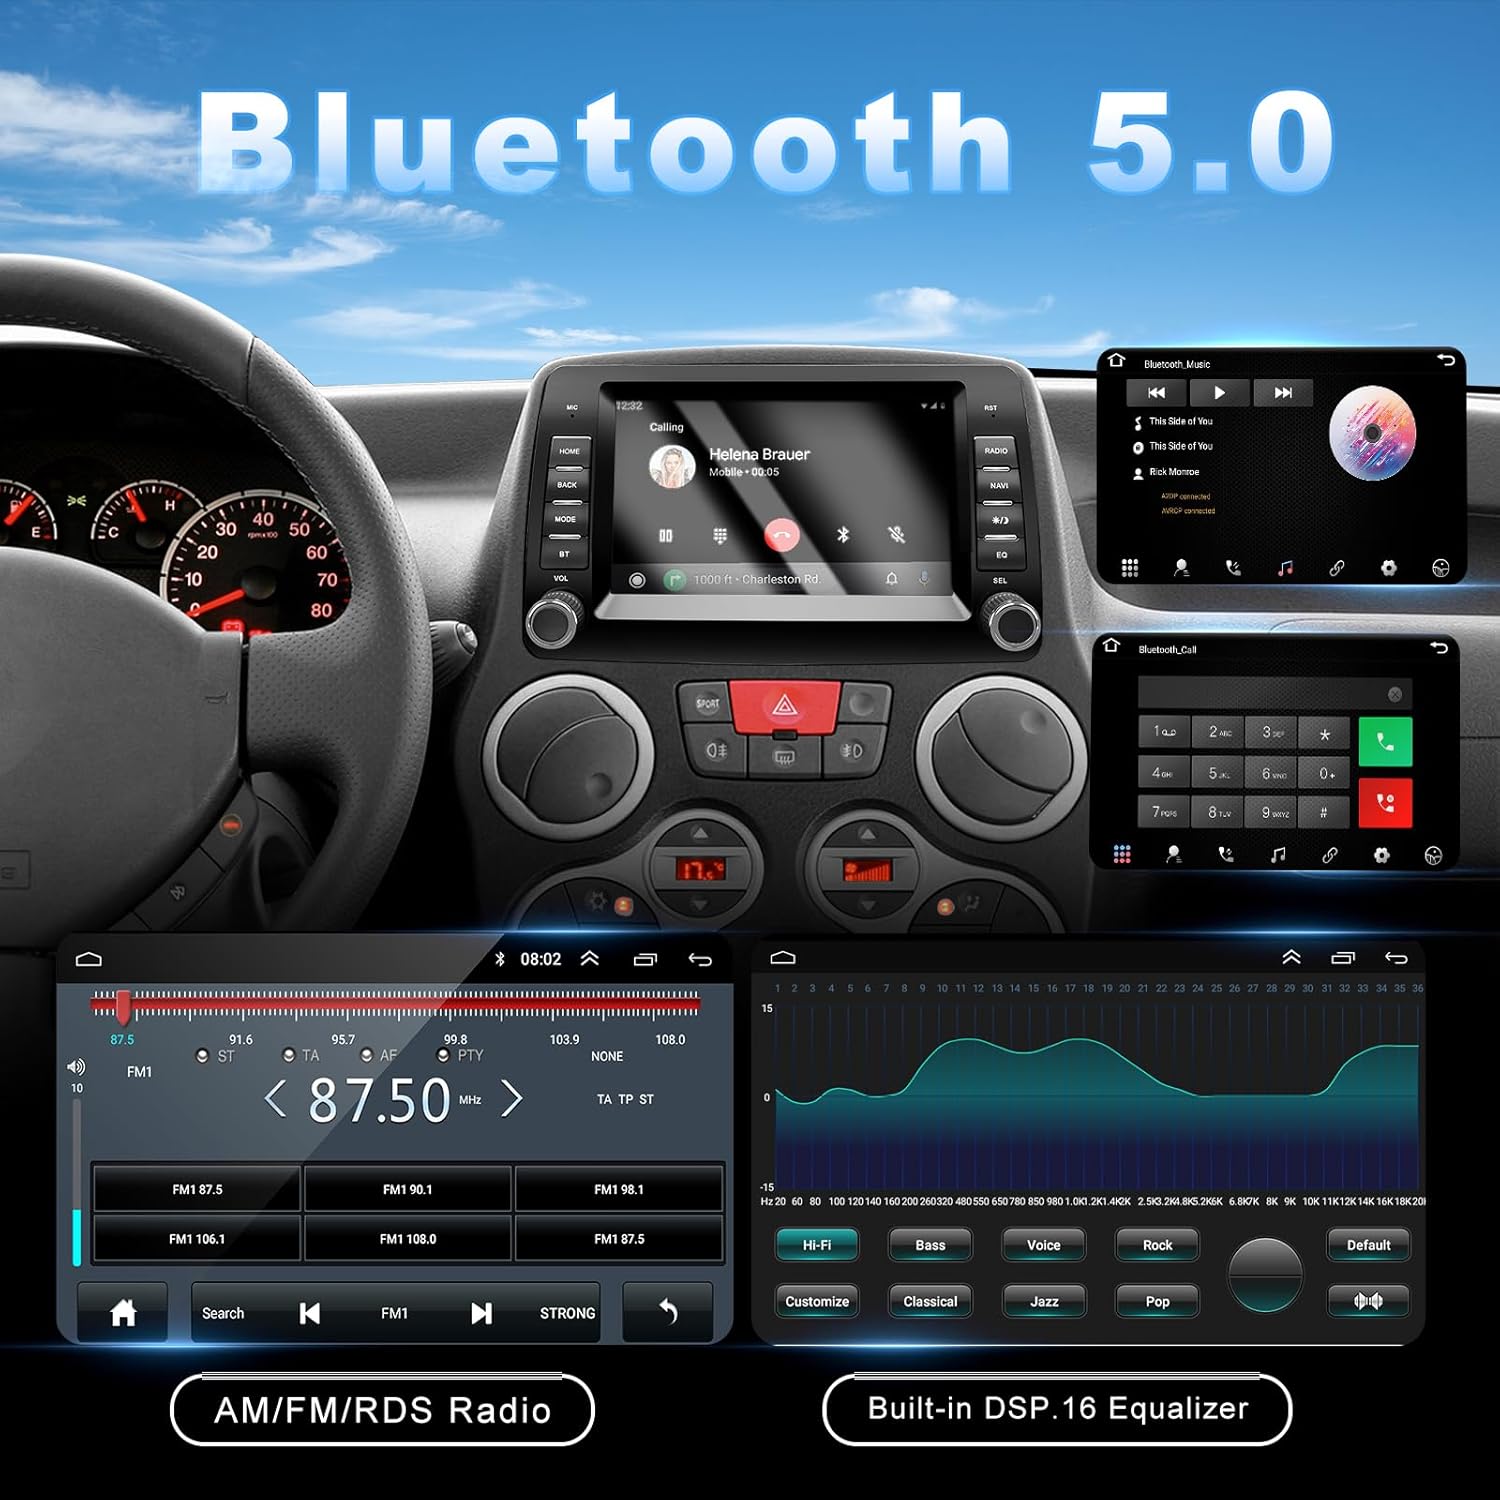
Image 1.1: Before and After Installation in Fiat Panda Dashboard. This image illustrates the seamless integration of the ANKEWAY car radio into the Fiat Panda dashboard, replacing the original stereo unit.
2. Package Contents
Please verify that all items listed below are included in your package. If any items are missing or damaged, please contact customer support.
- 1x ANKEWAY Car Radio for Fiat Panda
- 1x 6-pin USB Cable
- 1x 4-pin USB Cable
- 1x GPS Antenna
- 1x CANBUS Adapter
- 1x External Microphone
- 1x Power Cable Harness
- 1x RAC Cable
- 1x AHD Rear Camera and Connection Cable
- 4x Plastic Removal Levers

Image 2.1: Package Contents. This image displays the car radio unit alongside all included accessories such as cables, antennas, and tools.
3. Setup and Installation
The ANKEWAY XBH-7702 car radio is designed for easy installation, with pre-grouped cables and connectors that directly interface with your vehicle's original wiring. No additional frames or accessories are typically required.
3.1 General Installation Steps
- Preparation: Ensure the vehicle's ignition is off and the battery is disconnected before starting installation.
- Remove Original Radio: Use the provided plastic removal levers to carefully detach the trim and remove the existing car radio from the dashboard.
- Connect Wiring Harness: Connect the supplied power cable harness to the vehicle's original wiring. The CANBUS adapter should be integrated at this stage to ensure compatibility with original steering wheel controls.
- Connect Peripherals: Attach the GPS antenna, external microphone, USB cables, and RAC cable as needed.
- Reversing Camera Installation: Install the AHD rear camera at the rear of your vehicle and route its connection cable to the car radio unit.
- Mount New Radio: Carefully slide the ANKEWAY car radio into the dashboard opening, ensuring all connections are secure and no wires are pinched.
- Test Functionality: Reconnect the battery, turn on the ignition, and test all functions of the car radio before fully reassembling the dashboard trim.
3.2 CANBUS Adapter
The included CANBUS adapter resolves protocol incompatibility issues, preserving the functionality of your original steering wheel controls without the need for an external controller.
3.3 Reversing Camera
The high-quality reversing camera supports high-definition input, night vision, and automatic display when reversing, significantly enhancing your driving experience.
Image 3.1: Reversing Camera System. This image shows the car radio display with the reversing camera feed and the physical camera unit.
4. Operating Instructions
Your ANKEWAY car radio runs on Android 13, offering a versatile and user-friendly interface.
4.1 Wireless CarPlay and Android Auto
Connect your iOS or Android smartphone wirelessly or via USB to access CarPlay or Android Auto. This allows you to use navigation, music, messaging, and other compatible apps directly on the car radio display. Voice control is supported for a safer driving experience. Mirror-Link functionality is also available.

Image 4.1: CarPlay and Android Auto Interfaces. This image shows the distinct user interfaces for Apple CarPlay and Android Auto on the car radio screen, along with compatible apps.

Image 4.2: Connectivity Options. This image highlights the features and connection methods for Apple CarPlay, Android Auto, and MirrorLink.
4.2 Android 13 System and Apps
The Android 13 operating system allows you to connect to the internet via Wi-Fi and install various applications directly from the app store. The system supports multiple languages, including Italian, Spanish, German, and French.

Image 4.3: Wi-Fi Connectivity. This image demonstrates the car radio's ability to connect to mobile Wi-Fi for internet access and app downloads.

Image 4.4: App Interface. This image shows the car radio's screen displaying a selection of installed applications, including music streaming and social media apps.
4.3 Split Screen Functionality
The split-screen feature allows you to view two applications simultaneously, for example, navigation on one side and music on the other.

Image 4.5: Split Screen View. This image demonstrates the car radio's capability to display two applications concurrently, such as radio and a video player.
4.4 FM RDS Radio
The radio supports station frequency display and allows audio adjustment via DSP (Digital Signal Processor) and equalizer functions for optimal sound quality.

Image 4.6: FM RDS Radio and Equalizer. This image displays the FM radio interface with RDS information and the built-in DSP 16-band equalizer for sound customization.

Image 4.7: RDS Radio Interface. This image shows the car radio's RDS radio interface, displaying current station frequencies and presets.
4.5 Navigation
Utilize navigation applications through Android Auto, CarPlay, or directly via the Android 13 system with the included GPS antenna.

Image 4.8: Navigation Display. This image shows a navigation application running on the car radio screen, providing route guidance.
4.6 Steering Wheel Controls
The CANBUS adapter ensures that your original steering wheel controls remain fully functional, allowing you to manage audio and other features without taking your hands off the wheel.

Image 4.9: Steering Wheel Control Interface. This image illustrates the car radio's interface for configuring and utilizing steering wheel controls for various functions.
5. Maintenance
To ensure the longevity and optimal performance of your ANKEWAY car radio, follow these simple maintenance guidelines:
- Cleaning the Screen: Use a soft, lint-free cloth to gently wipe the screen. For stubborn smudges, slightly dampen the cloth with water or a screen-safe cleaner. Avoid harsh chemicals or abrasive materials.
- Software Updates: Regularly check for and install firmware updates released by our development team to optimize system performance and add new features. Refer to the Support section for how to obtain updates.
- Environmental Conditions: Avoid exposing the unit to extreme temperatures, direct sunlight for prolonged periods, or excessive moisture.
- Cable Connections: Periodically check all cable connections to ensure they are secure and free from damage.
6. Troubleshooting
If you encounter issues with your car radio, please refer to the following common troubleshooting steps:
6.1 Unit Does Not Turn On
If the car radio does not power on after installation:
- Check Yellow Wire Connection: Ensure the yellow wire labeled 'battery port' is correctly connected. There might be multiple yellow wires; try connecting another one if the first attempt fails.
- Verify Power Harness: Inspect the power harness for any loose connections or damage. If possible, try using an alternative power harness to rule out a faulty cable.
- Check Vehicle Fuses: Ensure the vehicle's relevant fuses for the car radio are intact and not blown.

Image 6.1: Power On Troubleshooting. This image provides visual guidance for troubleshooting power issues, specifically checking the yellow 'battery port' wire and the power harness.
6.2 No Sound
- Check speaker connections.
- Verify volume levels and mute settings.
- Ensure the correct audio source is selected.
6.3 CarPlay/Android Auto Not Connecting
- Ensure your smartphone's Bluetooth and Wi-Fi are enabled.
- Check for any pending software updates on your smartphone or the car radio.
- Try restarting both the car radio and your smartphone.
- If using a wired connection, ensure the USB cable is functional and properly connected.
7. Specifications
| Brand | ANKEWAY |
| Model Number | XBH-7702 |
| Operating System | Android 13 |
| Connectivity Technology | USB, Wireless (Bluetooth, Wi-Fi) |
| Compatible Devices | Smartphone, Tablet |
| Audio Output Mode | Stereo |
| Surround Sound Channel Configuration | 5.1 |
| Video Encoding | H.264, H.265/HEVC |
| Number of Audio Channels | 2 |
| Audio Output Type | Speakers |
| Manufacturer | Shenzhen Cheluzhe technology co., LTD |
8. Warranty and Support
8.1 Product Warranty
This ANKEWAY car radio comes with a 1-year warranty from the date of purchase, covering manufacturing defects and malfunctions under normal use. Please retain your proof of purchase for warranty claims.
8.2 Customer Support and Firmware Updates
Our development team regularly releases firmware updates to optimize the system experience. If you require a system update or have any technical questions, please contact ANKEWAY customer support. You can typically find contact information on the product packaging or the official ANKEWAY website.