1. Introduction
This manual provides essential instructions for the safe installation, operation, and maintenance of your hofstein Ripoll 3-Light Pendant Lamp. Please read this manual thoroughly before installation and retain it for future reference. This pendant lamp features three glass shades in varying sizes (20 cm, 25 cm, 30 cm diameter) and colors (blue, gold, green), designed for indoor use in dining rooms, kitchens, hallways, bedrooms, or living rooms.

Image 1.1: The hofstein Ripoll 3-Light Pendant Lamp with its three distinct glass shades.
2. Safety Instructions
WARNING: Risk of electric shock. Always disconnect power at the main circuit breaker before installation, maintenance, or bulb replacement.
- Installation must be performed by a qualified electrician or a person with electrical knowledge.
- Ensure the mounting surface can support the weight of the fixture.
- Do not connect the fixture to an ungrounded electrical system.
- Use only E27 bulbs with a maximum wattage of 15W per socket.
- Do not touch the bulb or fixture immediately after use, as it may be hot.
- This product is designed for indoor use only (IP20 rating). Do not expose to moisture or extreme temperatures.
- Keep packaging materials out of reach of children.
3. Package Contents
Carefully unpack the box and ensure all components are present and undamaged. If any parts are missing or damaged, do not proceed with installation and contact customer support.

Image 3.1: All components included in the package.
The package should contain:
- 1x Ceiling canopy (Ø 30 cm, H 2.5 cm) with pre-wired sockets
- 3x Pendant cables with lamp holders
- 1x Glass shade (Ø 20 cm)
- 1x Glass shade (Ø 25 cm)
- 1x Glass shade (Ø 30 cm)
- 1x Mounting bracket (approx. 27 cm)
- Mounting hardware (screws, wall plugs, cable clamps)
- Instruction manual (this document)
Note: E27 bulbs are not included and must be purchased separately.
4. Setup and Installation
Before beginning installation, ensure the power supply is turned off at the circuit breaker. It is recommended to have a second person assist with the installation.
4.1 Tools Required (Not Included)
- Screwdriver (Phillips head)
- Drill
- Pencil
- Wire strippers
- Voltage tester
- Ladder
4.2 Installation Steps
- Turn off Power: Locate the circuit breaker controlling the light fixture's power supply and turn it off. Verify power is off using a voltage tester.
- Prepare Mounting Surface: Remove any existing light fixture. Use the mounting bracket as a template to mark the drilling points on the ceiling.
- Install Mounting Bracket: Drill holes at the marked points. Insert wall plugs (if necessary) and secure the mounting bracket to the ceiling using the provided screws.
- Wiring: Connect the fixture's wires to your household electrical wires. Typically, this involves connecting:
- Live (L) wire from fixture to Live (L) wire from ceiling.
- Neutral (N) wire from fixture to Neutral (N) wire from ceiling.
- Ground (E) wire from fixture to Ground (E) wire from ceiling.
- Attach Ceiling Canopy: Carefully push the wired canopy up to the ceiling, aligning the holes in the canopy with the mounting bracket. Secure the canopy to the bracket using the provided screws.
- Adjust Pendant Lengths: The pendant cables can be adjusted in length during installation. Loosen the cable clamps inside the canopy, adjust each cable to your desired height (maximum 125 cm), and then tighten the clamps securely.
- Install Glass Shades: Carefully attach each glass shade to its respective lamp holder. Ensure they are securely fastened.
- Insert Bulbs: Screw E27 bulbs (not included, max 15W each) into the lamp holders.
- Restore Power: Once installation is complete and all connections are secure, turn the power back on at the circuit breaker.
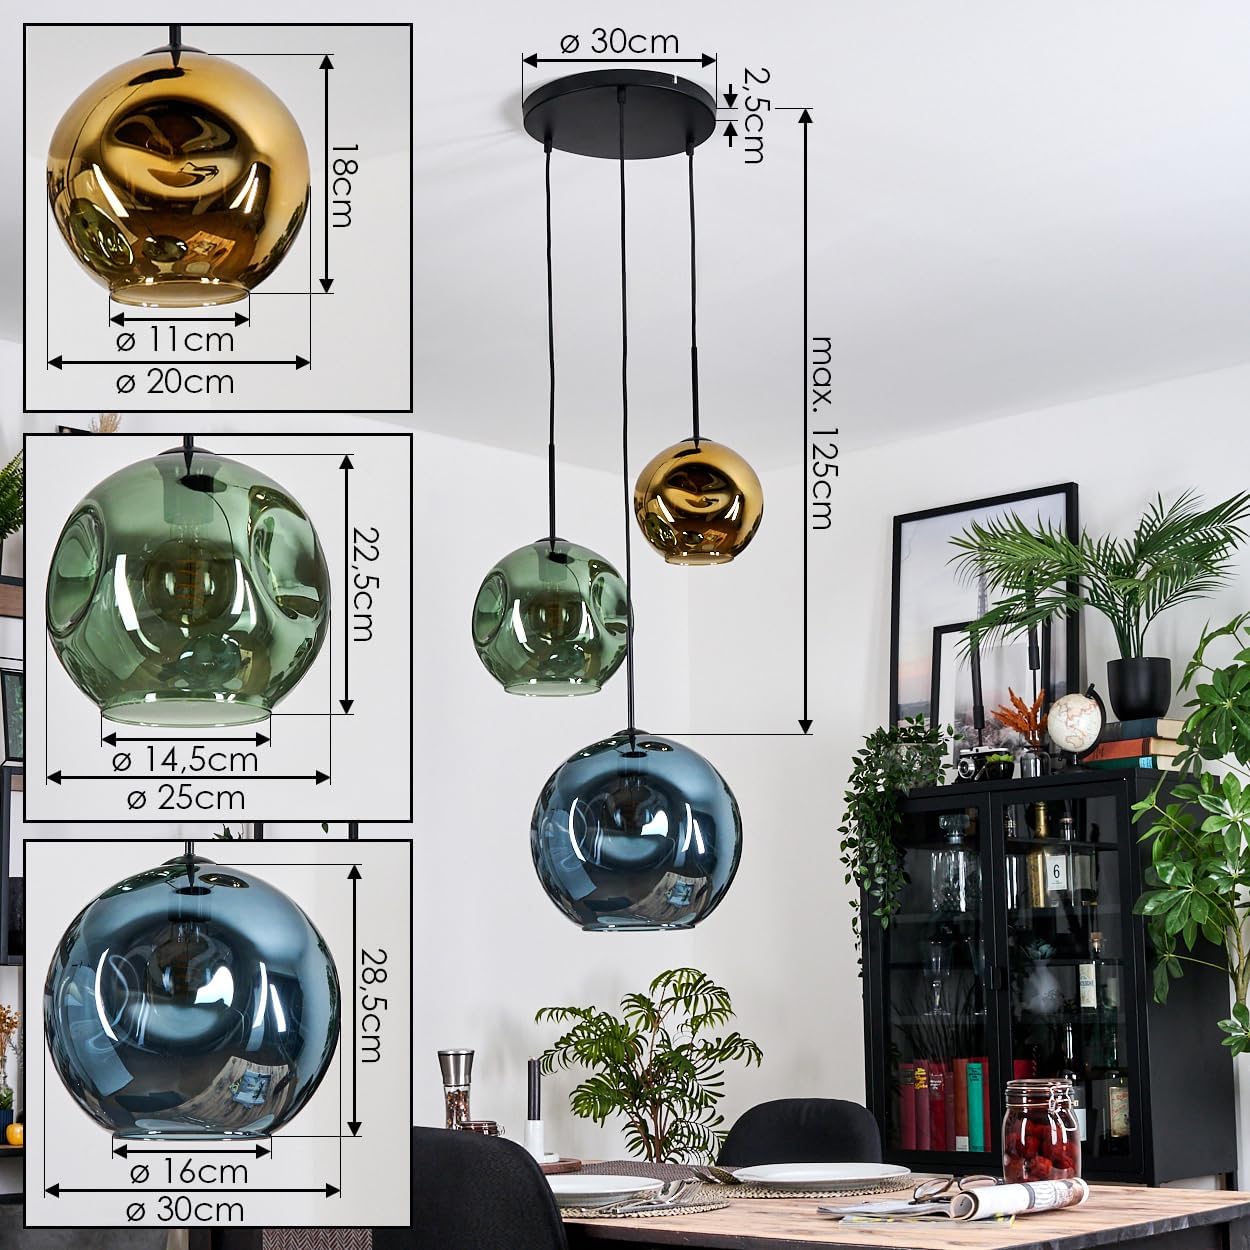
Image 4.1: Dimensional overview and installation reference.

Image 4.2: Detailed view of the ceiling canopy and wiring connections.
5. Operating Instructions
The hofstein Ripoll pendant lamp is operated via your standard wall light switch. There is no integrated on/off switch on the fixture itself.
- Power On/Off: Flip the wall switch to turn the light fixture on or off.
- Dimming: This fixture is dimmable, but requires an external dimmer switch (not included) to be installed in your electrical system. Ensure any dimmer used is compatible with E27 incandescent or dimmable LED bulbs.
- Bulb Type: Use E27 base bulbs. The maximum wattage per bulb is 15 Watts.
6. Maintenance
6.1 Cleaning
To maintain the appearance of your pendant lamp:
- Always turn off the power and allow the fixture to cool before cleaning.
- Wipe the metal parts with a soft, dry cloth.
- Clean the glass shades with a soft, damp cloth and a mild glass cleaner if necessary. Avoid abrasive cleaners or solvents.
- Ensure the fixture is completely dry before restoring power.
6.2 Bulb Replacement
When a bulb needs to be replaced:
- Turn off the power at the circuit breaker.
- Allow the old bulb to cool completely.
- Carefully unscrew the old E27 bulb from its socket.
- Screw in a new E27 bulb, ensuring it does not exceed 15 Watts.
- Restore power.
7. Troubleshooting
| Problem | Possible Cause | Solution |
|---|---|---|
| Light does not turn on. | No power to the fixture. Bulb is faulty or loose. Incorrect wiring. | Check circuit breaker. Ensure wall switch is ON. Replace bulb or tighten it. Verify wiring connections (consult an electrician if unsure). |
| Light flickers. | Loose bulb. Incompatible dimmer switch. Faulty bulb. | Tighten bulb. Ensure dimmer is compatible with the bulb type. Replace bulb. |
| Shades appear uneven. | Pendant cable lengths are not adjusted correctly. | Adjust cable lengths inside the canopy (refer to Section 4.2, Step 6). |
8. Specifications
| Feature | Detail |
|---|---|
| Model Number | B0DS2J2NQP |
| Brand | hofstein |
| Type | Pendant Lamp, Cluster Pendant |
| Dimensions (Overall) | 30 cm (L) x 30 cm (W) x 125 cm (H max) |
| Shade Diameters | 20 cm, 25 cm, 30 cm |
| Canopy Diameter | 30 cm |
| Canopy Height | 2.5 cm |
| Material (Fixture) | Metal |
| Material (Shades) | Glass |
| Shade Colors | Blue, Gold, Green |
| Number of Lights | 3 |
| Bulb Base | E27 |
| Max Wattage per Bulb | 15 Watts |
| Bulbs Included | No |
| Dimmable | Yes (with external dimmer, not included) |
| Voltage | 230 Volt |
| Protection Rating | IP20 (Indoor use only) |
| Protection Class | I |
| Mounting Type | Ceiling Mount, Semi-flush |
| Assembly Required | Yes |
| Recommended Rooms | Dining Room, Kitchen, Hallway, Bedroom, Living Room |
9. Warranty and Support
For information regarding warranty coverage and customer support, please refer to the documentation provided at the time of purchase or contact your retailer. Keep your proof of purchase for any warranty claims.
For technical assistance or inquiries, please visit the hofstein brand store or contact their customer service directly.