Introduction
This manual provides detailed instructions for the assembly, installation, operation, and maintenance of your HOOBRO BB21DBJ01 3-Tier Floating Shelf with LED Lights. Please read all instructions carefully before beginning assembly and retain this manual for future reference.
Safety Information
- Do not exceed the weight limit of 12.7 pounds (5.7 kg) per shelf. Overloading can cause the shelf to detach from the wall, resulting in injury or damage.
- Follow all provided installation instructions for safe and secure wall mounting. Improper installation can lead to instability.
- Ensure the shelf is mounted to a solid wall or into wall studs for maximum stability. Avoid mounting into drywall alone without appropriate anchors.
- Keep small parts and packaging materials away from children to prevent choking hazards.
Package Contents
Verify that all components are present before beginning assembly. If any parts are missing or damaged, please contact customer service.
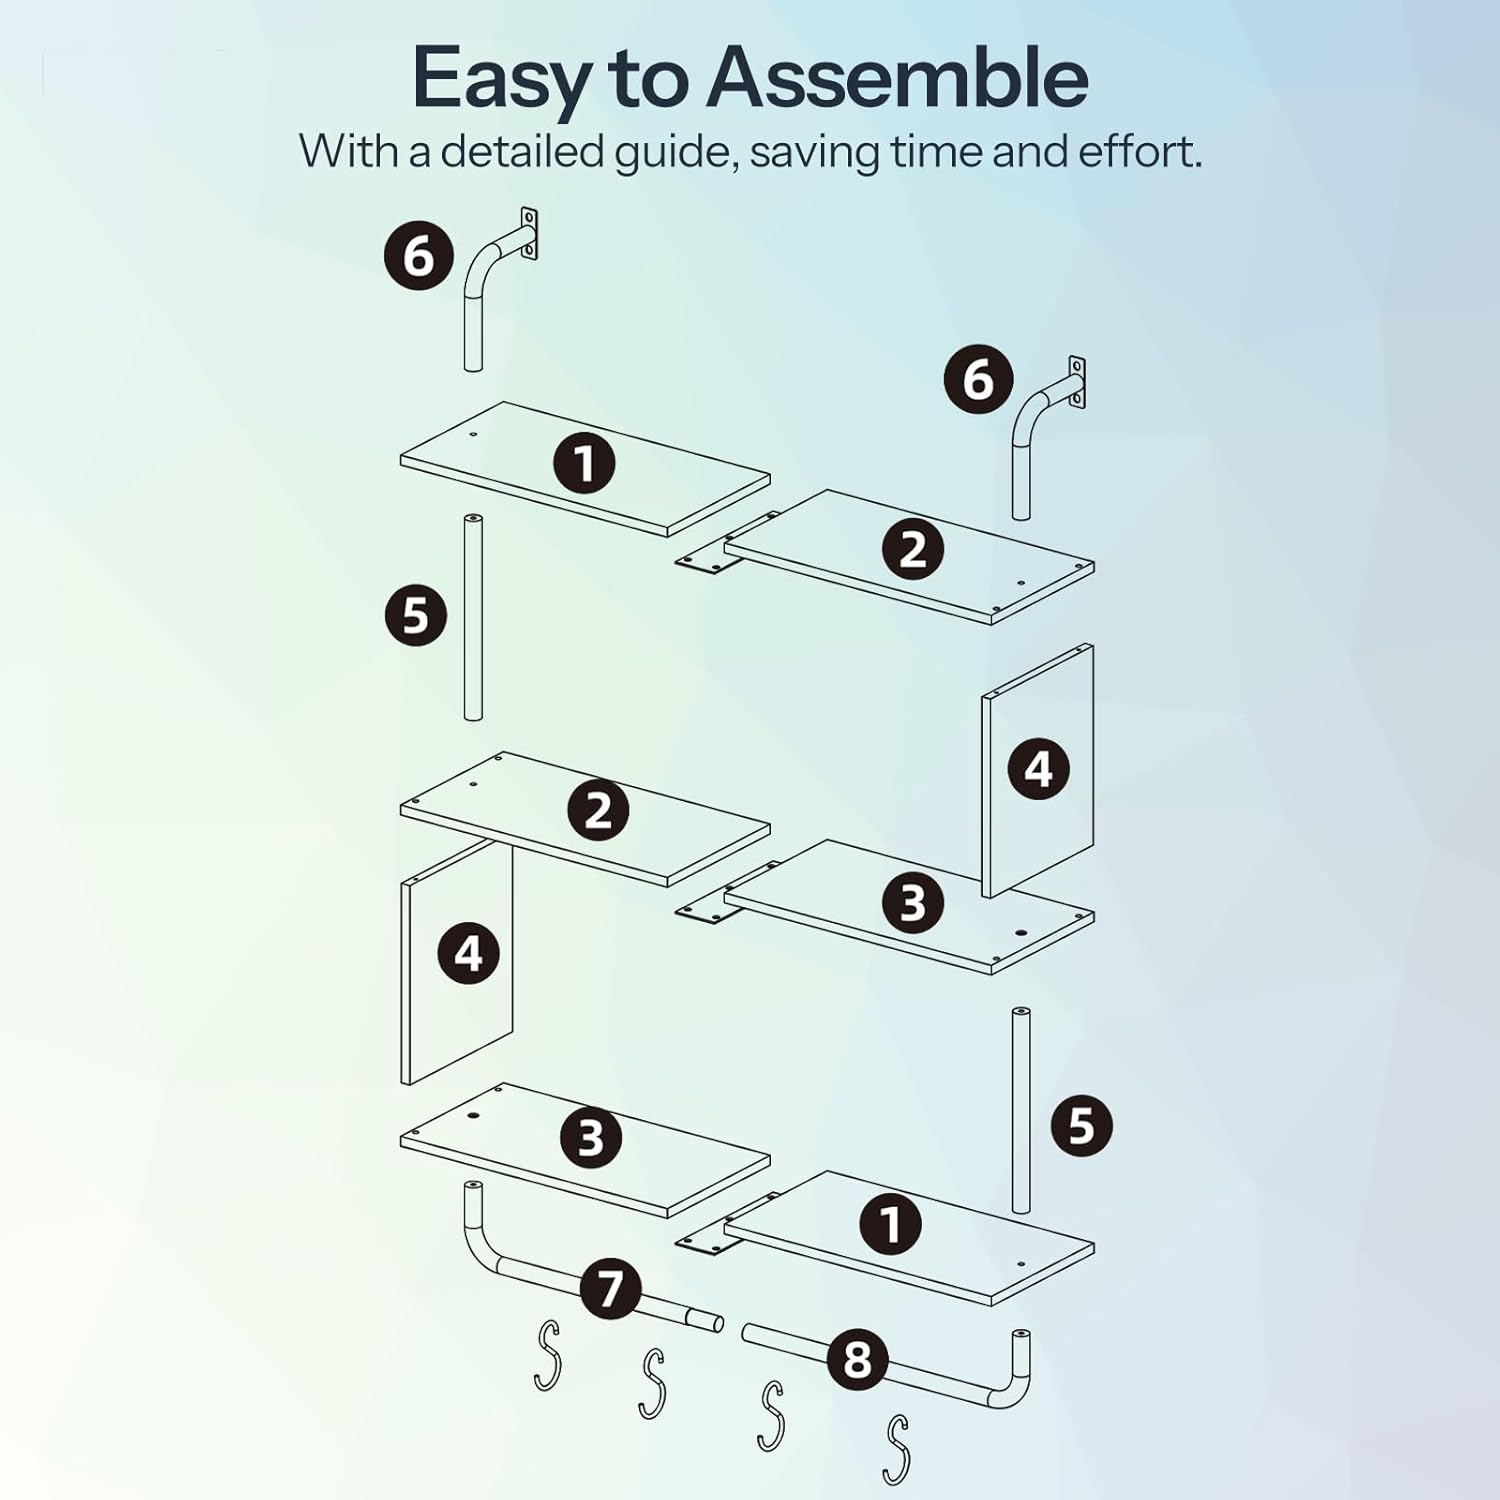
Figure 1: Exploded view of shelf components.
| Part No. | Description | Quantity |
|---|---|---|
| 1 | Top/Bottom Shelf Panel | 2 |
| 2 | Middle Shelf Panel (Left) | 1 |
| 3 | Middle Shelf Panel (Right) | 1 |
| 4 | Side Panel | 2 |
| 5 | Vertical Pipe Support | 2 |
| 6 | Wall Mount Bracket | 2 |
| 7 | Hanging Rod | 1 |
| 8 | S-Hooks | 4 |
| LED Light Strip with Remote | 1 Set | |
| Assembly Hardware (Screws, Anchors, Allen Key) | 1 Set |
Setup and Assembly
Assembly is straightforward with the provided instructions and hardware. A detailed guide is included to save time and effort.
- Unpack Components: Carefully remove all parts from the packaging and lay them out on a clean, soft surface to prevent scratches.
- Assemble Shelf Panels: Connect the top, middle, and bottom shelf panels using the designated screws and the vertical pipe supports. Ensure all connections are secure.
- Attach Side Panels: Secure the side panels to the assembled shelves.
- Install Hanging Rod: Attach the hanging rod to the bottom of the lowest shelf.
- Prepare for Wall Mounting: Attach the wall mount brackets to the top of the shelf unit.
- LED Light Strip Installation: Affix the LED light strip to the underside of the shelves as desired. Ensure the USB cable is accessible for power.
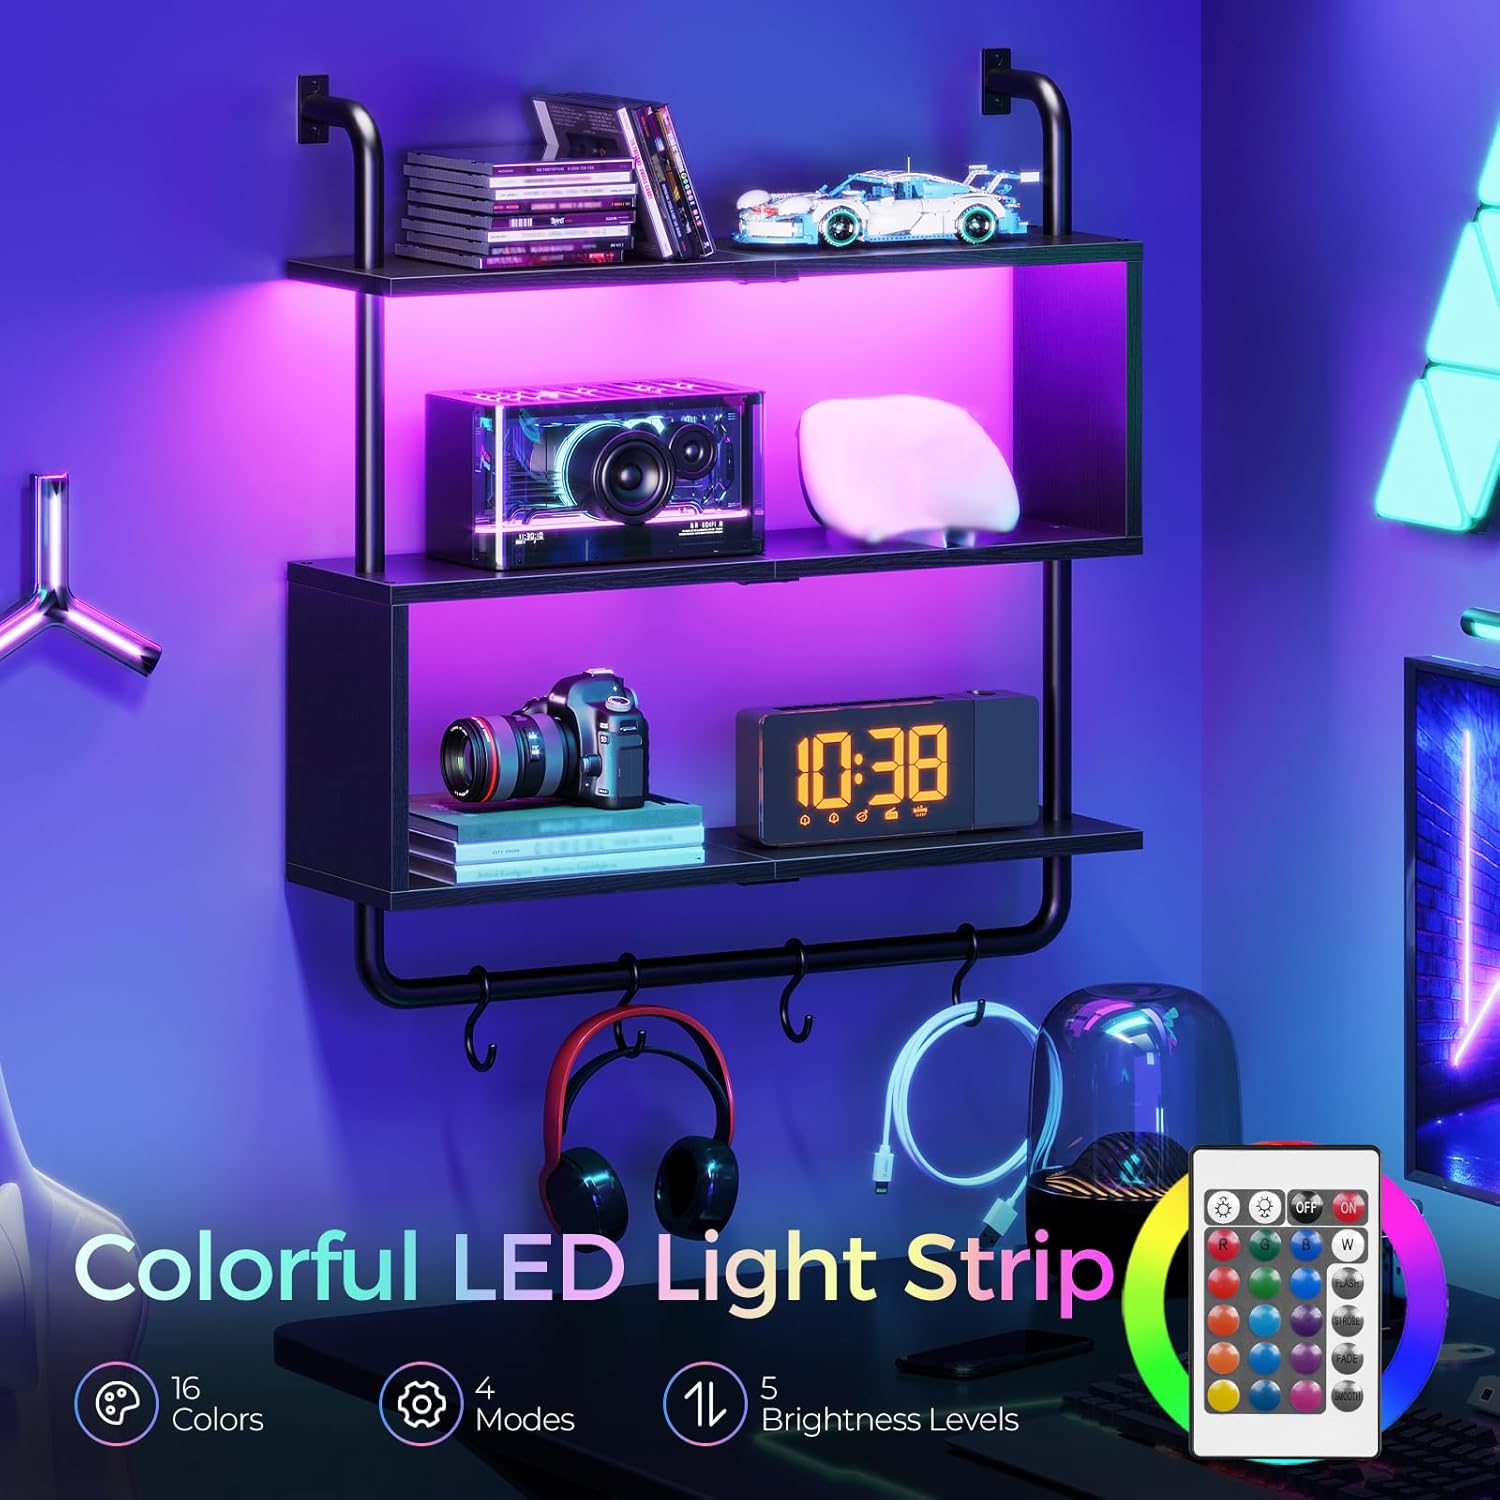
Figure 2: Fully assembled shelf unit.
Installation
Proper wall mounting is crucial for the stability and safety of your floating shelf. This shelf is designed for wall mounting.
- Choose Location: Select a suitable location on a solid wall. For optimal security, use a stud finder to locate wall studs and aim to mount the shelf directly into them.
- Mark Drilling Points: Hold the assembled shelf against the wall at the desired height and use a pencil to mark the drilling points through the wall mount brackets.
- Drill Pilot Holes: Drill pilot holes at the marked locations. If mounting into drywall without studs, use appropriate wall anchors (consider purchasing higher quality anchors if the included ones seem insufficient).
- Secure to Wall: Align the shelf's wall mount brackets with the drilled holes and secure the shelf to the wall using the provided screws. Ensure all screws are tightened firmly.
- Attach S-Hooks: Place the S-hooks onto the hanging rod.

Figure 3: Details of wall mounting and hanging rod.
Operating Instructions (LED Lights)
The integrated LED lights offer customizable ambiance for your space.
- Power Connection: Connect the USB cable of the LED light strip to a compatible USB power source (e.g., wall adapter, power bank, computer USB port).
- Remote Control: Use the included remote control to operate the LED lights.
- Color Selection: Choose from 16 available colors to match your mood or decor.
- Mode Selection: Select from 4 dynamic modes (e.g., flash, strobe, fade, smooth) for various lighting effects.
- Brightness Adjustment: Adjust the light intensity with 5 brightness levels.

Figure 4: Shelf with LED lights in a gaming environment.
Video 1: Overview of the HOOBRO Floating Shelf with LED Lights, showcasing its features and design.
Video 2: Demonstration of the HOOBRO Floating Wall Shelves with LED lights in various settings.
Maintenance
To keep your floating shelf looking its best, follow these simple maintenance guidelines:
- Cleaning: The smooth panel surfaces can be easily wiped clean with a soft, damp cloth. Avoid abrasive cleaners or harsh chemicals that may damage the finish.
- Dusting: Regularly dust the shelves and metal frame with a dry, soft cloth.
- Check Connections: Periodically check all screws and wall mounts to ensure they remain tight and secure.
Troubleshooting
If you encounter any issues with your HOOBRO floating shelf, refer to the following common solutions:
- Shelf Instability: Ensure all assembly screws are tightened. Verify that the wall mounting is secure and, if possible, mounted into wall studs. Re-check wall anchors if not mounted into studs.
- LED Lights Not Working: Check if the USB power source is connected and functioning. Ensure the remote control battery is not depleted. Verify that the LED strip connections are secure.
- Missing Parts: If any parts were missing upon arrival, please contact HOOBRO customer service for assistance.
Specifications
| Feature | Detail |
|---|---|
| Model Number | BB21DBJ01 |
| Material | Engineered Wood, Metal |
| Color | Black |
| Overall Dimensions (L x W x H) | 29.5" x 7.9" x 30.7" (75cm x 20cm x 78cm) |
| Shelf Depth | 7.8" (20cm) |
| Shelf Thickness | 0.5 Inches |
| Number of Shelves | 3 |
| Weight Capacity (per shelf) | 12.7 lbs (5.7 kg) |
| LED Lights | 16 Colors, 4 Modes, 5 Brightness Levels |
| Mounting Type | Wall Mount |
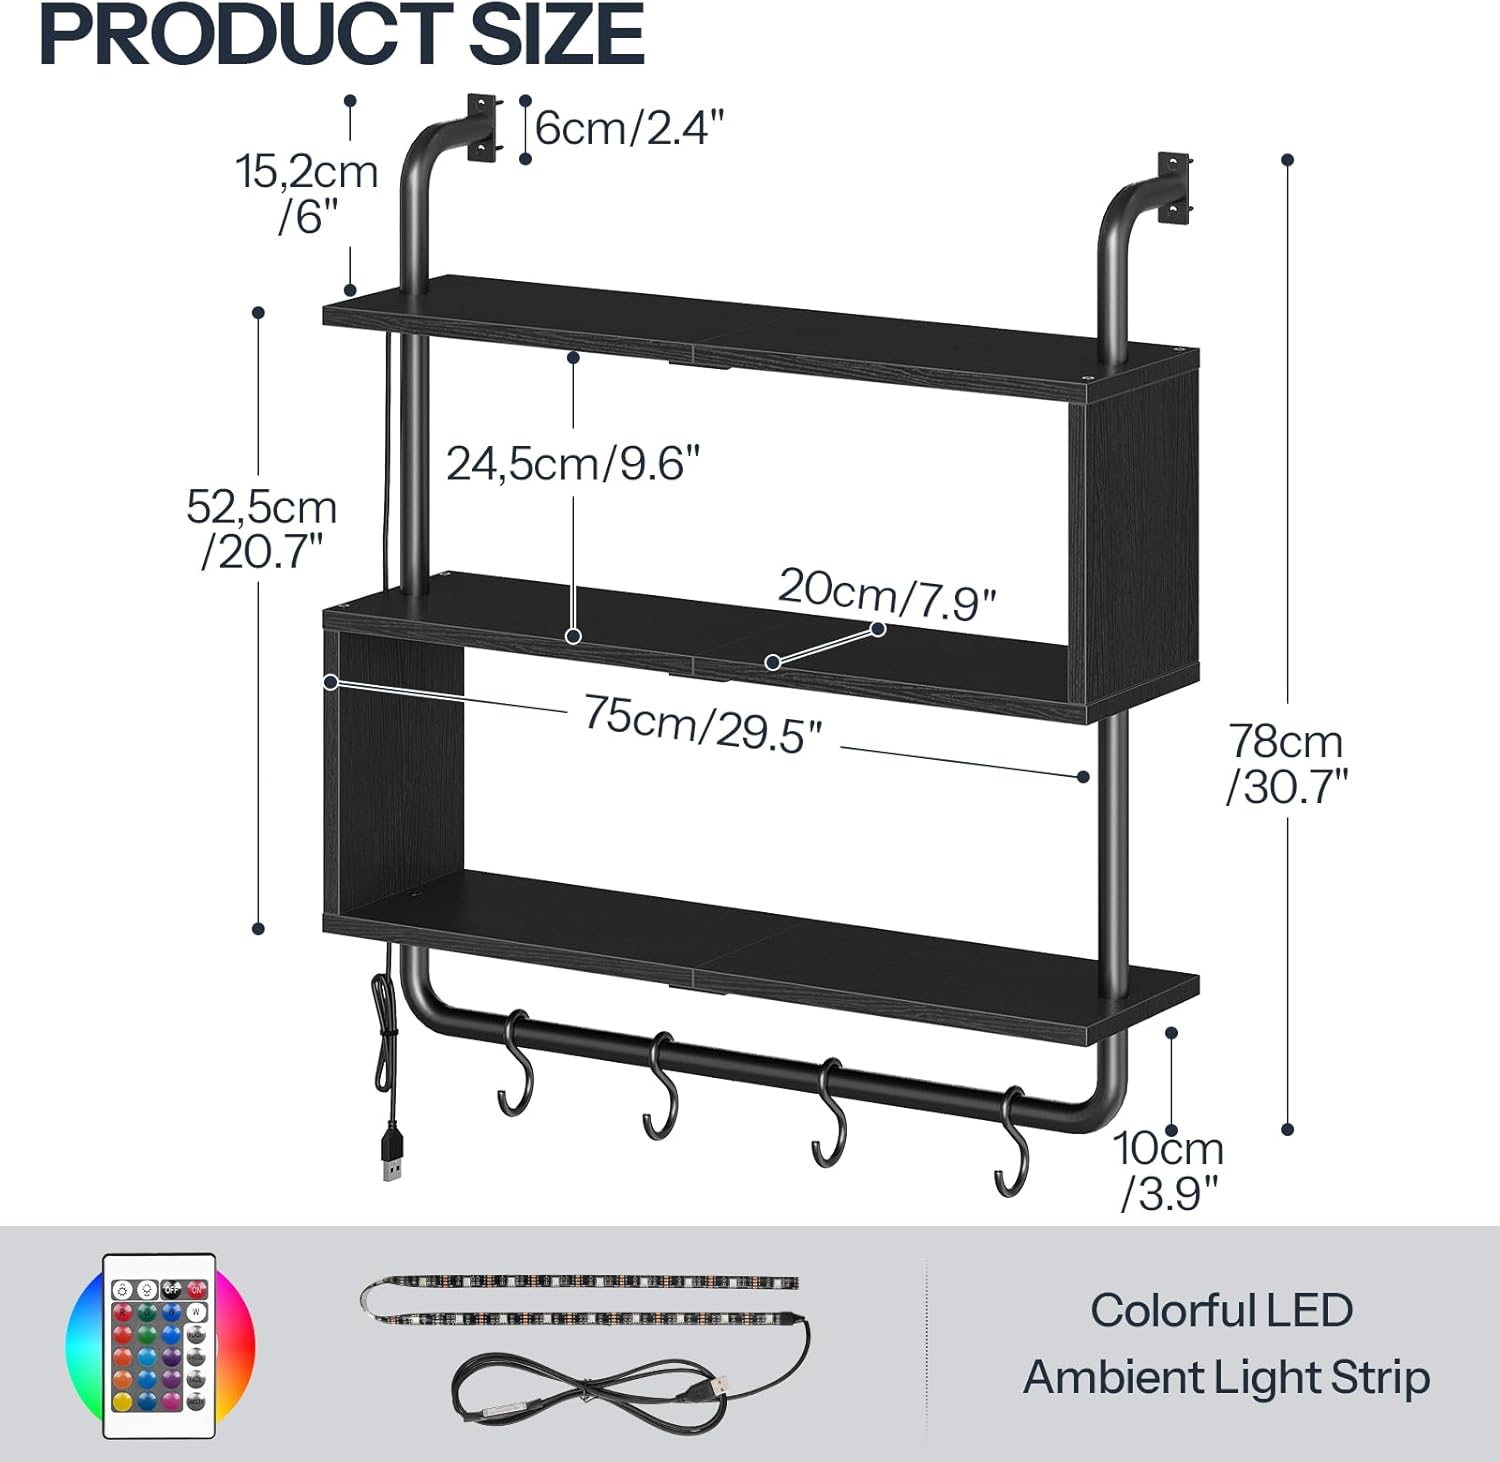
Figure 5: Detailed product dimensions.
Warranty and Support
For warranty information, product support, or to report missing/damaged parts, please contact HOOBRO customer service directly. Refer to your purchase documentation or the HOOBRO official website for contact details.


