1. Important Safety Information
Please read and understand all instructions before assembly and use. Retain this manual for future reference.
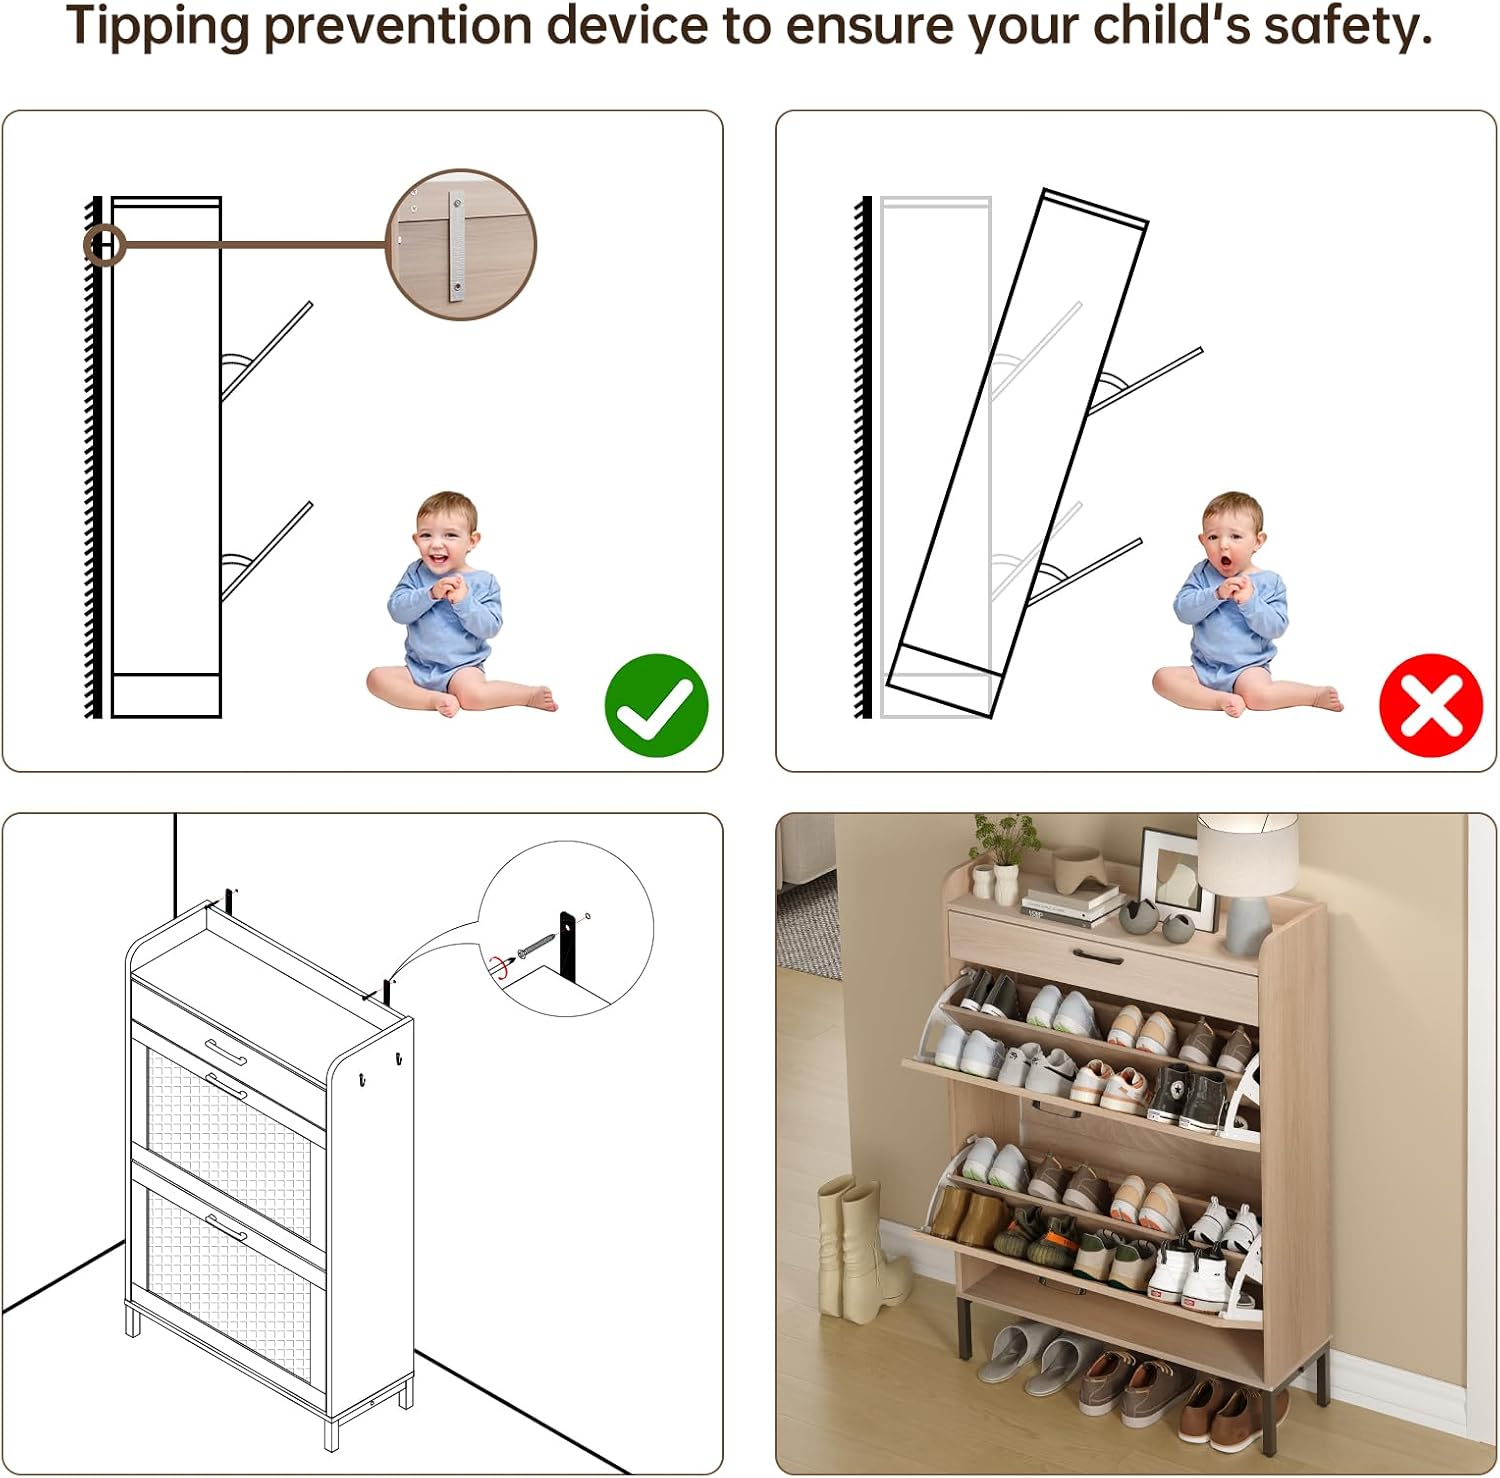
- Anti-Tip Device: Always secure the cabinet to the wall using the built-in anti-tip device to prevent tipping. Failure to do so can result in serious injury.
- Weight Capacity: Do not overload the cabinet. Exceeding the recommended weight capacity may cause instability and damage.
- Clearance: Keep the area around the cabinet clear to prevent tripping hazards.
- Assembly: Assembly requires careful attention. It is recommended to have two people for assembly to ensure stability and safety.
2. Product Overview
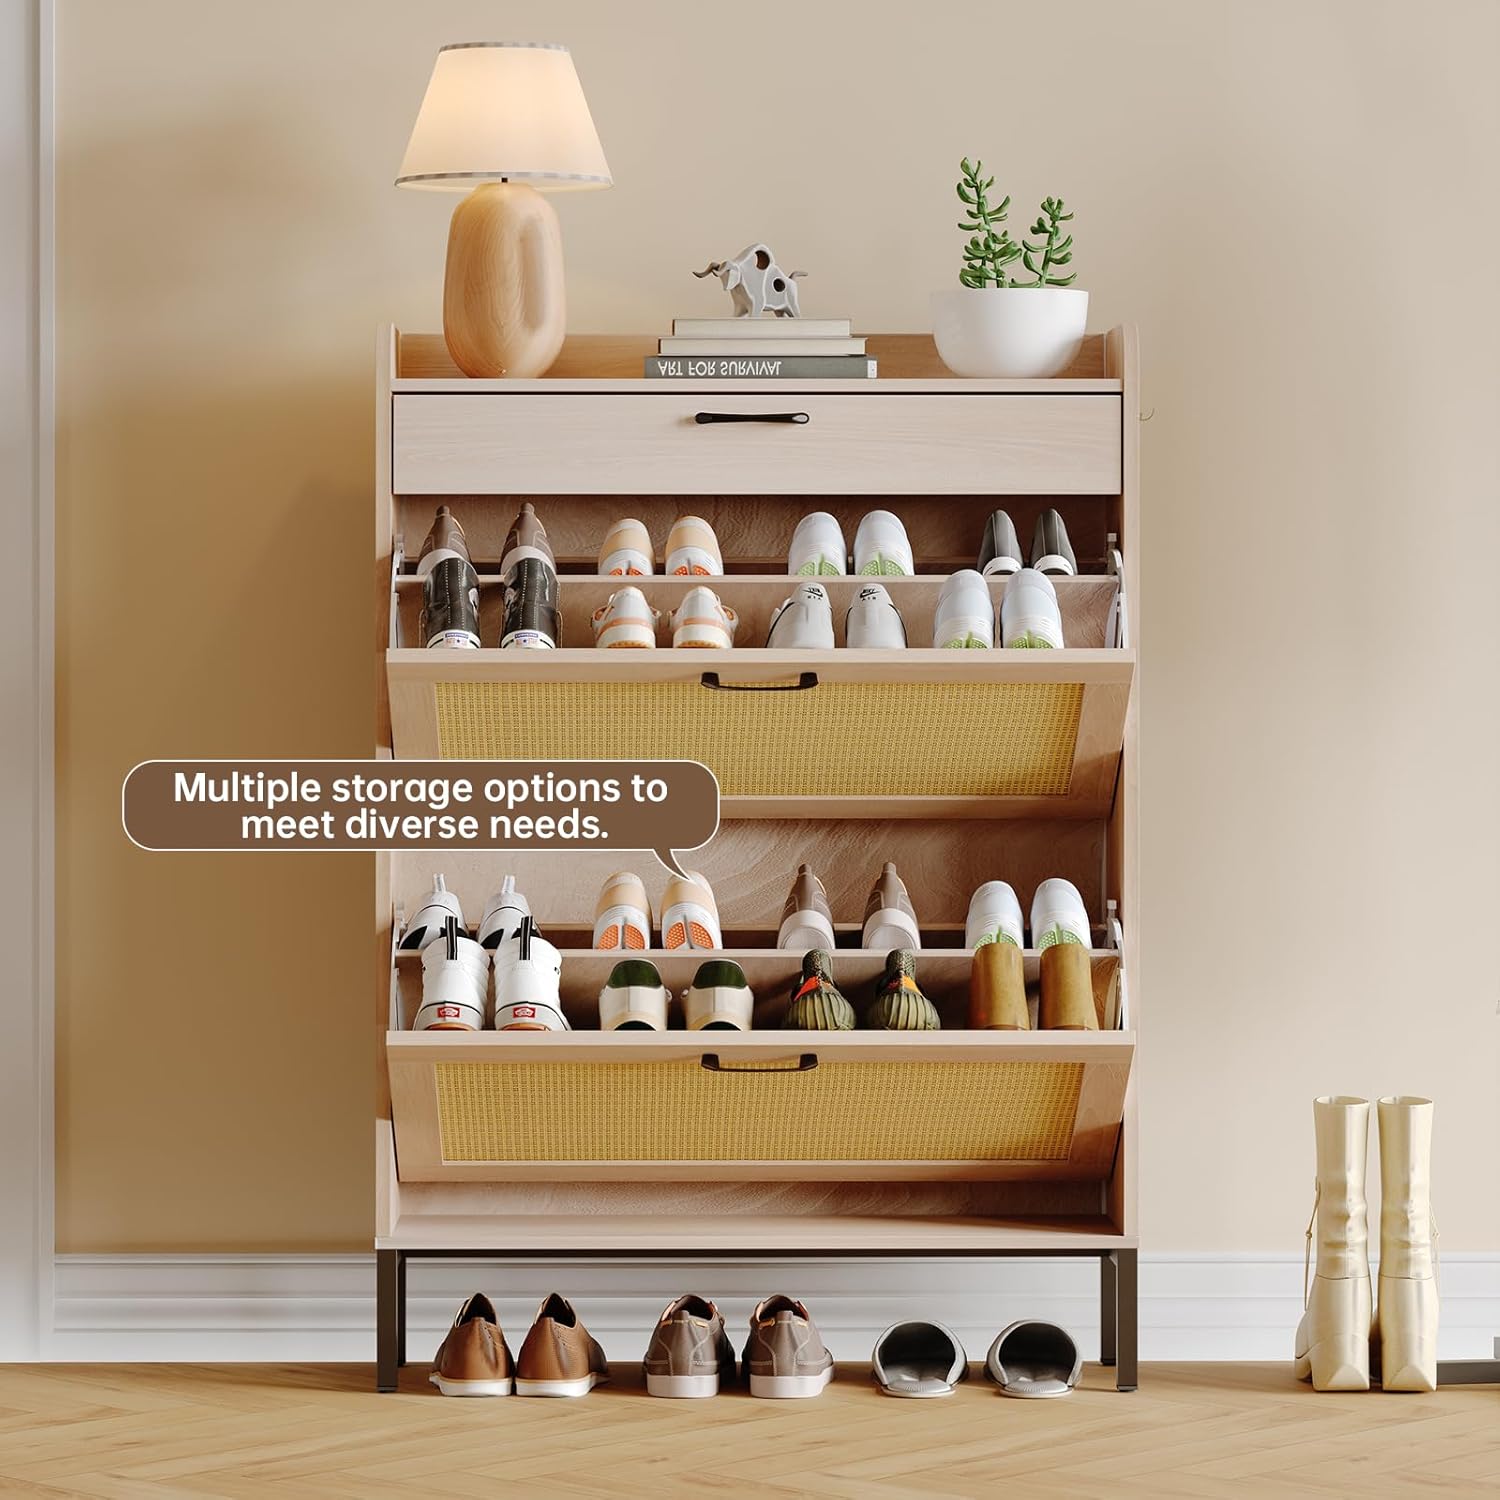
The Airynee Rattan Shoe Storage Cabinet is designed to provide an organized and space-saving solution for shoe storage. It features a slim profile, two flip-down drawers, and an additional top drawer for accessories.

2.1 Components and Features
- Top Surface: A flat surface suitable for placing decorative items, keys, or small plants. Features raised side panels to prevent items from falling.
- Top Drawer: A single pull-out drawer for storing smaller items like wallets, keys, or other accessories.
- Flip Drawers (x2): Two main compartments with flip-down doors, each containing adjustable and removable baffles for organizing shoes.
- Rattan Doors: The flip-down doors feature a rattan design for ventilation and aesthetic appeal.
- Metal Handles: Black metal handles provide a secure grip for opening drawers.
- Metal Support Legs: Reinforced metal legs ensure stability and support the cabinet's weight.
- Anti-Tip Device: Included for wall mounting to prevent accidental tipping.


3. Package Contents
Before beginning assembly, ensure all parts and tools listed in the included instruction manual are present and undamaged. If any components are missing or damaged, contact customer support immediately.
- Shoe Cabinet Components (various wood panels, metal legs, hardware)
- Assembly Hardware (screws, dowels, cam locks, etc.)
- Anti-Tip Device Kit
- Assembly Tools (basic tools may be included, but a screwdriver and hammer are generally recommended)
- User Manual (this document)
4. Assembly Instructions
Assembly is required for this product. Follow the detailed step-by-step instructions provided in the separate assembly manual included in your package. It is recommended to assemble the cabinet on a soft, clean surface to prevent scratches.
- Preparation: Unpack all components and verify against the parts list. Organize hardware for easy access.
- Frame Assembly: Begin by assembling the main frame of the cabinet according to the diagrams.
- Drawer Installation: Install the top pull-out drawer and the two flip-down drawer mechanisms.
- Leg Attachment: Securely attach the metal support legs to the base of the cabinet.
- Anti-Tip Device Installation: This is a critical step. Attach the anti-tip device to the back of the cabinet and then securely fasten it to a wall stud using appropriate hardware. Ensure the cabinet is level and stable before use.
For visual guidance, refer to the installation demo video available on the product page where this item was purchased.
5. Operation
5.1 Using the Flip Drawers
- To open a flip drawer, gently pull the metal handle outwards and downwards. The drawer will pivot open.
- Place shoes onto the internal baffles. The baffles can be adjusted or removed to accommodate different shoe heights and styles (e.g., sneakers, heels, boots).
- To close, push the drawer upwards and inwards until it clicks securely into place.
5.2 Using the Top Drawer
- To open the top drawer, pull the metal handle outwards.
- Store small items such as keys, mail, or other accessories.
- To close, gently push the drawer inwards until it is flush with the cabinet front.
5.3 Top Surface Usage
- The top surface can be used to display decorative items, hold a lamp, or provide a temporary spot for bags or other belongings.
- The raised side panels help prevent items from sliding off.
6. Care and Maintenance
- Cleaning: Wipe the cabinet surfaces with a soft, damp cloth. Avoid harsh chemicals or abrasive cleaners, which can damage the finish.
- Dusting: Regularly dust the rattan panels and wood surfaces to maintain appearance.
- Spills: Clean up spills immediately to prevent staining or damage to the wood.
- Sunlight: Avoid prolonged exposure to direct sunlight, which can cause fading or discoloration.
- Humidity: Maintain a stable humidity level in the room to prevent warping or cracking of the wood.
- Hardware: Periodically check all screws and fasteners to ensure they are tight. Retighten as necessary.
7. Troubleshooting
- Cabinet is Wobbly:
- Ensure all assembly screws are tightened securely.
- Verify that the cabinet is placed on a level surface.
- Confirm the anti-tip device is properly installed and secured to the wall. - Drawers Do Not Close Smoothly:
- Check for any obstructions inside the drawer or along the tracks.
- Ensure shoes are properly placed and not overfilling the compartment.
- Verify that the drawer mechanisms were installed correctly during assembly. - Shoes Do Not Fit:
- Adjust or remove the internal baffles within the flip drawers to create more space for larger shoes or boots. - Missing Parts:
- Refer to the package contents list in the assembly manual. If parts are missing, contact customer support with your purchase details.
8. Specifications
| Feature | Specification |
|---|---|
| Brand | Airynee |
| Model | 2-Drawer Rattan Shoe Storage Cabinet |
| ASIN | B0DS274GJ9 |
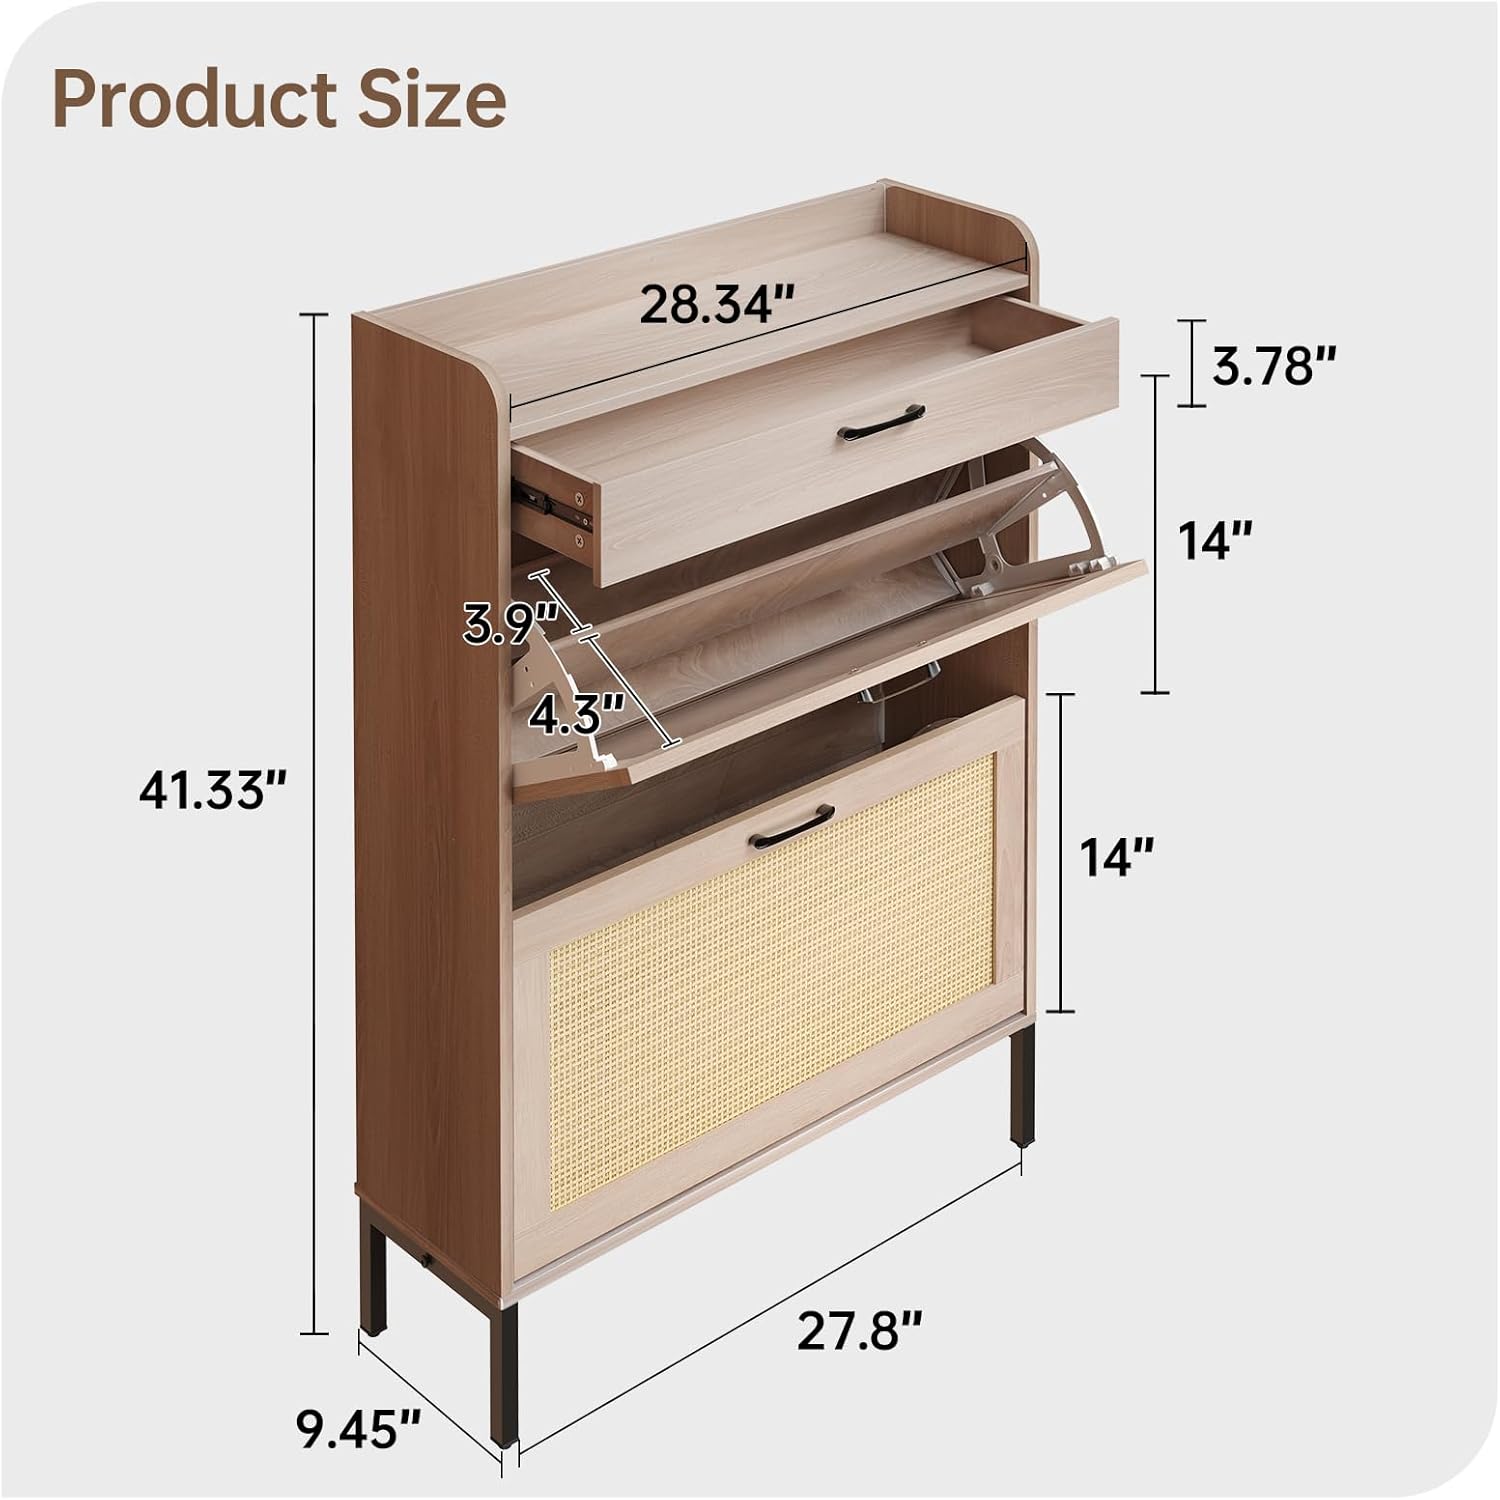
| Product Dimensions (D x W x H) | 9.45" x 29.5" x 41.3" |
| Material | Wood, Rattan, Metal |
| Mounting Type | Freestanding (with wall anchor) |
| Number of Drawers | 1 (top) + 2 (flip) |
| Number of Shelves | 3 (internal baffles in flip drawers) |
| Special Features | Adjustable/Removable Baffles, Anti-Tipping Device, Space Saving Design |
| Assembly Required | Yes |
| Item Weight | 48.5 pounds |
9. Customer Support
If you encounter any issues during assembly, operation, or have questions regarding your Airynee Rattan Shoe Storage Cabinet, please do not hesitate to contact our customer support team.
- Contact Method: Refer to the contact information provided with your purchase or on the retailer's website.
- Response Time: Our team aims to respond with a satisfactory solution within 24 hours.