1. Introduction
This manual provides comprehensive instructions for the Mycket portable DAB/DAB+/FM radio, Model D009. It covers setup, operation, maintenance, and troubleshooting to ensure optimal performance and longevity of your device. Please read this manual carefully before using the product.
The Mycket D009 radio features advanced signal reception technology for clear audio, Bluetooth 5.0 for wireless streaming, USB playback, AUX-in connectivity, a dual alarm clock, and a sleep timer. Its integrated rechargeable battery offers portability for use in various environments.
2. Safety Instructions
- Do not expose the device to rain, moisture, or extreme temperatures.
- Avoid dropping or subjecting the device to strong impacts.
- Do not disassemble or attempt to repair the device yourself. Refer all servicing to qualified personnel.
- Keep the device away from heat sources such as radiators, heat registers, stoves, or other apparatus (including amplifiers) that produce heat.
- Use only the specified charging cable and power adapter (5V via USB) to charge the device.
- Ensure proper ventilation around the device during operation and charging.
- Dispose of batteries and electronic components responsibly according to local regulations.
3. Product Overview
3.1 Package Contents
- 1 x Mycket Portable DAB Radio (Model D009)
- 1 x USB Charging Cable
- 1 x User Manual
3.2 Device Layout and Controls
Familiarize yourself with the main components and controls of your Mycket radio.

Image 1: Front view of the Mycket D009 portable DAB radio, showing the speaker grille, LCD display, control buttons (MODE, OK, O/M, FAV, 1-4), and the telescopic antenna extended. The right side shows the DC 5V USB-C port, reset button, and headphone jack.
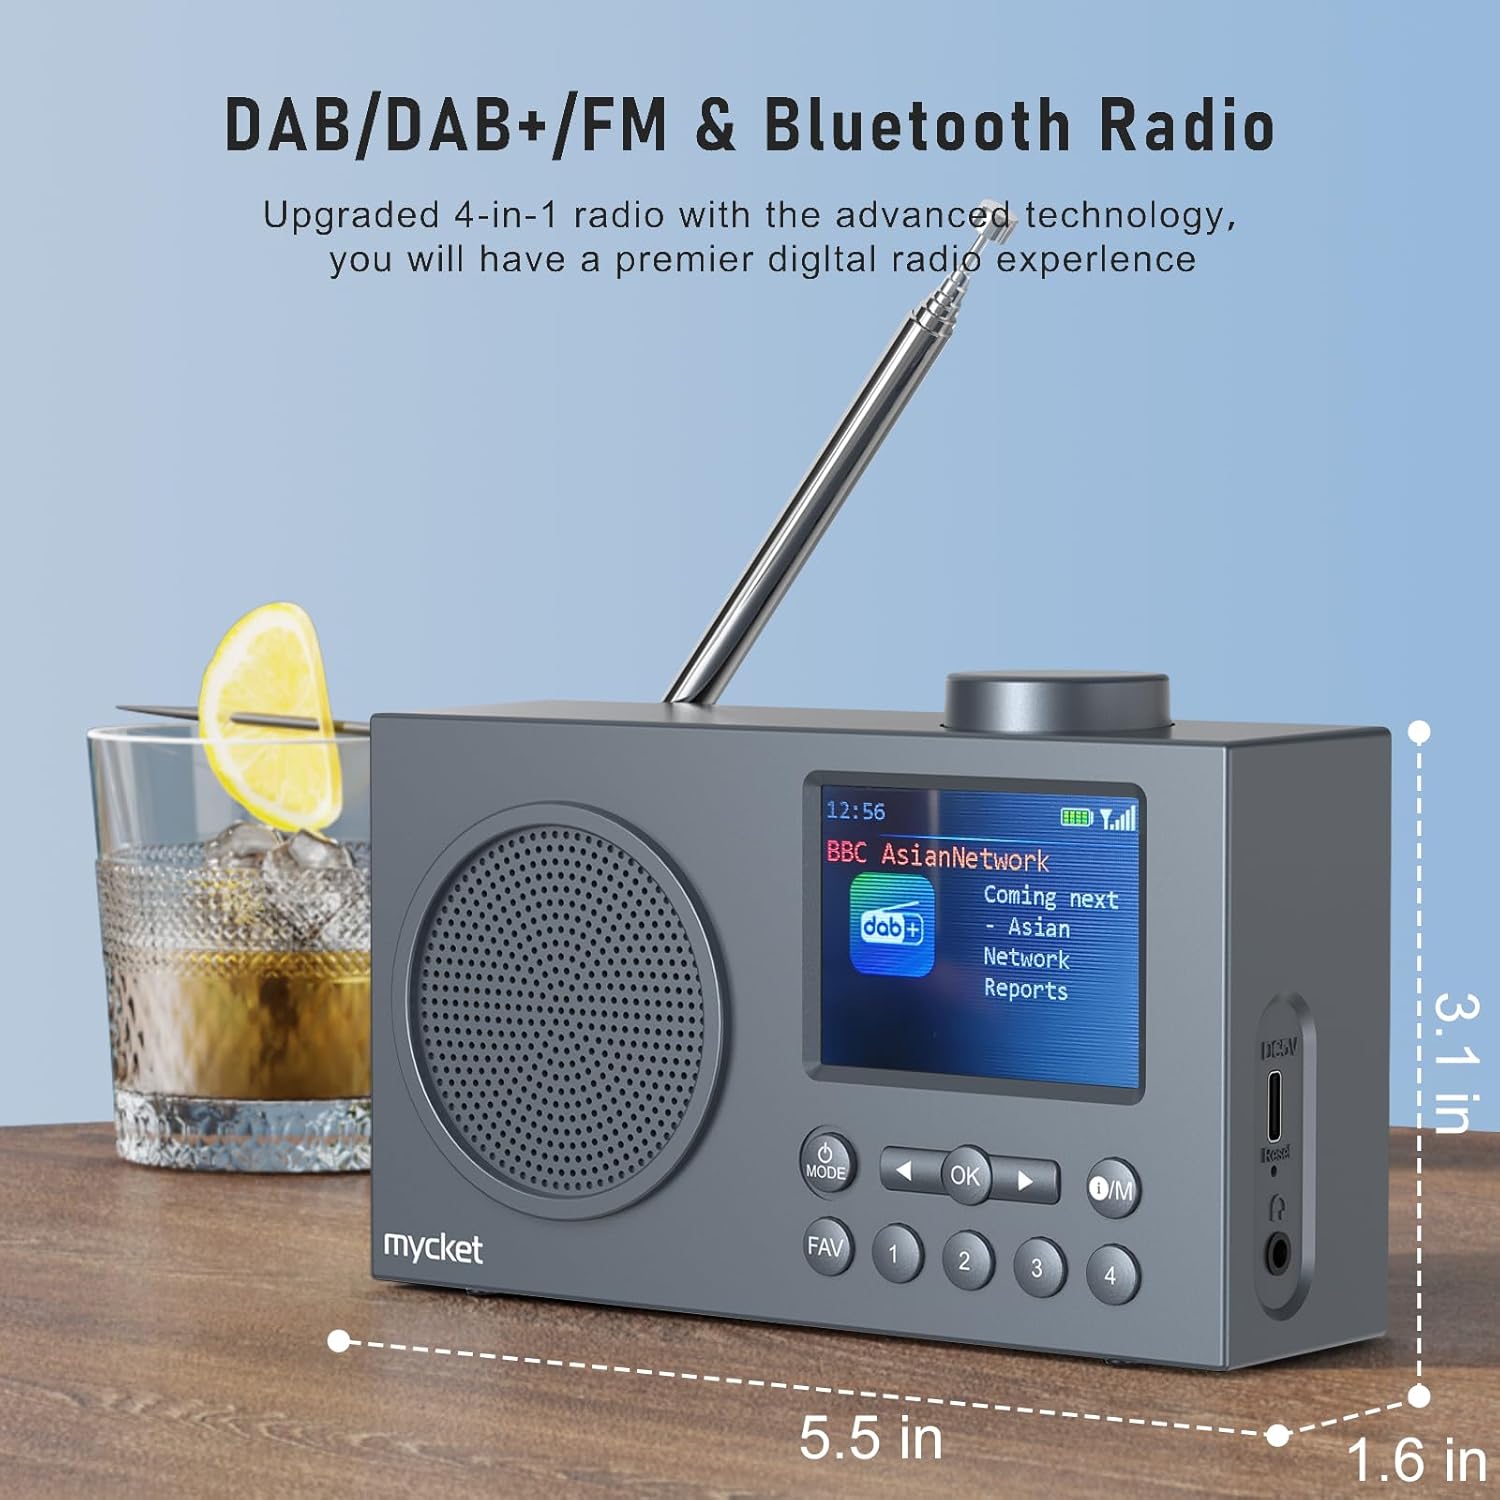
Image 2: Side view of the Mycket D009 radio illustrating its compact dimensions: approximately 5.5 inches (length), 1.6 inches (width), and 3.1 inches (height). The image also highlights its DAB/DAB+/FM and Bluetooth capabilities.
- Display: 2.4-inch TFT color display for station information, time, and settings.
- Speaker: Integrated Hi-Fi speaker for audio output.
- Telescopic Antenna: For optimal radio signal reception.
- MODE Button: Switches between DAB, FM, Bluetooth, USB, and AUX modes.
- OK Button: Confirms selections or enters menus.
- O/M Button: Power On/Off and Menu access.
- FAV Button: Accesses favorite presets.
- Number Buttons (1-4): Direct access to stored presets.
- Navigation Buttons (Left/Right): Navigates menus or tunes stations.
- Volume Knob: Adjusts audio volume.
- DC 5V USB-C Port: For charging the internal battery.
- Reset Button: Resets the device (use a thin object to press).
- 3.5mm Headphone Jack: For private listening.
4. Setup
4.1 Charging the Battery
The radio is equipped with a built-in 2200mAh lithium battery. Before first use, fully charge the device.
- Connect the provided USB charging cable to the DC 5V USB-C port on the side of the radio.
- Connect the other end of the USB cable to a compatible USB power adapter (not included) or a computer USB port.
- The charging indicator on the display will show the charging status. A full charge typically takes approximately 2.5 hours and provides up to 12 hours of playback time at 70% volume.

Image 3: The Mycket D009 radio display showing a full battery indicator, emphasizing its long playback time on a single charge.
4.2 Antenna Adjustment
For optimal radio reception, fully extend the telescopic antenna. Adjust its position for the best signal quality.
4.3 Initial Power On
Press and hold the O/M button to power on the radio. The display will light up, and the device will typically start in the last used mode or initiate a DAB scan if it's the first use.
5. Operating Instructions
5.1 Switching Modes
Press the MODE button repeatedly to cycle through available modes: DAB, FM, Bluetooth, USB, and AUX.
5.2 DAB/DAB+ Radio Operation
- Switch to DAB mode using the MODE button.
- The radio will automatically perform a full scan for available DAB/DAB+ stations upon first use or if no stations are found. To initiate a manual scan, press and hold the OK button, then select "Full Scan" from the menu.
- Once the scan is complete, use the navigation buttons (Left/Right) to browse through the list of available stations.
- Press OK to select and listen to a station.

Image 4: The Mycket D009 radio display showing a DAB station and highlighting the auto-scan and 40 preset features (20 DAB & 20 FM).
5.2.1 Storing DAB Presets
The radio supports up to 20 DAB presets.
- Tune to the desired DAB station.
- Press and hold one of the number buttons (1-4) or the FAV button to save the current station to a preset slot. Follow the on-screen prompts to select a slot if using the FAV button.
- To recall a preset, briefly press the corresponding number button or the FAV button and select from the list.
5.3 FM Radio Operation
- Switch to FM mode using the MODE button.
- To auto-scan for FM stations, press and hold the OK button. The radio will scan and store available stations.
- To manually tune, use the navigation buttons (Left/Right) to adjust the frequency.
- Press OK to confirm the station.
5.3.1 Storing FM Presets
The radio supports up to 20 FM presets, similar to DAB presets.
- Tune to the desired FM station.
- Press and hold one of the number buttons (1-4) or the FAV button to save the current station.
- To recall a preset, briefly press the corresponding number button or the FAV button and select from the list.
5.4 Bluetooth 5.0 Pairing
Connect your smartphone or tablet to the radio via Bluetooth for wireless audio streaming.
- Switch to Bluetooth mode using the MODE button. The radio display will show "Bluetooth Pairing" or similar.
- On your mobile device, enable Bluetooth and search for available devices.
- Select "Mycket D009" from the list of devices.
- Once paired, the radio will confirm the connection, and you can play audio from your device through the radio.

Image 5: The Mycket D009 radio displaying "Playing" in Bluetooth mode, next to a smartphone showing "Mycket D009" as a connected Bluetooth device.
5.5 USB Playback
Play MP3 audio files directly from a USB drive.
- Insert a USB drive containing MP3 files into the USB port.
- Switch to USB mode using the MODE button.
- The radio will automatically detect and begin playing MP3 files. Use the navigation buttons to skip tracks.
5.6 AUX-in Connection
Connect external audio devices using a 3.5mm audio cable (not included).
- Connect one end of a 3.5mm audio cable to the AUX-in port on the radio.
- Connect the other end to the headphone jack or audio output of your external device.
- Switch to AUX mode using the MODE button.
- Control playback from your external device.
5.7 Alarm Clock Function
Set up to two independent alarms.
- Press and hold the O/M button to enter the menu.
- Navigate to "Alarm Settings" using the navigation buttons and press OK.
- Select Alarm 1 or Alarm 2.
- Set the alarm time, source (DAB, FM, or Buzzer), and volume.
- Confirm settings by pressing OK.
5.8 Sleep Timer Function
Set the radio to automatically turn off after a specified period.
- Press and hold the O/M button to enter the menu.
- Navigate to "Sleep Timer" and press OK.
- Select the desired duration (e.g., 15, 30, 60 minutes).
- The radio will automatically power off after the set time.
5.9 Headphone Use
Connect 3.5mm headphones to the headphone jack for private listening. The internal speaker will be muted automatically.
6. Maintenance
- Cleaning: Use a soft, dry cloth to clean the radio's exterior. Do not use abrasive cleaners or solvents.
- Battery Care: To prolong battery life, avoid fully discharging the battery frequently. Charge the device regularly, even if not in use for extended periods.
- Storage: Store the radio in a cool, dry place away from direct sunlight and extreme temperatures.
7. Troubleshooting
| Problem | Possible Cause | Solution |
|---|---|---|
| No power / Radio does not turn on. | Battery is depleted. | Charge the radio using the provided USB cable. |
| Poor radio reception (DAB/FM). | Antenna not fully extended or positioned correctly. Weak signal area. | Fully extend and adjust the telescopic antenna. Try moving the radio to a different location. Perform a full scan for stations. |
| Bluetooth pairing fails. | Radio not in Bluetooth mode. Device too far. Bluetooth not enabled on external device. | Ensure the radio is in Bluetooth mode. Keep devices within range (approx. 10 meters). Enable Bluetooth on your external device and search for "Mycket D009". |
| No sound from speaker. | Volume too low. Headphones connected. | Increase the volume. Disconnect headphones if not intended for private listening. |
| USB playback not working. | USB drive not inserted correctly. Incompatible file format. | Ensure USB drive is fully inserted. Check that files are in MP3 format. |
| Device unresponsive. | Temporary software glitch. | Press the reset button on the side of the radio using a thin object (e.g., a paperclip). |
8. Specifications
| Brand | Mycket |
| Model | D009 |
| Radio Modes | DAB, DAB+, FM |
| Bluetooth Version | 5.0 |
| Playback Options | FM, DAB, DAB+, Bluetooth, USB MP3, AUX-in |
| Speaker Output Power | 5 Watts |
| Speaker Unit | 4 Ω10 W 78 mm x 1 |
| Display | 2.4-inch TFT Color LCD |
| Presets | 40 (20 DAB, 20 FM) |
| Battery Type | Built-in Lithium-ion (18650) |
| Battery Capacity | 2200 mAh (3.7V - 2.2 Ah) |
| Playback Time | Approx. 8-9 hours at 70% volume (up to 12 hours) |
| Charging Time | Approx. 2.5 hours |
| Power Input | 5V via USB |
| Dimensions (Product) | Approx. 14 cm (L) x 4 cm (W) x 7.8 cm (H) |
| Output Connections | 3.5mm Headphone Jack |
9. Warranty and Support
Mycket products are designed for reliability and performance. This product comes with:
- 12-Month Warranty: Enjoy a hassle-free 12-month warranty from the date of purchase.
- Customer Support: For any questions, issues, or support needs, please contact Mycket customer service.
Please retain your proof of purchase for warranty claims.


