ZLPOWER GS-III-12KW-48V
ZLPOWER 12000W 48V Off-Grid Inverter Charger User Manual
Model: GS-III-12KW-48V
Brand: ZLPOWER
1. Introduction
This manual provides detailed instructions for the installation, operation, and maintenance of your ZLPOWER 12000W 48V Off-Grid Inverter Charger, Model GS-III-12KW-48V. This device is designed to provide reliable power conversion for off-grid solar systems, featuring a pure sine wave output, split-phase capabilities, and integrated MPPT solar charge controllers. Please read this manual thoroughly before installation and operation to ensure safe and efficient use.
2. Safety Information
Always observe the following safety precautions to prevent injury and damage to the inverter or connected equipment:
- Qualified Personnel: Installation and maintenance should only be performed by qualified personnel.
- Electrical Hazard: This unit operates with high voltages. Do not open the casing or attempt repairs unless specifically instructed by ZLPOWER support.
- Proper Grounding: Ensure the inverter is properly grounded according to local electrical codes.
- Ventilation: Install the inverter in a well-ventilated area to prevent overheating.
- Battery Safety: Work with batteries carefully. Wear eye protection and avoid contact with battery acid.
- Overload Protection: Do not exceed the inverter's rated power output. The unit includes built-in overload protection.
- Environmental Conditions: Avoid exposure to moisture, dust, and corrosive substances.

Figure 2.1: Inverter's Multiple Intelligent Protection Systems
3. Package Contents
Upon unpacking, verify that all items are present and undamaged:
- ZLPOWER 12000W 48V Off-Grid Inverter Charger
- User Manual (this document)
- External WiFi-module (if included with your model)
- Mounting hardware (if applicable)
4. Product Overview
The ZLPOWER 12000W 48V Off-Grid Inverter Charger is a robust solution for converting DC power from batteries into stable AC power for various applications. It features a low-frequency design with a built-in transformer, ensuring high surge capacity and reliability.

Figure 4.1: Front View of the Inverter Charger
4.1. Key Features
- 12000W Pure Sine Wave Inverter Charger (36000W peak for 20 seconds)
- 48V DC Input, 120/240V Split-Phase AC Output
- Built-in 2 x 80A MPPT Solar Charge Controllers
- UL 1741 Standard ETL Certification
- Adjustable 5-stage AC charging with a maximum current of 200A
- AC/DC Priority Modes
- Automatic Generator Start (AGS) function
- External WiFi-module for mobile monitoring
- High efficiency up to 98% in line mode
- Comprehensive protection: overvoltage, low voltage, over-temperature, overload, short circuit
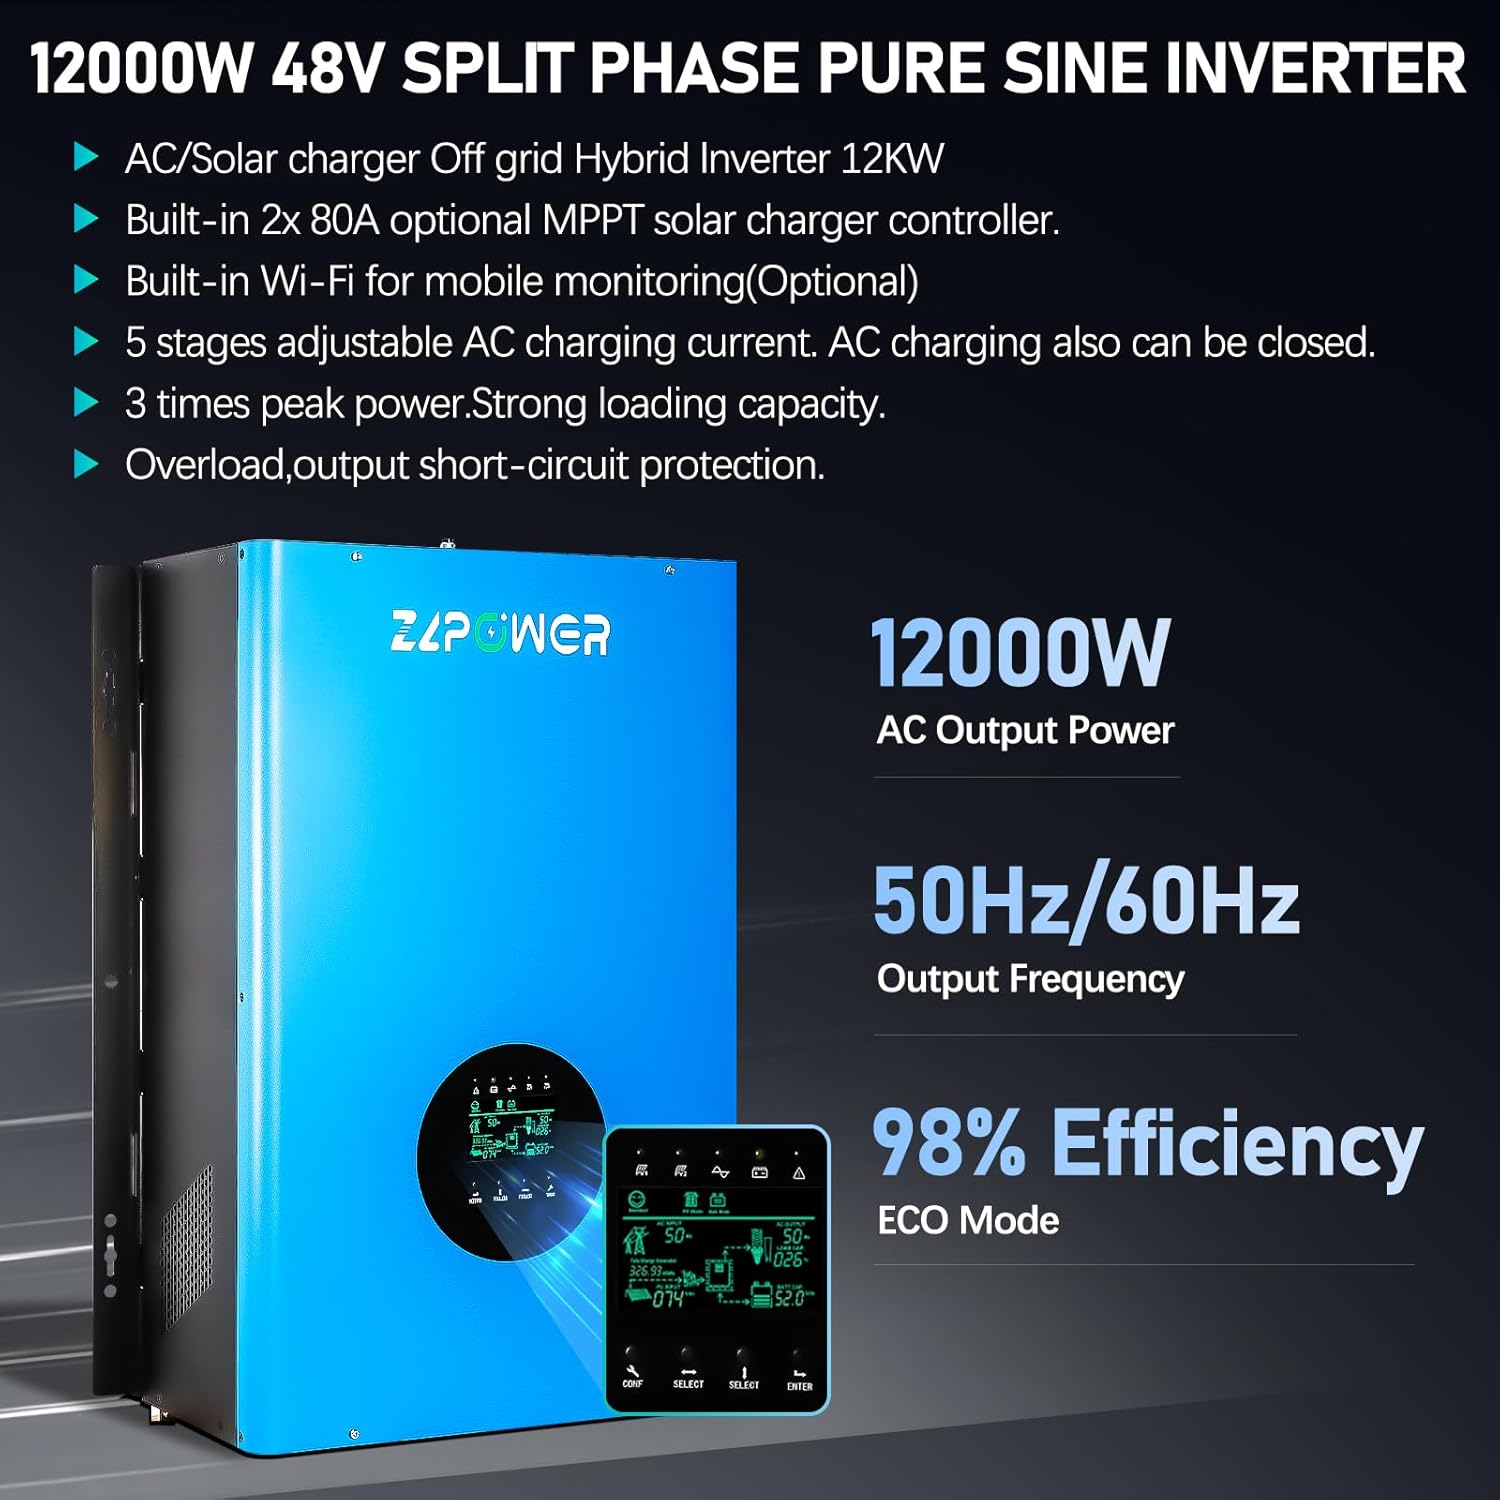
Figure 4.2: Inverter Key Features and Performance
4.2. LCD Display
The integrated LCD screen provides real-time operational data, including input/output voltage, current, frequency, battery status, and solar charging information. Use the navigation buttons (CONF, SELECT, ENTER) to access and adjust settings.

Figure 4.3: LCD Screen Display

Figure 4.4: Detailed LCD Control Panel
4.3. Connection Terminals
The rear panel of the inverter houses all necessary connection terminals for battery, AC input, AC output, and communication ports.

Figure 4.5: Wiring Terminal Layout
- Battery Positive
- Battery Negative
- Terminal block
- AC input switch
- AC output switch
- On / off switch
- Grounding terminal
- RS-232 (Optional)
- CAN/RS485/USB
- Remote switch
- DC FAN
- Generator start signal
- AC FAN
5. Setup and Installation
Proper installation is crucial for the safe and efficient operation of the inverter. Refer to the wiring diagram and ensure all connections are secure and comply with local electrical codes.
5.1. Mounting Location
Choose a dry, well-ventilated area, away from direct sunlight, heat sources, and flammable materials. Ensure sufficient clearance around the unit for airflow.
5.2. Wiring Diagram
The inverter integrates with solar panels, a 48V battery bank, and can connect to a generator or utility grid for AC input, providing 120/240V split-phase AC output to your loads.

Figure 5.1: Typical Application of GS III Series Hybrid Inverter
5.3. Connection Steps
- Battery Connection: Connect the 48V battery bank to the Battery Positive and Negative terminals (1 & 2 in Figure 4.5). Ensure correct polarity.
- Solar Panel Connection: Connect solar panels to the MPPT solar charge controller inputs.
- AC Input Connection: Connect the utility grid or generator to the AC input terminals (via AC input switch 4).
- AC Output Connection: Connect your loads (appliances) to the AC output terminals (via AC output switch 5).
- Grounding: Connect the grounding terminal (7) to a reliable earth ground.
- Remote Switch (Optional): If using, connect the remote switch (10).
- Generator Start Signal (Optional): If using, connect the generator start signal (12).

Figure 5.2: Example Installation Setups
6. Operation
6.1. Initial Power-Up
- Ensure all wiring connections are correct and secure.
- Turn on the battery breaker/switch.
- Turn on the inverter's main ON/OFF switch (6 in Figure 4.5).
- The LCD display will illuminate, showing the system status.
- If connected, turn on the AC input switch (4) and AC output switch (5).
6.2. Battery Compatibility
The inverter charger is compatible with a wide range of 48V battery types. Ensure the correct battery type is selected in the inverter settings for optimal charging and discharge performance.

Figure 6.1: Compatible Battery Types
- AGM (Absorbent Glass Mat)
- GEL (Gel Electrolyte)
- Lithium-ion (Li)
- Sealed Lead Acid (SLA)
- LiFePO4 (Lithium Iron Phosphate)
- Flooded (FLD)
6.3. AC Charging and Priority Modes
The inverter features a 5-stage adjustable AC charging current (0%-100%, max 200A) and allows selection between AC priority and DC (battery) priority modes. These settings can be configured via the LCD display.
6.4. Automatic Generator Start (AGS)
The AGS function can automatically start a connected generator when battery voltage drops below a set threshold or during a power outage, ensuring continuous power supply.
6.5. Appliance Compatibility
The 12000W pure sine wave output with 36000W peak power for 20 seconds ensures compatibility with a wide range of home and office appliances, including high-wattage devices like ovens, refrigerators, and washing machines.

Figure 6.2: Appliance Compatibility
7. Monitoring
The ZLPOWER inverter charger is equipped with an external WiFi-module for convenient mobile monitoring of your system's performance.
7.1. WiFi Module Connection
Connect the external WiFi module to the designated port on the inverter. Follow the instructions provided with the module for initial setup and network configuration.

Figure 7.1: Wireless Router Connection and App Setup
7.2. SmartESS Mobile Application
Download the SmartESS application to monitor your inverter's performance from your smartphone or tablet. The app allows you to view real-time data, adjust settings, and receive alerts.
- iOS App: Download SmartESS for iOS
- Android App: Download SmartESS for Android
8. Maintenance
Regular maintenance ensures the longevity and optimal performance of your inverter charger.
- Cleaning: Keep the inverter clean and free from dust. Use a dry cloth to wipe the exterior. Do not use liquid cleaners.
- Ventilation: Ensure ventilation openings are not blocked. Periodically check for dust buildup in cooling fans and vents.
- Connections: Periodically check all electrical connections for tightness and signs of corrosion.
- Battery Health: Monitor battery voltage and health regularly, especially for lead-acid batteries.
- Firmware Updates: Check the manufacturer's website for any available firmware updates.
9. Troubleshooting
This section provides solutions to common issues. For problems not listed here, contact ZLPOWER technical support.
| Problem | Possible Cause | Solution |
|---|---|---|
| Inverter not turning on | No battery connection; Low battery voltage; Main switch off | Check battery connections; Charge batteries; Turn on main switch. |
| No AC output | Overload; Short circuit; AC output switch off; Inverter fault | Reduce load; Check for short circuits; Turn on AC output switch; Restart inverter. |
| Low battery alarm | Batteries discharged; Insufficient charging | Check solar input; Verify AC charging settings; Inspect battery health. |
| Over-temperature warning | Poor ventilation; Overload; High ambient temperature | Ensure clear airflow; Reduce load; Relocate inverter to cooler area. |
10. Specifications
Technical specifications for the ZLPOWER 12000W 48V Off-Grid Inverter Charger (Model GS-III-12KW-48V).
| Feature | Detail |
|---|---|
| Model Name | GS-III-12KW-48V |
| Rated Power | 12000 Watts |
| Peak Power | 36000 Watts (for 20 seconds) |
| DC Input Voltage | 48V |
| AC Output Voltage | 120/240V Split Phase |
| Output Waveform | Pure Sine Wave |
| Output Frequency | 60Hz (adjustable to 50Hz via LCD) |
| MPPT Solar Charger | Built-in 2 x 80A |
| Max AC Charging Current | 200A (adjustable 0%-100%) |
| Efficiency (Line Mode) | Up to 98% |
| Certifications | UL 1741 Standard ETL Certified |
| Product Dimensions | 24.8 x 16.54 x 7.87 inches |
| Item Weight | 147.7 pounds |
| Recommended Uses | Home, Office, Vehicle |

Figure 10.1: Inverter Dimensions
11. Warranty and Support
ZLPOWER provides a 60-month (5-year) warranty for this product, covering quality-related issues. Lifetime technical support is also available.
For technical assistance, warranty claims, or any questions regarding your ZLPOWER inverter, please contact ZLPOWER customer support. Refer to the product packaging or ZLPOWER's official website for contact details.
Ask a question about this manual
Ask about setup, troubleshooting, compatibility, parts, safety, or missing instructions. Manuals+ will review the question and use this page’s manual context to help answer it.