Ocypus Gamma A40 BK
Ocypus Gamma A40 BK Compact CPU Cooler User Manual
Model: Gamma A40 BK | Brand: Ocypus
1. Introduction
Thank you for choosing the Ocypus Gamma A40 BK Compact CPU Cooler. This manual provides detailed instructions for installation, operation, and maintenance to ensure optimal performance and longevity of your product. Please read this manual thoroughly before installation and keep it for future reference.

Figure 1: Ocypus Gamma A40 BK CPU Cooler installed in a computer system.
2. Package Contents
Please verify that all items listed below are included in your package:
- Ocypus Gamma A40 BK CPU Cooler (Heatsink with pre-attached 100mm PWM fan)
- Mounting Hardware for Intel (LGA 115X/1200/1700/1851)
- Mounting Hardware for AMD (AM4/AM5)
- Thermal Paste
- User Manual

Figure 2: Included accessories for installation.
3. Specifications
| Feature | Specification |
|---|---|
| Product Dimensions (L x W x H) | 10.5 cm x 9.3 cm x 13.3 cm |
| Cooling Method | Air Cooling |
| Compatible Devices | CPU |
| Noise Level | 29.5 dB |
| Material | Aluminum, Plastic, Copper |
| Maximum Rotational Speed | 2400 RPM |
| Air Flow | 41 Cubic Feet/Minute |
| Power Connector Type | 3-Pin |
| Voltage | 12 Volts (DC) |
| Wattage | 1.2 W |
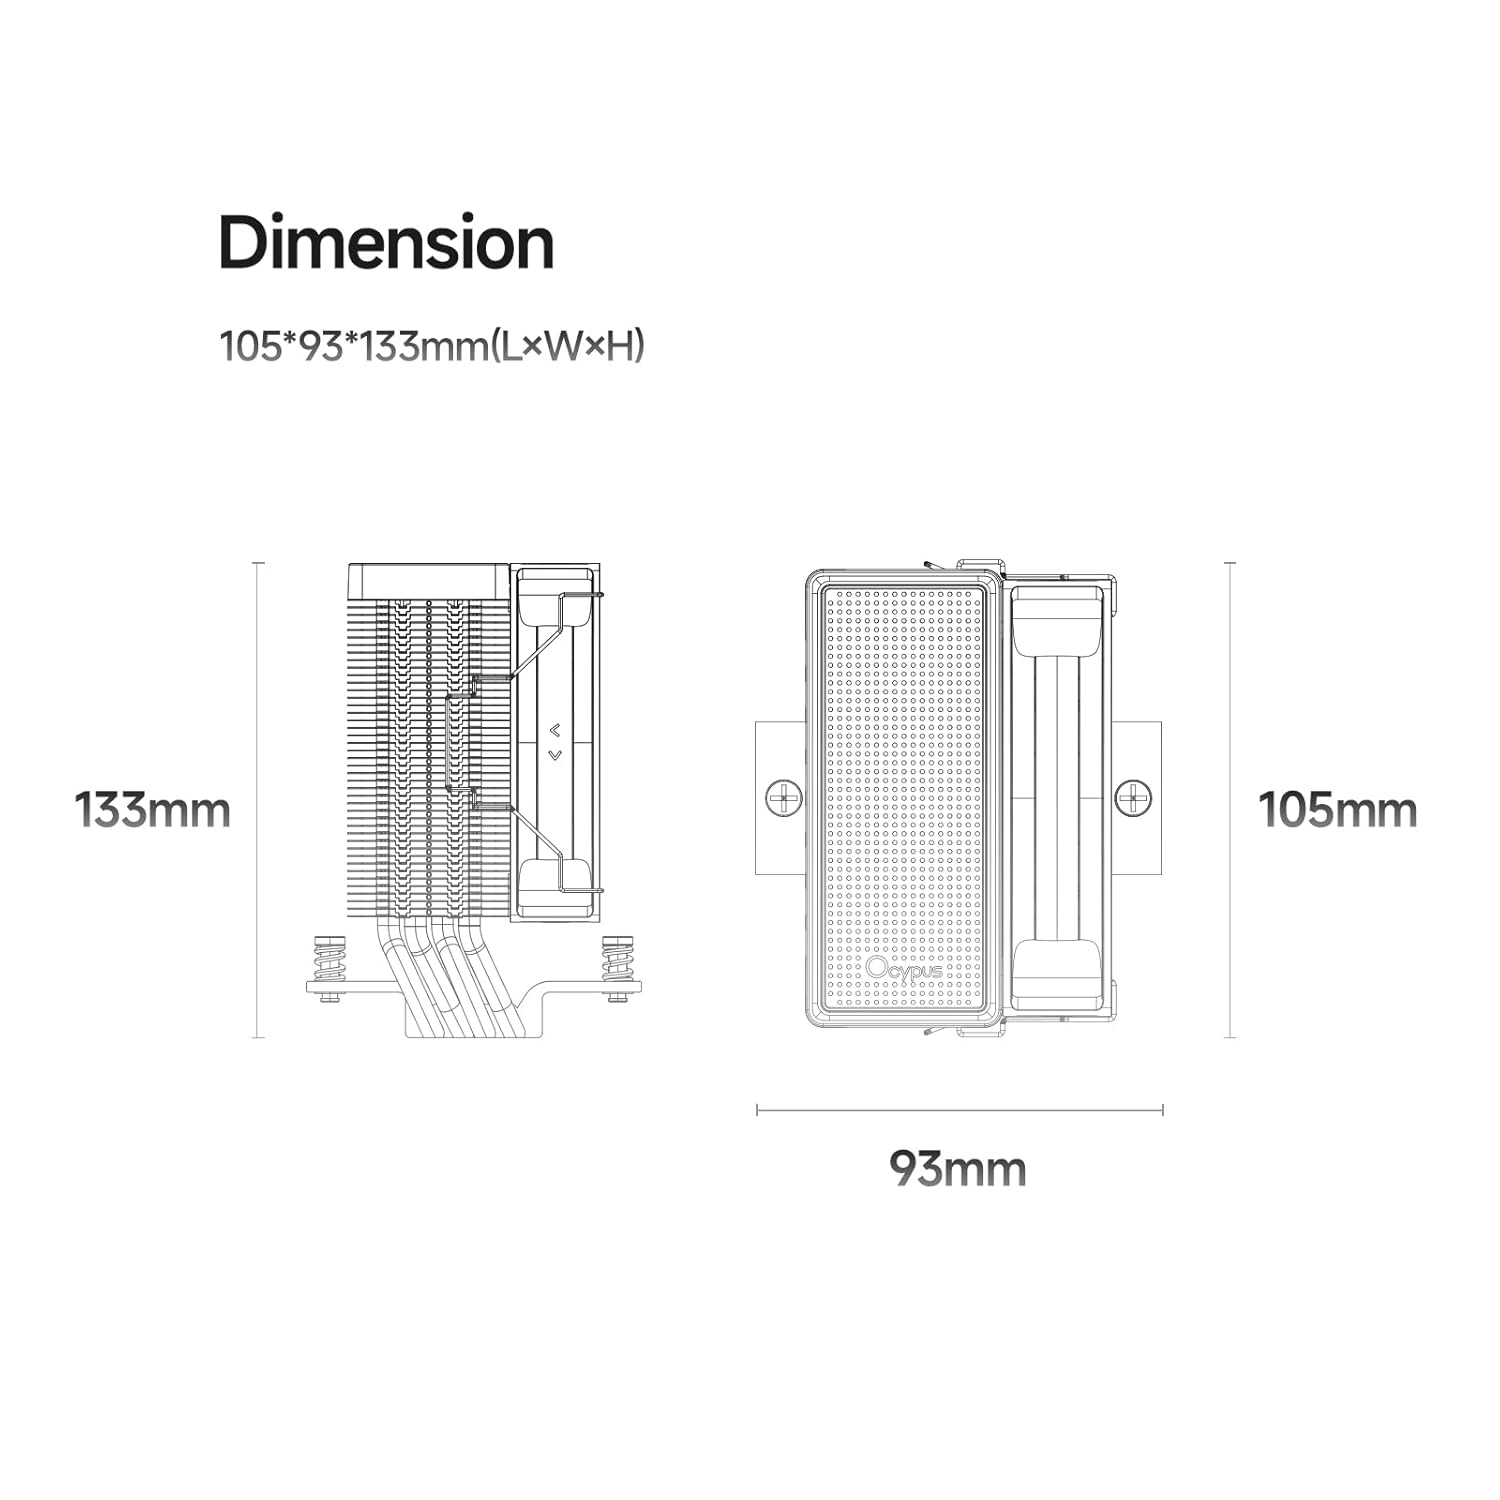
Figure 3: Product dimensions.
4. Installation Guide
This section provides step-by-step instructions for installing your Ocypus Gamma A40 BK CPU Cooler. Please ensure your system is powered off and unplugged before beginning installation.
4.1 General Preparation
- Unpack all components and verify against the package contents list.
- Ensure your motherboard is compatible with the cooler (Intel LGA 115X/1200/1700/1851 or AMD AM4/AM5).
- Remove any existing CPU cooler and clean off old thermal paste from the CPU IHS (Integrated Heat Spreader).
- Carefully peel off the protective film from the cooler's base before applying thermal paste.

Figure 4: Direct-touch heat pipe design.
4.2 Installation Video Guide
For a visual step-by-step guide, please refer to the official installation video below. This video demonstrates the installation process for both Intel and AMD platforms.
Video 1: Installation guide for upHere CPU Cooler H45, demonstrating steps for both Intel and AMD platforms. This video is relevant for general installation procedures.
4.3 Intel Platform Installation (LGA 115X/1200/1700/1851)
- Attach the correct Intel backplate to the rear of your motherboard, aligning the holes.
- Secure the backplate with the appropriate standoffs from the front side of the motherboard.
- Apply a small amount of thermal paste to the center of the CPU IHS.
- Place the cooler onto the CPU, ensuring the mounting holes align with the standoffs.
- Secure the cooler by tightening the screws in a diagonal pattern until snug. Do not overtighten.
4.4 AMD Platform Installation (AM4/AM5)
- Remove the existing plastic retention brackets from the motherboard, but keep the original backplate.
- Install the AMD standoffs onto the motherboard's original backplate.
- Attach the AMD mounting clips to the standoffs.
- Apply a small amount of thermal paste to the center of the CPU IHS.
- Place the cooler onto the CPU, ensuring the mounting holes align with the clips.
- Secure the cooler by tightening the screws in a diagonal pattern until snug. Do not overtighten.
4.5 Connecting the Fan
Connect the 3-pin PWM fan cable from the cooler to the CPU_FAN header on your motherboard. Ensure the connector is fully seated.

Figure 5: High-performance 100mm fan details.
5. Operating Instructions
Once installed, the Ocypus Gamma A40 BK CPU Cooler operates automatically, controlled by your motherboard's PWM fan settings. You can typically adjust fan curves and monitoring settings through your motherboard's BIOS/UEFI or dedicated software utilities provided by your motherboard manufacturer.
6. Maintenance
Regular maintenance ensures optimal cooling performance and extends the lifespan of your CPU cooler.
- Dust Cleaning: Periodically clean the heatsink fins and fan blades using compressed air or a soft brush. Ensure the fan is not spinning rapidly during cleaning to prevent damage to the bearings.
- Thermal Paste: Reapply thermal paste every 1-2 years, or if the cooler is removed and reinstalled. Clean the old thermal paste thoroughly before applying new paste.
- Fan Inspection: Check the fan for any unusual noises or wobbling. If the fan is damaged or excessively noisy, consider replacing it.
7. Troubleshooting
If you encounter issues with your CPU cooler, refer to the following common problems and solutions:
| Problem | Possible Cause | Solution |
|---|---|---|
| CPU Overheating | Insufficient thermal paste, poor cooler contact, dust buildup, incorrect fan speed settings. | Reapply thermal paste, ensure cooler is securely mounted, clean dust from heatsink and fan, adjust fan curve in BIOS/UEFI. |
| Fan Not Spinning | Fan cable disconnected, faulty fan, incorrect BIOS settings. | Check fan cable connection to CPU_FAN header, test fan on another header, check BIOS for fan control settings. |
| Excessive Fan Noise | Dust buildup, fan bearing issue, high fan speed. | Clean fan blades, reduce fan speed in BIOS/UEFI, consider fan replacement if noise persists. |
8. Warranty and Support
Ocypus products are designed for reliability and performance. For warranty information and technical support, please refer to the official Ocypus website or contact your retailer. Keep your purchase receipt as proof of purchase for warranty claims.
For further assistance, you may visit the Ocypus Store on Amazon.
Ask a question about this manual
Ask about setup, troubleshooting, compatibility, parts, safety, or missing instructions. Manuals+ will review the question and use this page’s manual context to help answer it.