1. Introduction
Thank you for choosing the TeeGGi 1/16 Fast RC Car, model 16101 pro. This high-performance remote control vehicle is designed for enthusiasts seeking speed, durability, and precise control. Featuring a powerful brushless motor, 4WD system, and robust metal components, this RC car delivers an exhilarating off-road experience. Please read this manual thoroughly before operating your RC car to ensure proper setup, safe operation, and optimal performance.
2. Safety Information
WARNING: Not suitable for children under three years old.
- Always operate the RC car in open areas away from people, pets, and obstacles.
- Do not operate in wet conditions or near water to prevent damage to electronic components.
- Keep fingers, hair, and loose clothing away from moving parts such as wheels and gears.
- Ensure batteries are charged correctly and handled with care. Do not overcharge or short-circuit batteries.
- Adult supervision is recommended for users under 14 years of age.
- Turn off the RC car and remote control when not in use.
3. Package Contents
Please verify that all items are present in your package:
- 1 x TeeGGi 1/16 Fast RC Car (Model 16101 pro)
- 1 x Remote Control
- 3 x 7.4V 1500mAh LiPo Batteries
- 1 x Charging Cable
- 1 x Screwdriver
- 1 x Hex Wrench
- 1 x User Manual

Image: All components included in the package, including the RC car, remote control, batteries, and tools.
4. Product Overview
The TeeGGi 16101 pro RC car is engineered for high performance and durability. Key features include:
- Brushless Motor: Powerful 2840 brushless motor capable of reaching speeds up to 45mph (70km/h).
- 4WD System: Four-wheel drive for superior traction and handling on various terrains.
- Professional-Grade Chassis: Constructed from high-toughness explosion-proof PVC shell and reinforced with metal components for enhanced durability.
- Metal Differentials: Upgraded metal front and rear differentials for smoother turns and increased longevity.
- Independent Suspension: Front and rear upright spring damping with double wishbone independent suspension for stable driving.
- LED Headlights: Integrated LED headlights with three modes (normal, slow flashing, fast flashing).
- 2.4GHz Remote Control: Provides a stable connection up to 150 meters with full proportional throttle and steering.

Image: The TeeGGi 1/16 Fast RC Car, showcasing its sleek design, alongside the remote control and three LiPo batteries.

Image: An internal view of the RC car's professional-grade chassis, highlighting the robust nylon material, metal parts, and electronic components.
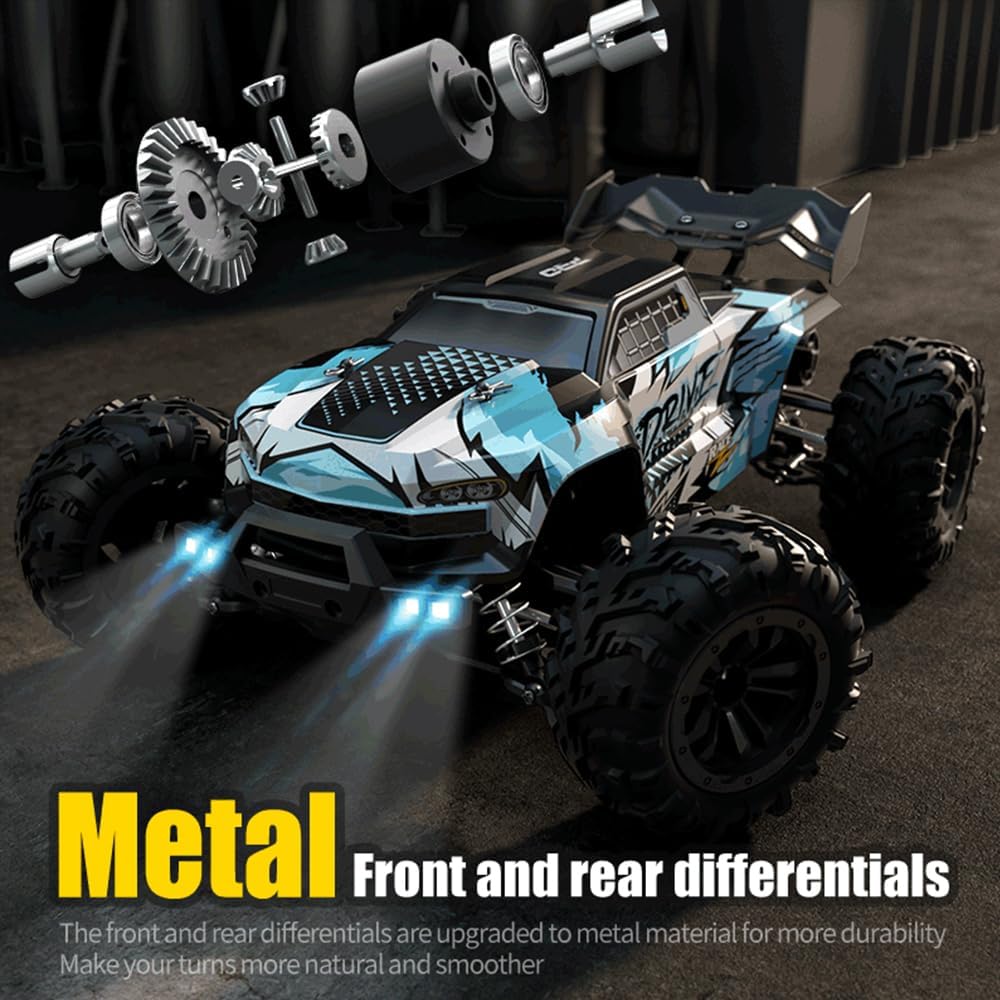
Image: Close-up view illustrating the upgraded metal front and rear differentials, designed for enhanced durability and smoother turning performance.

Image: The 2.4GHz remote control unit, showing the steering wheel, accelerator trigger, LED light button, and three-speed regulation switch.
5. Setup
5.1 Charging the Battery
- Connect the provided charging cable to a USB power adapter (not included).
- Connect the LiPo battery to the charging cable.
- The charging indicator light will show the charging status. Refer to the charger's instructions for specific light patterns.
- Once fully charged (approximately 3-4 hours per battery), disconnect the battery from the charger.
Note: Each 7.4V 1500mAh LiPo battery provides up to 20 minutes of run time.
5.2 Installing Batteries
5.2.1 RC Car Battery Installation
- Carefully remove the body shell of the RC car.
- Locate the battery compartment.
- Insert a charged 7.4V 1500mAh LiPo battery into the compartment.
- Connect the battery's T-type plug to the car's power connector. Ensure the connection is secure.
- Replace the body shell.
5.2.2 Remote Control Battery Installation
- Open the battery cover on the back of the remote control.
- Insert the required AA batteries (included) into the compartment, observing the correct polarity (+/-).
- Close the battery cover securely.
6. Operating
6.1 Power On and Pairing
- Turn on the RC car by pressing the power switch on the vehicle. The car's LED lights will illuminate.
- Turn on the remote control. The indicator light on the remote will flash.
- The remote control and RC car will automatically pair. Once paired, the indicator light on the remote will become solid.
6.2 Driving Controls
- Throttle Trigger: Pull the trigger to accelerate forward. Push the trigger to brake or reverse. The throttle is full proportional, allowing for precise speed control.
- Steering Wheel: Turn the steering wheel left or right to control the direction of the car. The steering is also full proportional.
- LED Light Button: Press this button on the remote to cycle through the LED headlight modes: normal light, slow flashing, and fast flashing.
- Rudder Size Adjustment: Use the trim dials on the remote control to fine-tune steering and throttle response if the car pulls to one side or moves without input.
6.3 Driving Tips
- Start with slow speeds to get accustomed to the controls before attempting high-speed maneuvers.
- Practice steering and throttle control in an open, flat area.
- Avoid driving into walls or hard objects at high speeds to prevent damage.
- The 4WD system and large foot tires provide strong grip on various surfaces, including sand, mud, and grass.
7. Maintenance
- Cleaning: After each use, especially in dusty or muddy conditions, clean the car with a soft brush or cloth. Do not use water directly on electronic components.
- Battery Care: Store LiPo batteries in a cool, dry place. Do not leave batteries fully charged or fully discharged for extended periods. Always disconnect batteries from the car when not in use.
- Component Inspection: Regularly check all screws, nuts, and moving parts (e.g., differentials, suspension, drive shafts) for looseness or damage. Tighten as necessary.
- Lubrication: Periodically apply a small amount of silicone grease to moving plastic parts and gears to reduce wear.
8. Troubleshooting
| Problem | Possible Cause | Solution |
|---|---|---|
| Car does not respond to remote. | Low battery in car or remote; Not paired; Power switch off. | Charge car battery; Replace remote batteries; Ensure both are powered on and paired. |
| Car runs slowly or inconsistently. | Low car battery; Obstruction in wheels/gears; Damaged motor. | Recharge car battery; Clear any obstructions; Contact support if motor is damaged. |
| Steering is off-center. | Steering trim not adjusted. | Adjust the steering trim dial on the remote control. |
| Remote control indicator light flashes continuously. | Not paired with car; Low remote battery. | Ensure car is on and within range for pairing; Replace remote batteries. |
9. Specifications
| Feature | Detail |
|---|---|
| Model Number | 16101 pro |
| Scale | 1:16 |
| Top Speed | Up to 45mph (70km/h) |
| Motor Type | Brushless Motor |
| Drive System | 4-Wheel Drive (4WD) |
| Battery | 7.4V 1500mAh LiPo (3 included) |
| Run Time | Approx. 20 minutes per battery |
| Remote Control Frequency | 2.4GHz |
| Remote Control Range | Up to 150 meters |
| Product Dimensions | 11.81 x 9.06 x 4.53 inches |
| Item Weight | 2.2 pounds |
| Recommended Age | 14 years and up |
10. Warranty and Support
This product is manufactured by TeeGGi. For any product-related inquiries, technical support, or warranty claims, please contact the manufacturer directly or refer to your purchase platform for seller contact information.
Protection plans may be available for purchase separately:
- 2-Year Protection Plan: Available for purchase.
- 3-Year Protection Plan: Available for purchase.
- Complete Protect: A monthly plan covering eligible past and future purchases.
Please retain your proof of purchase for any warranty or support claims. The standard return policy allows for returns within 30 days for refund or replacement.