
Introduction
Thank you for choosing the Rafow 240FT Drip Irrigation System Kit. This system is designed to provide efficient and automatic watering for your garden, greenhouse, flower beds, and other plant areas. By delivering water directly to the plant roots, it minimizes evaporation and conserves water. This manual provides detailed instructions for the proper setup, operation, and maintenance of your irrigation system.
Package Contents
Please verify that all components listed below are included in your package:
- 1 x 33FT 1/2 inch thick irrigation hose (main line)
- 1 x 207FT 1/4 inch thin irrigation hose (branch lines)
- 10 x Blue ground plug spring spray tubes
- 8 x Red ground plug fine hole spray tubes
- 7 x Barb tees (1/2 inch to 1/4 inch)
- 2 x 1/2 inch plugs
- 10 x 1/4 inch plugs
- 1 x 16 straight tee
- 1 x Internal 6-point to 16 joint (US standard)
- 8 x Quick-connect straight tees
- 10 x Blue mist nozzles
- 8 x Orange mist nozzles
- 1 x White tape
- 1 x Pack of black cable ties

Image: Overview of the Rafow Drip Irrigation System Kit components, including various tubing sizes, connectors, and emitters.
Setup
1. Planning Your Layout
Before assembly, plan the layout of your irrigation system. Determine the location of your water source, the path of the main 1/2 inch tubing, and where the 1/4 inch branch lines will extend to individual plants or plant groups. Consider the water pressure requirements and the optimal placement of emitters for even coverage.
2. Connecting to Water Source
- Connect the internal 6-point to 16 joint (US standard) to your outdoor faucet or garden hose.
- Attach the 1/2 inch thick irrigation hose to this joint. Ensure a secure connection to prevent leaks.
3. Assembling the Main and Branch Lines
- Lay out the 1/2 inch main irrigation hose according to your planned layout.
- Use the barb tees (1/2 inch to 1/4 inch) to create branch points from the main line. Insert the 1/2 inch end into the main line and the 1/4 inch end will connect to the thinner tubing.
- Connect the 1/4 inch thin irrigation hose to the 1/4 inch outlets of the barb tees. Extend these branch lines to your plants.
- Use quick-connect straight tees and other connectors as needed to extend or split the 1/4 inch lines.
- Secure all connections firmly. The innovative quick connector design ensures a secure, leak-free installation.
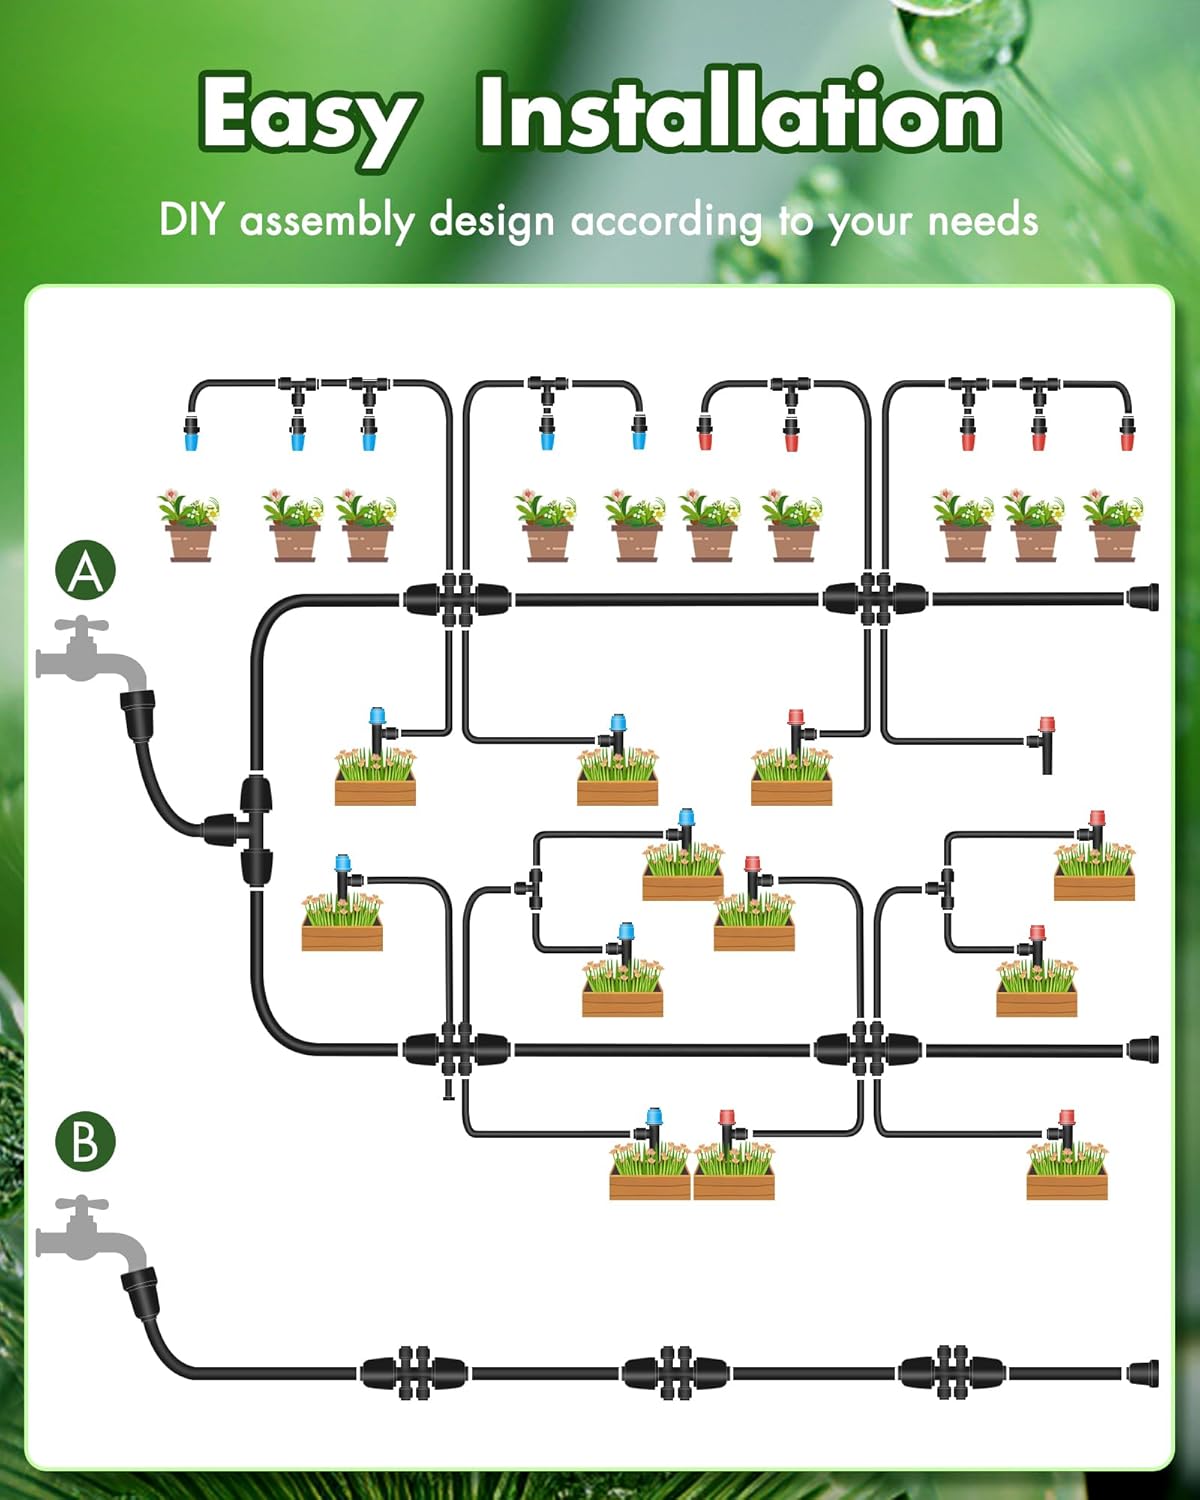
Image: A diagram illustrating the typical installation of the drip irrigation system, showing the main line connected to a water source and branching out to multiple plants.
4. Attaching Emitters and Sprayers
- At the end of each 1/4 inch branch line, attach the desired emitter or sprayer type (blue ground plug spring spray tube, red ground plug fine hole spray tube, blue mist nozzle, or orange mist nozzle).
- Ensure the emitters are positioned close to the base of the plants for direct watering.
- Use the 1/4 inch plugs to cap off any unused 1/4 inch lines. Use the 1/2 inch plugs for the main line if needed.
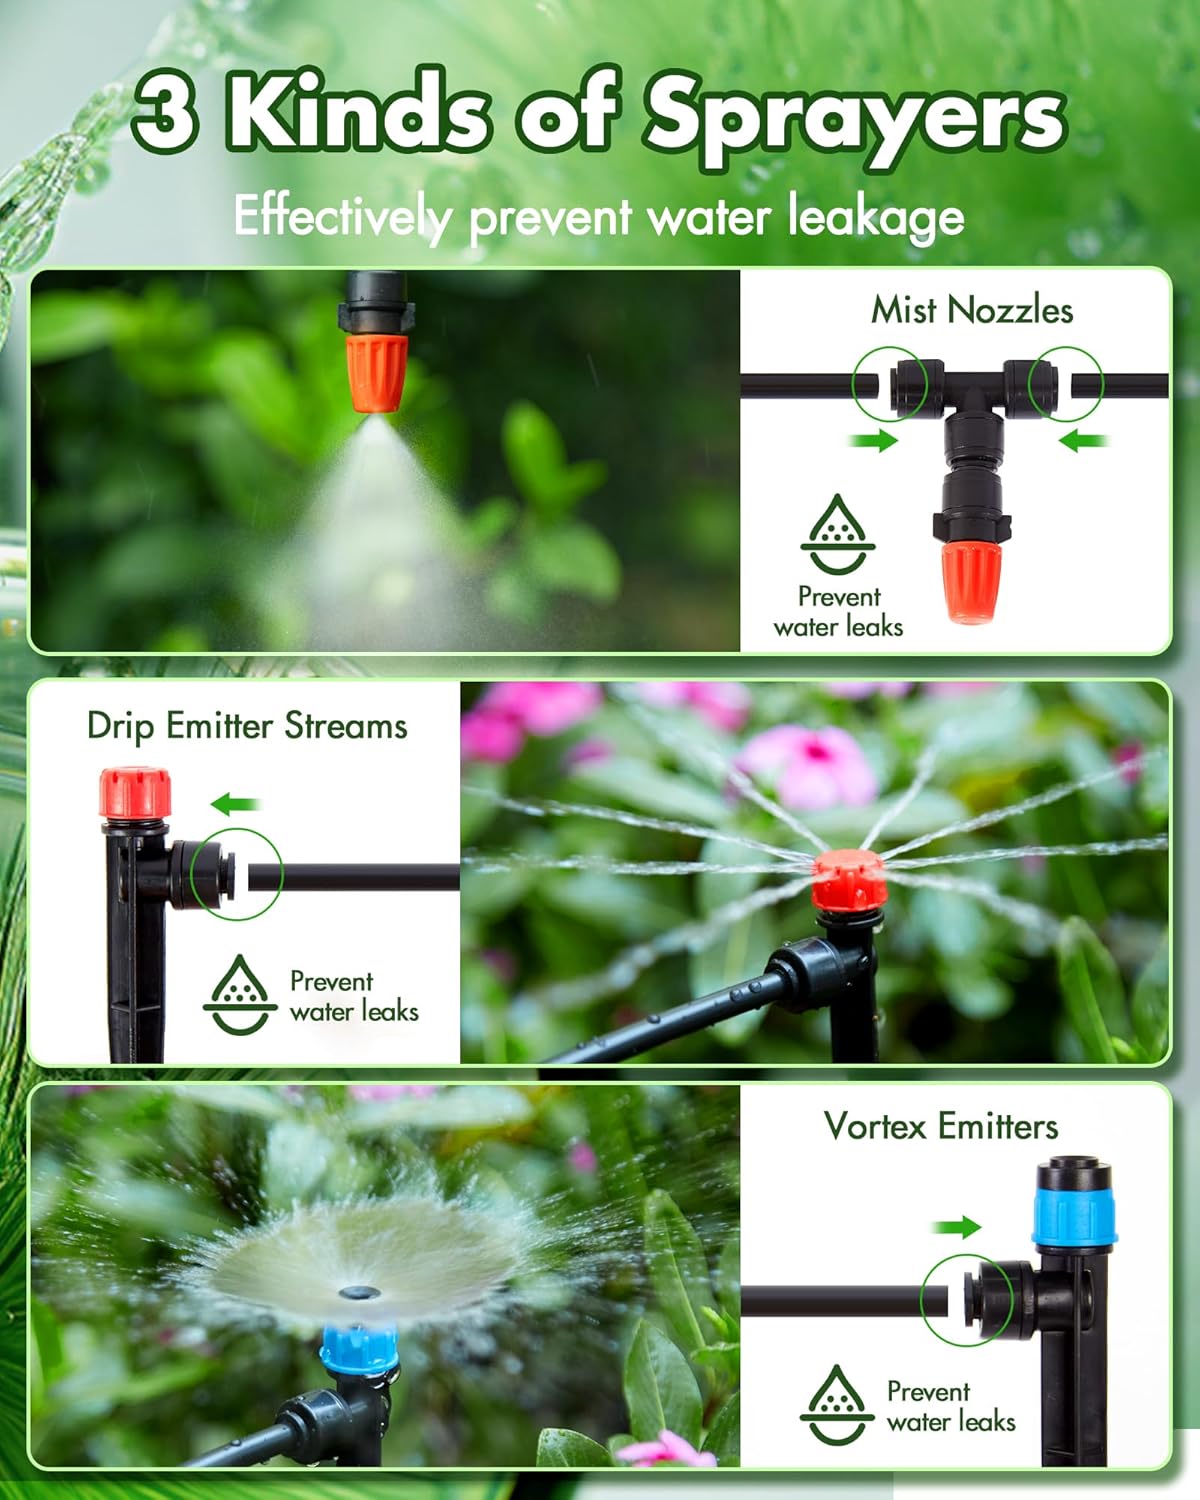
Image: Visual representation of three different types of sprayers included in the kit: Mist Nozzles, Drip Emitter Streams, and Vortex Emitters, highlighting their leak prevention features.
Operating Instructions
1. Initial Water Flow Test
- Slowly turn on your water source.
- Inspect the entire system for any leaks, especially at connection points. Tighten any leaking connections.
- Observe the water flow from each emitter to ensure even distribution.
2. Adjusting Emitters
The system includes adjustable emitters that allow you to customize the water flow for individual plants. You can adjust them to:
- Stop: Completely shut off water flow to a specific plant.
- Micro-drop: Provide a slow, consistent drip for delicate plants or those requiring less water.
- Spray: Deliver a wider spray pattern for larger plants or areas requiring more coverage.
Rotate the top of the emitter to adjust the water flow from off to a small spray or a large spray, depending on your plant's needs.

Image: Close-up view of adjustable emitters demonstrating different spray patterns, from small to large, by rotating the cap.
3. Setting a Watering Schedule
Once the system is installed and adjusted, you can turn on the faucet switch to begin automatic watering. For optimal water conservation and plant health, consider using a timer (not included) to automate your watering schedule. Adjust the duration and frequency of watering based on plant type, weather conditions, and soil moisture levels.
Maintenance
1. Regular Checks
Periodically inspect your drip irrigation system for:
- Clogs: Check emitters and tubing for blockages from dirt or mineral deposits.
- Leaks: Look for any drips or puddles around connections or along the tubing.
- Damage: Inspect tubing and components for cracks, kinks, or animal damage.
2. Cleaning
If emitters become clogged, gently remove them and clean any debris. You can flush the lines by temporarily removing the end caps or emitters and allowing water to run through the system.
3. Winterization (for cold climates)
Before the first frost, it is crucial to drain your irrigation system to prevent damage from freezing water. Disconnect the system from the water source, open all end caps, and allow all water to drain out. Store components in a dry, protected area if possible.
Troubleshooting
| Problem | Possible Cause | Solution |
|---|---|---|
| Uneven water distribution / Low flow at end of line | Clogged emitters; Insufficient water pressure; Kinked tubing; Too many emitters on one line. | Clean emitters; Check water source pressure; Straighten tubing; Reduce number of emitters or add another main line branch. |
| Leaks at connections | Loose connections; Damaged O-rings or fittings; Incorrectly installed components. | Tighten all connections firmly; Inspect and replace damaged fittings; Ensure components are installed correctly. |
| Emitters not spraying correctly | Clogged nozzle; Emitter adjustment incorrect. | Remove and clean the nozzle; Adjust the emitter cap to the desired spray pattern. |
| Tubing appears damaged or kinked | Physical damage; Improper installation. | Replace damaged sections of tubing; Reroute tubing to avoid sharp bends or pressure points. |
Specifications
| Feature | Detail |
|---|---|
| Brand | Rafow |
| Model Number | DY09 |
| Material | Polypropylene (PP) |
| Power Source | Water Powered |
| Special Features | Weather Resistant |
| Fit Type | Rigid tubing connections |
| Total Tubing Length | 240FT (33FT 1/2 inch + 207FT 1/4 inch) |
| Number of Pieces | 71 |
| Included Components | 1/4 & 1/2 inch Irrigation Tubing Hose, Adjustable Nozzle Emitters, Barbed Fittings |
Warranty and Support
For warranty information and customer support, please refer to the retailer where you purchased this product or contact the manufacturer directly. Keep your proof of purchase for any warranty claims.