1. Product Overview
This Imdinnogo 3D Printer Accessories Screws Assortment Kit provides a comprehensive collection of screws and components essential for the assembly, maintenance, and repair of compatible 3D printers. The kit is designed to ensure precision printing by providing the necessary hardware for various parts of your 3D printer system.
The kit is specifically designed for use with X1/X1C/X1E/P1P/P1S/AMS series 3D printers. It is important to note that while some screws (BT2*5, BT2*8, BT3*8) may be suitable for the A1 series, the kit is primarily intended for the X1/P1/AMS series.
A key feature of the screws in this kit is the presence of blue glue on some threads. This blue glue is applied to enhance the tightness of the screw connection, aiding in secure locking and preventing loosening during operation.
2. Package Contents
The kit includes a variety of screws, a pressing plate, and a helical compression spring. The screws are organized for easy identification and selection. Below is a detailed list of the components included:
- 10 × ST3-4.5 Screws
- 20 × M3-6 Screws
- 10 × BT3-8 Screws
- 10 × BT2-8 Screws
- 20 × BT3-6 Screws
- 10 × M3-14 Screws
- 10 × MG2.5-13 Screws
- 5 × MG3-14 Screws
- 5 × MG2.5-15 Screws
- 10 × BTG2-16 Screws
- 10 × BT3-5 Screws
- 20 × M3-4.5 Screws
- 10 × ST2-3.5 Screws
- 10 × M1.6-4 Screws
- 20 × BT2-5 Screws
- 5 × M3-23 Screws
- 5 × COVER SS303 (Pressing Plate)
- 5 × 1.1*12mm Helical Compression Spring

Image 2.1: Complete contents of the screw assortment kit.
3. Screw Identification and Usage
Understanding the different screw types and their designated locations is crucial for proper installation and maintenance. Refer to the table below for detailed information on each screw type, its quantity, and its primary application area.
Note on Screw Models:
- If the screw model includes BT, it indicates that the locking base is typically plastic.
- If the screw model includes ST or M, it indicates that the locking base is typically metal.
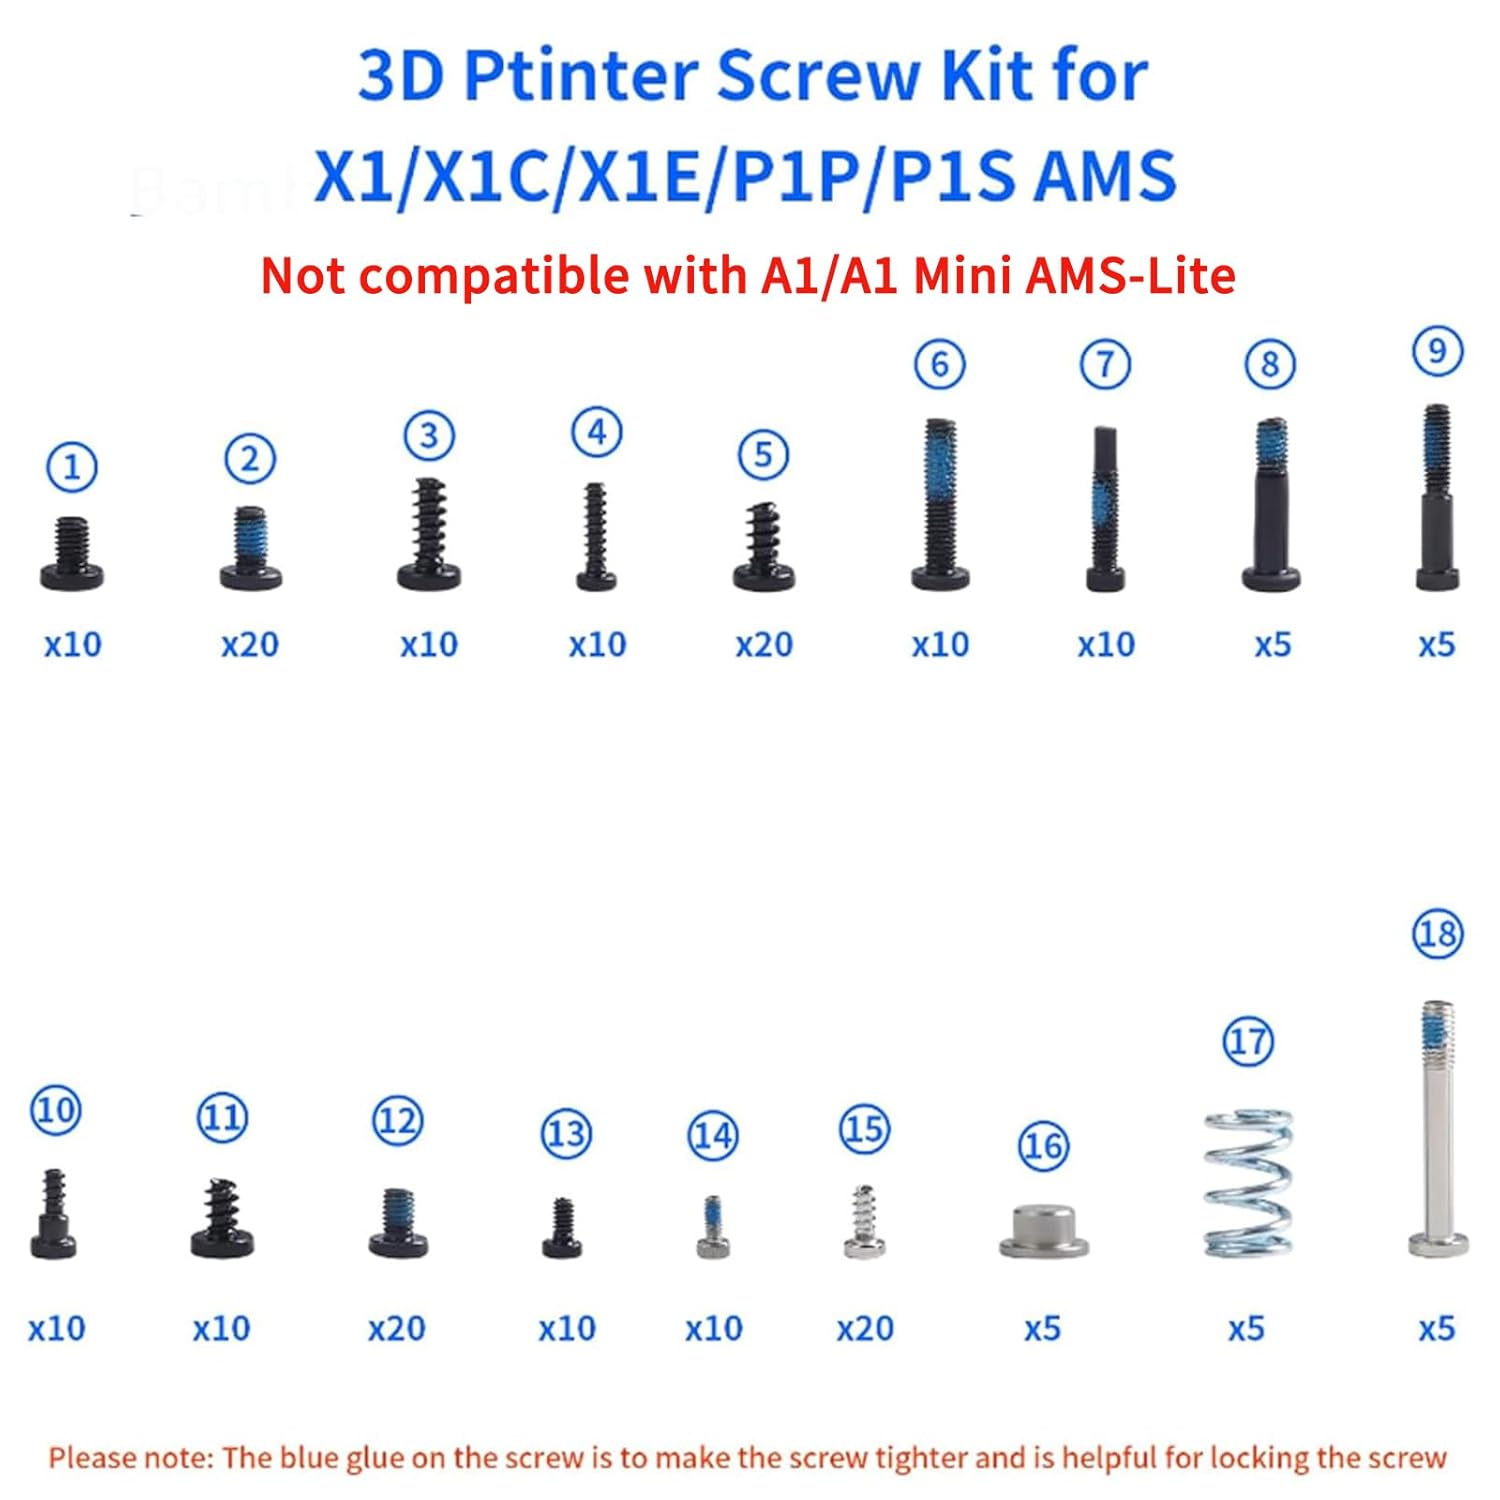
Image 3.1: Numbered identification of screw types.
Screw Kit List and Locations
| Item Number | Item Name | QTY | Location |
|---|---|---|---|
| 1 | ST3-4.5 | 10 | Rear Panel and the Front Cover (Front) |
| 2 | M3-6 | 20 | XY/Z Motor and the X1 AP Board |
| 3 | BT3-8 | 10 | Heatbed Unit and the AMS Main Frame |
| 4 | BT2-8 | 10 | AMS first stage feeder, the MC board, and the Excess chute |
| 5 | BT3-6 | 20 | P1S panels and the Z-axis Timing Pulley |
| 6 | M3-14 | 10 | Driven gear of the Extruder Unit |
| 7 | MG2.5-13 | 10 | Cutter lever |
| 8 | MG3-14 | 5 | Hotend |
| 9 | MG2.5-15 | 5 | Hotend Cooling Fans |
| 10 | BTG2-6 | 10 | PTEF tube Bracket |
| 11 | BT3-5 | 10 | Rear Panel and the Front Cover (Rear) |
| 12 | M3-4.5 | 20 | X1C Panels |
| 13 | ST2-3.5 | 10 | P1S Panels (Upper) |
| 14 | M1.6-4 | 10 | TH Board FPC Cable of X1C toolhead PCBs |
| 15 | BT2-5 | 20 | Toolhead housing and PCBs |
| 16 | COVER SS303 | 5 | Extruder Gear Assembly |
| 17 | Spring 1.1*12*8 | 5 | Extruder Gear Assembly |
| 18 | M3-23 | 5 | For the AMS Filament Buffer |
Table 3.1: Screw Kit List and Corresponding Locations.
4. Installation and Setup
This section provides guidance on installing the screws and components from the kit into your 3D printer. Always refer to your 3D printer's official documentation or diagrams for precise screw locations and assembly steps.
Extruder Gear Assembly
The pressing plate and spring are specifically used for mounting the extruder gear assembly. Ensure correct orientation and secure fastening.

Image 4.1: Installation of the pressing plate and spring for the extruder gear assembly.
General Screw Applications
The various screws in this kit can be used for a multitude of applications within your 3D printer, including but not limited to:
- Mounting and locking the toolhead housing and Hall PCB board filament sensor.
- Securing the AMS first stage feeder and main frame.
- Attaching the MC board, rear panel, and front cover.
- Fastening the Z-axis timing pulley, PTEF tube bracket, and platform heatbed unit.
- Securing stepper motors and hotend cooling fans.

Image 4.2: Examples of screw locations on the 3D printer extruder.

Image 4.3: Additional examples of screw locations on the 3D printer.
When installing, ensure the screws are tightened securely but do not overtighten, especially those with plastic locking bases (BT type), to prevent stripping. The blue glue on some screws helps maintain a tight fit.
5. Maintenance
Regular inspection of your 3D printer's screws is recommended to ensure optimal functionality. Over time, screws can become loose, worn, or damaged due to vibrations and repeated use. This screw kit provides the necessary replacements to keep your printer in prime condition.
If you notice any loose, stripped, or missing screws, identify the correct replacement from this kit using the provided identification table (Table 3.1) and replace them promptly. Proper fastening ensures the stability and precision of your 3D printing operations.
6. Troubleshooting
If you encounter issues related to loose components or parts not fitting correctly after assembly, verify that the correct screw types have been used for their designated locations as per Table 3.1.
Ensure all screws are adequately tightened. If a screw head strips during installation, it may indicate overtightening or a need for a replacement screw. The high-precise cutting technology of these fasteners aims to prevent stripping, but care should always be taken during installation.
For more detailed troubleshooting guides specific to your X1/P1 Series and AMS 3D printers, it is highly recommended to consult the official Bambu Lab Wiki. This resource provides extensive information on component replacement and general printer maintenance.
7. Specifications
Key specifications for the Imdinnogo 3D Printer Accessories Screws Assortment Kit:
| Specification | Detail |
|---|---|
| Package Dimensions | 6.14 x 5.31 x 0.87 inches |
| Item Weight | 2.89 ounces |
| Manufacturer | Imdinnogo |
| ASIN | B0DRY7XZXZ |
| Head Style | Socket |
| Head Type | Socket |
| Set Screw Thread Type | M |
| Thread Style | Right Hand |
8. Warranty and Support
This product is manufactured by Imdinnogo. For any product-related inquiries, technical support, or assistance with specific applications, please contact the seller directly through the platform where the purchase was made.
Return Policy: This product is eligible for a refund or replacement within 30 days of purchase, subject to the retailer's return policy.
For additional resources and community support regarding your 3D printer, refer to the official Bambu Lab documentation and forums.