CAMECHO B0DRVTKJS3
CAMECHO 4 Channel Dash Cam User Manual
Model: B0DRVTKJS3
Introduction
This user manual provides detailed instructions for the installation, operation, and maintenance of your CAMECHO 4 Channel Dash Cam. Please read this manual thoroughly before using the device to ensure proper functionality and safety.
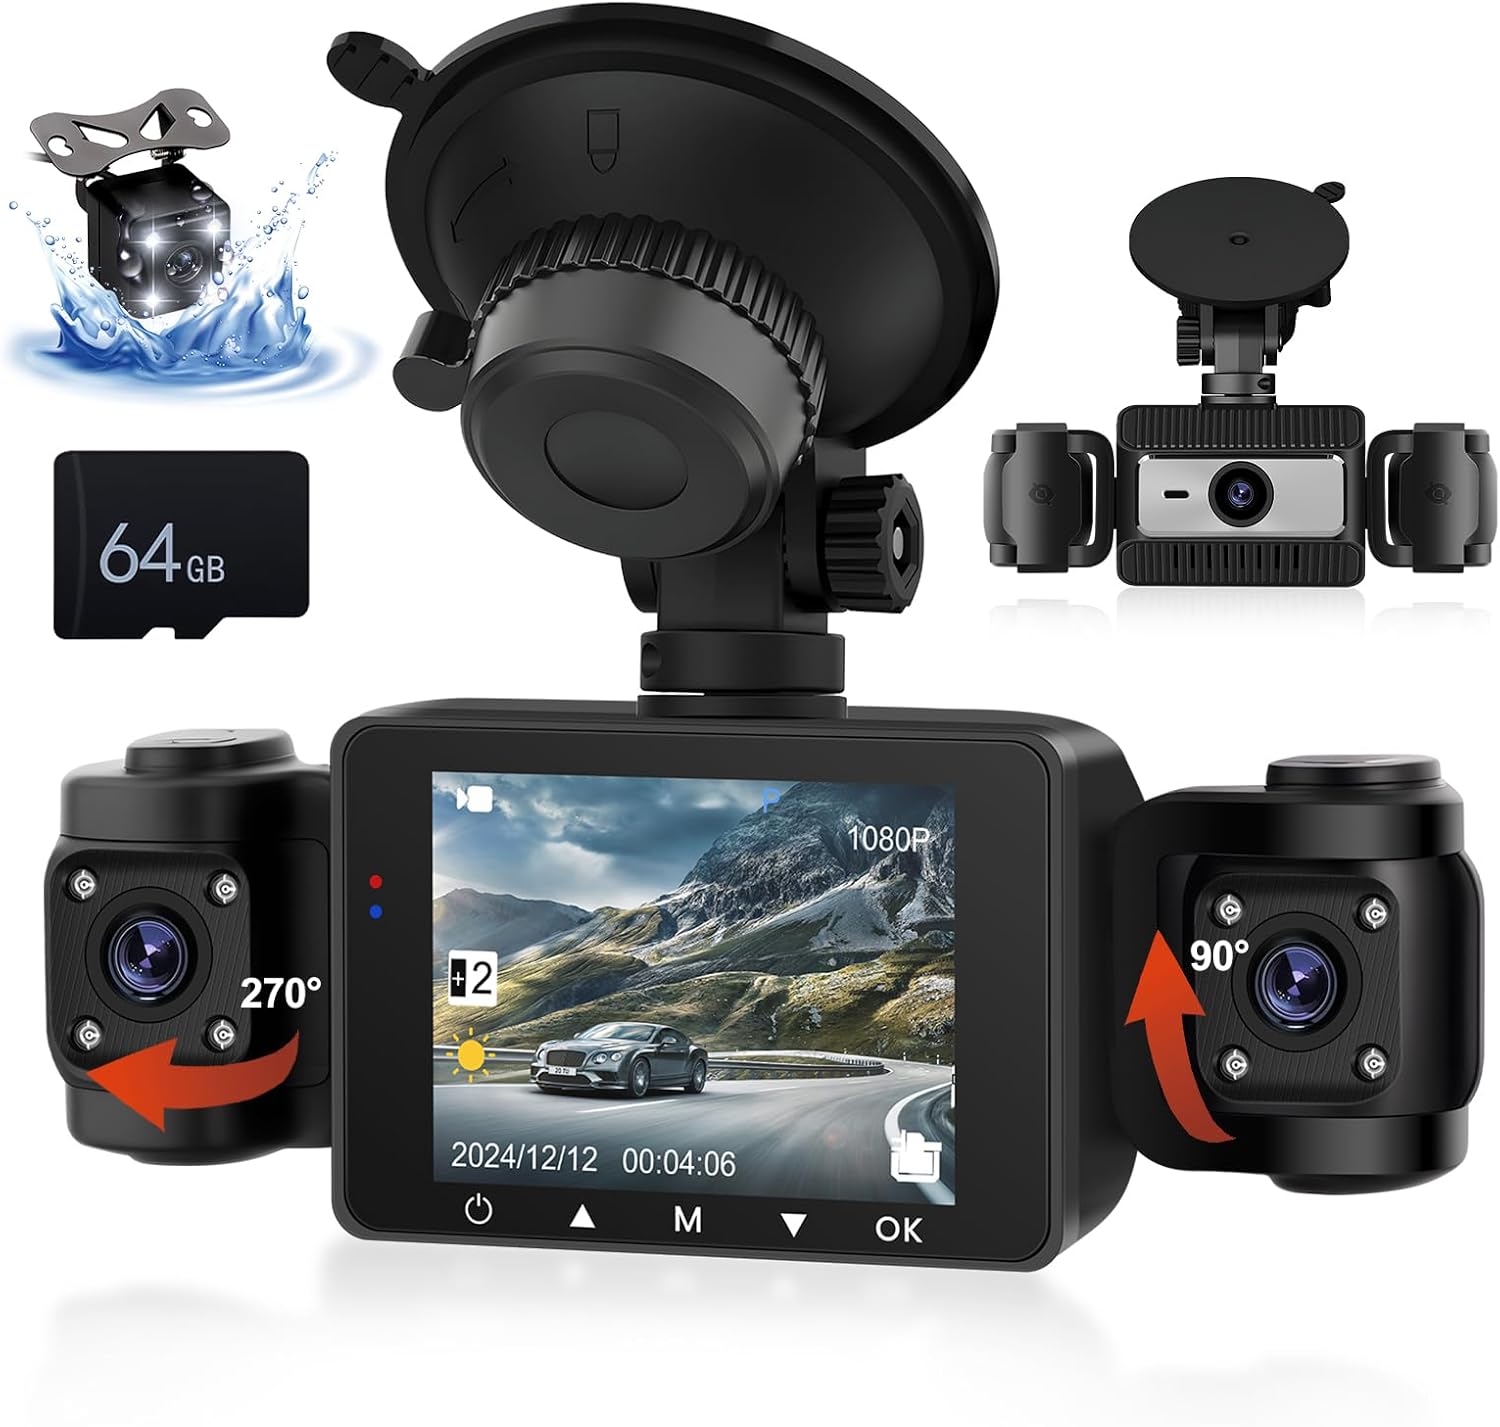
Image: The CAMECHO 4 Channel Dash Cam system, showing the main unit with its display, two adjustable side cameras, a separate rear camera, and an included 64GB TF card.
Package Contents
Verify that all items listed below are included in your package:
- 1 x Dash Camera (Main Unit)
- 1 x Rear View Camera
- 1 x 64GB TF Card
- 1 x Power Cord (Car Charger)
- 1 x Extended Line (for Rear Camera)
- 1 x Anti-skid Pad
- 1 x User Manual

Image: An illustration detailing the various components included in the product package, such as the dash cam, rear camera, TF card, power cord, extended line, anti-skid pad, and user manual.
Product Overview
The CAMECHO 4 Channel Dash Cam provides comprehensive vehicle monitoring with its multi-camera system. Key features include:
- Quadruple Channel Recording: Simultaneous monitoring of front (150°), rear (120°), and interior (dual 120°) views.
- High Definition Capture: 1080P front camera, 480P interior and rear cameras with a 2.4-inch IPS screen.
- Infrared Night Vision: Enhanced low-light performance with 4 infrared LEDs for clear interior capture.
- Loop Recording: Automatic overwriting of oldest footage to ensure continuous recording.
- G-Sensor: Automatically locks video footage upon detecting collisions or bumps.

Image: A detailed diagram illustrating the various parts of the dash cam, including HD lenses, display screen, night vision light, reset button, OK button, down-page button, menu key, flip up button, power button, AV-IN port, TF card slot, bracket holes, baffle, speaker, and brackets.
Setup and Installation
Follow these steps for proper installation of your dash cam system:
- Prepare the Windshield: Clean the area on your windshield where you intend to mount the dash cam. Ensure it is free of dust and grease.
- Mount the Dash Cam: Attach the dash cam to the windshield using the suction cup mount. Press firmly to ensure a secure adhesion. Position it so it does not obstruct your view.
- Insert TF Card: Insert the provided 64GB TF card into the TF card slot on the dash cam. Ensure it is inserted correctly until it clicks into place.
- Connect Power: Connect the power cord to the dash cam and plug the other end into your vehicle's cigarette lighter socket. Route the cable neatly to avoid interference with driving.
- Install Rear Camera:
- Mount the rear camera at the back of your vehicle, typically near the license plate or inside the rear window.
- Connect the extended line to the rear camera and route it to the main dash cam unit.
- Connect the extended line to the AV-IN port on the main dash cam.
- For reverse view functionality, connect the reverse trigger wire of the extended line to your vehicle's reverse light anode (positive wire).
- Adjust Camera Angles: Adjust the angles of the front, interior, and rear cameras to ensure optimal coverage. The interior cameras can rotate 270° and 90° respectively, and the main unit can rotate 360° on its mount.

Image: A visual guide demonstrating the installation process, including cleaning the windshield, attaching the mounting bracket, connecting the power cable, and routing the rear camera cable.

Image: A schematic showing the connection points for the dash cam, power cable, and rear camera, along with suggested cable routing for a clean installation.
Operating Instructions
Power On/Off
- The dash cam will automatically power on and begin recording when your vehicle's ignition is turned on (power is supplied to the cigarette lighter socket).
- To manually power on/off, press and hold the Power button (refer to Product Overview diagram for location).
Recording Modes
- Normal Recording: The camera continuously records when powered on. Footage is saved in segments (e.g., 1-minute files).
- Loop Recording: When the TF card is full, the oldest unlocked video files will be automatically overwritten by new recordings.
- G-Sensor (Emergency Recording): If a sudden impact or collision is detected, the G-sensor will automatically trigger and lock the current video file, preventing it from being overwritten by loop recording.

Image: A visual representation of the loop recording function, showing how older files are overwritten to make space for new recordings on the 64GB TF card.

Image: An illustration demonstrating the G-Sensor's function, where a collision triggers the automatic locking of video footage to protect it from being overwritten.
Menu Navigation
Use the Menu key to access settings. Navigate through options using the Up/Down buttons (Flip up/Down-page buttons) and confirm selections with the OK button.
- Video Resolution: Adjust front camera resolution (e.g., 1080P). Interior and rear cameras are fixed at 480P.
- Exposure Compensation: Adjust brightness settings for optimal video quality in varying light conditions.
- Audio Recording: Enable or disable microphone recording.
- Date/Time Stamp: Set the correct date and time for accurate video timestamps.

Image: A visual representation of the exposure compensation feature, illustrating how the dash cam automatically adjusts light sensitivity to prevent overexposure or underexposure, improving picture quality in various lighting conditions.
Viewing Footage
- On-Device Playback: Use the display screen and navigation buttons to review recorded videos directly on the dash cam.
- Computer Playback: Remove the TF card and insert it into a computer's card reader. Video files are typically saved in separate folders for each camera (FRONT, BACK, LEFT, RIGHT).
Parking Assistance
When the rear camera is properly connected to the reverse light trigger, the dash cam display will automatically switch to the rear view with auxiliary parking lines when the vehicle is put into reverse. This assists with parking by reducing blind spots.

Image: An illustration of the parking assistance feature, displaying the rear camera view with adjustable parking auxiliary lines on the dash cam screen to aid in safe parking maneuvers.
Maintenance
- Clean Lenses: Regularly clean the camera lenses with a soft, lint-free cloth to ensure clear video quality. Avoid abrasive materials.
- TF Card Maintenance: Format the TF card periodically (e.g., once a month) through the dash cam's menu to prevent data corruption and ensure optimal recording performance. Back up any important footage before formatting.
- Firmware Updates: Check the CAMECHO official website for any available firmware updates to improve performance and add new features. Follow instructions carefully if updating.
- Operating Temperature: Avoid exposing the dash cam to extreme temperatures (very hot or very cold) for extended periods, as this can affect battery life and component longevity.
Troubleshooting
| Problem | Possible Cause | Solution |
|---|---|---|
| Dash cam does not power on. | No power supply; faulty power cord; vehicle's cigarette lighter socket is off. | Check power connection. Ensure vehicle ignition is on. Test power cord in another socket or with another device. |
| Recording stops or freezes. | TF card full; TF card error/corruption; low quality TF card. | Format the TF card. Replace with a high-speed, reputable brand TF card if issues persist. |
| Poor video quality. | Dirty lens; incorrect resolution settings; extreme lighting conditions. | Clean camera lenses. Adjust exposure compensation in settings. Ensure resolution is set to desired quality (e.g., 1080P for front). |
| G-Sensor not working. | G-Sensor sensitivity set too low or off. | Adjust G-Sensor sensitivity in the settings menu. |
| Rear camera not displaying. | Loose connection; faulty cable/camera. | Check all connections for the rear camera and extended line. Ensure the AV-IN port is secure. |
Specifications
| Feature | Detail |
|---|---|
| Model | B0DRVTKJS3 |
| Brand | CAMECHO |
| Product Dimensions | 1.5 x 5.4 x 2 inches (Main Unit) |
| Item Weight | 7 ounces |
| Screen Size | 2.4 Inches (IPS) |
| Video Capture Resolution | Front: 1080p; Interior/Rear: 480p |
| Camera Angles | Front: 150°; Interior: Dual 120°; Rear: 120° |
| Special Features | Loop Recording, G-Sensor, Infrared Night Vision, Parking Assistance |
| Included TF Card | 64GB |
| Mounting Type | Windshield Mount |
| Control Method | Touch (referring to screen interaction, though buttons are also present) |
Warranty and Support
CAMECHO products are designed for reliability and performance. For warranty information, please refer to the documentation included with your purchase or visit the official CAMECHO website.
For technical support or inquiries, you may contact CAMECHO customer service. The provided information indicates online help is available via email:
Email: yanningqiu2021@163.com
When contacting support, please provide your product model (B0DRVTKJS3) and a detailed description of your issue.

Image: A customer service representative with a headset, accompanied by text indicating online help and user manual support available via the email address yanningqiu2021@163.com.
Related Documents - B0DRVTKJS3
 |
GT806 3-Channel Dash Cam User Manual Explore the features and setup of the GT806 3-Channel Dash Cam, offering 2.5K+1080P+1080P recording, Wi-Fi connectivity, G-sensor, night vision, and 24-hour parking monitoring. Supports up to 256GB storage. |
 |
LOTUS Dash Cam User Manual: Specifications, Installation, and Features Comprehensive user manual for the LOTUS Dash Cam. This guide covers product specifications, installation instructions for front and rear cameras, detailed feature explanations including G-sensor, loop recording, motion detection, and parking monitoring, along with a Q&A and FAQ section. |
 |
Galphi M2-3 Channel Dash Cam Quick Start Guide Get started with your Galphi M2-3 Channel dash cam. This guide covers SD card insertion, power connection, formatting, 24-hour recording, and warranty registration. |
 |
CAMECHO W7798 Dash Cam User Manual and Specifications Comprehensive user manual for the CAMECHO W7798 dash cam, detailing its product structure, key features, basic operations, menu settings, USB modes, charging instructions, technical specifications, and troubleshooting guide. |
 |
AX2V DV-690WM 1080P Full HD Wireless Dash Cam User Manual User manual for the AX2V DV-690WM 1080P Full HD Wireless Dash Cam. Learn about features, installation, specifications, app usage, and troubleshooting for this car dashboard camera. |
 |
First Safe 3-Channel Dash Cam User Manual User manual and installation guide for the First Safe 3-Channel Dash Cam, featuring 1080P recording, WiFi connectivity, and G-sensor technology. |
Ask a question about this manual
Ask about setup, troubleshooting, compatibility, parts, safety, or missing instructions. Manuals+ will review the question and use this page’s manual context to help answer it.