1. Introduction
This manual provides detailed instructions for the setup, operation, and maintenance of your Irfora D1007 TAM Cordless Telephone. Please read this manual thoroughly before using the device to ensure proper functionality and to familiarize yourself with all features. Keep this manual for future reference.
2. Package Contents
Verify that all items listed below are included in your package. If any items are missing or damaged, please contact your retailer.
- 1 x Handset
- 1 x Cradle (Base Unit)
- 1 x Telephone Line Cable
- 2 x Rechargeable Batteries (400mAh, 1.2V each)
- 1 x Power Cord (US/EU Plug, as per region)
- 1 x User Manual (English)

Image: The complete package contents of the Irfora D1007 TAM Cordless Telephone, showing the handset, base unit, power adapter, telephone line cable, two rechargeable batteries, and the user manual.
3. Product Layout and Components
Familiarize yourself with the various parts of your cordless telephone and base unit.
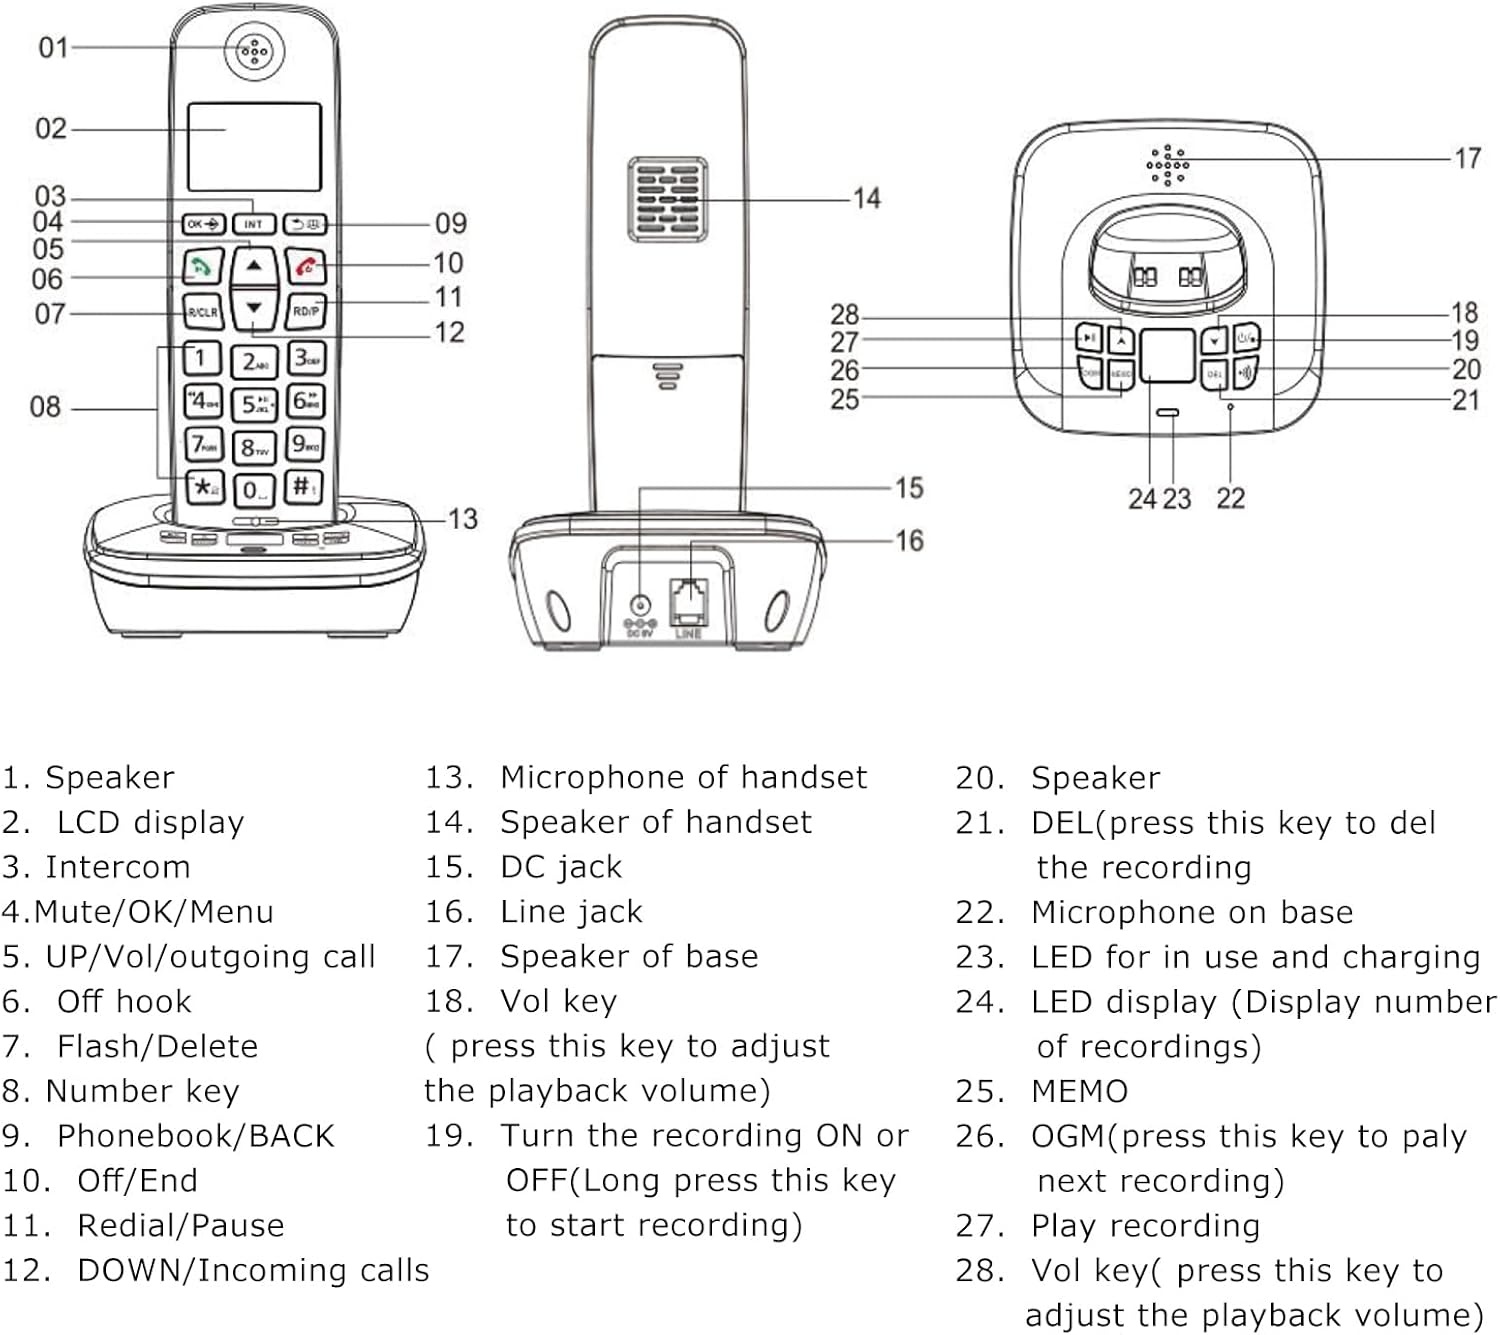
Image: A detailed diagram illustrating the handset and base unit with numbered labels pointing to specific components for easy identification.
Handset Components:
- Speaker
- LCD display (3 lines)
- Intercom button (INT)
- Mute/OK/Menu button
- UP/Vol/Outgoing call button
- Off hook button (Green call button)
- Flash/Delete button (R/CLR)
- Number keys (0-9, *, #)
- Phonebook/BACK button
- Off/End button (Red call button)
- Redial/Pause button (RD/P)
- DOWN/Incoming calls button
- Microphone of handset
Base Unit Components:
- Speaker of handset
- DC jack (Power input)
- Line jack (Telephone line input)
- Speaker of base
- Vol key (Volume adjustment for playback)
- Turn the recording ON or OFF (Long press to start recording)
- DEL (Press to delete the recording)
- Microphone on base
- LED for in use and charging indication
- LED display (Display number of recordings)
- MEMO button
- OGM (Press to play next recording)
- Play recording button
- Vol key (Press to adjust playback volume)
4. Setup
4.1 Battery Installation
- Open the battery compartment cover on the back of the handset.
- Insert the two rechargeable batteries, ensuring correct polarity (+ and -).
- Close the battery compartment cover securely.
4.2 Connecting the Base Unit
- Connect one end of the telephone line cable to the LINE jack on the base unit and the other end to your telephone wall socket.
- Connect the power cord to the DC jack on the base unit and plug the adapter into a power outlet.
4.3 Initial Charging
Place the handset on the base unit. For the first use, charge the handset for at least 12 hours. A full charge typically takes 10 hours. This ensures optimal battery performance and longevity.
4.4 Handset Registration
Your handset may be pre-registered. If not, or if you wish to register additional handsets (up to 5 per base unit), refer to the detailed registration steps in the full user manual. The system supports a maximum of 4 base units per handset.

Image: A side view of the base unit, highlighting the DC power input and the telephone line jack for connecting to power and the telephone network.
5. Operating Instructions
5.1 Basic Call Functions
- Making a Call: Press the green call button, then dial the number. Alternatively, dial the number first (pre-dial) and then press the green call button.
- Receiving a Call: When the phone rings, press the green call button.
- Ending a Call: Press the red call button or place the handset back on the base unit.
- Redial: Press the RD/P button to redial the last number called.
- Volume Adjustment: During a call, use the UP/DOWN buttons to adjust the earpiece or hands-free volume.
- Mute: During a call, press the Mute button to temporarily disable your microphone. Press again to unmute.

Image: A close-up view of the handset's keypad, emphasizing the design of the buttons for comfortable and easy use.
5.2 Answering Machine (TAM) Functions
The base unit features a digital answering machine with up to 60 minutes of message recording capacity.
- Recording Outgoing Message (OGM): The base can record two groups of OGM. Refer to the full manual for detailed steps on recording your personalized outgoing message.
- Playing Messages: Press the OGM button on the base unit to play recorded messages. Use the Vol keys to adjust playback volume.
- Memo Recording: The system supports memo recording up to 120 seconds.
- Deleting Messages: Press the DEL button on the base unit to delete recordings.
- Voice Prompts: The answering machine provides voice prompts in English, Spanish, French, and German.
5.3 Phonebook
Store up to 50 phone book memories, each with a maximum of 12 characters for the name and 20 digits for the number.
- Adding an Entry: Navigate to the Phonebook menu, select 'Add New', enter the name and number, then save.
- Searching/Dialing: Press the Phonebook button to access your stored contacts. Use the UP/DOWN buttons to scroll, then press the green call button to dial.
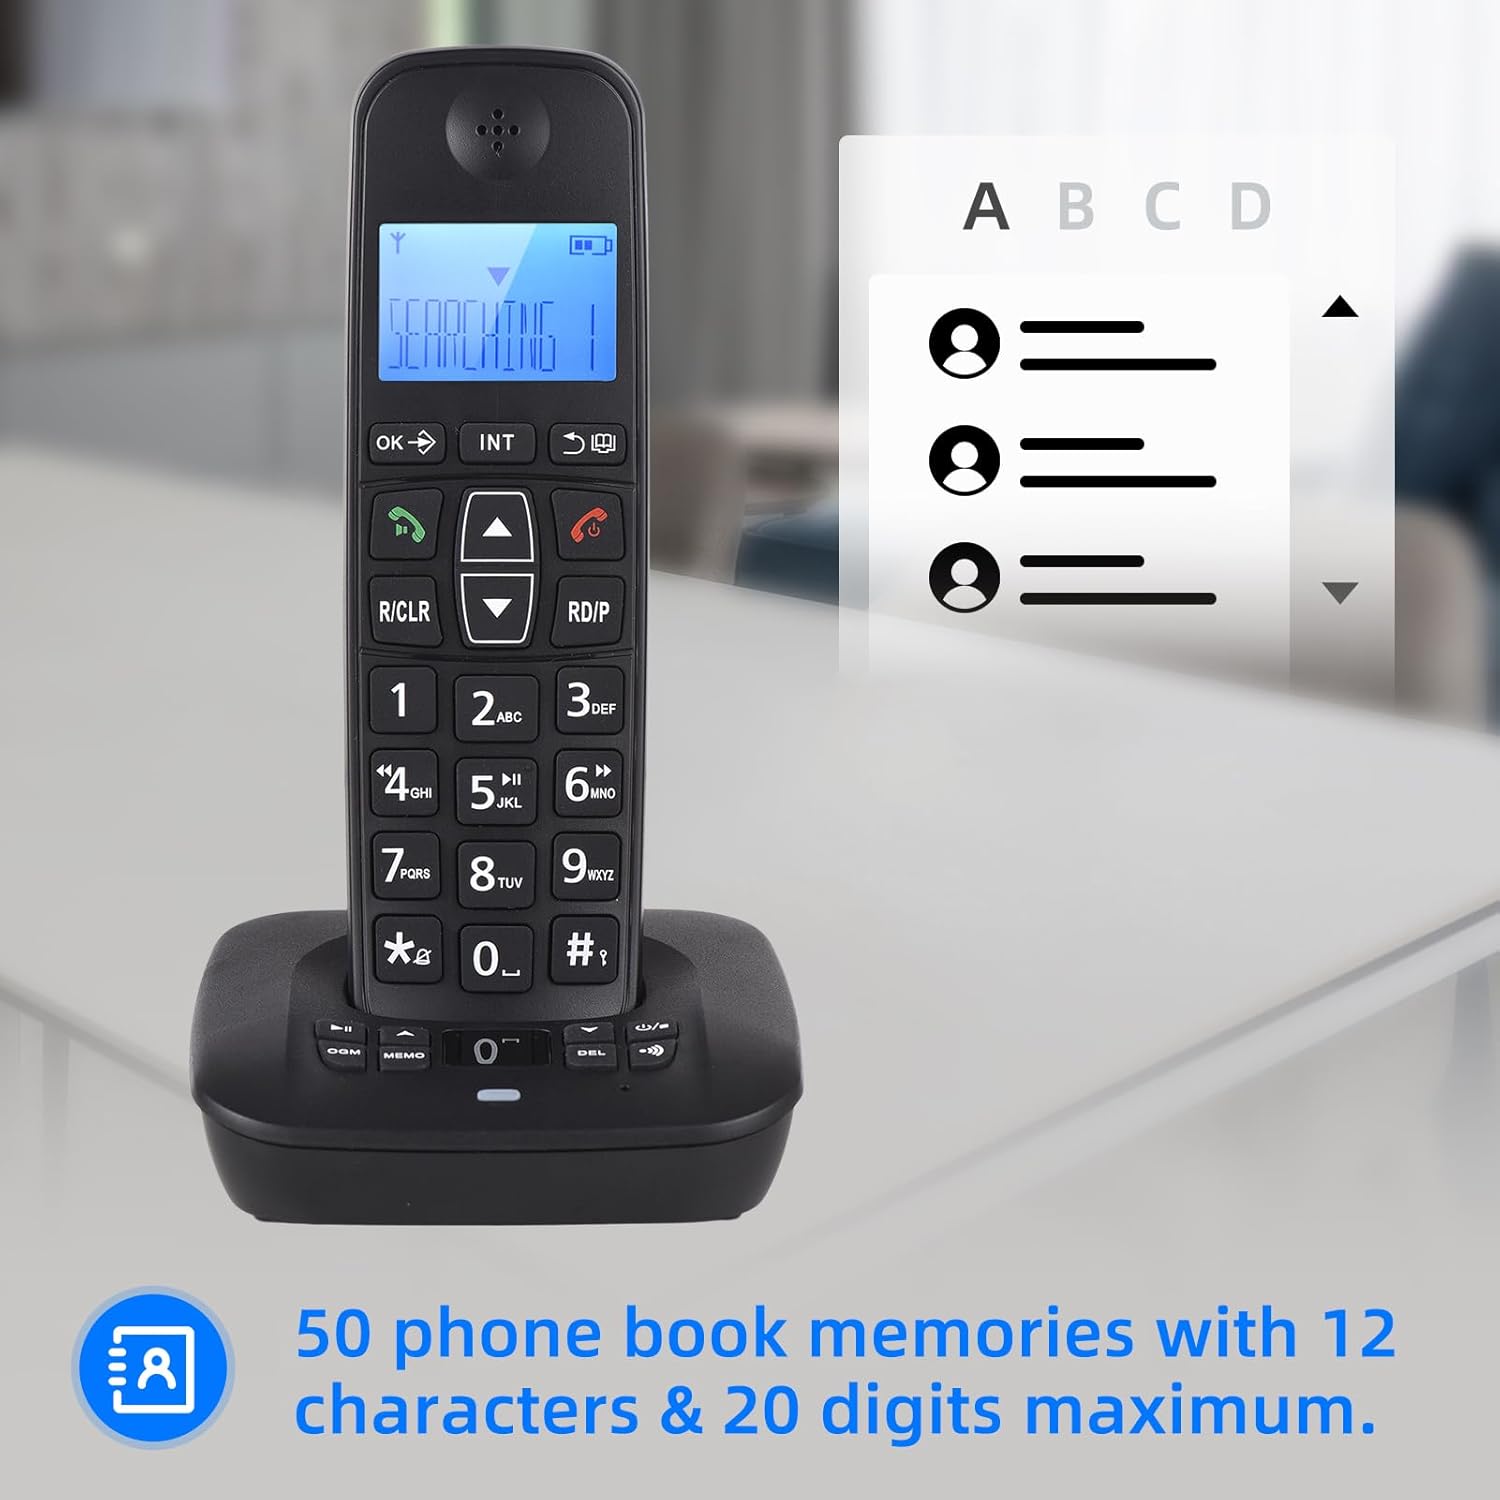
Image: The handset display showing the phonebook feature, indicating the capacity for 50 entries with space for names and numbers.
5.4 Caller ID
The phone stores up to 30 incoming numbers and 10 outgoing numbers.
- Viewing Incoming Calls: Press the DOWN button to access the incoming call list.
- Viewing Outgoing Calls: Press the RD/P button repeatedly to cycle through outgoing calls.

Image: The handset on its base, with icons representing Caller ID, 30 incoming number memories, and 10 outgoing number memories.
5.5 Intercom and Conference Call
- Intercom: If you have multiple registered handsets, you can make intercom calls between them. Press the INT button and select the desired handset.
- Call Transfer: Transfer an external call to another handset.
- Conference Call: Conduct a three-way conference call involving an external call and two internal handsets.
5.6 Ringing Tones
- Selection: Choose from 10 different ringing tones.
- Customization: Set different melodies for different types of calls (e.g., internal vs. external).
5.7 LCD Display
The handset features a 3-line LCD display for clear visibility of caller ID, menu options, and phonebook entries.

Image: A close-up of the handset's LCD screen, demonstrating its 3-line display capability for showing information clearly.
6. Maintenance
- Cleaning: Wipe the handset and base unit with a soft, damp cloth. Do not use abrasive cleaners or solvents.
- Battery Care: Use only the specified rechargeable batteries. If the phone will not be used for an extended period, remove the batteries.
- Environment: Keep the phone away from excessive heat, direct sunlight, and moisture.
7. Troubleshooting
If you encounter issues with your telephone, try the following basic troubleshooting steps:
- No Dial Tone: Ensure the telephone line cable is securely connected to both the base unit and the wall socket. Check if the power adapter is properly plugged in.
- Cannot Make/Receive Calls: Verify that the handset is charged. Check if the telephone line is active.
- Handset Not Registering: Follow the registration steps in the full user manual. Ensure the handset is within range of the base unit.
- Poor Sound Quality: Check for interference from other electronic devices. Ensure the handset is within optimal range of the base.
- Answering Machine Not Recording: Check the available memory. Ensure the answering machine function is enabled.
For more complex issues, refer to the comprehensive troubleshooting section in the full user manual or contact customer support.
8. Specifications
- Model: D1007 TAM
- Color: Black
- Material: Plastic
- Input: 100-240V, 50/60Hz
- Frequency: 1.8/1.9GHz
- Interface Languages: Portugu, Spanish, English, French, German, Italian, Dutch, Hungarian, Greek, Polish, Danish, Norwegian, Swedish, Turkish, Russian, Ukrainian (16 kinds)
- Battery: 2 x Rechargeable Batteries (400mAh, 1.2V each)
- Handset Size: 18 x 5.3 x 2 cm (7 x 2 x 0.9 inches)
- Cradle Size: 11 x 10.5 x 4.3 cm (4.3 x 4.1 x 1.6 inches)
- Talk Time: Up to 10 hours continued talk
- Standby Time: Up to 120 hours on standby
- Answering Machine Capacity: Max. 60 minutes
- Phonebook Memories: 50 entries (12 characters & 20 digits max)
- Incoming Call Memories: 30 numbers
- Outgoing Call Memories: 10 numbers
9. Warranty and Support
For warranty information and customer support, please refer to the documentation provided at the time of purchase or visit the official Irfora website. Keep your purchase receipt as proof of purchase.