Product Overview
The Dosilkc 8-Channel POE Network Video Recorder (NVR) is designed for home security camera systems, supporting resolutions up to 4K. It features H.265+ video compression for efficient storage and remote access capabilities for convenient monitoring.

This image displays the front and rear panels of the Dosilkc 8-Channel POE NVR. The front panel shows indicator lights, while the rear panel features 8 PoE ports, audio input/output, VGA, HDMI, and USB ports for connectivity.
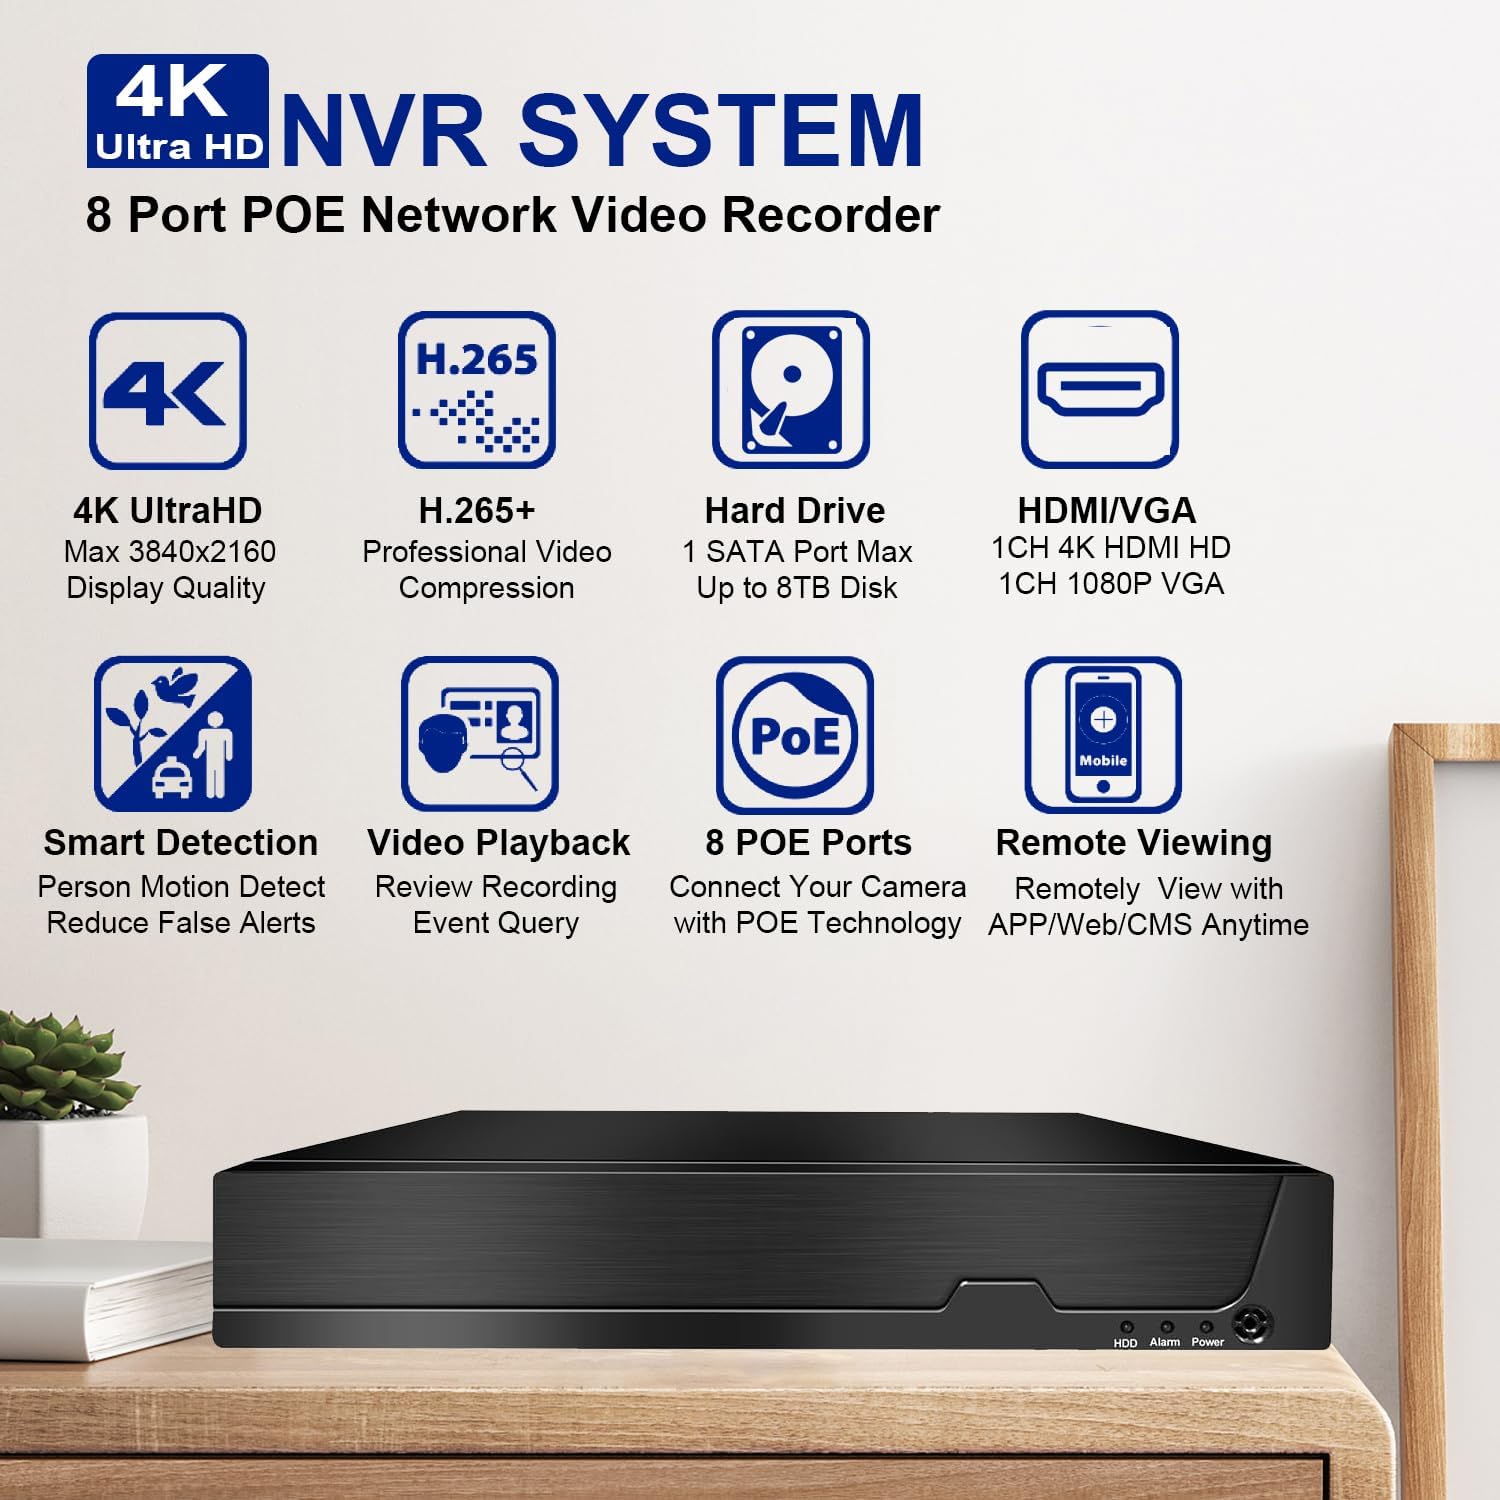
This image highlights the key features of the Dosilkc 4K Ultra HD NVR System, including 4K UltraHD display quality, H.265+ video compression, support for up to 8TB hard drive, HDMI/VGA output, smart detection, video playback, 8 PoE ports, and remote viewing capabilities.
Package Contents
Before beginning installation, please verify that all items listed below are present in your package:
- NVR Unit
- USB Mouse
- Power Adapter
- User Manual (this document)
Setup Guide
1. Hardware Connection
The Dosilkc NVR features Power over Ethernet (PoE) ports, simplifying camera installation by providing both power and data through a single Ethernet cable.
- Connect Cameras: Connect your PoE IP cameras to the NVR's PoE ports using Ethernet cables. The NVR will automatically power the cameras.
- Connect Monitor: Connect a monitor to the NVR using either the HDMI or VGA port. HDMI supports up to 4K resolution, while VGA supports 1080p.
- Connect Mouse: Plug the included USB mouse into one of the NVR's USB ports.
- Network Connection: Connect the NVR to your local network router using an Ethernet cable for remote access capabilities.
- Power On: Connect the power adapter to the NVR and then to a power outlet. The NVR will power on automatically.

This diagram illustrates the typical setup for the Dosilkc PoE NVR, showing connections for PoE IP cameras, a VGA/HDMI monitor, an internet router for remote viewing, audio input/output, a USB mouse, and the power supply.

This image emphasizes the "Plug & Play Easy Setup" feature, demonstrating how a single Ethernet cable provides both network access and power supply to the cameras, simplifying installation.
2. Initial Configuration
Upon first boot, the NVR may guide you through a setup wizard. Follow the on-screen prompts to set up basic parameters such as date/time, network settings, and administrator password.
Hard Drive Installation (if not pre-installed): The NVR supports up to an 8TB SATA hard drive. Refer to the NVR's internal diagram for proper installation of the HDD. Ensure the NVR is powered off before installing or removing a hard drive.
Operating Instructions
1. Local Viewing and Playback
Once connected to a monitor, you can view live feeds from your cameras and manage recordings directly from the NVR interface using the USB mouse.
- Live View: The main screen displays live video feeds from all connected cameras.
- Playback: Access the playback menu to review recorded footage. You can search by time, calendar, event, or channel.
- Recording Modes: The NVR supports various recording modes including manual, alarm, dynamic detection, and scheduled timing.

This image illustrates the 24/7 HDD Recording & Playback capability, showing a monitor displaying live camera feed and icons representing up to 8TB HDD storage and PC LMS Server Storage for video recording without monthly fees.
2. Remote Access
The NVR allows remote viewing of your security system from mobile devices or computers.
- Mobile App: Download the free "Videolink" app from the App Store (iOS) or Google Play (Android). Follow the app's instructions to add your NVR using its unique ID or QR code.
- PC Client: Use the LMS client software for Windows or Mac to access your NVR from a computer.
- Web Browser: Access the NVR interface directly via a web browser (Firefox, Google Chrome, Microsoft Edge) by entering the NVR's IP address.

This image details the various remote access methods for the NVR, including the "Videolink" mobile app for iOS and Android, AJDev Tools, LMS client for Windows and Mac, and web browser access via Firefox, Google Chrome, and Microsoft Edge, showing live view on different devices.

This image illustrates the compatibility of the Dosilkc NVR system with various viewing devices, including different types of cameras, laptops, tablets, and smartphones, allowing users to view their home from anywhere.
3. Advanced Features
- H.265+ Video Compression: This advanced compression technology reduces file sizes by up to 50% without compromising video quality, allowing for longer recording times and saving hard drive space.
- Smart Detection & Alerts: Configure the NVR for intelligent motion detection, including human and vehicle detection, to reduce false alarms. Receive alerts via FTP, app notifications, email, or live alarms.
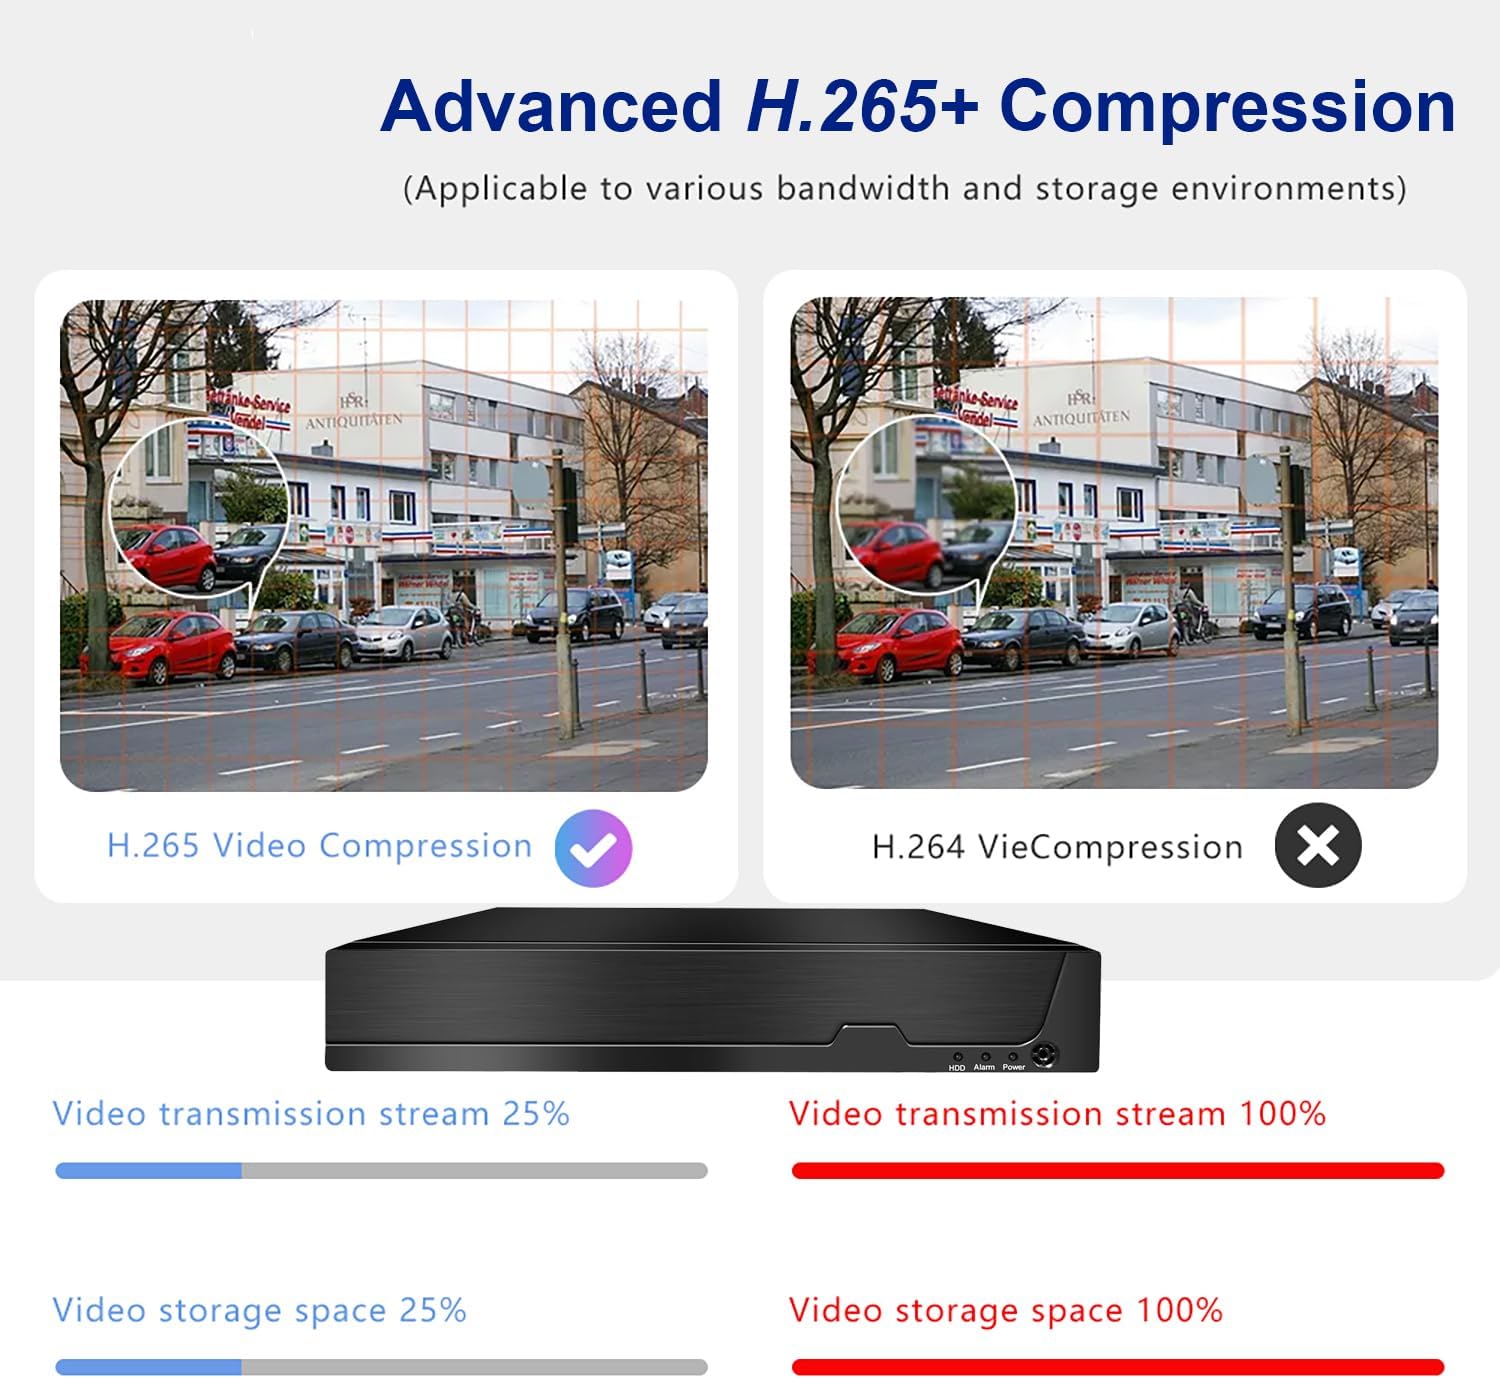
This image compares Advanced H.265+ Compression with H.264, showing that H.265+ significantly reduces video transmission stream and storage space requirements while maintaining quality.

This image demonstrates the AI Human and Vehicle Detection feature, showing how the system can differentiate between human/vehicle movement and other movements (like a dog running), sending alerts only for relevant events.

This image highlights the Smart Motion Detect & Alerts features, including options for FTP upload, app notifications, email alerts, and live alarms, ensuring users are promptly informed of detected events.
Maintenance
- Regular Cleaning: Keep the NVR unit free from dust. Use a soft, dry cloth for cleaning. Do not use liquid cleaners.
- Firmware Updates: Periodically check the Dosilkc official website for firmware updates to ensure optimal performance and security.
- Hard Drive Health: Monitor the health of your hard drive through the NVR's system settings. Replace the HDD if any issues are detected to prevent data loss.
- Ventilation: Ensure the NVR is placed in a well-ventilated area to prevent overheating. Do not block ventilation openings.
Troubleshooting
No Video Output on Monitor
- Check if the NVR is powered on and the power adapter is securely connected.
- Verify the HDMI/VGA cable connection between the NVR and the monitor.
- Ensure the monitor is set to the correct input source (HDMI/VGA).
- Try a different HDMI/VGA cable or monitor.
Cameras Not Displaying
- Check the Ethernet cable connection for each camera to its respective PoE port on the NVR.
- Ensure the cameras are powered on (indicator lights on cameras should be active).
- If using non-Dosilkc PoE cameras, ensure they are ONVIF compatible and their IP addresses are configured to be on the same subnet as the NVR's PoE ports. Use the provided tool software to adjust IP addresses if necessary.
- Reboot the NVR and the cameras.
Remote Access Not Working
- Verify the NVR is connected to your internet router and has a valid network connection.
- Ensure your mobile device or computer has an active internet connection.
- Double-check the NVR's ID or QR code entered in the mobile app/client software.
- Check your router's firewall settings; port forwarding may be required for direct IP access (though P2P/Cloud access via app usually bypasses this).
No Recording / HDD Issues
- Ensure a hard drive is installed and properly connected inside the NVR.
- Check the HDD status in the NVR's system settings. Format the HDD if it's new or unrecognized.
- Verify that recording schedules or motion detection settings are correctly configured.
Specifications
| Feature | Detail |
|---|---|
| Model Number | RM |
| Channels | 8 Channel POE |
| Max Resolution Support | 12MP/8MP/5MP/4MP/3MP/1080P HD POE IP Cameras |
| Video Compression | H.265+ |
| Hard Drive Interface | 1 SATA interface |
| Max HDD Capacity | Up to 8TB (HDD Not Included) |
| Video Output | HDMI (max 4K@30fps), VGA (max 1080p@30fps) |
| Remote Access App | Videolink (iOS/Android) |
| PC Client Software | LMS Client |
| Playback Quality | 1x12MP@30fps, 1x8MP@30fps, 2x5MP@25fps+2xD1, 4x4MP@25fps, 4x3MP@25fps, 4x1080p@30fps |
| Dimensions | 13.9 x 11 x 3 inches |
| Item Weight | 3.3 pounds |
| Connectivity Technology | VGA, Ethernet, HDMI |
Warranty and Support
Dosilkc products come with a standard manufacturer's warranty. Please refer to the warranty card included in your package or visit the official Dosilkc website for detailed warranty terms and conditions.
For technical support, troubleshooting assistance, or any inquiries regarding your Dosilkc NVR, please contact our customer support team. Contact information can typically be found on our official website or on the product packaging.
Online Resources:
- Dosilkc Official Website: Visit Dosilkc Store on Amazon