1. Introduction and Safety Information
Thank you for choosing the ORRD Fluted Storage Cabinet. This manual provides essential information for the safe assembly, operation, and maintenance of your new furniture. Please read all instructions carefully before beginning assembly and retain this manual for future reference.
Important Safety Instructions:
- Always assemble the cabinet on a soft, clean surface to prevent scratches.
- Ensure all parts are present and undamaged before assembly. Do not use damaged parts.
- Do not overtighten screws during assembly, as this may damage the material.
- Place the assembled cabinet on a level and stable surface.
- To prevent tipping, especially in households with children or pets, it is highly recommended to secure the cabinet to a wall using appropriate anti-tip hardware (not included unless specified in the package).
- Do not overload shelves. Distribute weight evenly.
The ORRD Fluted Storage Cabinet features a rounded corner design for enhanced safety. This design minimizes sharp edges, reducing the risk of accidental bumps and scrapes.
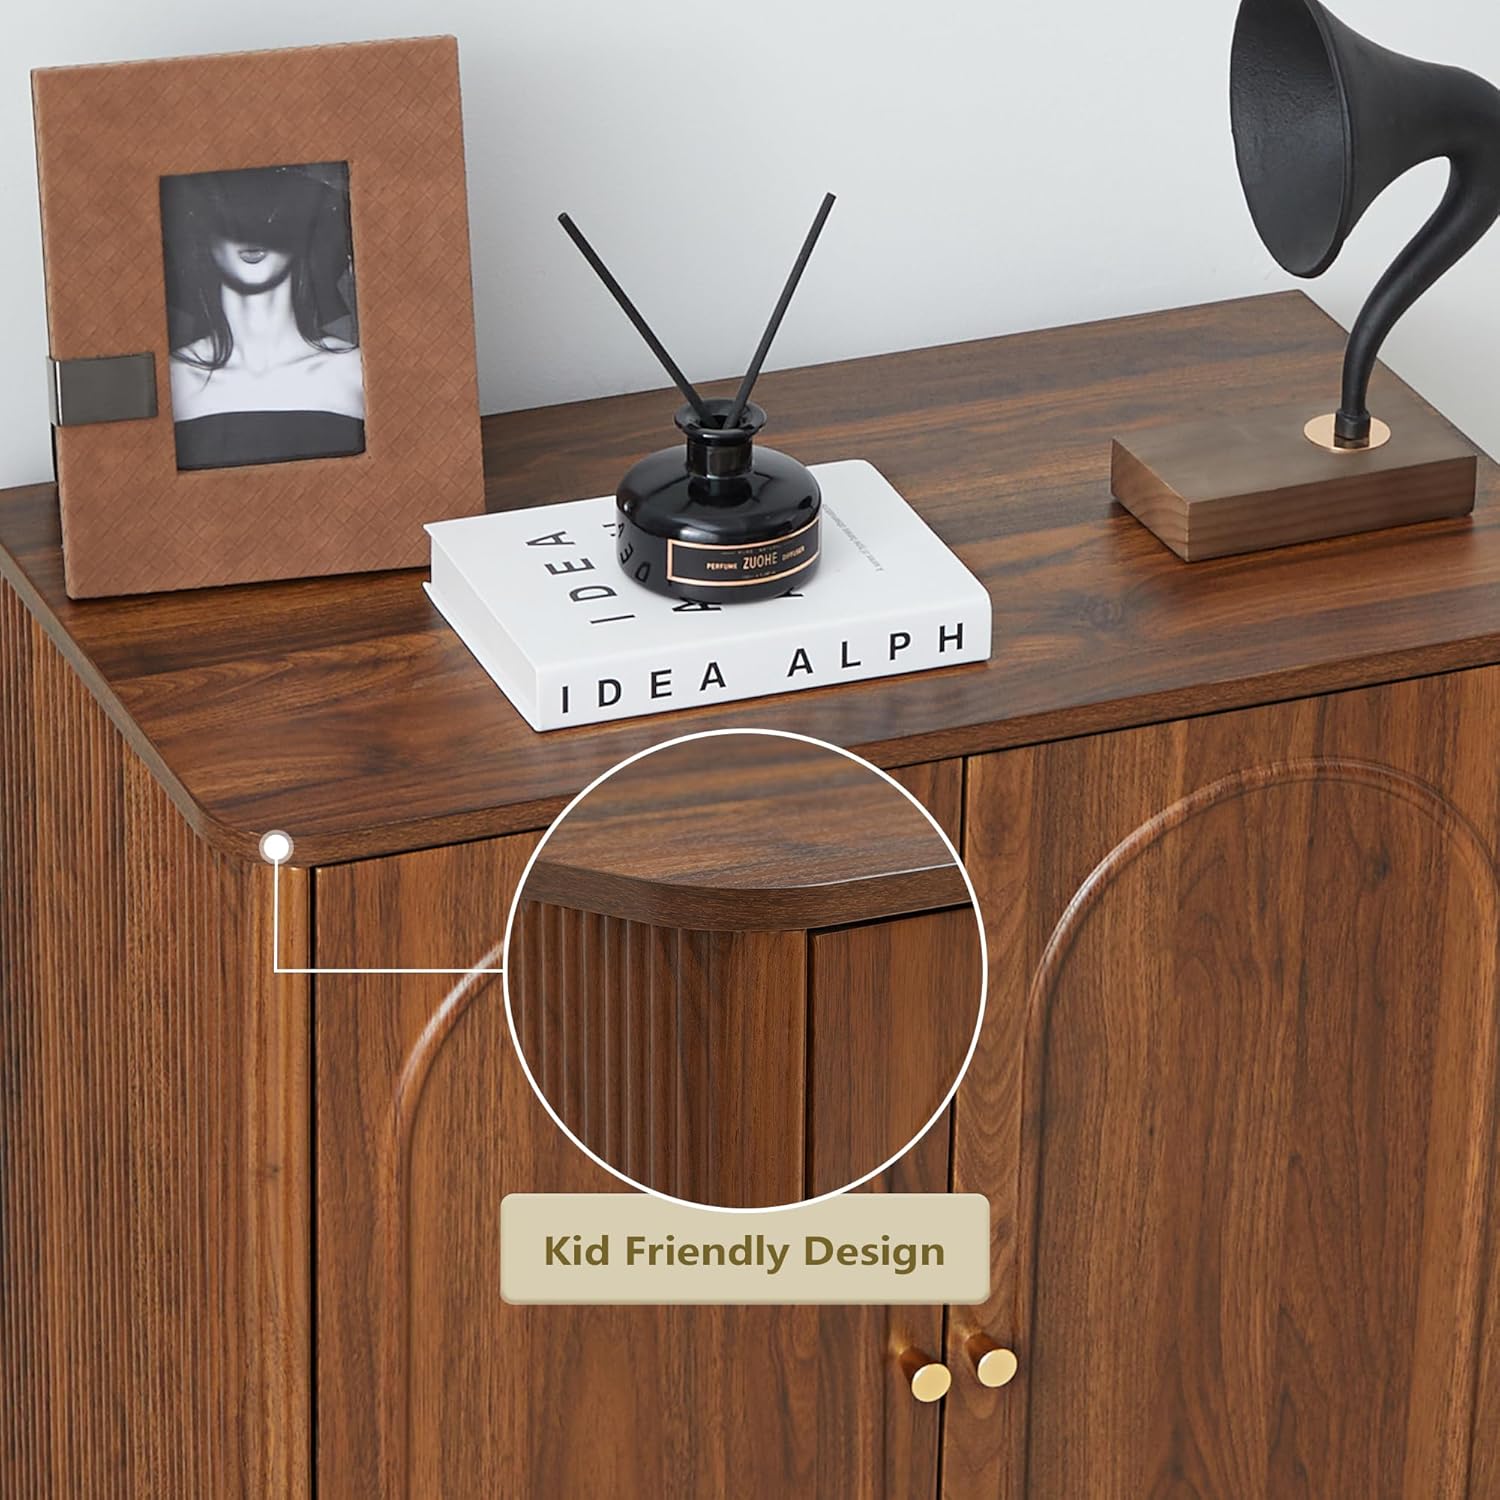
Image: Close-up view of the cabinet's top corner, highlighting the smooth, rounded edge for safety.
2. Parts List and Hardware
A detailed list of all components, hardware, and tools required for assembly is provided in the separate assembly instruction booklet included in your product package. Please refer to that document to identify and verify all parts before starting the assembly process.
3. Setup Instructions
Assembly of the ORRD Fluted Storage Cabinet requires careful attention to the step-by-step instructions. Please follow the detailed assembly guide provided in your product package. The general steps are outlined below:
- Unpack and Organize: Carefully remove all components from the packaging. Lay them out on a clean, soft surface and organize them according to the parts list in your assembly manual.
- Assemble the Frame: Follow the diagrams and instructions to connect the side panels, back panel, and top/bottom panels to form the main cabinet frame.
- Attach Legs: Securely attach the solid wood legs to the base of the cabinet.
- Install Doors: Mount the two cabinet doors using the provided hinges. Ensure they are properly aligned and open/close smoothly.
- Insert Adjustable Shelf: Place the adjustable shelf inside the cabinet at your desired height.
- Final Checks: Verify all connections are secure and the cabinet is stable.
For visual guidance on the cabinet's features and potential uses, please refer to the video below:
Video: An overview of the ORRD Fluted Storage Cabinet, showcasing its design and functionality.
4. Operating Instructions
Adjusting Shelves:
The ORRD Fluted Storage Cabinet features one adjustable shelf, allowing you to customize the internal storage space to fit various items. To adjust the shelf height:
- Empty the shelf of all contents.
- Carefully lift the shelf to remove it from its current position.
- Relocate the four shelf pins to the desired height level within the cabinet. Ensure all pins are inserted securely and are at the same height.
- Place the shelf back onto the pins, ensuring it is level and stable before placing items on it.

Image: The cabinet with its doors open, illustrating the adjustable shelf feature.
Door Operation:
The cabinet is equipped with two doors that open outwards. The doors are designed to close smoothly and securely, often featuring magnetic catches for a firm closure. Ensure no items obstruct the doors from closing completely.
Video: Demonstrates the features and design of the Modern Credenza Wooden Accent Sideboard Buffet Cabinet.
5. Maintenance
Proper care and maintenance will help preserve the appearance and longevity of your ORRD Fluted Storage Cabinet.
- Cleaning: Wipe surfaces with a soft, slightly damp cloth. Avoid using abrasive cleaners, harsh chemicals, or furniture polish that may damage the engineered wood finish.
- Spills: Immediately wipe up any liquid spills with a dry cloth to prevent moisture absorption and potential damage.
- Sunlight and Heat: Avoid placing the cabinet in direct sunlight or near heat sources (e.g., radiators, fireplaces) to prevent fading, warping, or cracking of the wood finish.
- Stability Check: Periodically inspect all screws, bolts, and fasteners. Retighten any loose connections to maintain structural integrity.
6. Troubleshooting
If you encounter any issues with your cabinet, please refer to the following common troubleshooting tips:
- Wobbly Cabinet: Ensure the cabinet is placed on a completely level surface. Check that all legs are firmly attached and all assembly screws are tightened. If necessary, use furniture shims under the legs to stabilize the cabinet.
- Doors Not Aligning/Closing Properly: Verify that the hinges are correctly installed and tightened. Most hinges allow for minor adjustments to align the doors. Refer to your assembly manual for specific hinge adjustment instructions. Check for any internal obstructions preventing the doors from closing.
- Scratches/Minor Damage: For minor scratches, a wood repair marker or furniture wax stick in a matching color can be used.
7. Specifications
Key specifications for the ORRD Fluted Storage Cabinet:
| Feature | Detail |
|---|---|
| Brand | ORRD |
| Model Number | d5652774-4b69-4c06-a97c-6a5a3b8242e9 |
| Material | Engineered Wood |
| Color | Walnut |
| Product Dimensions (D x W x H) | 14.76" x 26.93" x 31.5" |
| Number of Doors | 2 |
| Adjustable Shelves | 1 |
| Base Type | Solid Wood Legs |
| Assembly Required | Yes |
| Recommended Uses | Dining Room, General Storage, Kitchen, Living Room |

Image: Detailed product dimensions including height, width, and depth.
8. Warranty Information
Specific warranty details for the ORRD Fluted Storage Cabinet are not provided in the available product data. Please refer to the documentation included with your purchase or contact the seller directly for information regarding warranty coverage and terms.
9. Customer Support
If you have any questions, require assistance with assembly, or need to report missing or damaged parts, please contact the seller or manufacturer directly. Contact information is typically provided in the product packaging or on the seller's platform.