TokeShimi LED Bathroom Mirror 20 x 28
TokeShimi LED Bathroom Mirror (20"L x 28"W) Instruction Manual
Model: LED Bathroom Mirror 20 x 28
1. Introduction
Thank you for choosing the TokeShimi LED Bathroom Mirror. This manual provides essential information for the safe installation, operation, and maintenance of your new mirror. Please read these instructions thoroughly before beginning installation or use, and retain this manual for future reference.
Product Features:
- Dual Lighting: Integrated frontlit and backlit LED strips for enhanced brightness.
- Adjustable Lighting: Stepless dimming (5%-100%) and 3-color temperature adjustment (3000K-6000K).
- Anti-Fog Function: Quick defogging with a 1-hour auto-off safety feature.
- Memory Function: Retains your last lighting settings.
- Durable Construction: HD tempered glass with shatterproof film for safety.
- Energy Efficient: Designed for lower power consumption (0.04 kWh).
Important Safety Information:
Always mount the mirror securely using the provided hardware. In case of breakage, handle with care to avoid injury from sharp edges. Do not install near heat sources or in areas prone to vibration. Ensure power is disconnected before installation or maintenance.

Image 1.1: The TokeShimi LED Bathroom Mirror with both front and back lighting illuminated, showcasing its modern design above a bathroom vanity.
2. Package Contents
Please verify that all components are present and undamaged before proceeding with installation.
- TokeShimi LED Bathroom Mirror (1 unit)
- Mounting Hardware Kit (screws, wall anchors, French cleats)
- Power Cable (for plug-in option)
- Instruction Manual (this document)
3. Specifications
| Feature | Detail |
|---|---|
| Brand | TokeShimi |
| Model | LED Bathroom Mirror 20 x 28 |
| Dimensions | 28"L x 20"W |
| Room Type | Bathroom |
| Shape | Rectangular |
| Frame Material | Glass |
| Mounting Type | Wall Mount (French Cleat) |
| Special Feature | Fogless, Dimmable, 3-Color Light, Memory Function |
| LED Lifespan | 50,000 hours (UL-certified) |
| Power Consumption | 0.04 kWh (approx.) |
| Item Weight | 14.27 pounds |

Image 3.1: Detail showing the UL-listed certification for the LED strips and driver, ensuring product safety and durability.
4. Setup and Installation
4.1 Pre-Installation Checklist
- Ensure the wall can support the mirror's weight (14.27 lbs).
- Verify power supply is turned off at the circuit breaker before any wiring.
- Gather necessary tools: drill, level, measuring tape, screwdriver.
- Determine desired mounting orientation (vertical or horizontal).

Image 4.1: Recommended installation dimensions for the mirror, suitable for 24"-30" vanities, with suggested reserved space above and below.
4.2 Mounting Instructions (French Cleat System)
- Mark Locations: Use a level and measuring tape to mark the desired position for the French cleats on the wall. Ensure marks are level and spaced correctly for your mirror's orientation.
- Drill and Install Anchors: Drill pilot holes at the marked locations. Select appropriate wall anchors based on your wall thickness (refer to Image 4.4). Insert the wall anchors.
- Secure Cleats: Screw the French cleats securely to the wall using the provided screws. Ensure they are firmly attached.
- Hang Mirror: Carefully lift the mirror and slot its integrated French cleat system onto the wall-mounted cleats. Ensure the mirror is securely seated and level.

Image 4.2: Visual guide for the three main steps of mirror installation using the French cleat system.

Image 4.3: The mirror can be installed in either vertical or horizontal orientation to suit your space.
4.3 Wiring Options
The mirror supports two power connection methods:
- Option 1: Plug-in: Connect the provided power cable to a standard wall outlet.
- Option 2: Hardwired: For a seamless look, the mirror can be hardwired directly into your electrical system by a qualified electrician. Ensure power is off at the breaker before attempting hardwiring.

Image 4.4: Illustration of the two power connection methods: direct plug-in or hardwired installation.
4.4 Wall Anchor Selection Guide
Choosing the correct wall anchor is crucial for secure installation. Refer to the table below:
| Thickness of Wall | Recommended Wall Anchor | Recommended Drill Bit |
|---|---|---|
| >5/8" (16mm) | Expansion Anchors | 1/4" (6mm) drill bit, drilling depth in 31/32" (50mm) |
| 5/16"-5/8" (8-16mm) | Butterfly Anchors | 25/64" (10mm) drill bit |
| <5/16" (8mm) | Unapplicable |
Notice: Please check the wall thickness and ensure you select the correct anchors for mirror installation.
5. Operating Instructions
The TokeShimi LED Bathroom Mirror features intuitive touch controls located on the mirror surface.
5.1 Power On/Off and Color Temperature Adjustment
- Short Press: Tap the power icon to turn the lights on or off.
- Short Press (while on): Tap the light icon to cycle through three color temperatures: 3000K (Warm Light), 4500K (Neutral Light), and 6000K (Cool Light).

Image 5.1: Short press the light control button to change between warm, neutral, and cool light settings.
5.2 Brightness Dimming
- Long Press: While the lights are on, press and hold the light icon to seamlessly adjust brightness from 5% to 100%. Release when the desired brightness is achieved.
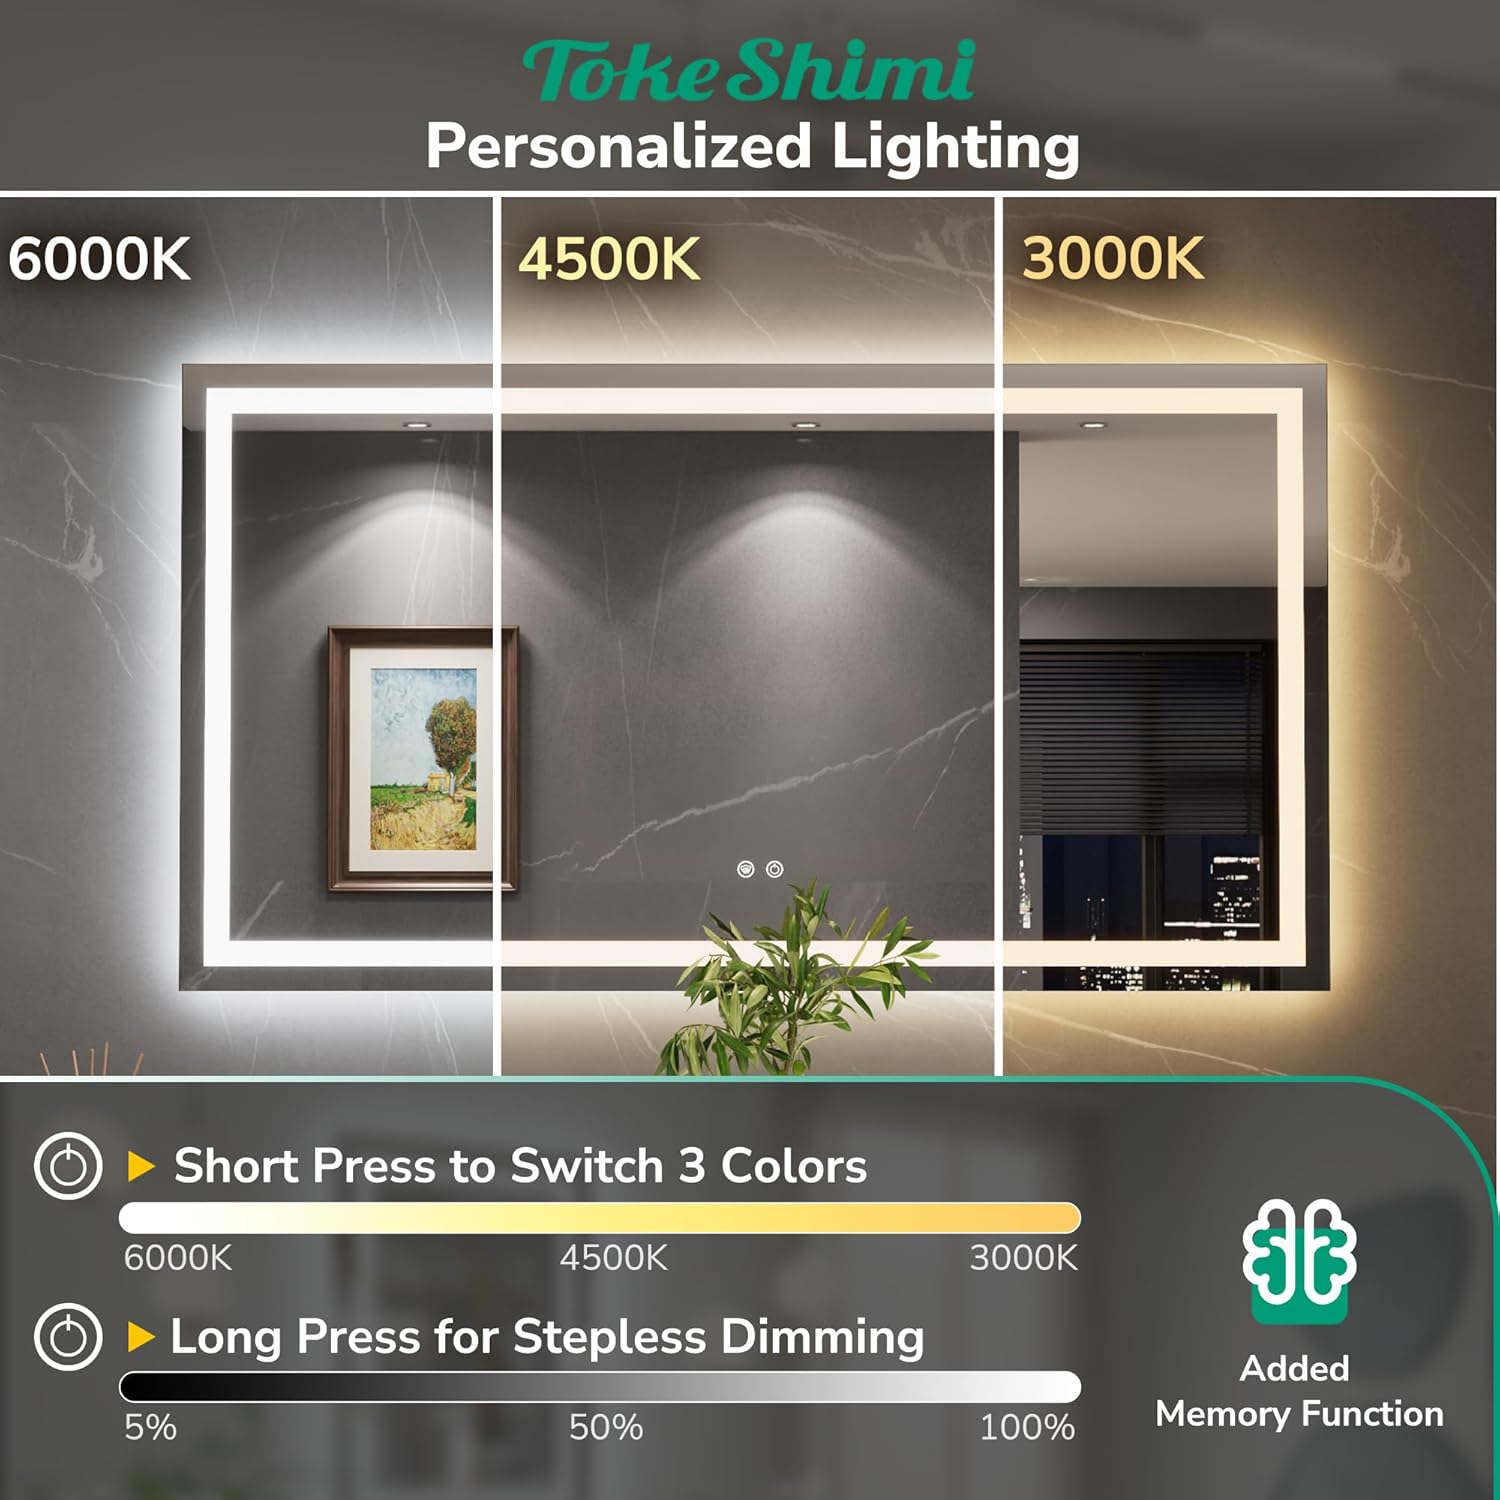
Image 5.2: Long press the light control button to continuously dim or brighten the mirror's illumination.
5.3 Anti-Fog Function
- Activate: Tap the anti-fog icon to activate the defogging function. The icon will illuminate.
- Auto-Off: For safety and energy efficiency, the anti-fog function will automatically turn off after 1 hour of continuous operation.

Image 5.3: The anti-fog feature ensures a clear reflection even in steamy bathroom conditions.
5.4 Memory Function
The mirror is equipped with a memory function that automatically saves your last used brightness and color temperature settings. When you turn the mirror back on, it will resume with these saved settings.
6. Maintenance
6.1 Cleaning the Mirror
- Power Off: Always turn off the mirror's power before cleaning.
- Cleaning Solution: Use a soft, lint-free cloth and a non-abrasive glass cleaner. Do not spray cleaner directly onto the mirror surface; instead, apply it to the cloth.
- Avoid Harsh Chemicals: Do not use abrasive cleaners, ammonia-based products, or solvents, as these can damage the mirror's surface or electronic components.
- Drying: Wipe the mirror dry immediately after cleaning to prevent water spots.
7. Troubleshooting
| Problem | Possible Cause | Solution |
|---|---|---|
| Mirror lights do not turn on. | No power supply; loose connection; faulty LED driver. | Check power outlet/breaker. Ensure all connections are secure. If hardwired, consult an electrician. Contact support if issue persists. |
| Lights are dim or flickering. | Incorrect brightness setting; unstable power supply; faulty LED strip. | Adjust brightness using the touch control. Check power supply stability. Contact support if flickering continues. |
| Anti-fog function not working. | Function not activated; faulty defogger. | Ensure the anti-fog icon is illuminated. If activated but not working, contact support. |
| Touch controls are unresponsive. | Temporary electronic glitch; moisture on controls. | Turn off power at the breaker for 5 minutes, then restore. Ensure controls are dry. Contact support if issue persists. |
8. Warranty and Support
8.1 Product Warranty
The TokeShimi LED Bathroom Mirror comes with a 2-year warranty from the date of purchase, covering manufacturing defects and malfunctions under normal use. This warranty does not cover damage caused by improper installation, misuse, accidents, or unauthorized modifications.
8.2 Customer Support
For any questions, concerns, or warranty claims, please contact TokeShimi customer support. We offer 24/7 email/phone assistance and a 30-day free return policy.
- For Returns/Replacements: If you receive a broken or wrong mirror, contact us directly with a photo of the mirror. We will arrange a free replacement. This simplifies the process compared to standard Amazon returns.
- General Inquiries: To contact us via Amazon, navigate to the product page, click on 'TokeShimi' next to 'Sold by', then click 'Ask a question' to send us a message. We aim to respond within 24 hours.

Image 8.1: Overview of customer service benefits including 24/7 support, 30-day free returns, and a 2-year warranty.
Image 8.2: Simplified process for obtaining a replacement for broken or incorrect mirrors by contacting TokeShimi directly.
Image 8.3: Instructions on how to reach TokeShimi customer support through the Amazon platform.
Related Documents - LED Bathroom Mirror 20 x 28
 |
TokeShimi Bathroom LED Mirror Installation, Usage, and Specifications Guide Comprehensive guide for installing, using, and cleaning the TokeShimi Bathroom LED Mirror. Includes safety instructions, features, operation, contact information, packing list, installation steps, and technical specifications. |
 |
TokeShimi LED Mirror: Installation, Use, and Cleaning Guide Comprehensive guide for installing, using, and cleaning your TokeShimi LED Mirror. Includes product details, safety instructions, mounting methods, and warranty information. |
 |
TokeShimi LED Bathroom Mirror Installation Manual Comprehensive installation manual for the TokeShimi LED Bathroom Mirror, detailing usage, cleaning, safety, installation steps, required tools, accessories, and technical specifications. Features anti-fog, adjustable color temperature, and touch controls. |
 |
TETOTE LED Mirror Installation and Care Guide Comprehensive guide for installing and maintaining TETOTE LED mirrors, including safety instructions, mounting methods, wiring, and product specifications. |
 |
SERA 48" LED Mirror: Bali Series M-48BFFR - Installation & Operation Guide Comprehensive guide for the SERA 48" LED Mirror, Bali Series (Model M-48BFFR), covering installation, operation, safety, features, and troubleshooting. Features include LED lighting, anti-fog, and touch controls. |
 |
Niccy Oval LED Bathroom Vanity Mirror Installation Guide Step-by-step installation instructions for the Niccy Oval LED Bathroom Vanity Mirror, including tool requirements, mounting methods, and operating instructions for light and anti-fog functions. |
Ask a question about this manual
Ask about setup, troubleshooting, compatibility, parts, safety, or missing instructions. Manuals+ will review the question and use this page’s manual context to help answer it.