1. Introduction
Thank you for purchasing the Mini Drone V9. This foldable quadcopter is equipped with advanced features such as 4K dual HD cameras, Wi-Fi FPV, and intelligent flight modes, designed to provide an immersive and enjoyable aerial experience. Please read this manual thoroughly before operating the drone to ensure safe and proper use.
2. Safety Precautions
- Read the Manual: Always read the entire user manual before operating the drone.
- Age Recommendation: This product is not suitable for children under 14 years old. Adult supervision is recommended for younger users.
- Flight Environment: Fly in open, unobstructed areas, away from people, animals, buildings, and power lines. Avoid flying in strong winds or adverse weather conditions.
- Battery Safety: Use only the provided charging cable and charger. Do not overcharge or short-circuit the battery. Discontinue use if the battery is damaged or swollen.
- Maintain Line of Sight: Always keep the drone within your visual line of sight during flight.
- Propeller Safety: Keep hands, face, and loose clothing away from rotating propellers.
- Local Regulations: Be aware of and comply with all local laws and regulations regarding drone operation.
3. Package Contents
Please check the package contents upon unboxing:
- Mini Drone V9
- Remote Controller
- Modular Drone Battery
- USB Charging Cable
- Spare Propellers (set)
- User Manual
4. Product Overview

Figure 4.1: Mini Drone V9, Remote Controller, and Folded Drone. This image displays the drone in its unfolded state, ready for flight, alongside its dedicated remote controller with a smartphone mount. A smaller inset shows the drone in its compact, folded configuration, highlighting its portability.
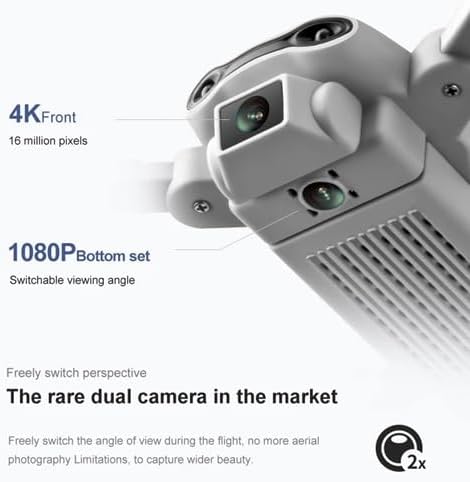
Figure 4.2: Dual Camera System. This close-up view illustrates the drone's dual camera setup, featuring a 4K front camera and a 1080P bottom camera, allowing for switchable viewing angles during flight.

Figure 4.3: Modular Battery. An illustration demonstrating the easy installation and removal of the modular lithium battery, designed for convenient loading and unloading.
5. Setup
5.1 Charging the Battery
The drone uses a modular lithium battery. Ensure the battery is fully charged before each flight.
- Connect the USB charging cable to the drone battery.
- Plug the other end of the USB cable into a 5V/1A USB power adapter (not included).
- The indicator light on the cable will show charging status (e.g., red for charging, off for fully charged). Charging typically takes about 60-90 minutes.
5.2 Installing the Drone Battery
- Ensure the drone is powered off.
- Insert the fully charged modular battery into the battery compartment on the drone's rear until it clicks into place.
5.3 Preparing the Remote Controller
The remote controller requires 3x AAA batteries (not included).
- Open the battery compartment on the back of the remote controller.
- Insert 3 AAA batteries, observing the correct polarity (+/-).
- Close the battery compartment.
5.4 Propeller Installation (if required)
If propellers are not pre-installed or need replacement:
- Match the propeller type (A or B) with the corresponding motor arm. Each motor arm is marked.
- Gently push the propeller onto the motor shaft until it is securely seated.
5.5 App Installation and Wi-Fi Connection
For FPV (First Person View) and advanced features, download the dedicated drone app.
- Scan the QR code provided in the quick start guide (or search for the app name, e.g., 'V9 FPV' or 'RC Drone') on your smartphone's app store (iOS/Android).
- Install the app.
- Power on the drone.
- Go to your phone's Wi-Fi settings and connect to the drone's Wi-Fi network (e.g., 'V9-XXXXXX').
- Open the drone app. The live video feed should appear, indicating a successful connection.
6. Operating Instructions
6.1 Power On/Off and Pairing
- Place the drone on a flat, level surface.
- Press and hold the power button on the drone until the indicator lights turn on.
- Power on the remote controller. The controller will beep, and its indicator light will flash.
- Push the left joystick (throttle) all the way up, then all the way down. The drone and controller lights will become solid, indicating successful pairing.
6.2 Gyro Calibration
After pairing, calibrate the gyroscope for stable flight:
- Push both joysticks down and to the right simultaneously. The drone lights will flash rapidly and then become solid, indicating calibration is complete.
6.3 One-Click Take-off and Landing
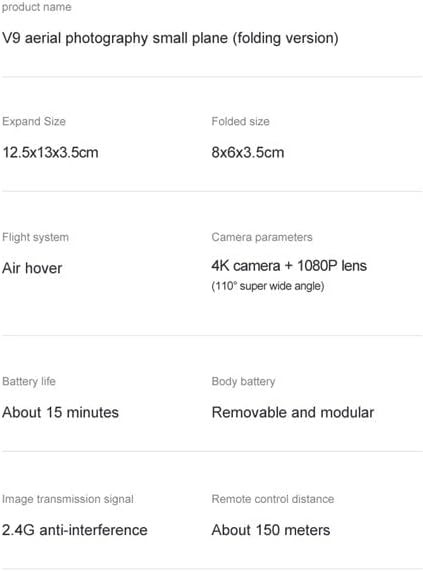
Figure 6.1: One-Click Take-off/Landing and Headless Mode. This image illustrates the simplicity of one-key take-off and landing, showing the drone ascending from a marked spot, and also depicts the concept of headless mode, where the drone's orientation is relative to the pilot.
- Take-off: Press the One-Key Take-off button (usually indicated by an arrow pointing up). The drone will automatically ascend and hover at a certain altitude.
- Landing: Press the One-Key Landing button (usually indicated by an arrow pointing down). The drone will automatically descend and land gently.
6.4 Basic Flight Controls
- Left Joystick (Throttle):
- Push up: Ascend
- Push down: Descend
- Push left/right: Rotate left/right (Yaw)
- Right Joystick (Direction):
- Push up/down: Fly forward/backward (Pitch)
- Push left/right: Fly left/right (Roll)
6.5 Advanced Flight Functions
- Headless Mode: Press the Headless Mode button. In this mode, the drone's forward direction is relative to the pilot, regardless of the drone's actual orientation. Press again to exit.
- Altitude Hold/Steady Hover: The drone automatically maintains its altitude, allowing for stable hovering. This feature is typically active by default.
- One-Key Return: Press the One-Key Return button. The drone will attempt to fly back towards its take-off point. This function is based on the initial take-off direction and does not use GPS.
- Speed Switch: Press the Speed Switch button to cycle through different speed modes (e.g., low, medium, high).
- Trajectory Flight: (Via App) In the app, draw a flight path on your screen. The drone will automatically follow the drawn trajectory.
- 360° Roll: Fly the drone to a height of at least 3 meters. Press the 360° Roll button, then push the right joystick in the desired direction (forward, backward, left, or right) to perform a flip.
- Gesture Recognition: (Via App) When the drone's camera is facing you, perform specific hand gestures (refer to app instructions) to trigger photo or video recording.
- Gravity Sensor Control: (Via App) Enable this mode in the app to control the drone's direction by tilting your smartphone.
- VR 3D Mode: (Via App) Connect your smartphone to the drone's Wi-Fi and place it into a compatible VR 3D headset. The app will split the screen for an immersive first-person view.
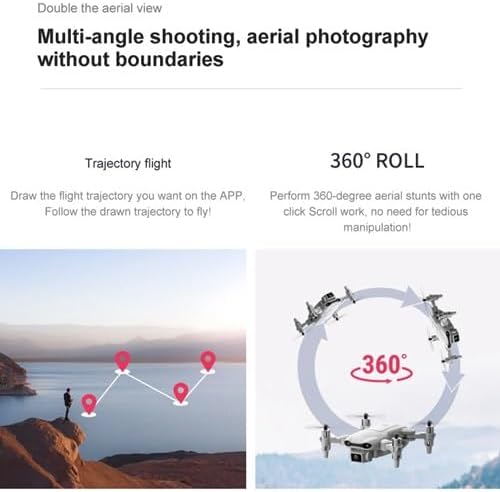
Figure 6.2: Trajectory Flight and 360° Roll. This image demonstrates the trajectory flight feature, where a user can draw a path on the app for the drone to follow, and also illustrates the drone performing a 360-degree roll stunt.
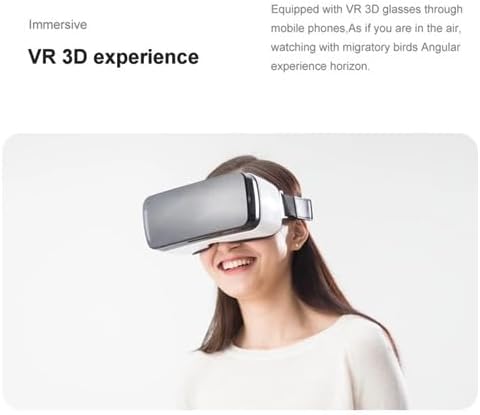
Figure 6.3: VR 3D Experience. A person is shown wearing a VR headset, demonstrating the immersive 3D experience possible when using the drone with compatible VR glasses and a smartphone.
7. Camera Operation
The Mini Drone V9 features dual cameras: a 4K front camera and a 1080P bottom camera.
- Switching Cameras: Use the dedicated button on the remote controller or the option within the app to switch between the front and bottom cameras.
- Photo Capture: Press the Photo button on the remote controller or tap the camera icon in the app to take a still image.
- Video Recording: Press the Video button on the remote controller or tap the video icon in the app to start/stop recording.
- FPV (First Person View): Once connected to the drone's Wi-Fi via the app, you will see a live video feed from the drone's camera on your smartphone screen.
8. Maintenance
- Cleaning: Use a soft, dry cloth to clean the drone body and camera lenses. Do not use harsh chemicals or solvents.
- Propeller Inspection: Regularly check propellers for damage (cracks, bends). Replace any damaged propellers immediately using the spare parts provided.
- Battery Care: Store batteries in a cool, dry place. For long-term storage, charge batteries to approximately 50% capacity. Do not store fully charged or fully depleted batteries for extended periods.
- Storage: Fold the drone arms for compact storage. Keep the drone and accessories in a safe place, away from direct sunlight and extreme temperatures.
9. Troubleshooting
| Problem | Possible Cause | Solution |
|---|---|---|
| Drone does not power on | Battery not charged or installed correctly | Ensure battery is fully charged and securely inserted. |
| Controller does not pair with drone | Incorrect pairing procedure; low controller battery | Follow pairing steps (power on drone, then controller, throttle up/down). Replace controller batteries. |
| Drone flies unstably or drifts | Gyroscope not calibrated; damaged propellers | Perform gyroscope calibration on a flat surface. Check and replace damaged propellers. |
| No FPV video feed in app | Not connected to drone's Wi-Fi; app not open | Ensure phone is connected to the drone's Wi-Fi network. Restart the app and drone. |
| Short flight time | Battery not fully charged; old battery | Fully charge the battery. Consider replacing the battery if it's old or degraded. |
10. Specifications
| Feature | Detail |
|---|---|
| Brand | weidilixiang |
| Model Name | K911 Se |
| Video Capture Resolution | 4K (Front), 1080P (Bottom) |
| Camera Angle | 110° Super Wide Angle |
| Connectivity Technology | 5G Wi-Fi FPV |
| Remote Control Technology | 5G |
| Remote Control Distance | About 150 meters |
| Battery Life | About 15 minutes |
| Battery Type | Removable and Modular Lithium Battery |
| Material | Plastic |
| Expanded Dimensions | 12.5"L x 13"W x 3.5"H (approx. 31.75cm L x 33.02cm W x 8.89cm H) |
| Folded Dimensions | 8"L x 6"W x 3.5"H (approx. 20.32cm L x 15.24cm W x 8.89cm H) |
| Item Weight | 7.1 ounces (approx. 201 grams) |
| Skill Level | Intermediate |
| Special Feature | Brushless Motor |
11. Warranty and Support
For any questions, technical support, or warranty inquiries, please contact the manufacturer or your point of purchase. Keep your purchase receipt as proof of purchase for warranty claims.