Leselux LES-T70
Leselux LED Ceiling Light with Motion Sensor User Manual
Model: LES-T70
Introduction
Thank you for choosing the Leselux LED Ceiling Light with Motion Sensor. This innovative and versatile lighting solution is designed to provide convenient and efficient illumination for various spaces. With its wireless design, long-lasting battery, and smart features, it offers a superior lighting experience. Please read this manual carefully before installation and use to ensure optimal performance and safety.
Product Overview
The Leselux LED Ceiling Light is a compact, ultra-thin, and rechargeable lighting fixture equipped with a motion sensor and remote control. It offers three operating modes, adjustable color temperature, and dimmable brightness, making it suitable for a wide range of indoor applications such as hallways, staircases, closets, garages, and storage rooms. Its magnetic installation allows for easy setup without the need for complex wiring.

Image: The Leselux LED Ceiling Light shown with its included remote control, USB-C charging cable, magnetic patch, and mounting screws.
What's in the Box
- Leselux LED Ceiling Light
- Remote Control
- Magnetic Patch
- Nano Adhesive
- Type-C Cable (50 cm)
Key Features
- Three Operating Modes: The Leselux wireless ceiling light offers three distinct modes: Always On, Night Induction, and Day Induction. Easily switch between modes using the button on the light or the remote control. In induction modes, the light automatically activates when motion is detected within a 4-6 meter radius and turns off after 20 seconds of no motion.
- Ultra-Thin and Wireless Installation: Featuring an ultra-thin magnetic design, the light is only 1.5 cm thick. No wiring is required; simply peel off the adhesive paper from the magnetic sheet and stick it to the ceiling, then attach the ceiling light. This makes it perfect for areas without electrical outlets, such as storage rooms, sheds, porches, cabinets, hallways, staircases, and basements.
- Long Battery Life: Equipped with a built-in 6000mAh rechargeable battery, the light fully charges in approximately 8 hours via a USB Type-C cable. In constant illumination mode, the light lasts for 13 hours. In sensor mode, it can last from 25 to 45 days, depending on usage frequency. This extended battery life minimizes the need for frequent recharging.
- Adjustable Color Temperature and Dimmable Brightness: The ultra-thin ceiling light provides 250 lumens of brightness and offers three color temperature options: 3000K warm white, 4500K natural white, and 6500K cool white. It also features stepless dimming from 5% to 100% and a memory function that retains the last color temperature setting.
- Remote Control and Timer Function: The rechargeable wireless LED ceiling light comes with a remote control. For extended illumination, you can set a timer for 15, 30, or 60 minutes using the remote. The remote control range is 5-8 meters, allowing you to adjust all functions from anywhere in the room without needing to remove the light.
Setup and Installation
The Leselux LED Ceiling Light offers two convenient installation methods: magnetic adhesion and screw mounting.
1. Magnetic Installation (No Drilling Required)
- Clean the desired installation surface to ensure it is dry and free of dust.
- Peel off the protective film from the nano adhesive on the back of the magnetic patch.
- Firmly press the magnetic patch onto the clean surface (e.g., ceiling, wall).
- Align the Leselux ceiling light with the magnetic patch. The strong magnets will securely hold the light in place.
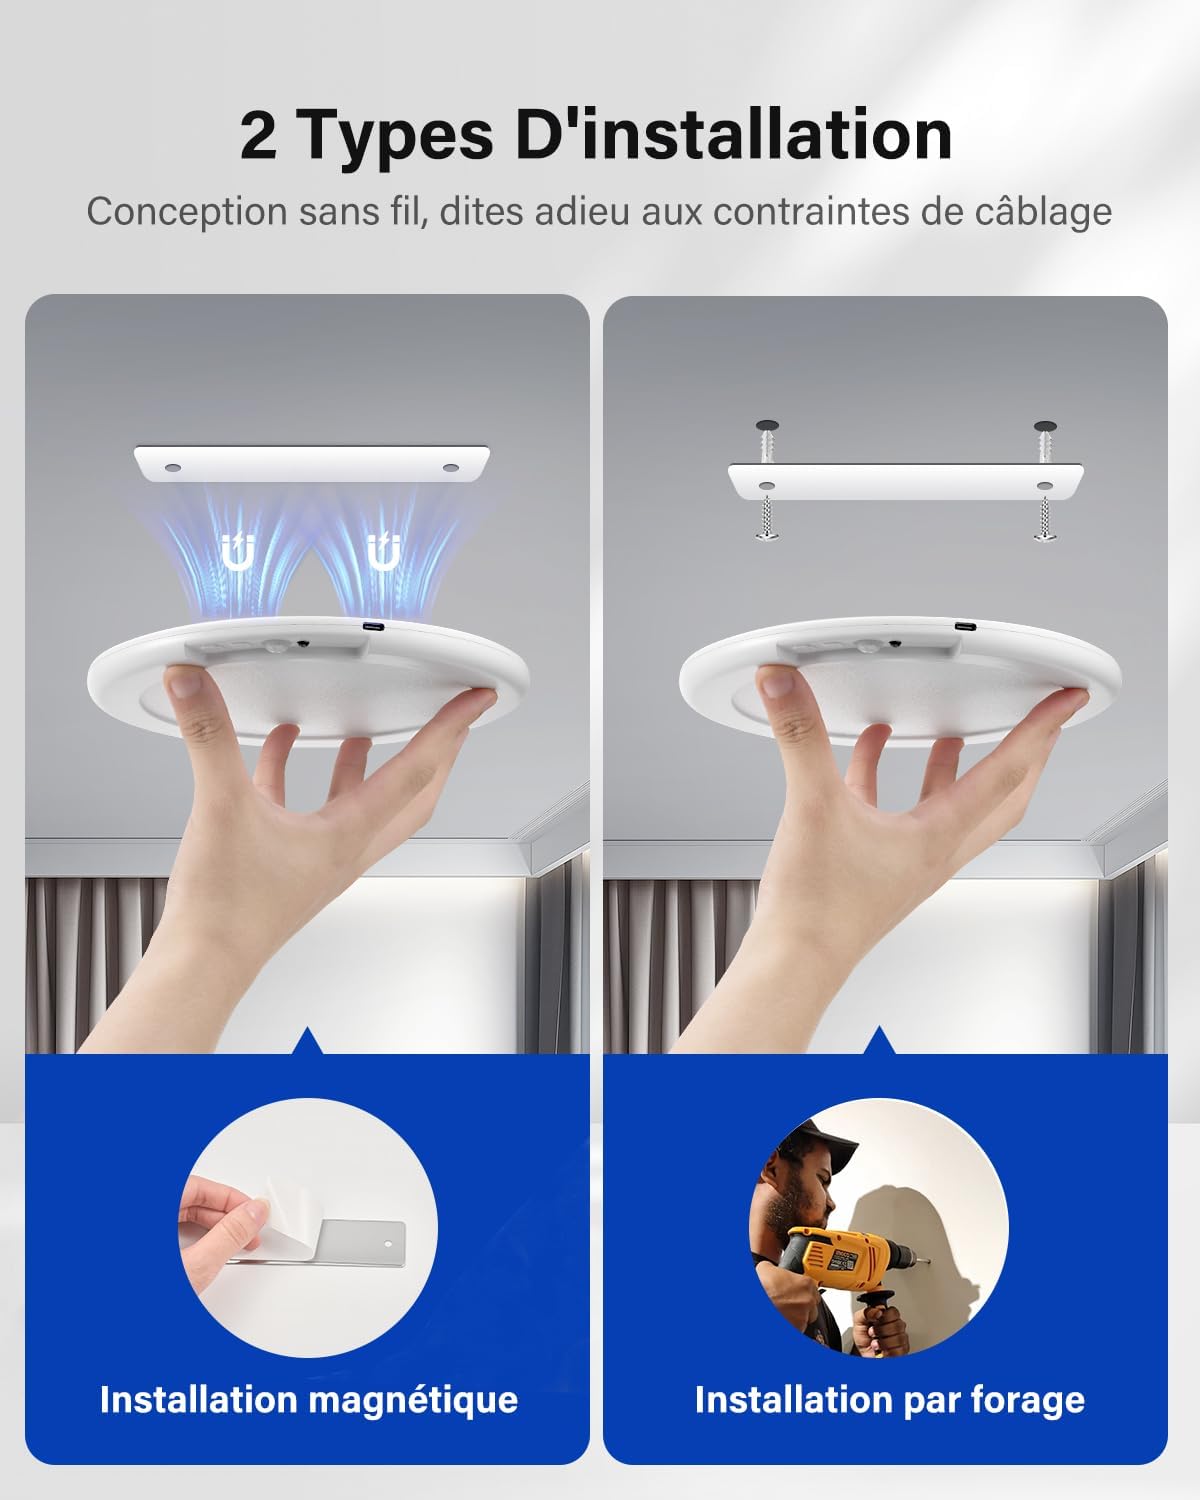
Image: Illustration showing both magnetic installation (left) and screw drilling installation (right) for the ceiling light.
2. Screw Mounting (For Permanent Fixture)
- Position the magnetic patch on the desired surface and mark the two screw holes.
- Drill two holes at the marked positions. Insert the provided wall plugs if installing into drywall or masonry.
- Secure the magnetic patch to the surface using the provided screws.
- Attach the Leselux ceiling light to the secured magnetic patch.
Charging the Device
Before first use, it is recommended to fully charge the ceiling light. Connect the provided Type-C cable to the charging port on the light and to a standard USB power adapter (not included). A full charge takes approximately 8 hours.

Image: Side view of the Leselux ceiling light showing the USB-C charging port and an indicator of battery life in days for different modes.
Operating Instructions
Switching Modes
The light features a button on its side and a remote control to switch between the three operating modes:
- Always On Mode (ON): The light remains continuously illuminated.
- Night Induction Mode (AUTO2): The motion sensor activates only in low-light conditions or darkness. The light turns on when motion is detected and turns off after 20 seconds of no motion.
- Day Induction Mode (AUTO1): The motion sensor activates regardless of ambient light conditions (day or night). The light turns on when motion is detected and turns off after 20 seconds of no motion.

Image: Visual representation of the three intelligent modes: Day Sensor Mode (AUTO1), Night Sensor Mode (AUTO2), and Always On Mode (ON), illustrating their detection capabilities and light activation conditions.
Adjusting Color Temperature and Brightness
Use the remote control to customize the light's appearance:
- Color Temperature: Select between 3000K (warm white), 4500K (natural white), and 6500K (cool white) to match your preference or environment.
- Brightness Dimming: Adjust the brightness from 5% to 100% using the dimming buttons on the remote. The light has a memory function that recalls your last brightness and color temperature setting.

Image: Display of the three available color temperatures: 3000K (warm white), 4500K (natural white), and 6500K (cool white), along with a brightness slider from 5% to 100%.
Using the Timer Function
The remote control allows you to set a timer for automatic shut-off. This function is particularly useful in "Always On" mode to conserve battery life or for specific lighting durations.
- Press the 15min button on the remote to set the light to turn off after 15 minutes.
- Press the 30min button on the remote to set the light to turn off after 30 minutes.
- Press the 60min button on the remote to set the light to turn off after 60 minutes.
The timer function is only active when the light is in "Always On" mode.

Image: A visual guide demonstrating the intelligent timer function, showing the light with timer settings for 15, 30, and 60 minutes, and a note that it's used only in ON mode.
Maintenance
- Cleaning: To clean the light, gently wipe the surface with a soft, dry cloth. Do not use abrasive cleaners or solvents, as they may damage the finish. Ensure the light is off and disconnected from any charging cable before cleaning.
- Charging: Recharge the battery when the light's brightness diminishes or when it no longer activates reliably in sensor mode. Use the provided Type-C cable and a compatible USB power source. Avoid overcharging by disconnecting once fully charged.
- Recycling: This product contains a rechargeable battery and electronic components. Please dispose of it responsibly at designated recycling facilities in accordance with local regulations. Do not dispose of it with household waste.
Troubleshooting
| Problem | Possible Cause | Solution |
|---|---|---|
| Light does not turn on. | Battery is depleted. Incorrect mode selected. | Charge the light fully. Ensure the light is in "Always On" mode or an appropriate sensor mode for current light conditions. |
| Motion sensor not working. | Incorrect mode selected. Obstruction in sensor path. Sensor range too far. | Switch to "Night Induction" or "Day Induction" mode. Ensure no objects block the sensor. Place the light within 4-6 meters of desired detection area. |
| Remote control not responding. | Remote battery depleted. Obstruction between remote and light. Out of range. | Replace remote control battery. Ensure clear line of sight. Operate within 5-8 meters of the light. |
| Light turns off too quickly. | No continuous motion detected in sensor mode. | In sensor modes, the light turns off after 20 seconds of no motion. If continuous light is needed, switch to "Always On" mode. |
Specifications
| Feature | Detail |
|---|---|
| Brand | Leselux |
| Model Number | LES-T70 |
| Dimensions (L x W x H) | 20 x 24 x 1.7 cm (approx. 7.87 x 9.45 x 0.67 inches) |
| Weight | 430 grams (approx. 0.95 lbs) |
| Battery Capacity | 6000mAh |
| Charging Time | Approx. 8 hours (via USB Type-C) |
| Battery Life (Always On) | Approx. 13 hours |
| Battery Life (Sensor Mode) | 25-45 days (depending on usage) |
| Power | 5 Watts |
| Luminous Flux | 250 lumens |
| Color Temperature | 3000K (Warm White), 4500K (Natural White), 6500K (Cool White) |
| Dimmable | Yes (5% to 100% stepless dimming) |
| Motion Detection Range | 4-6 meters |
| Remote Control Range | 5-8 meters |
| Material | Acrylonitrile Butadiene Styrene (ABS), Polycarbonate (PC) |
| Special Features | Dimmable, Motion Detector, Portable, Adjustable Color Temperature |
| Certification | CE |
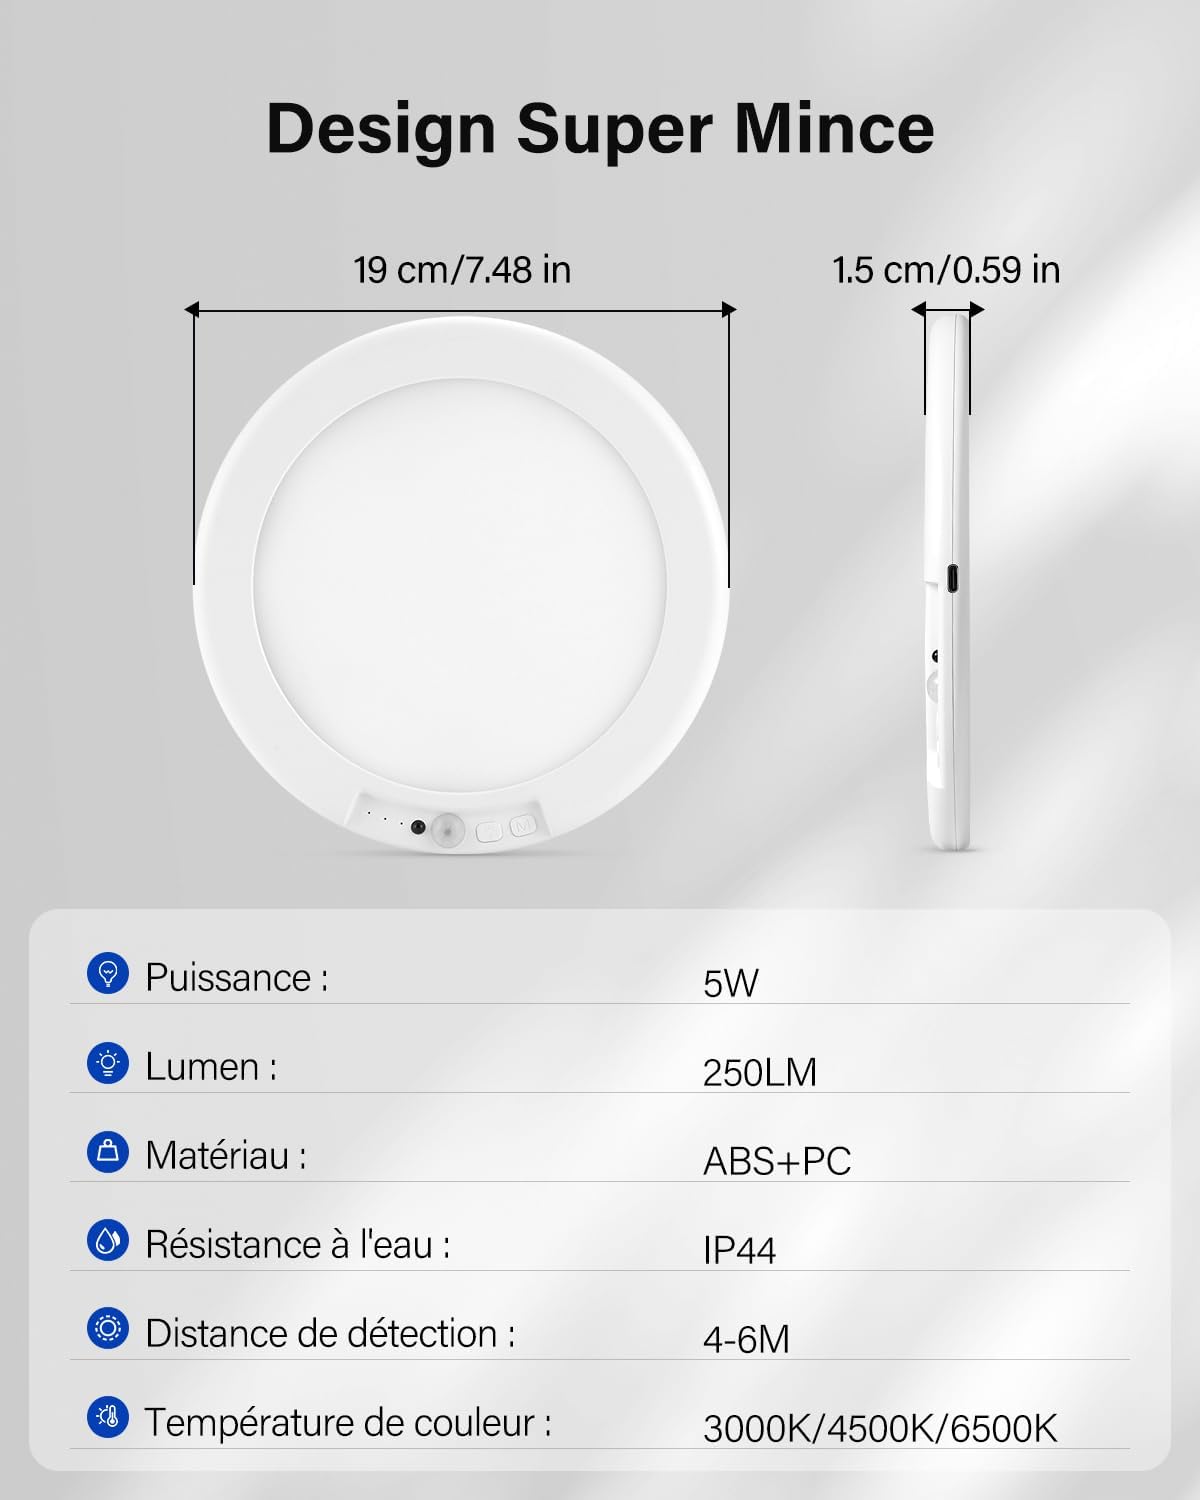
Image: Detailed diagram illustrating the super thin design with dimensions (19 cm diameter, 1.5 cm thickness) and a summary of key specifications like power, lumen, material, water resistance, detection distance, and color temperature.
Warranty and Support
Leselux is committed to providing high-quality products and excellent customer service.
- Warranty: Within two years of product purchase, Leselux will provide a free replacement for any non-human quality issues.
- Customer Support: Expect a rapid response within 24 hours for any inquiries or issues.
- Returns: Enjoy hassle-free returns within 30 days of purchase.
For support, please contact Leselux customer service through the platform where you purchased the product.
Ask a question about this manual
Ask about setup, troubleshooting, compatibility, parts, safety, or missing instructions. Manuals+ will review the question and use this page’s manual context to help answer it.