1. Introduction
Thank you for choosing the Natotinorch Handheld Metal Detector Wand. This device is designed for efficient and reliable detection of all metal products, making it ideal for safety inspections in various environments. Its ergonomic design, adjustable sensitivity, and dual alarm modes ensure ease of use and effective performance. Please read this manual thoroughly before operating the device to ensure proper use and maintenance.

Figure 1: Natotinorch Handheld Metal Detector Wand.
2. Product Overview
2.1 Key Features
- Rechargeable and Reusable: Built-in battery provides approximately 20 hours of operation on a full charge.
- Adjustable Sensitivity: Six LED lights indicate signal strength, allowing for sensitivity adjustment to suit specific needs.
- External Headphone Support: Features a 3.5mm headphone jack for discreet operation in noisy environments or to avoid disturbing others (headphones not included).
- Dual Alarm Modes: Switch between sound and vibration alarm modes based on the detection environment.
- Ergonomic Design: Arc-shaped handle for comfortable grip, measuring 17 inches long, 2.6 inches wide, and weighing 0.92 pounds.
- Wide Application: Capable of detecting all metals, suitable for use in airports, stations, docks, schools, exhibitions, museums, and other security inspection areas.
2.2 Components
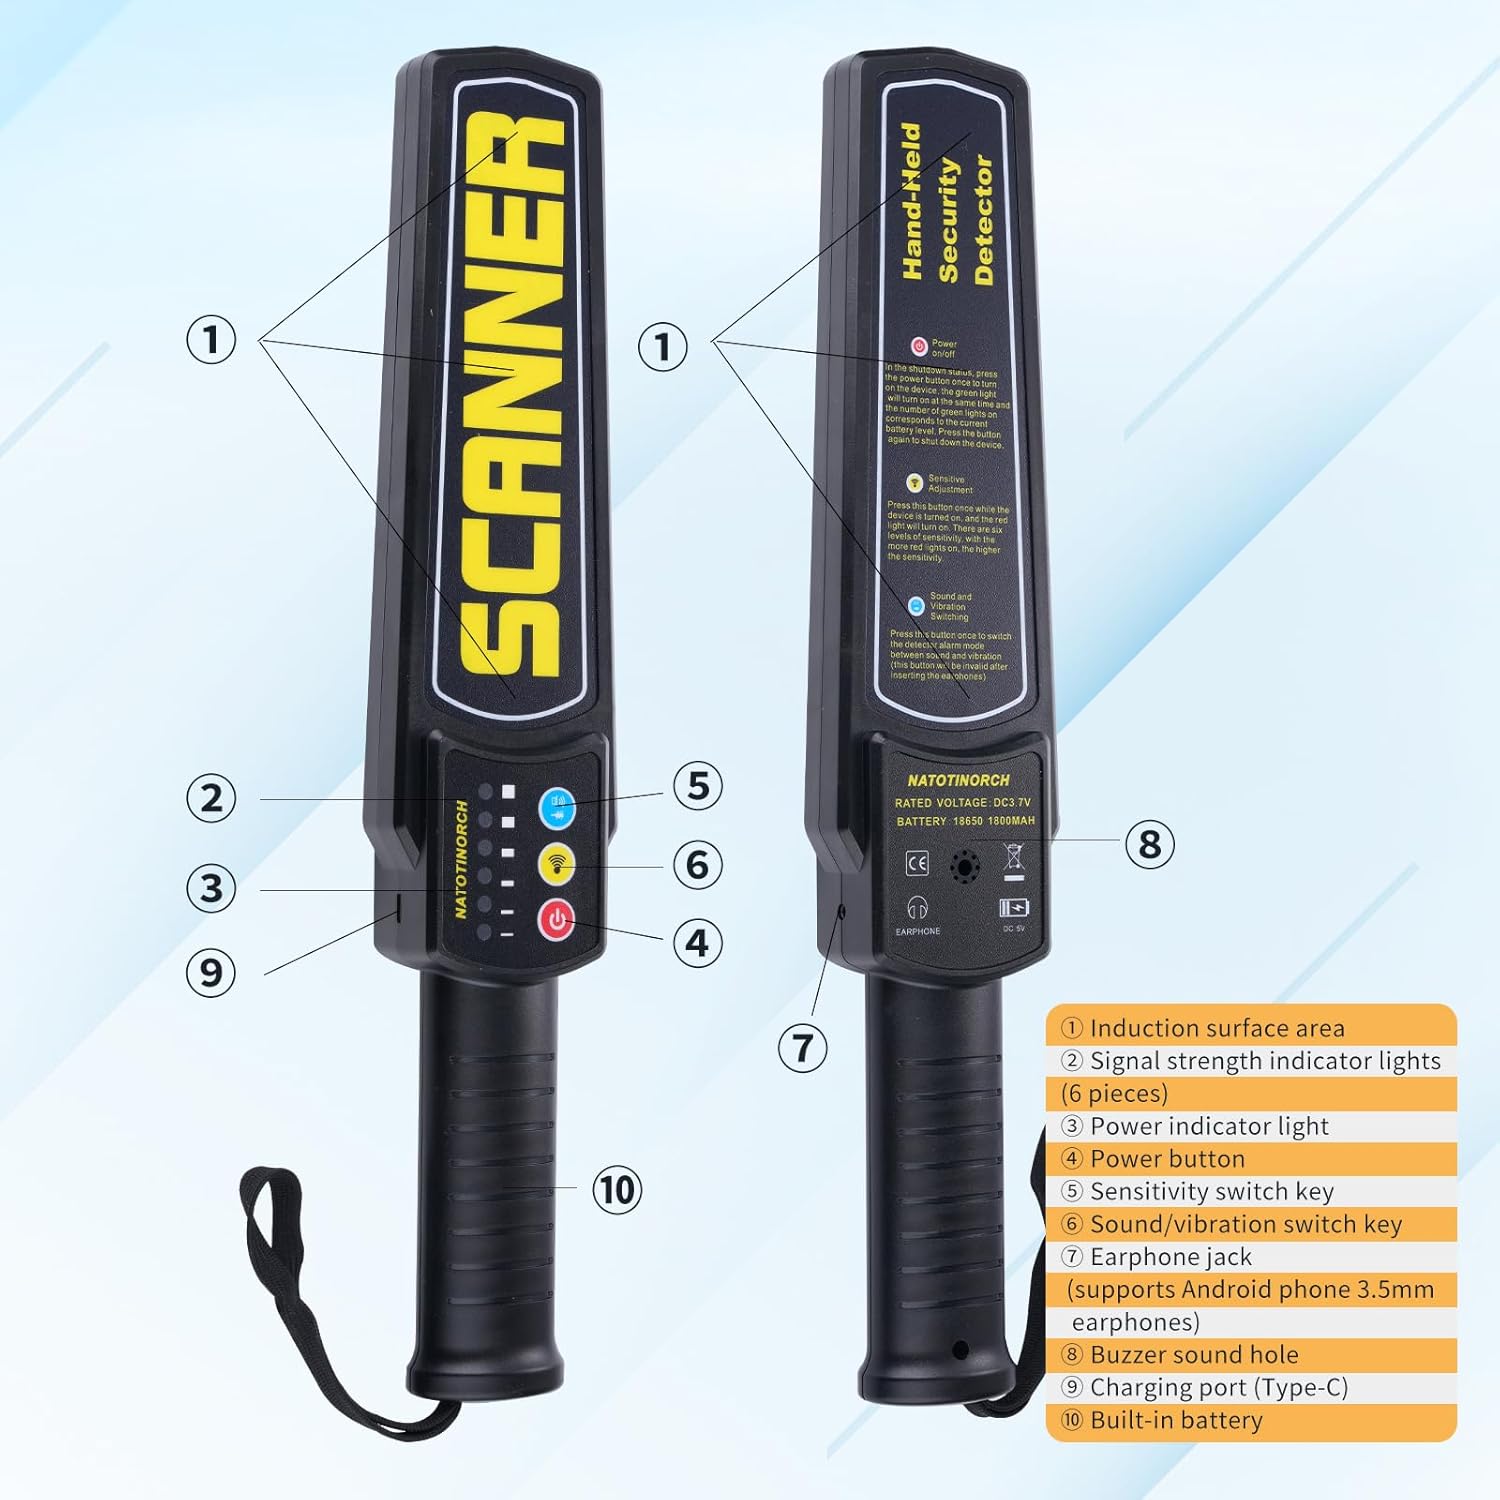
Figure 2: Product Components Diagram.
- Induction surface area
- Signal strength indicator lights (6 pieces)
- Power indicator light
- Power button
- Sensitivity switch key
- Sound/vibration switch key
- Earphone jack (supports Android phone 3.5mm earphones)
- Buzzer sound hole
- Charging port (Type-C)
- Built-in battery
3. Setup
3.1 Initial Charging
Before first use, fully charge the metal detector wand. The device has a built-in battery. When the power is low, the power indicator light (3) will signal. Use a charging adapter with DC5V and greater than 0.8A output to charge the instrument via the Type-C charging port (9). A full charge provides approximately 20 hours of continuous operation.

Figure 3: Charging the device.
3.2 Powering On/Off
To power on the device, press and hold the Power button (4) until the power indicator light (3) illuminates. To power off, press and hold the Power button (4) again until the lights turn off.
4. Operating Instructions
4.1 Adjusting Sensitivity
The metal detector features six sensitivity levels. Press the Sensitivity switch key (5) to cycle through the different levels. The signal strength indicator lights (2) will illuminate to show the current sensitivity setting. Adjust the sensitivity based on the size of the metal object you wish to detect and the environment.
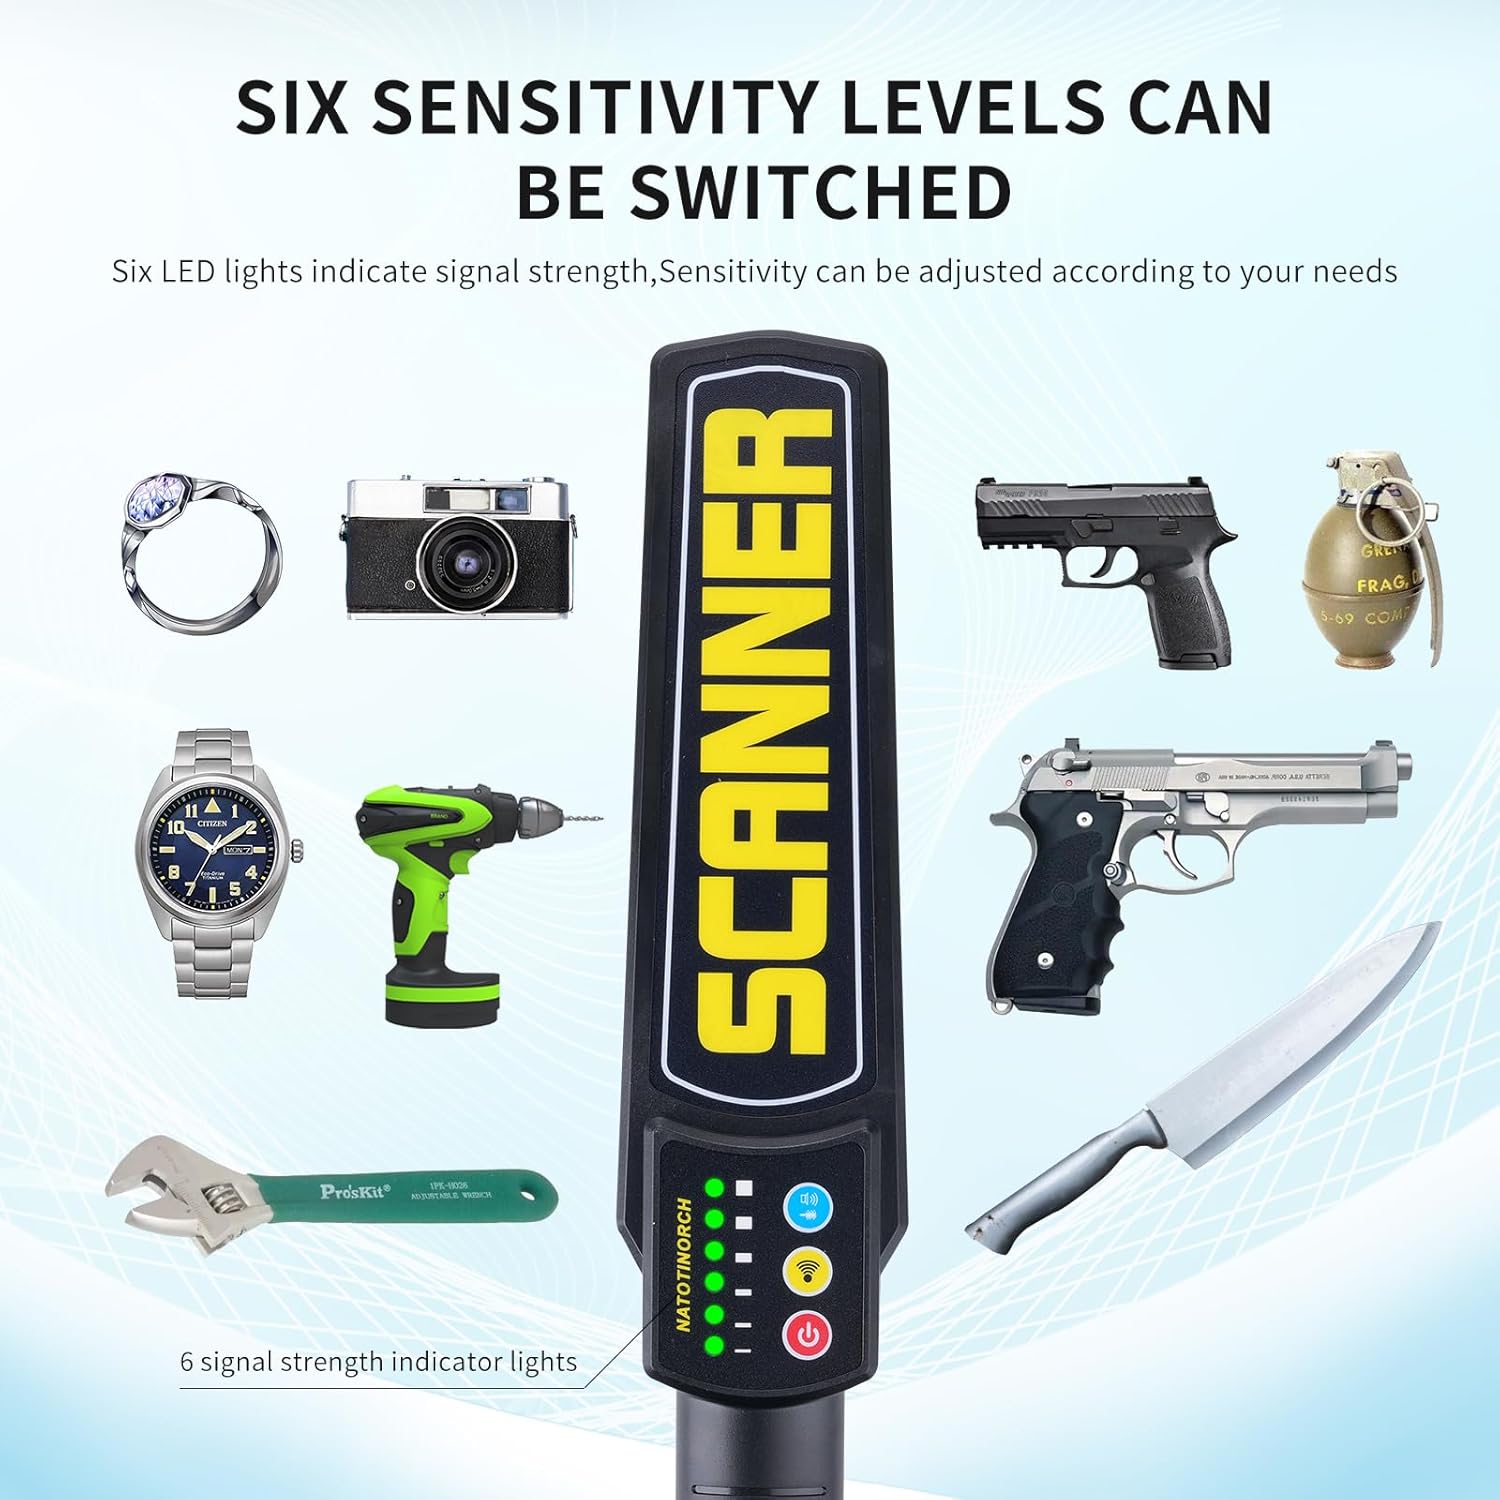
Figure 4: Six sensitivity levels and examples of detectable items.
4.2 Switching Alarm Modes
The device supports two alarm modes: sound and vibration. Press the Sound/vibration switch key (6) to toggle between these modes. The sound mode provides an audible alert through the buzzer sound hole (8), while the vibration mode offers a silent, tactile alert. Choose the mode appropriate for your environment.
4.3 Using External Headphones
For discreet operation or in noisy environments, you can connect 3.5mm headphones (not included) to the earphone jack (7). This allows you to hear detection alerts without disturbing others or being affected by ambient noise.

Figure 5: Earphone jack for external headphones.
4.4 Scanning Technique
Hold the metal detector wand by the ergonomic handle (10) and sweep the induction surface area (1) over the area to be inspected. Move the wand slowly and steadily. When a metal object is detected, the device will alert you according to the selected alarm mode (sound or vibration), and the signal strength indicator lights (2) will illuminate, with more lights indicating a stronger signal or closer proximity to the metal.

Figure 6: Example of typical usage in a security check scenario.
5. Maintenance
5.1 Cleaning
Wipe the device with a soft, dry cloth. Do not use abrasive cleaners or solvents, as they may damage the surface or internal components. Ensure the device is powered off before cleaning.
5.2 Battery Care
To prolong battery life, avoid fully discharging the battery frequently. Recharge the device when the power indicator light signals low battery. If storing the device for an extended period, charge it to approximately 50% and recharge every few months to prevent deep discharge.

Figure 7: Built-in rechargeable battery for extended use.
5.3 Storage
Store the metal detector in a cool, dry place, away from direct sunlight, extreme temperatures, and high humidity. Keep it out of reach of children.
6. Troubleshooting
| Problem | Possible Cause | Solution |
|---|---|---|
| Device does not power on. | Battery is fully discharged. | Charge the device using a DC5V > 0.8A adapter via the Type-C port. |
| Device keeps beeping after turning on. | Low battery reminder. | Charge the device immediately. |
| Inconsistent metal detection. | Sensitivity setting is too low or too high for the target. | Adjust the sensitivity level using the Sensitivity switch key (5). Ensure proper scanning technique. |
| No sound/vibration alert. | Incorrect alarm mode selected or headphones connected. | Press the Sound/vibration switch key (6) to select the desired mode. If headphones are connected, sound will be routed to them. |
7. Specifications
- Brand: Natotinorch
- Model: Z008
- Color: Black
- Material: Acrylonitrile Butadiene Styrene (ABS)
- Power Source: Battery Powered (Built-in Lithium Ion battery)
- Battery Capacity: 1300mAh
- Rated Voltage: DC3.7V
- Item Weight: 14.7 ounces (0.92 pounds)
- Product Dimensions (L x W x H): 16" x 2.6" x 1.5" (40.64 cm x 6.6 cm x 3.81 cm)
- Charging Port: Type-C
- Headphone Jack: 3.5mm
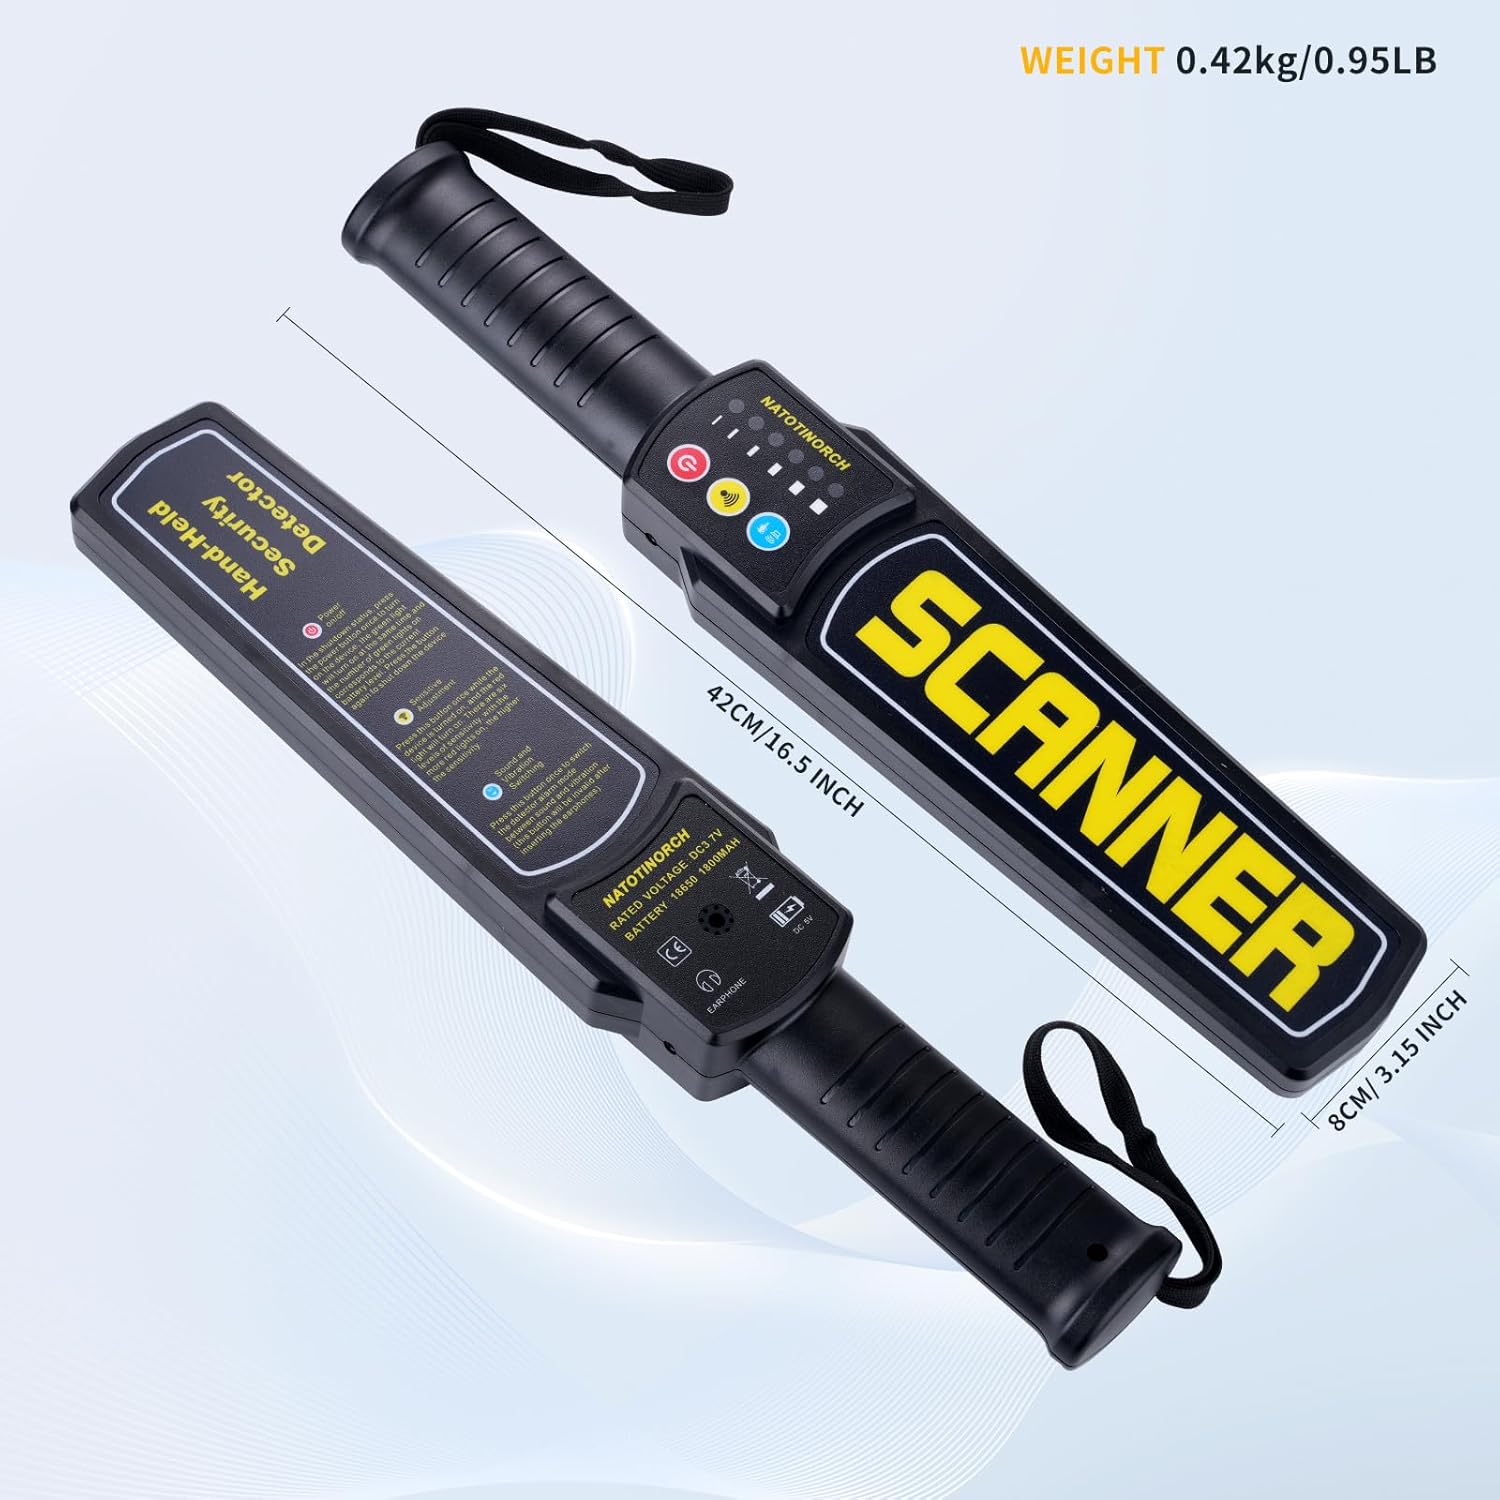
Figure 8: Product dimensions.
8. Safety Information
- Do not attempt to disassemble or modify the device. This may cause damage and void the warranty.
- Keep the device away from water and excessive moisture to prevent electrical shock or damage.
- Avoid exposing the device to extreme temperatures (hot or cold) or direct sunlight for prolonged periods.
- Use only the specified charging adapter (DC5V > 0.8A) for charging to prevent damage to the battery or device.
- Do not use the device if it appears damaged or is not functioning correctly.
- Dispose of the device and its battery responsibly according to local regulations. Do not dispose of in general waste.
9. Warranty and Support
For warranty information and technical support, please refer to the purchase documentation or contact Natotinorch customer service directly. You can also visit the official Natotinorch store on Amazon for more information: Natotinorch Amazon Store.
Please retain your proof of purchase for any warranty claims.


