TBANVOO 74588679
Window Cleaning Robot User Manual
Brand: TBANVOO | Model: 74588679
1. Introduction
Thank you for choosing the TBANVOO Window Cleaning Robot. This intelligent device is designed to simplify your window cleaning tasks, offering powerful suction, automatic water spray, and smart route planning for efficient and thorough cleaning of various surfaces including windows, tiles, and bathrooms. Please read this manual carefully before operating the robot to ensure safe and optimal performance.

Image 1.1: The TBANVOO Window Cleaning Robot, a compact and efficient device for automated surface cleaning.
2. Safety Information
Your safety is paramount. Always adhere to the following safety guidelines:
- Safety Rope: Always attach the provided safety rope and buckle securely to a fixed anchor point before operating the robot, especially when cleaning high windows. The rope length is 450cm.
- Power Connection: Ensure the power adapter is securely connected during operation. The robot has a built-in battery for approximately 30 minutes of adhesion in case of power interruption, allowing time for retrieval.
- Sensors: The robot is equipped with 4 multi-directional sensors for obstacle detection and edge sensing. Keep sensors clean for optimal performance.
- Surface Condition: Do not use the robot on cracked, damaged, or uneven surfaces. Ensure the surface is free from large debris that could obstruct movement or damage the device.
- Water Tank: Use only clean water or recommended cleaning solutions in the water tank. Do not overfill.
- Supervision: While the robot operates autonomously, it is recommended to supervise its operation, especially during initial uses or in new environments.
3. Package Contents
Please check the box for the following items:
- 1 x Host (Window Cleaning Robot)
- 1 x Power Adapter
- 1 x Controller (Remote Control)
- 1 x Small Kettle (for filling water)
- 1 x Safety Rope + Safety Buckle
- 3 x Cleaning Rags
- 1 x Instruction Manual
4. Product Overview
The TBANVOO Window Cleaning Robot features a compact design with advanced functionalities for effective cleaning.
- Automatic Water Spray: Equipped with 4 water spray ports for continuous and even moisture application during cleaning.
- Strong Suction: Features 5600Pa strong suction, providing a vertical load-bearing capacity of 4kg, ensuring firm adhesion to surfaces.
- Intelligent Sensors: Multiple sensors provide millisecond response for intelligent perception of edges and obstacles, enhancing safety and navigation.
- M6.0 Intelligent Control Chip: An advanced AI intelligence chip for smart route planning and efficient operation.
- Upgraded Chassis: Features an upgraded tank track and a new self-tuning chassis, allowing it to adapt well to various surfaces such as marble, frameless glass, framed glass, and tiles.

Image 4.1: Illustration of the robot's powerful 5600Pa suction, capable of vertical load-bearing up to 4kg.
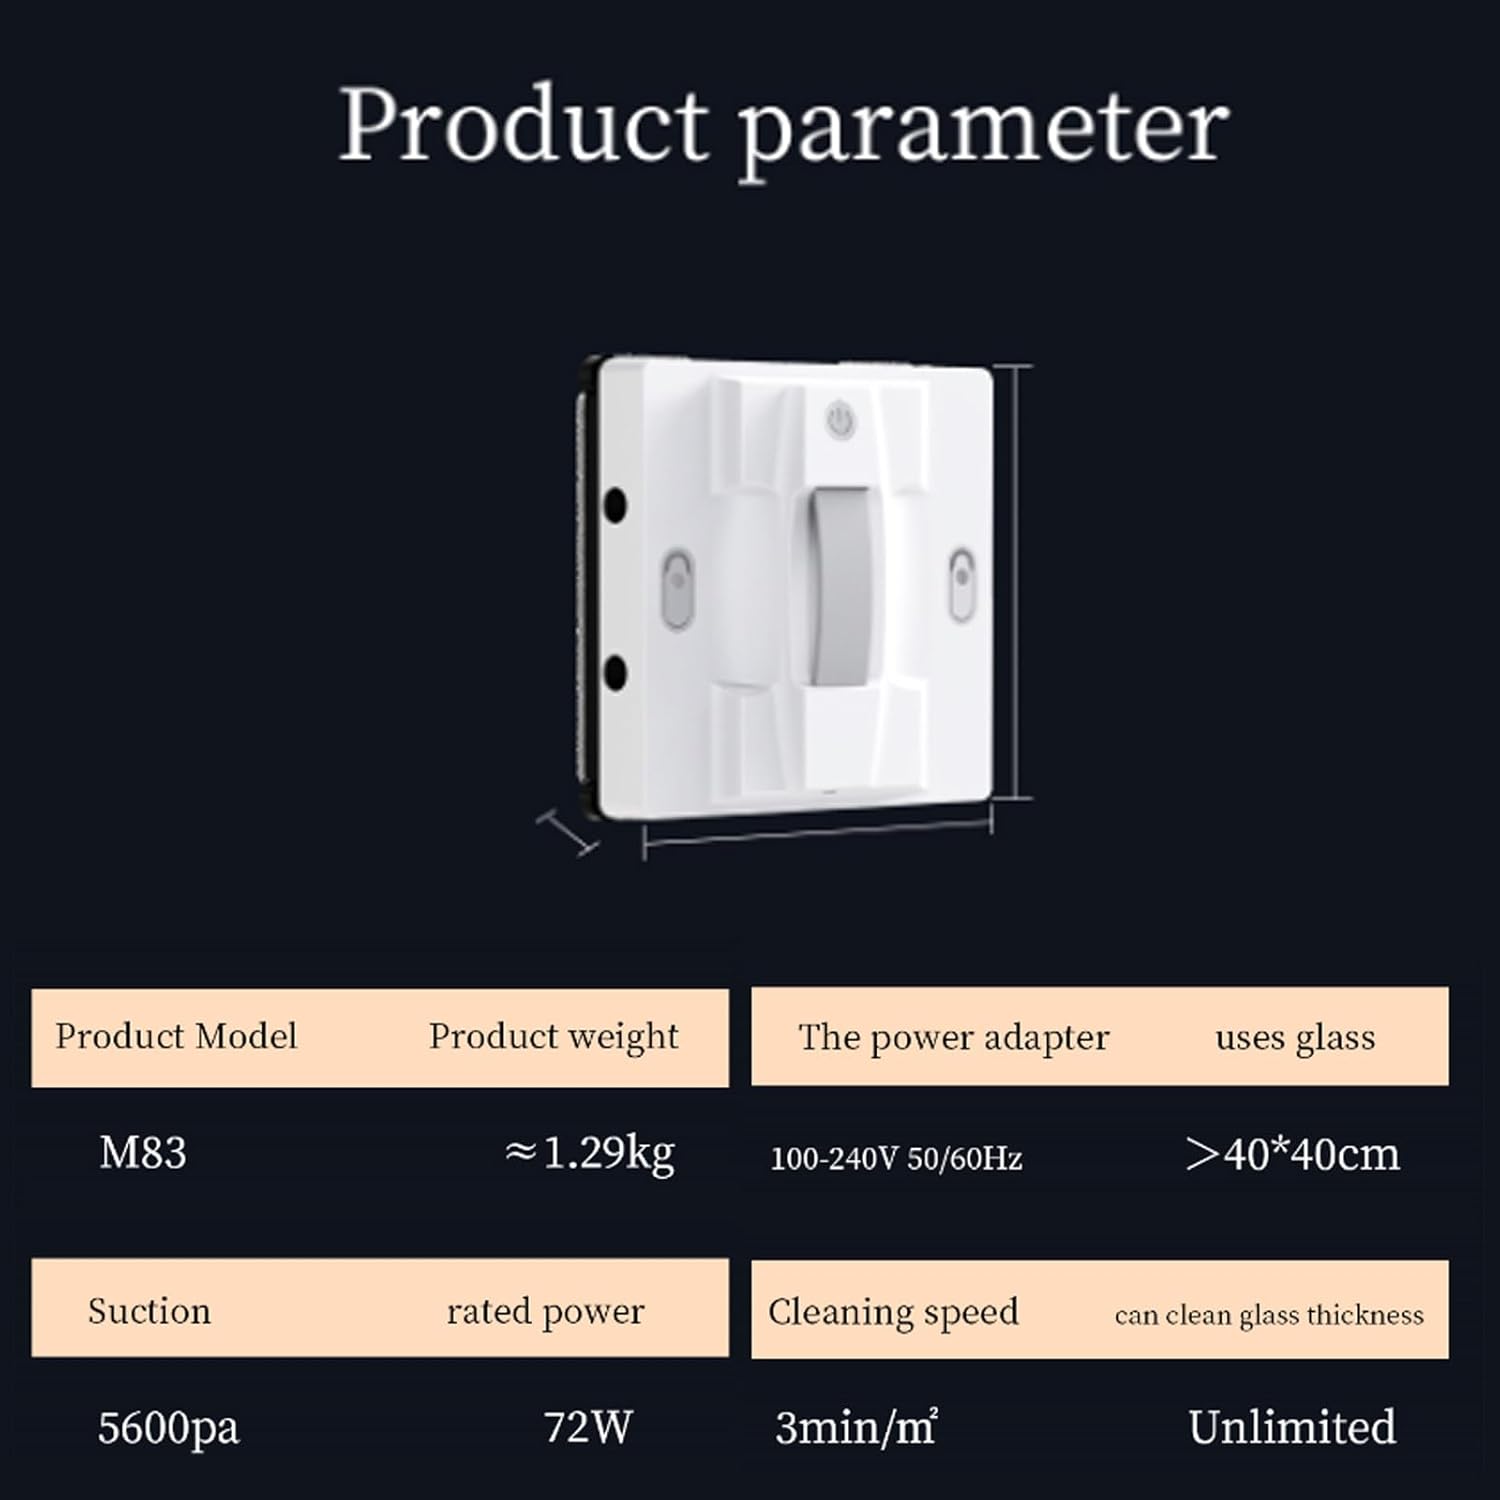
Image 4.2: Close-up of the robot's upgraded tank track and self-tuning chassis, designed for adaptability across various surfaces.
5. Setup
- Charge the Robot: Before first use, ensure the robot's internal battery is fully charged. Connect the power adapter to the robot and a power outlet.
- Attach Cleaning Rags: Securely attach the provided cleaning rags to the designated areas on the robot's underside. Ensure they are clean and properly aligned.
- Fill Water Tank: Use the small kettle to fill the robot's water tank(s) with clean water or a suitable window cleaning solution. The total capacity is 50+50ml.
- Connect Safety Rope: Attach the safety rope's buckle to the robot and secure the other end to a sturdy, fixed object (e.g., a heavy piece of furniture, a window frame anchor) to prevent accidental falls.
- Connect Power Adapter: Plug the power adapter into the robot and then into a power outlet. The robot requires continuous power during operation.
6. Operating Instructions
The robot can be controlled via the included remote control or a dedicated mobile application.
6.1 Power On/Off
- Power On: Place the robot on the surface to be cleaned. Press and hold the power button on the robot or the remote control until it powers on and adheres to the surface.
- Power Off: Press the power button on the robot or the remote control. The robot will release suction and can be removed from the surface.
6.2 Cleaning Modes and Route Planning
The robot features built-in intelligent route planning for efficient cleaning:
- Z-type Cleaning: Ideal for tall and narrow surfaces.
- N-type Cleaning: Ideal for wide and short surfaces.
- N/Z-type Cleaning: A combination mode for general use.
- Fixed-point Cleaning: For concentrated cleaning on a specific area.
Select the desired cleaning mode using the remote control or the mobile app. The robot will automatically plan its route.
6.3 Automatic Water Spray
The robot will automatically spray water from its 4 ports during the cleaning process. Ensure the water tank is filled for this function to operate.
6.4 Remote and App Control
Control the robot's functions, start/stop, and change modes using the provided remote control or by connecting to the dedicated mobile application. The app provides convenient control and monitoring.
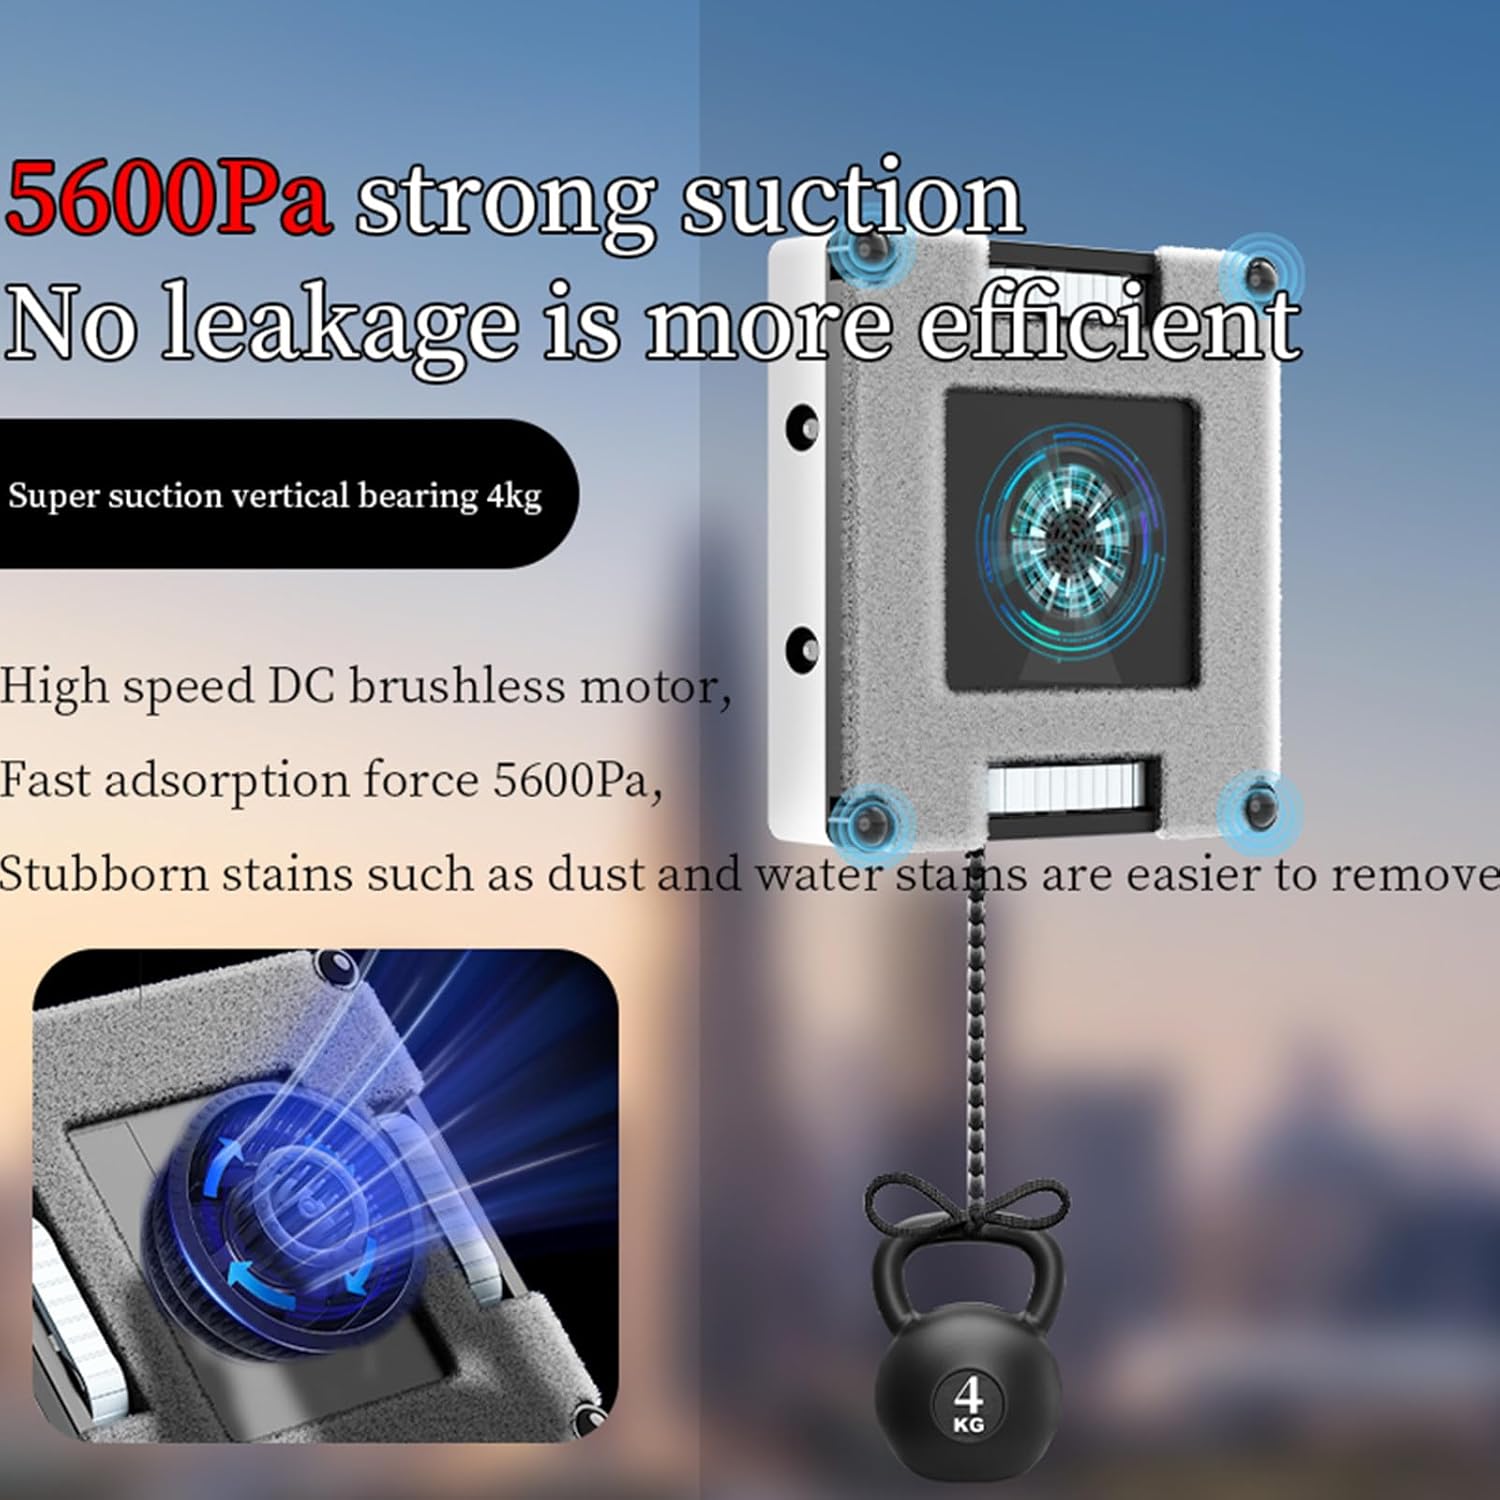
Image 6.1: The window cleaning robot being controlled wirelessly via a smartphone application, indicated by the Wi-Fi signal icon.
6.5 Voice Real-time Broadcasting
The robot provides voice prompts for real-time status updates, such as "Start cleaning!" or "Cleaning is complete!", keeping you informed of its progress.

Image 6.2: Visual representation of the robot's voice real-time broadcasting feature, showing speech bubbles with status updates.
7. Maintenance
Regular maintenance ensures the longevity and optimal performance of your robot.
- Clean Cleaning Rags: After each use, remove and wash the cleaning rags. Replace them when they show signs of wear or excessive dirt.
- Empty/Refill Water Tank: Empty any remaining water from the tank after use. Refill with fresh water or solution before each new cleaning session.
- Clean Sensors: Periodically wipe the robot's sensors with a soft, dry cloth to ensure they are free from dust and debris, which can affect navigation.
- Clean Exterior: Wipe the robot's exterior with a damp cloth. Do not immerse the robot in water.
- Storage: Store the robot in a cool, dry place away from direct sunlight when not in use.
8. Troubleshooting
If you encounter issues with your robot, please refer to the following common solutions:
- Robot not adhering to surface: Ensure the surface is clean and dry. Check for sufficient power supply. The suction power is 5600Pa; ensure the surface is suitable for this level of suction.
- Poor cleaning performance: Replace or clean the cleaning rags. Ensure the water tank is filled and the spray nozzles are not clogged.
- Robot stops unexpectedly: Check power connection. The robot has a 30-minute battery backup for power outages; retrieve it promptly. Clean sensors if they are dirty.
- Remote control not working: Check the batteries in the remote control. Ensure there are no obstructions between the remote and the robot.
- App connectivity issues: Ensure Bluetooth or Wi-Fi is enabled on your device and the robot. Restart the app and the robot.
If the problem persists, please contact customer support.
9. Specifications
Detailed technical specifications for the TBANVOO Window Cleaning Robot:

Image 9.1: Visual representation of the product parameters, including model, weight, power, suction, and cleaning speed.
| Feature | Specification |
|---|---|
| Model | M83 (Internal Model) / 74588679 (Part Number) |
| Size | 22 x 22 x 7 cm (8.66 x 8.66 x 2.76 inches) |
| Weight | 1.3 kg (approx. 2.87 lbs) / Item Weight: 6.6 pounds (Package Weight) |
| Power | 72W |
| Power Adapter Input | 100-240V 50/60Hz |
| Minimum Erasable Size | 40 x 40 cm (15.7 x 15.7 inches) |
| Suction Power | 5600Pa |
| Noise Level | Approximately 60dB |
| Safety Rope Length | 450 cm (14.76 feet) |
| Water Tank Capacity | 50 + 50 ml |
| Cleaning Speed | 3 minutes/m³ |
| Applicable Glass Thickness | Unlimited |
| Color | White |
10. Warranty and Support
For warranty information and customer support, please refer to the documentation provided at the time of purchase or contact TBANVOO customer service directly. Keep your purchase receipt as proof of purchase.
Manufacturer: TBANVOO
For further assistance, visit the official TBANVOO website or contact their support channels.
Ask a question about this manual
Ask about setup, troubleshooting, compatibility, parts, safety, or missing instructions. Manuals+ will review the question and use this page’s manual context to help answer it.