1. Safety Information
Please read all safety warnings and instructions carefully before using this product. Failure to follow the warnings and instructions may result in electric shock, fire, and/or serious injury.
- Keep the inflator away from children.
- Do not operate the inflator in explosive atmospheres, such as in the presence of flammable liquids, gases, or dust.
- Always ensure the correct pressure setting for the item being inflated to prevent over-inflation and potential damage or injury. Refer to the item's manufacturer recommendations for proper inflation pressure.
- Do not leave the inflator unattended while it is operating.
- Avoid prolonged continuous operation to prevent overheating. Allow the device to cool down if it becomes hot.
- Protect the inflator from moisture and water.
- Use only manufacturer-specified attachments and accessories.
- Disconnect the air hose from the item and turn off the inflator after use.
2. Product Overview
The JUSUOX Portable Tire Inflator is a versatile and compact air compressor designed for inflating various items such as car tires, motorcycle tires, bicycle tires, and sports balls. It features dual power options (cordless battery and 12V DC), a precise digital pressure gauge, and an automatic shut-off function for safe and efficient inflation.

Figure 2.1: JUSUOX Portable Tire Inflator and its accessories.
Key Features:
- Dual Power Source: Operates on an internal lithium battery for cordless use or via a 12V DC car cigarette lighter for continuous power.
- High Performance: Delivers an air flow rate of 34L/MIN with a maximum pressure of 150PSI.
- Preset Pressure & Memory Function: Includes pre-calibrated modes for common items (cars, bikes, motorcycles, balls) and remembers the last used settings.
- Dual Screen Pressure Gauge: Features a high-precision LCD screen displaying both real-time and preset pressure values.
- Automatic Shut-Off: Automatically stops inflation once the preset pressure is reached, preventing over-inflation.
- Multi-Function LED Light: Built-in LED light for illumination during nighttime use and an SOS red flash for emergencies.
Included Components:
- Tire inflator (1)
- DC power cord (1)
- Type-C Charging Cable (1)
- Inflation Tube (1)
- Storage Bag (1)
- Fuse (1)
- Presta Valve (1)
- Air Nozzle (2)
- Ball Air Nozzle (1)
3. Setup
3.1 Initial Charging
Before first use, fully charge the inflator using the provided Type-C charging cable. Connect the cable to the inflator's charging port and a suitable USB power adapter (not included). The battery indicator on the display will show charging progress.
3.2 Connecting the Air Nozzle
Select the appropriate air nozzle for the item you intend to inflate. Screw the inflation tube onto the inflator's air outlet. Attach the selected nozzle to the other end of the inflation tube.

Figure 3.1: Easy steps for connecting and preparing the inflator for use.
3.3 Powering Options
The inflator can be powered in two ways:
- Cordless (Battery Powered): For maximum portability, use the built-in battery. Ensure it is sufficiently charged.
- Corded (12V DC Powered): For continuous operation or when the battery is low, connect the DC power cord to your vehicle's 12V cigarette lighter socket.

Figure 3.2: Dual power supply options for the inflator.
4. Operating Instructions
4.1 Powering On and Mode Selection
- Press the Power button (⏻) to turn on the inflator. The dual screen display will illuminate.
- Press the Mode button (M) to cycle through the preset inflation modes: Car, Motorcycle, Bicycle, and Ball. Each mode has a default pressure setting.
- To set a custom pressure, use the '+' and '-' buttons to adjust the desired PSI value. The inflator remembers your last setting for each mode.
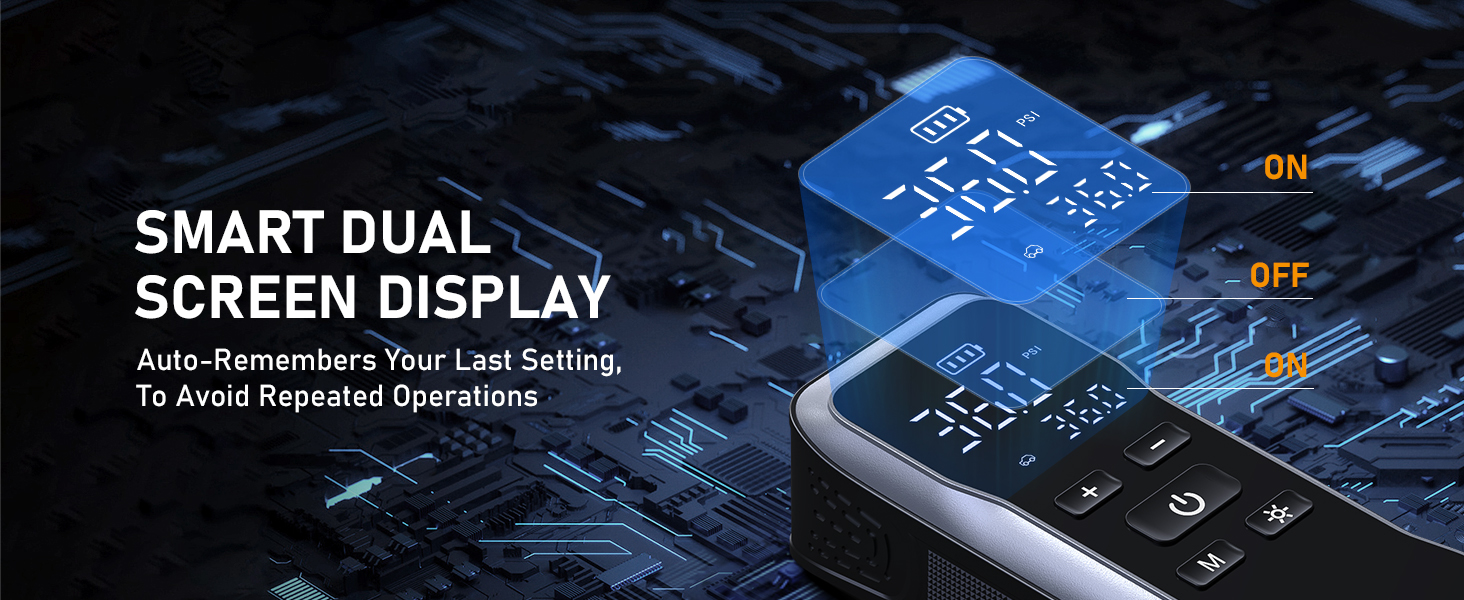
Figure 4.1: Smart Dual Screen Display and Memory Function.
4.2 Inflation Process
- Securely connect the inflation tube with the appropriate nozzle to the item you wish to inflate.
- Once the desired pressure is set, press the Power button (⏻) again to start inflation. The real-time pressure will be displayed.
- The inflator will automatically shut off once the preset pressure is reached.
- Disconnect the air hose from the item and the inflator.

Figure 4.2: Auto-Stop feature and preset pressure ranges.
4.3 Inflation Speed Examples:
- Car Tire (195/65 R15): Inflates from 25 PSI to 36 PSI in approximately 1 minute.
- Motorcycle Tire: Inflates from 25 PSI to 30 PSI in approximately 40 seconds.
- Bicycle Tire: Inflates from 30 PSI to 50 PSI in approximately 45 seconds.
- Sports Ball: Inflates from 3 PSI to 12 PSI in approximately 20 seconds.

Figure 4.3: Car tire inflation speed example.

Figure 4.4: Motorcycle tire inflation speed example.

Figure 4.5: Bicycle tire inflation speed example.

Figure 4.6: Sports ball inflation speed example.
4.4 Using the LED Light
Press the light button (※) to activate the built-in LED light. Press it again to cycle through modes: steady beam, SOS red flash, and off. This feature is useful for nighttime repairs or as a warning signal.

Figure 4.7: Built-in LED light for illumination.
5. Maintenance
5.1 Cleaning
Wipe the exterior of the inflator with a soft, damp cloth. Do not use harsh chemicals or abrasive cleaners. Ensure the device is completely dry before storing.
5.2 Storage
Store the inflator and its accessories in the provided storage bag in a cool, dry place, away from direct sunlight and extreme temperatures. Keep out of reach of children.
5.3 Battery Care
To prolong battery life, charge the inflator fully before long-term storage and recharge it every 3-6 months if not in regular use.
6. Troubleshooting
| Problem | Possible Cause | Solution |
|---|---|---|
| Inflator does not turn on. | Battery is depleted or DC power cord is not connected properly. | Charge the battery using the Type-C cable or connect the 12V DC power cord securely to a working cigarette lighter socket. |
| Inflator runs but does not inflate. | Air hose or nozzle is not securely connected, or there is a leak. | Ensure all connections are tight. Check the inflation tube and nozzle for any damage or leaks. |
| Inflator stops before reaching preset pressure. | Battery is low, or the inflator has overheated. | Recharge the battery or connect to 12V DC power. Allow the inflator to cool down if it feels hot to the touch. |
| Inaccurate pressure reading. | Improper connection to valve stem. | Ensure the nozzle is fully and securely attached to the valve stem. |
7. Specifications
| Feature | Detail |
|---|---|
| Brand | JUSUOX |
| Model Name | XM-8011 |
| Voltage | 12 Volts (DC) |
| Power Source | Battery and 12V DC Powered |
| Maximum Operating Pressure | 150 PSI |
| Air Flow Capacity | 34 LPM |
| Noise Level | 70 dB |
| Maximum Power | 60 Watts |
| Product Dimensions | 1.73"L x 7.68"W x 2.44"H |
| Item Weight | 1.7 pounds |
| Battery Cell Type | Lithium Ion |
| Hose Length | 13.78 Inches |
| UPC | 761164554258 |
8. Warranty and Support
For warranty information and customer support, please refer to the documentation included with your product or contact JUSUOX customer service directly. Keep your purchase receipt for warranty claims.
JUSUOX is committed to providing high-quality products and excellent customer service. For any inquiries or assistance, please visit the official JUSUOX website or contact their support team.


