SWTYMIKI ZWJ213
SWTYMIKI Shower Caddy Tension Pole Instruction Manual
Model: ZWJ213
Introduction
This manual provides detailed instructions for the assembly, installation, operation, and maintenance of your SWTYMIKI Shower Caddy Tension Pole. Please read this manual thoroughly before installation and use to ensure proper function and longevity of the product. Keep this manual for future reference.
Product Components
Before beginning assembly, verify that all components are present and undamaged. Refer to the diagram below for identification.

Image Description: This image displays all individual components of the SWTYMIKI Shower Caddy Tension Pole, neatly arranged on a white surface. Each part, including various pole segments, baskets, hooks, and holders, is clearly labeled with an alphanumeric identifier and quantity for easy identification during assembly.
- Pole Segments: Various lengths (A, B, C, D) for adjustable height.
- Baskets: Four corner-shaped baskets (F1, F2) for storage.
- Accessories: Soap holder (K), toothbrush holder (R), hooks (J), and adhesive fixed patches (H).
- Connectors: G-type connectors for pole segments.
Setup and Installation
Follow these steps for proper assembly and installation of your shower caddy.
1. Determine Required Height
Measure the height of your shower or bathroom corner from floor to ceiling. The caddy is adjustable from 27.6 to 108.3 inches (70 to 275 cm).
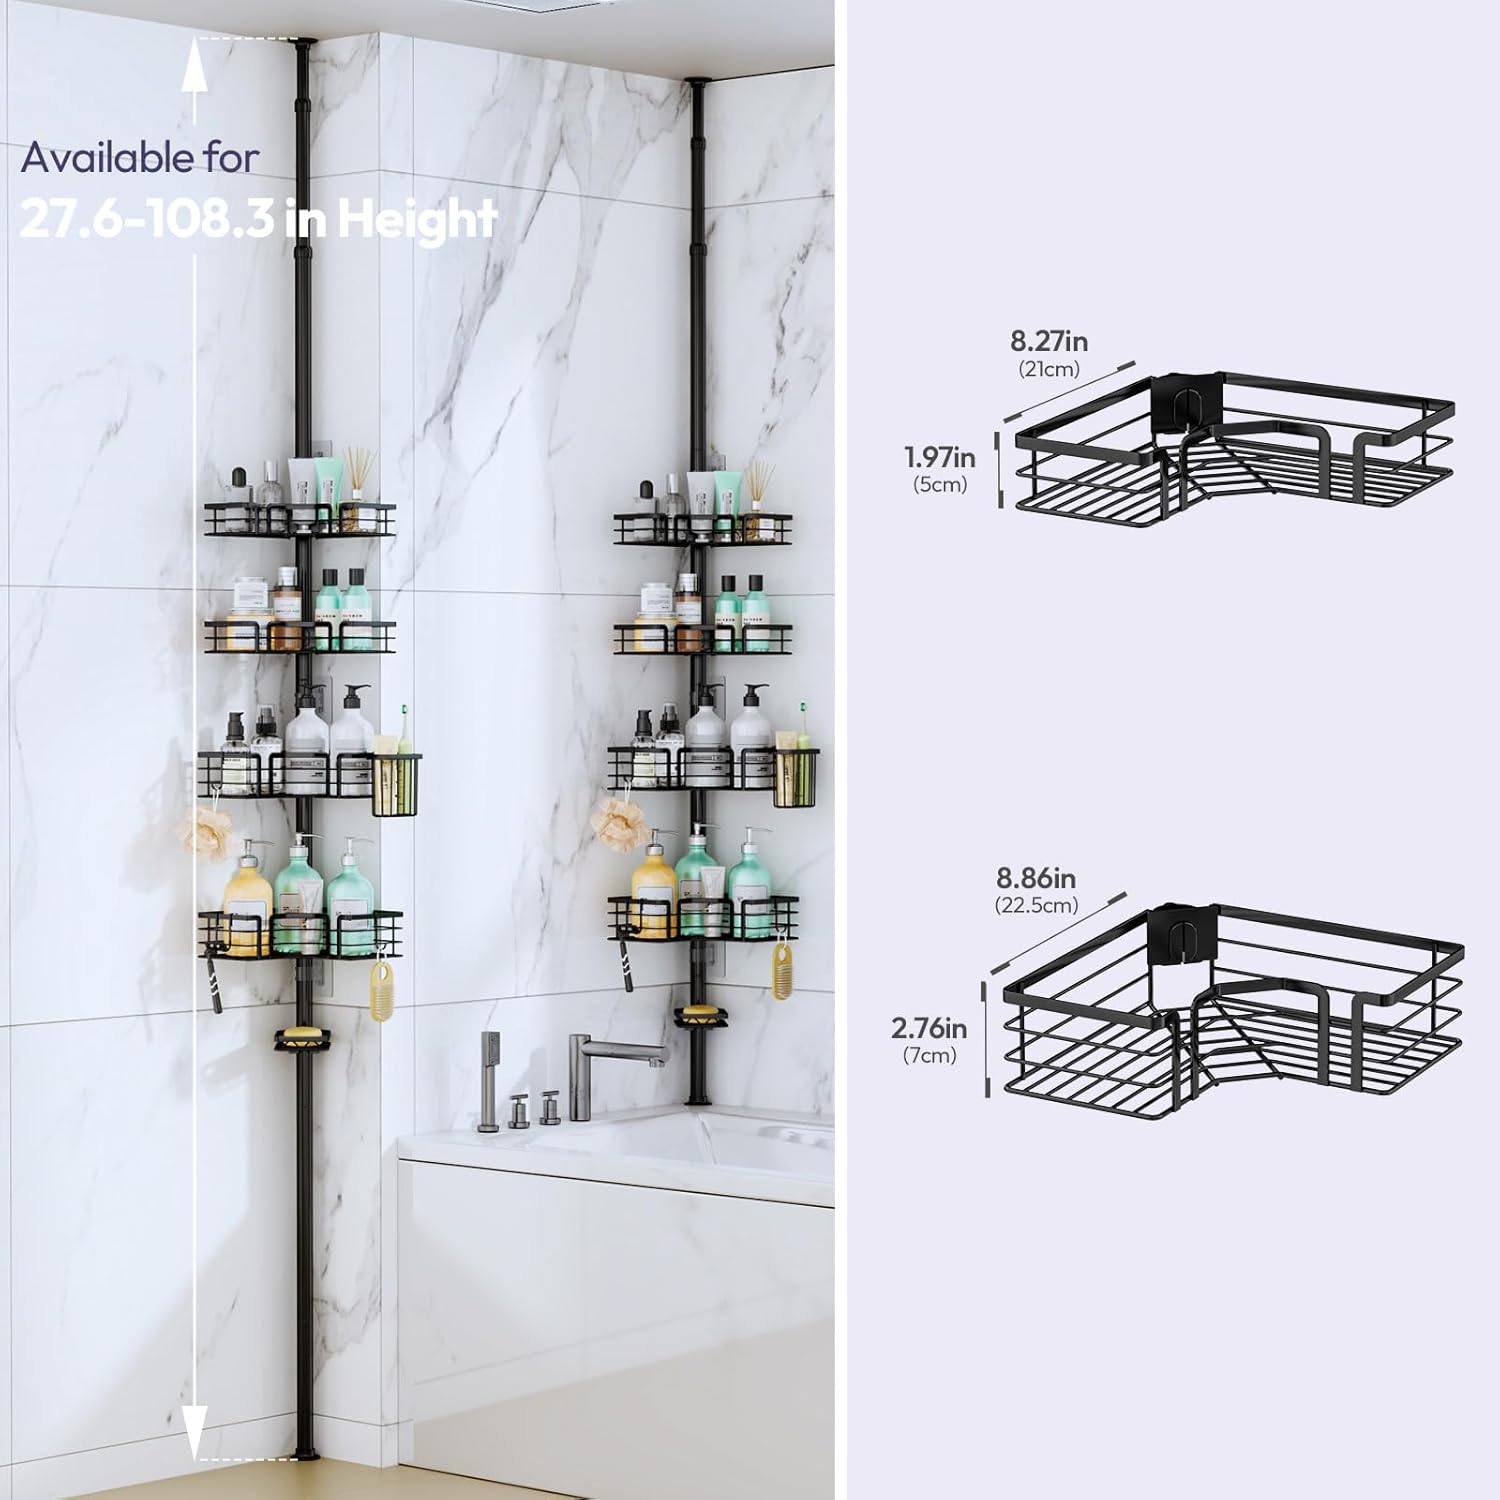
Image Description: This diagram illustrates how to combine different pole segments (A, B, C, D) to achieve various height configurations for the shower caddy, ranging from 27.6 inches to 108.3 inches. It provides a visual guide for selecting the correct pole combination based on the measured height.
2. Assemble the Pole
- Insert the B pole into the C pole. Note the direction of the C pole.
- Adjust the position of the B pole inside the C pole to achieve the desired length. There are different positions that can be tightened to get different lengths.
- Tighten the B pole to secure it in place.
- Assemble the B+C pole with the already assembled D pole together.
- Finally, connect the A pole. Ensure the spring mechanism is correctly positioned at the top.
Video Description: This video demonstrates the step-by-step assembly of the SWTYMIKI Shower Caddy Tension Pole. It shows how to connect the various pole segments, adjust their length, and secure them, highlighting the spring mechanism for tension installation.
3. Attach Baskets and Accessories
- Slide the basket clips onto the pole at your desired heights.
- Attach the baskets, soap holder, and toothbrush holder to the clips.
- The hooks can be attached to the baskets for hanging items like loofahs or razors.
- Use the adhesive fixed patches (H) to provide additional stability by securing the pole to the wall, if desired.
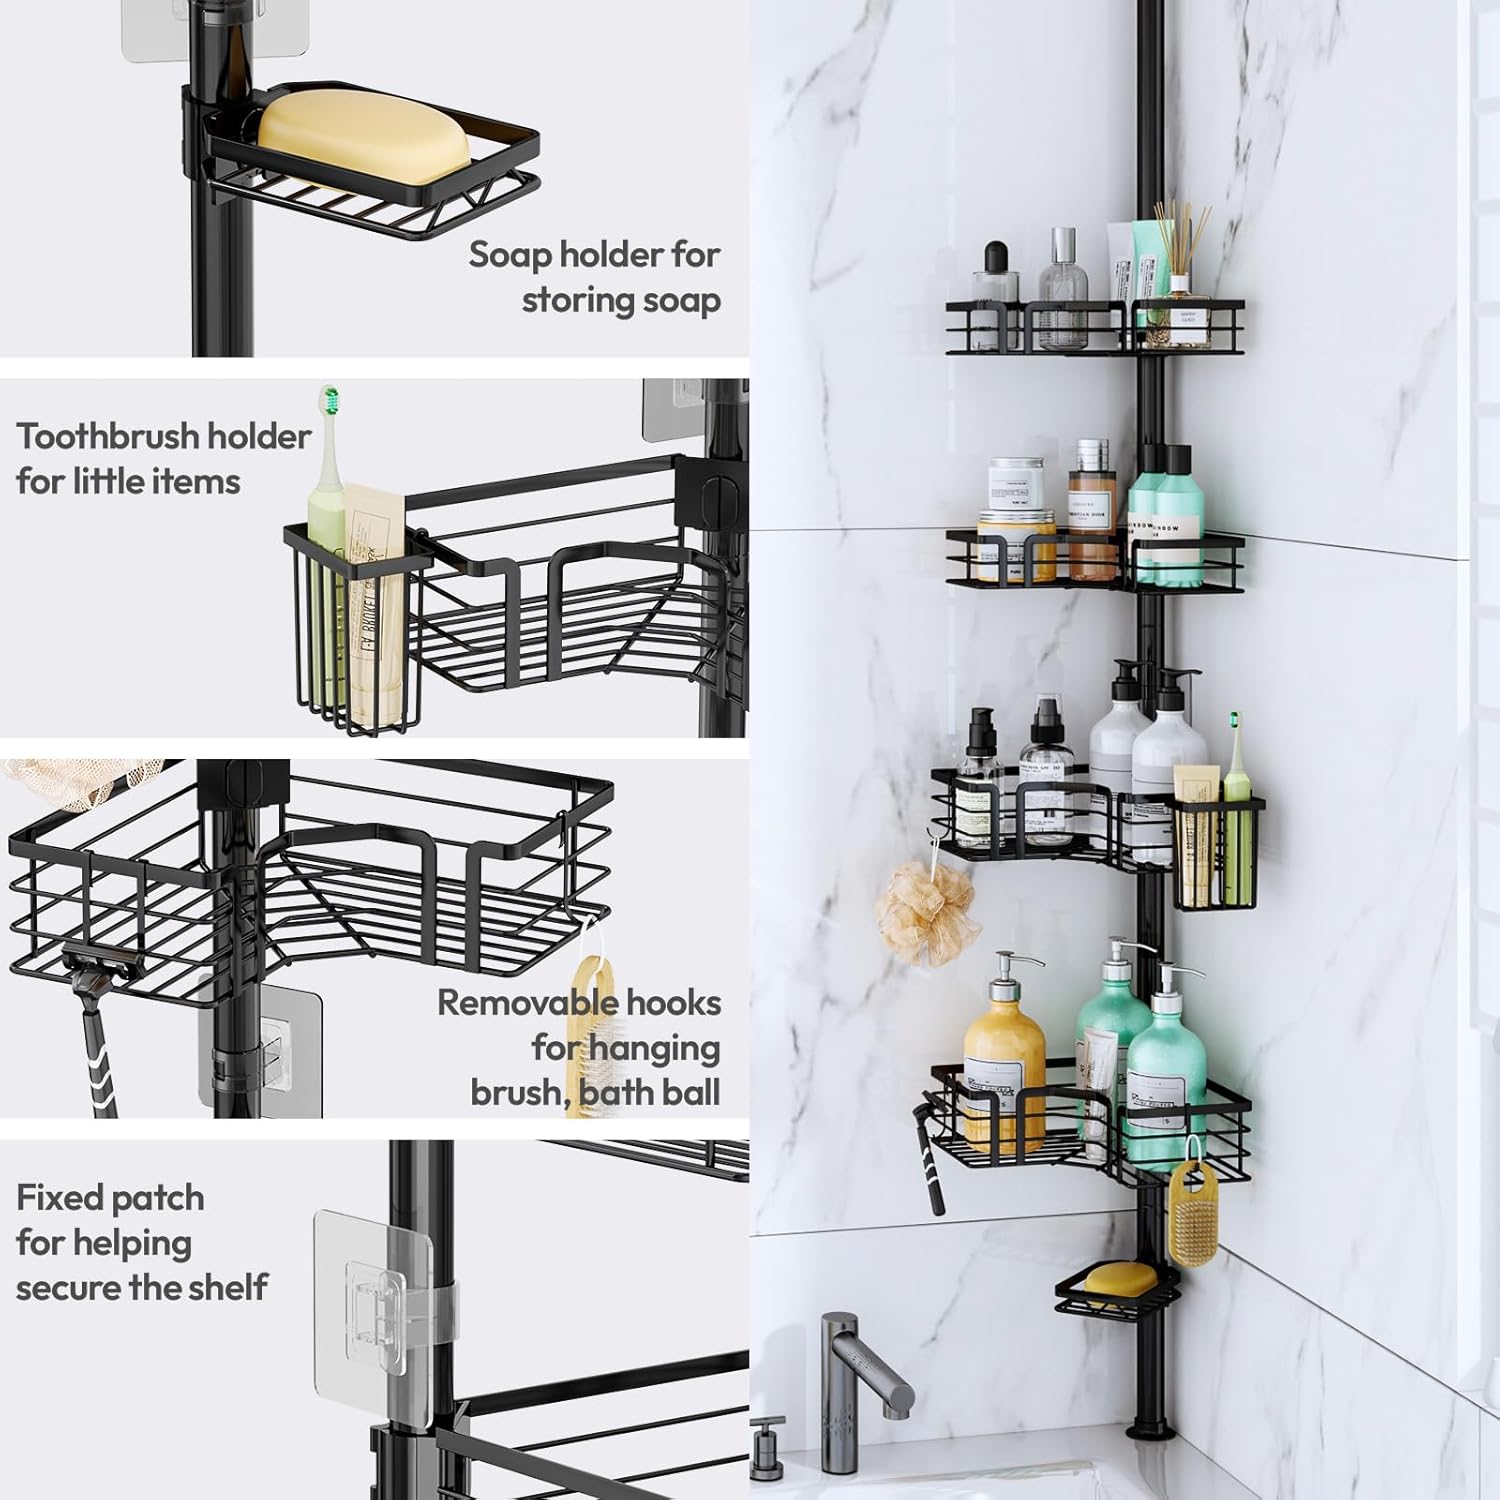
Image Description: This image provides a detailed view of how to attach the various accessories to the shower caddy pole. It shows the snap-on mechanism for the baskets, the placement of the soap holder and toothbrush holder, and the use of removable hooks for additional storage. An adhesive fixed patch is also visible, demonstrating how to secure the pole to the wall for enhanced stability.
4. Install the Assembled Caddy
- Place the top end of the assembled pole against the ceiling in the desired corner.
- Compress the spring mechanism by pushing the pole upwards, then guide the bottom end into position on the floor or bathtub edge.
- Ensure the pole is vertical and securely tensioned between the floor/tub and ceiling.
- If using, apply the adhesive fixed patches to the wall and secure the pole clips to them for extra stability.
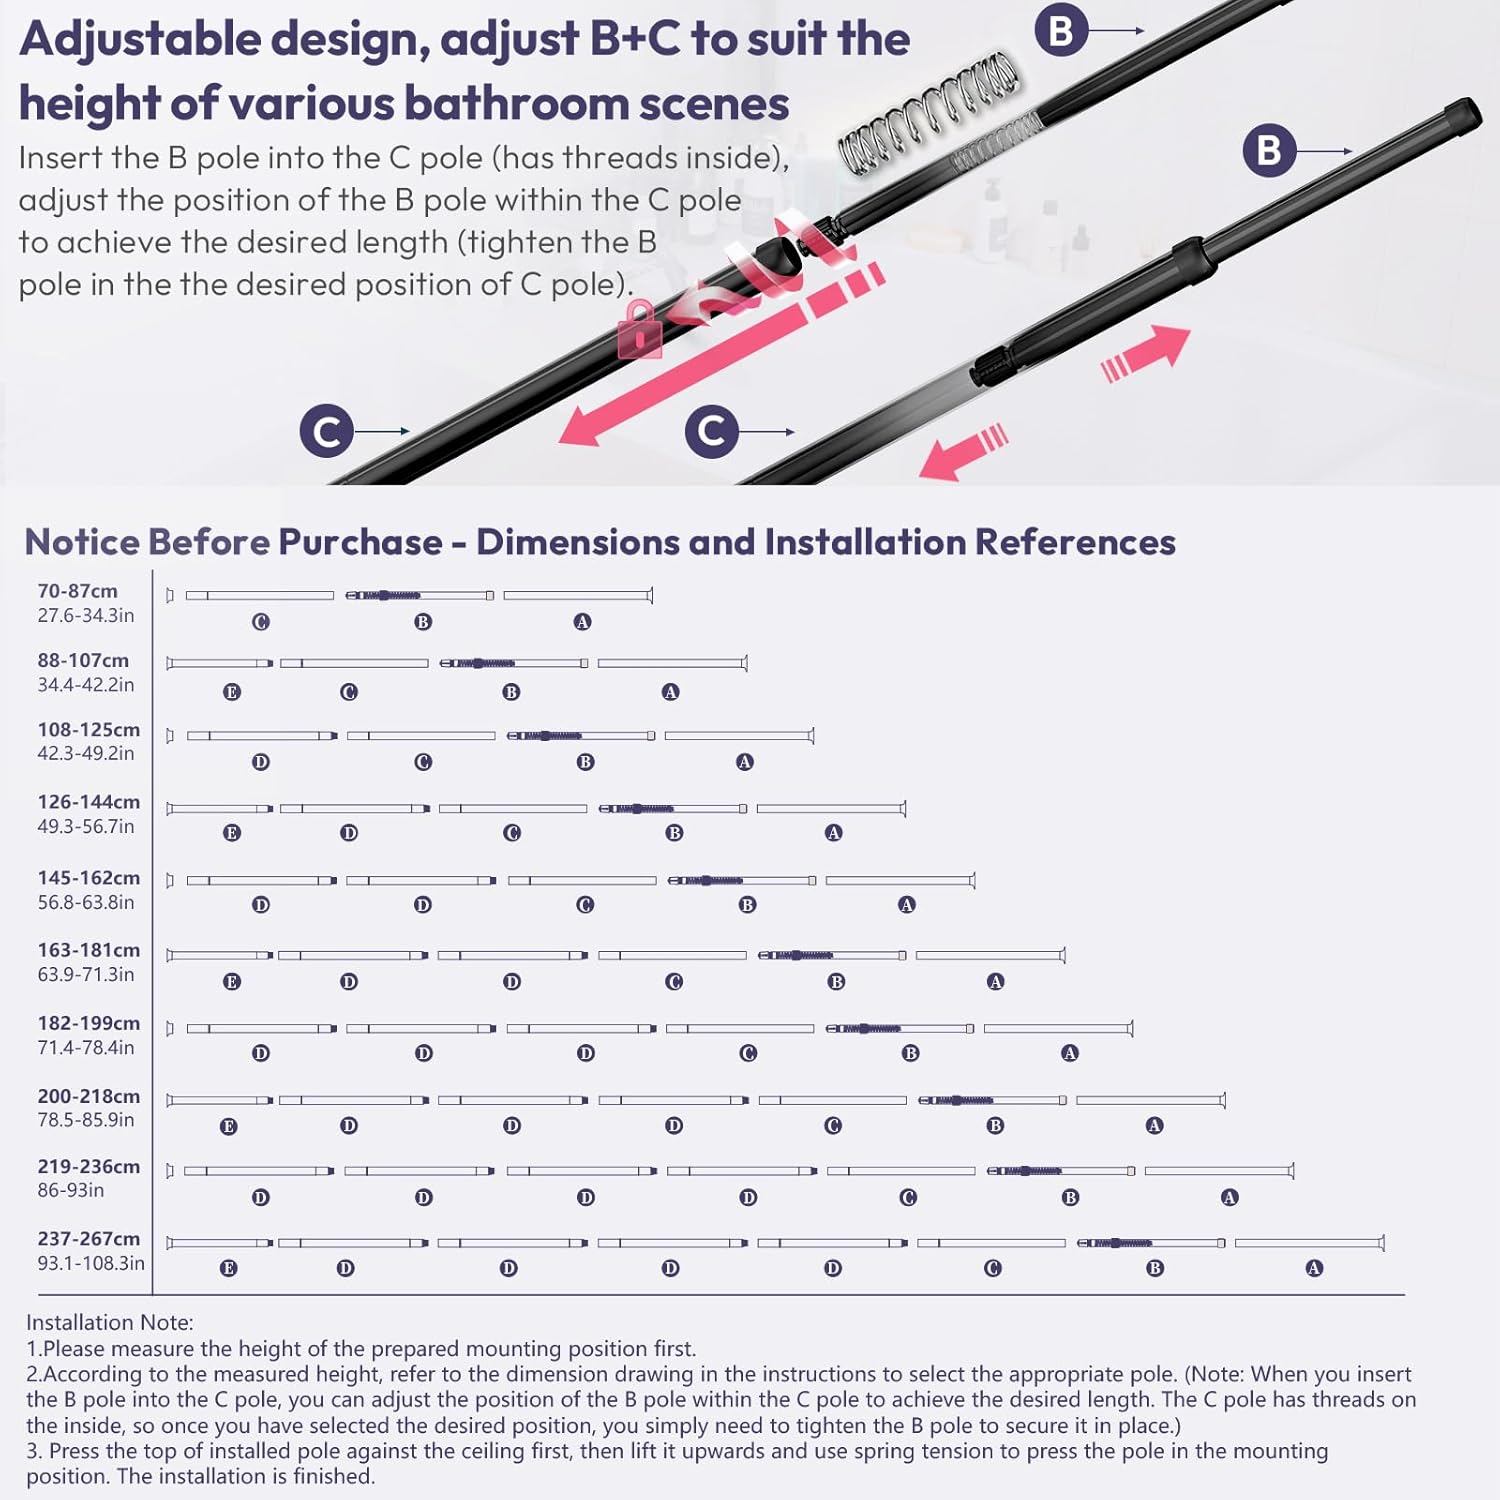
Image Description: This image displays the SWTYMIKI Shower Caddy Tension Pole fully installed in a bathroom corner, extending from the floor to the ceiling. The four baskets are visible, each holding various toiletries, demonstrating the product's storage capacity and how it fits seamlessly into a corner space.
Operating Instructions
The SWTYMIKI Shower Caddy is designed for straightforward use.
- Loading Baskets: Place shampoos, conditioners, body washes, and other toiletries onto the four adjustable baskets. The hollow design ensures quick drainage.
- Adjusting Basket Height: Baskets can be easily repositioned by releasing their clips, sliding them to the desired height, and re-securing. This allows customization for different bottle sizes.
- Using Accessories: Utilize the dedicated soap holder for bar soap and the toothbrush holder for toothbrushes or smaller items. The removable hooks are ideal for hanging loofahs, washcloths, or razors.
Maintenance
Regular maintenance will help preserve the appearance and functionality of your shower caddy.
- Cleaning: Wipe down the stainless steel pole and baskets regularly with a soft cloth and mild soap or a non-abrasive bathroom cleaner. Rinse thoroughly and dry to prevent water spots.
- Rust Prevention: Although made from 304 stainless steel for rust resistance, ensure proper ventilation in your shower area. Promptly dry any standing water on the caddy.
- Inspection: Periodically check the tension of the pole and the security of the baskets and accessories. Re-tighten or adjust as necessary.

Image Description: This close-up image highlights the hollow mesh design of the shower caddy baskets, showing water actively draining through them. This feature is designed to prevent water accumulation, keeping toiletries dry and reducing the risk of mold or mildew buildup.
Troubleshooting
| Problem | Possible Cause | Solution |
|---|---|---|
| Caddy is wobbly or unstable. | Insufficient tension; incorrect pole length; uneven surface. | Ensure the pole is properly tensioned by adjusting the B pole within the C pole. Verify the pole length matches your ceiling height. Use adhesive fixed patches for added stability. |
| Baskets slide down. | Clips not securely fastened; excessive weight. | Ensure basket clips are firmly snapped onto the pole. Distribute weight evenly and do not exceed the recommended capacity (25 pounds). |
| Signs of rust. | Prolonged exposure to moisture; abrasive cleaners used. | Wipe down regularly and ensure proper drying. Avoid harsh chemicals. If minor rust appears, clean with a stainless steel cleaner. |
Specifications
- Brand: SWTYMIKI
- Model: ZWJ213
- Material: 304 Stainless Steel
- Color: Black
- Adjustable Height: 27.6 to 108.3 inches (70 to 275 cm)
- Product Dimensions (Baskets): 8.86"D x 8.86"W x 2.76"H (approximate)
- Capacity: Up to 25 pounds
- Special Features: Adjustable, Durable, Large capacity, Rust Resistant, Stable, Fast Draining Hollow Design
- Included Components: Mounting Parts (Pole segments, 4 baskets, soap holder, toothbrush holder, 4 hooks, adhesive fixed patches)
Warranty and Support
For warranty information or technical support, please refer to the product packaging or contact SWTYMIKI customer service directly. Contact details can typically be found on the manufacturer's website or through your point of purchase.
Manufacturer: SWTYMIKI
Part Number: ZWJ213
Ask a question about this manual
Ask about setup, troubleshooting, compatibility, parts, safety, or missing instructions. Manuals+ will review the question and use this page’s manual context to help answer it.