1. Introduction and Overview
The HOLFENRY JKS50F Pulse Oximeter is designed to measure blood oxygen saturation (SpO2) and pulse rate (PR) through a finger. It is intended for sports and aviation purposes only and is not a medical device. This manual provides essential information for the correct operation and maintenance of the device.
The device features a clear display showing Blood Oxygen Saturation, Pulse Rate, and Perfusion Index (PI). It supports multi-user management and offers two measurement modes: Spot-check and Trend Record.

Figure 1.1: The HOLFENRY JKS50F Pulse Oximeter displaying Blood Oxygen Saturation (SpO2), Pulse Rate (PR), and Perfusion Index (PI) while being used by a family. The device is shown on a stand next to a family embracing.
2. Safety Information and Precautions
Please read all safety information carefully before using the device. Failure to follow these instructions may result in inaccurate readings or device damage.
- Intended Use: This device is intended for sports and aviation use only. It should not be used to diagnose or treat any medical condition.
- Explosion Hazard: Do not use the oximeter in the presence of flammable anesthetics mixture with air, oxygen, or hydrogen.
- Interference: Keep the oximeter away from dust, vibration, corrosive substances, explosive materials, high temperature, and moisture. Avoid strong electromagnetic interference from devices such as mobile phones or high-power equipment.
- Device Damage: Do not immerse the oximeter in water or other liquids. Avoid dropping or subjecting the device to strong impact.
- Probe Placement: Ensure the probe is placed correctly on the finger. Improper placement may lead to inaccurate results.
- Cleaning: Only use recommended cleaning agents. Refer to the 'Maintenance and Cleaning' section for detailed instructions.
- Disposal: Dispose of the device and its components according to local ordinances and recycling instructions.
3. Product Components (Packing List)
Verify that all items listed below are included in your package:
| Item | Quantity |
|---|---|
| Oximeter | 1 |
| Recharge base | 1 |
| Blood oxygen probe | 1 |
| User's manual | 1 |

Figure 3.1: Images of the HOLFENRY JKS50F Pulse Oximeter packaging, showing the device and its accessories inside the box.
4. Setup and Initial Use
4.1 Charging the Device
Before first use, ensure the oximeter is fully charged. The device uses a USB-C charging method.
- Place the oximeter into the charging base.
- Connect the charging base and a power supply using the provided USB-C cable.
- The charging indicator on the device will show the charging status. A full charge allows for approximately 8 hours of continuous use. The device can also be used continuously while plugged in.
Note: If the base does not work, check the magnetic connection between the oximeter and the charging base and re-seat it.
4.2 Connecting the Probe
Connect the blood oxygen probe to the designated port on the oximeter. Ensure a secure connection.
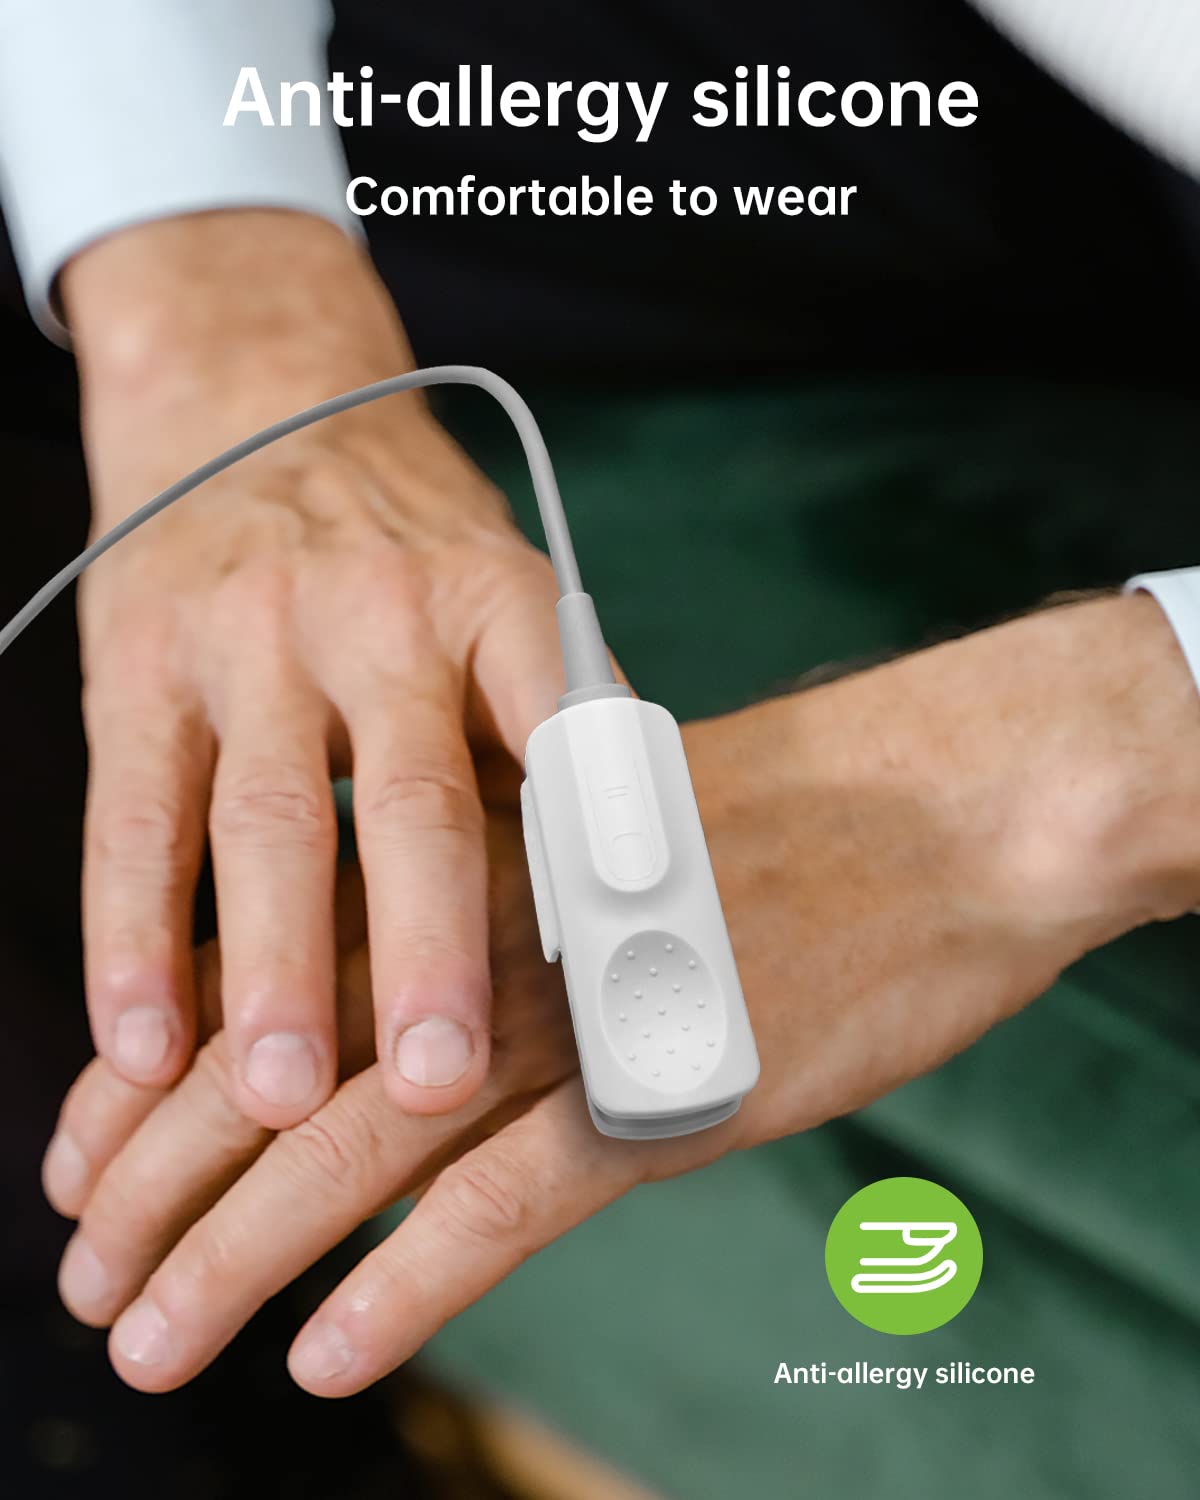
Figure 4.1: The anti-allergy silicone probe connected to the oximeter, shown on a user's finger for measurement. This image highlights the comfortable design of the probe.
5. Operation Instructions
5.1 Basic Operation
- Power On: Press the power button to turn on the device.
- Probe Placement: Clip the probe onto your finger, ensuring the finger is fully inserted and resting comfortably.
- Measurement: The device will automatically begin measurement. Keep your finger still during the process.
- Reading Display: After a few seconds, the SpO2 and PR values will be displayed on the screen.
- Power Off: The device will automatically power off after a period of inactivity, or you can manually press and hold the power button.
5.2 Operation Keys
The oximeter features several buttons for navigation and control:
- Power On/Off: Press to turn on, press and hold to turn off.
- Menu/Return: Access the menu or return to the previous screen.
- Increase/Select: Navigate up in menus or confirm selections.
- Decrease/Turn Off Alert: Navigate down in menus or silence alarms.
To access the menu, press the 'MENU' button. Use the 'UP' and 'DOWN' buttons to navigate and 'OK' to select. Options include User ID, Recording Mode, Data Management, Alarm Setting, Date and Time, and more.
6. Measurement Modes
The HOLFENRY JKS50F Pulse Oximeter supports two primary measurement modes to suit different monitoring needs:
- Spot-check Mode: For quick, on-demand measurements of SpO2 and PR. This mode provides immediate readings.
- Trend Record Mode: Allows for continuous monitoring and recording of data over specified intervals (e.g., 10s, 30s, 1M, 5M, 10M, 30M). This is useful for tracking changes over time.
You can select the desired mode through the device's menu. The oximeter provides an accuracy of 1% for SpO2 levels between 70-100% and 1 bpm for heart rate.

Figure 6.1: The oximeter display showing the 'Record Mode' menu with options for 'Point Test' (Spot-check) and various 'Trend' intervals. The image also highlights '1% Precision'.
7. Multi-user Management
The device supports multi-user management, allowing up to 10 individual user IDs to be stored. Each user ID can store up to 300 sets of measurement data.
- User ID Selection: Navigate to the 'User ID' option in the menu to select or switch between users.
- Data Storage: Measurements taken under a specific user ID will be stored under that profile, allowing for personalized tracking.
- Applicability: The device is suitable for adults and children. For infants, a special baby probe (sold separately) is required for accurate measurements.

Figure 7.1: The oximeter display showing the 'User ID' selection menu, with options for up to 10 users. The image also illustrates the device's use for adults, children, and infants (with a specific probe).
8. Maintenance and Cleaning
8.1 Cleaning the Device
To ensure hygiene and proper functioning, clean the oximeter regularly:
- Use a soft cloth dampened with either a commercial, non-abrasive cleaner, or a solution of 70% alcohol in water. Lightly wipe the surfaces of the oximeter.
- Ensure cleaning agent and non-corrosive detergents are used. Follow the manufacturer's directions for the cleaning agent.
- Do not spill liquid onto the instrument. Ensure no liquid is allowed to enter the interior of the oximeter.
- Do not use abrasive materials or wire brushes, as these may damage the device.
- Do not soak the oximeter in liquid.
8.2 General Maintenance
- Store the oximeter in a clean, dry environment when not in use.
- Avoid extreme temperatures, humidity, and direct sunlight.
- Regularly check the device for any visible damage.
9. Troubleshooting
If you encounter any issues with your HOLFENRY JKS50F Pulse Oximeter, refer to the table below for possible solutions:
| Problem | Possible Cause | Solution |
|---|---|---|
| Perfusion may be too low | Change the measuring site. Try another finger. | Ensure proper blood flow to the finger. |
| Body move | Interference due to person activity may be preventing the oximeter from tracking the pulse. Keep the person still, if possible. | Remain still during measurement. |
| The Pulse search time is too long | Electromagnetic interference may be preventing the oximeter from tracking the pulse. There may be interference from the ambient light, or the oximeter may be on an adult finger, reduced pressure cuff, arterial catheter, or intravascular line. | Remove the source of interference. Reposition oximeter, as necessary. |
| Display is dark or bright | Screen brightness not turned on to the highest level. | 1. Charging 2. Go to the menu to increase the brightness. |
10. Specifications
Detailed technical specifications for the HOLFENRY JKS50F Pulse Oximeter:
10.1 Product Specifications
| Measurement | Specification |
|---|---|
| SpO2 Measuring Range | 0~100% |
| SpO2 Accuracy | At 70~100%, ±1% |
| PR Measuring Range | 25~250 bpm |
| PR Accuracy | ±1 bpm or ±1%, whichever is greater |
| Data Update Period | <13 s |
| Resolution | 1 bpm |
10.2 Battery Specifications
| Type | Value |
|---|---|
| Lithium battery | 2000 mAh |
| Voltage | 3.7V |
| Continuous use | 8 hours (fully charged) |
10.3 Environmental Specifications
| Parameter | Operation | Storage |
|---|---|---|
| Temperature | +5°C ~ +40°C | -20°C ~ +55°C |
| Atmospheric Pressure | 700hPa ~ 1060hPa | 500hPa ~ 1060hPa |
| Relative Humidity | ≤85% | ≤93% |
10.4 Physical Specifications
| Parameter | Value |
|---|---|
| Weight | About 325g (include probe) |
| Dimensions | 158.5mm (length) x 73.5mm (width) x 25.5mm (height) |
10.5 Sensor Specifications
- Pulse oximetry sensors contain LEDs that emit red light at a wavelength of approximately 660 nm and infrared light at a wavelength of approximately 905 nm.
- The total optical output power of the sensor LEDs is less than 15 mW.
- There are no harmful light emissions felt within Class 1 level, according to IEC 60825-1:2001. No special safety precautions are required.
11. Definitions
Key symbols and their meanings:
- BF: Type BF equipment (Refer to IEC 60601-1:1995)
- !: Attention! Please refer to this manual.
- %SpO2: Oxygen saturation of arterial blood.
12. Manufacturer Information
Manufacturer: HOLFENRY
Address: Guangdong HealthTree Medical Technology Co., Ltd., ADD: 710, Area B, Dazhou Science and Technology Park, Xiangzhou District, Zhuhai City, Guangdong Province, China
Tel: +86-135395123424
Fax: +86-0756-3392018
Website: www.healthtreemd.com
