Introduction
This manual provides comprehensive instructions for the installation, operation, and maintenance of your PATIKIL 1-3/16 Inch Black Combination Cam Lock. Designed for security and convenience, this keyless 3-digit password lock is suitable for various applications including cabinets, drawers, and file cabinets. Please read these instructions carefully before installation and use.
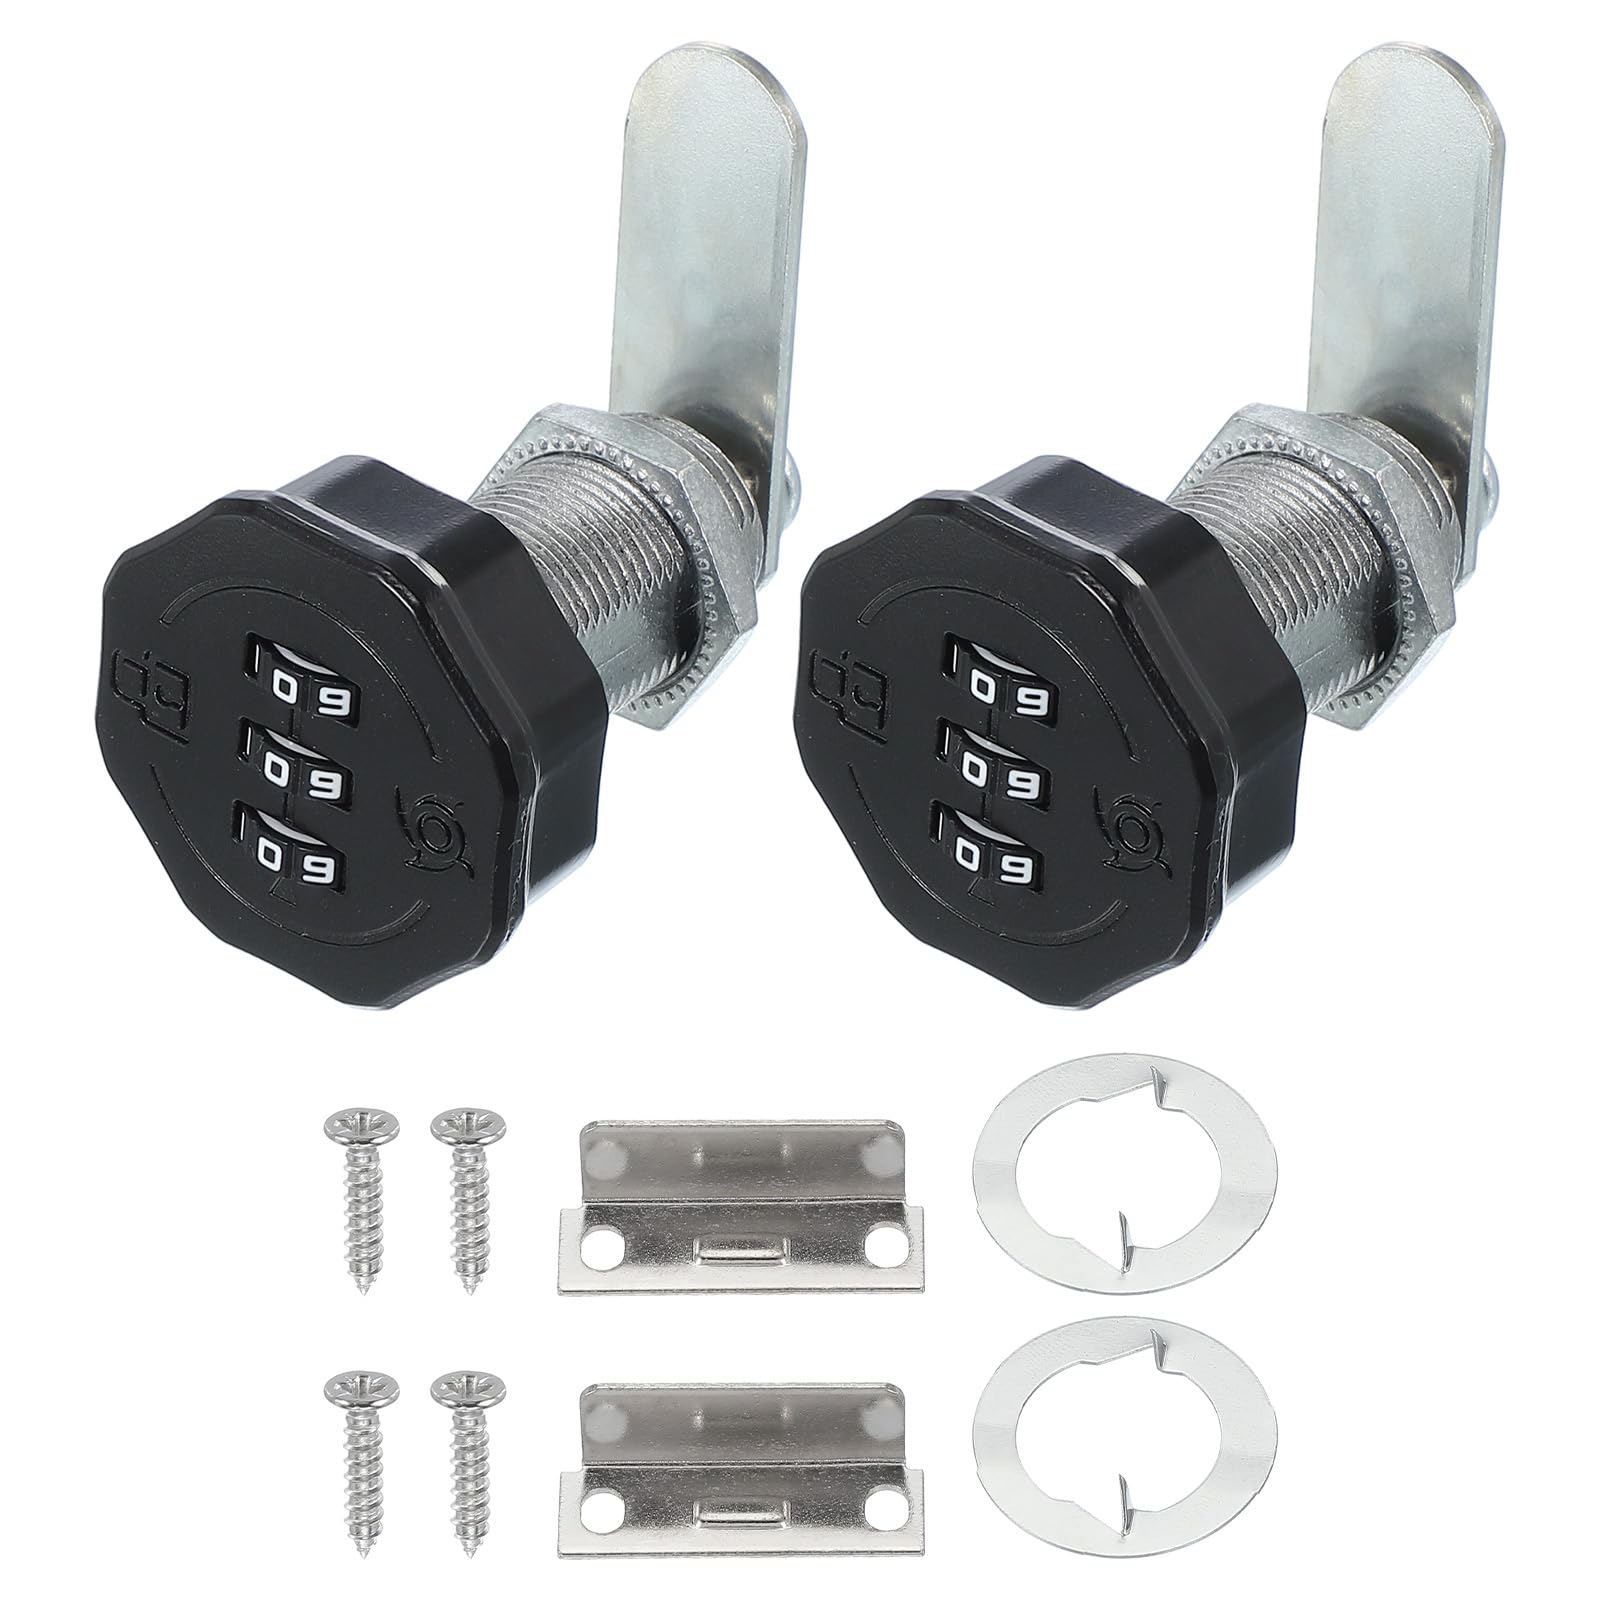
Image: PATIKIL 1-3/16 Inch Black Combination Cam Lock, showing the front view of the lock.
Product Overview and Components
The PATIKIL Combination Cam Lock is constructed from durable zinc alloy, offering robust security for your belongings. It features a 3-digit password mechanism, eliminating the need for traditional keys.
Key Features:
- Zinc Alloy Material: Ensures durability and resistance to wear.
- 3-Digit Password Design: Keyless entry for enhanced security.
- Easy to Use: Simple operation for setting and changing passwords.
- Rust-proof and Durable: Electroplated and polished surface for longevity.

Image: Visual representation of key features including Zinc Alloy Material, Sturdy & Practical, Password Design, and Easy to Use.
Included Components:
- Combination Lock (2 pcs)
- Locking Tab (2 pcs)
- Baffle (2 pcs)
- Screw (2 pcs)
- Password Pin (2 pcs)

Image: Exploded view showing individual components: Non-Slip Screw, Reinforcement Washer, Thinkened Cams, Deepened Hex Nut, Rotation Washer, Waterproof & Rustproof Material, and the lock body.
Specifications
| Feature | Specification |
|---|---|
| Lock Cylinder Size (L x Dia) | 30 x 19 mm / 1.18 x 0.75 inch |
| Lock Tongue Length | 36 mm / 1.42 inch |
| Lock Tongue Thickness | 2 mm / 0.08 inch |
| Center Distance | 26 mm / 1.02 inch |
| Knob Size | 35 mm / 1.38 inch |
| Suitable Door Panel Thickness | 22 mm / 0.87 inch |
| Material | Zinc Alloy |
| Color | Black |
| Item Weight | 7.7 ounces |
| Model Number | pta241119tt003028 |

Image: Diagram illustrating the dimensions of the lock cylinder, lock tongue, and knob, along with the suitable door panel thickness.
Installation Instructions
Follow these steps for proper installation of your combination cam lock:
- Drill a suitable hole: Prepare the cabinet or drawer panel by drilling a hole of appropriate size for the lock cylinder.
- Install the lock body: Insert the lock cylinder into the drilled hole from the front of the panel. Secure it with the provided hex nut and rotation washer from the back.
- Install the locking tab and adjust: Attach the locking tab to the back of the lock cylinder. Adjust its position to ensure proper engagement with the cabinet frame when locked.
- Fix with screws: Secure the locking tab and baffle with the provided screws to prevent movement.

Image: Four-panel diagram showing the installation steps: 1. Drill a suitable hole, 2. Install the lock body, 3. Install the locking tab and adjust its position, 4. Fix with screws.
Application Examples:
This lock is suitable for various applications, including:
- Cabinets
- Drawers
- Mailboxes
- Safe boxes
- Office file cabinets
- Gate, shed doors, barn doors (for light security)

Image: Collage showing the lock installed on various furniture pieces like drawers, cabinets, and storage units, demonstrating its wide application.

Image: The lock installed on a cabinet, highlighting its use as a one-way drawer lock, suitable for up, down, left, or right door installations.
Operating Instructions: Setting the Password
The initial password for your lock is 0-0-0. To set or change the password, follow these steps:
- Initial Password: Ensure the lock is set to the initial password 0-0-0 and is in the unlocked state.
- Access Reset Hole: Use a small stick or pointed tool to gently squeeze and hold the reset hole on the side of the lock.
- Set New Password: While holding the reset tool, turn the number wheels to your desired 3-digit combination.
- Release Tool: Once your new password is set, release the adjustment tool from the reset hole. Your new password is now active.
Note: Do not release the adjustment tool during the password setting process until the new combination is fully selected.
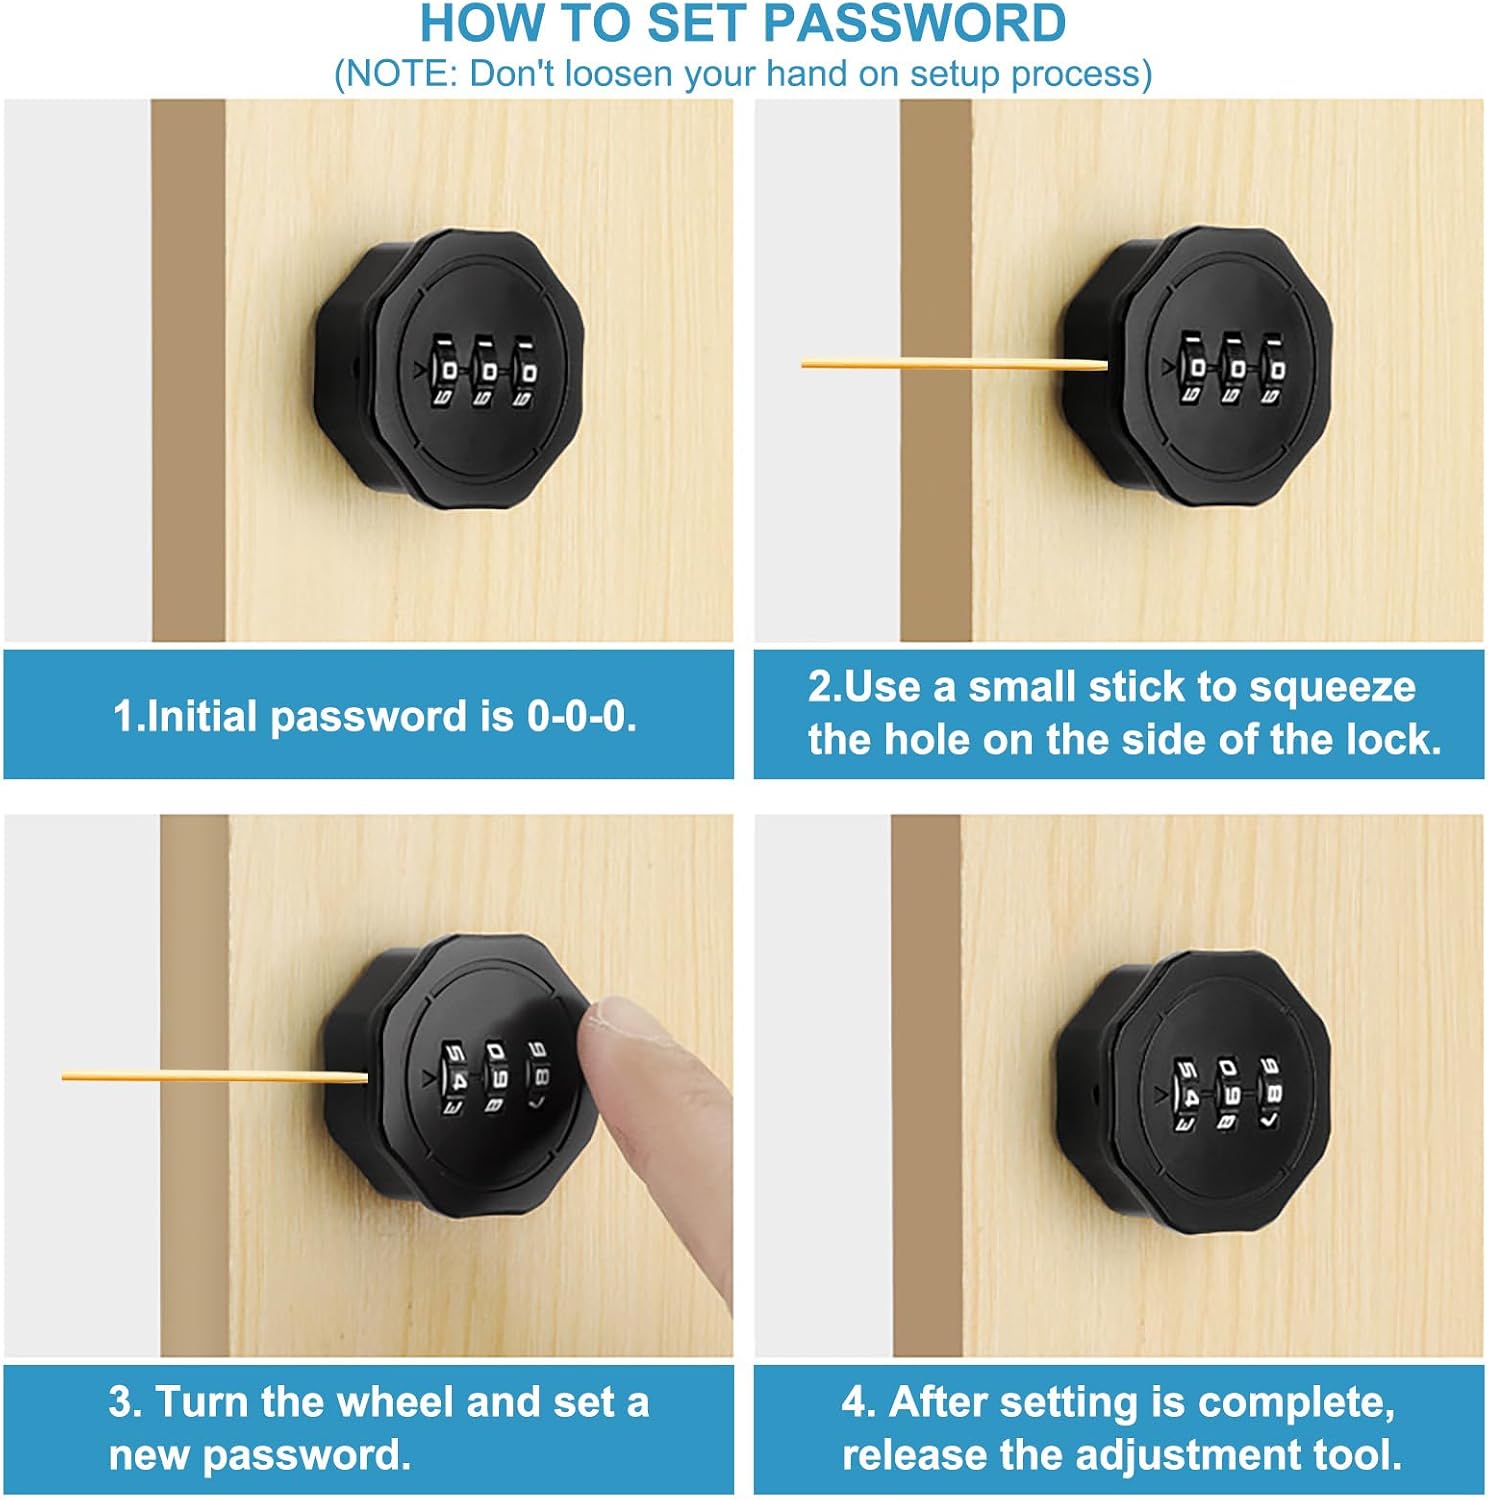
Image: Four-panel diagram illustrating the password setting process: 1. Initial password is 0-0-0, 2. Use a small stick to squeeze the hole on the side, 3. Turn the wheel and set a new password, 4. Release the adjustment tool.
Maintenance
To ensure optimal performance and longevity of your PATIKIL Combination Cam Lock, regularly wipe the exterior with a soft, dry cloth. Avoid using abrasive cleaners or solvents, as these can damage the finish. Periodically check that all components are securely fastened and that the number wheels turn smoothly. No lubrication is typically required for the internal mechanism, but if stiffness occurs, a small amount of graphite lubricant can be applied to the moving parts.
Troubleshooting
- Lock feels stiff: Apply a small amount of graphite lubricant to the moving parts of the mechanism.
- Cannot change password: Ensure the lock is in the unlocked state (set to the current password) before attempting to use the reset pin. Make sure the reset pin is fully depressed during the entire password setting process.
- Forgotten password: This lock does not have a master key or an external reset function if the password is forgotten after it has been set. It is crucial to remember your chosen combination.
- Lock not engaging/disengaging properly: Re-check all installation steps, especially the positioning and securing of the locking tab and baffle. Ensure the door panel thickness is within the suitable range (22 mm / 0.87 inch).
Warranty Information
This product is covered by a standard manufacturer's warranty. For detailed warranty terms, conditions, and duration, please refer to the PATIKIL official website or contact their customer support directly. Keep your purchase receipt as proof of purchase for any warranty claims.
Customer Support
For further assistance, technical support, or any inquiries regarding your PATIKIL Combination Cam Lock, please visit the official PATIKIL website. Contact information, including email and phone support, can typically be found in the 'Contact Us' section of their website or on the product packaging.