1. Introduction
The tenlamp G1 Audio Mixer is a compact and versatile sound card designed for live streaming, podcasting, gaming, and recording. It offers multi-channel mixing capabilities, customizable sound effects, voice changing features, and noise reduction technology. This manual provides detailed instructions for setting up, operating, and maintaining your G1 Audio Mixer to ensure optimal performance.
2. Product Overview
The G1 Audio Mixer integrates essential audio controls and effects into a user-friendly interface. Familiarize yourself with the device's layout and key features.
2.1 Key Features
- Multi-Channel Mixing: Supports 3.5mm microphones and instrument inputs for comprehensive audio control.
- Plug-and-Play Connectivity: Easy connection to PC, Mac, or mobile devices via USB-C, 3.5mm audio cable, or Bluetooth.
- Customizable Sound Effects: Adjust bass, midrange, treble, and reverb settings. Includes 6 customizable ambient sound effects.
- Noise Reduction: Equipped with a dedicated noise reduction function for clear audio output.
- Voice Changer: Offers multiple voice effects (female, deep, baby, magic) with adjustable parameters.
- Reverb Modes: Four preset reverb modes (Sing, Boom, Magic, MC) for various applications.
- Portable Design: Compact with a built-in 1000mAh battery for up to 6 hours of usage.
2.2 Device Layout
The following image illustrates the main controls and indicators on the G1 Audio Mixer.

Figure 1: Front view of the tenlamp G1 Audio Mixer, showing sliders for Mic, Music, Charge, B/T, Sing, Boom, Magic, MC, Monitor, Output, Reverb, Ducking, VocalCut, and buttons for Auto tune, Voice changer, Reverb preset, Customize effects, Original sound, Mute, Loopback, Denoise, and Power.
The rear panel features various input and output ports for connecting your devices.
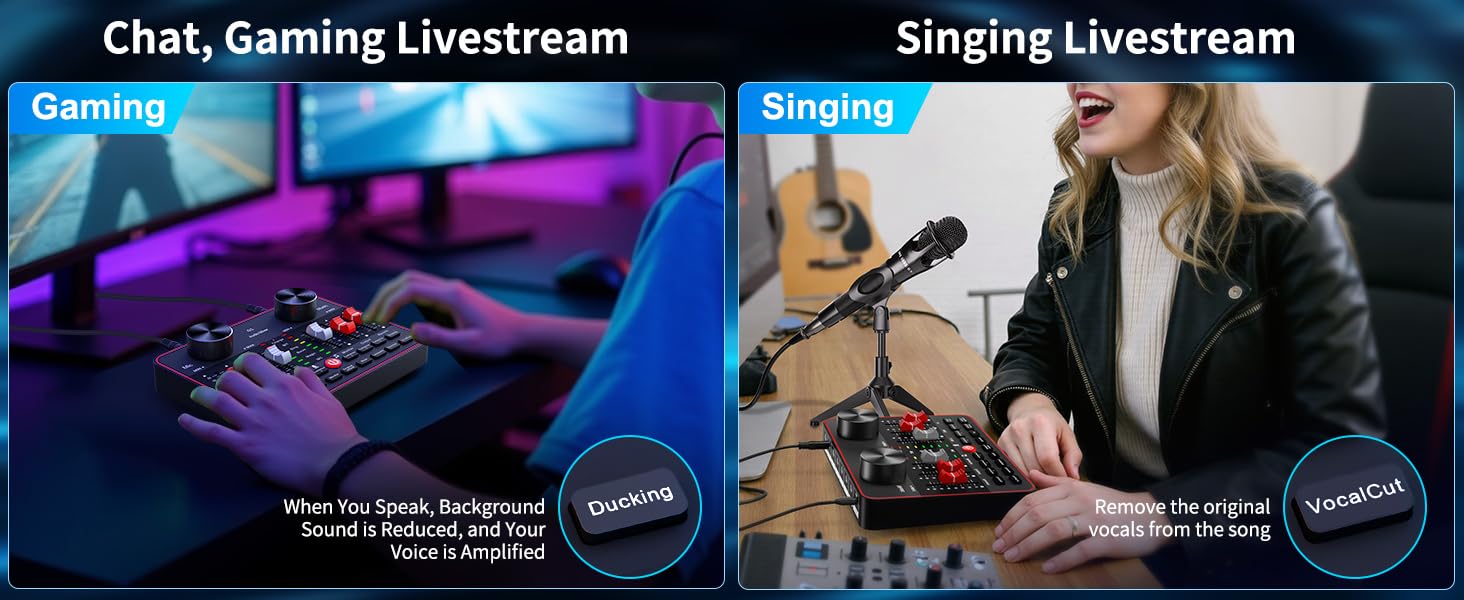
Figure 2: Rear panel of the tenlamp G1 Audio Mixer, indicating USB-C, Output (x2), Music, Monitor, Headset, and Mic (x2) ports.
3. Setup Instructions
Follow these steps to set up your G1 Audio Mixer for various applications.
3.1 Powering On the Device
- Connect the G1 mixer to a power source (e.g., computer USB port, USB wall adapter) using the provided USB-C cable. The 'Charge' indicator will illuminate.
- Press and hold the power button (U) located on the front panel until the indicators light up.
- The built-in 1000mAh battery provides up to 6 hours of usage on a full charge, allowing for portable operation.
3.2 Connecting Microphones and Headsets
- Microphones: Connect your 3.5mm condenser microphones to the 'Mic' input ports on the rear panel. The G1 supports two microphones simultaneously.
- Headset: Plug your headset into the 'Headset' port for monitoring your audio.
3.3 Connecting to Devices (PC/Mobile)
- PC/Mac Connection: Use the USB-C cable to connect the G1 mixer to your computer. The device will be recognized as an audio input/output device. Select the G1 as your default audio device in your operating system's sound settings and your streaming/recording software.
- Mobile Device Connection (Analog): Use a 3.5mm TRRS audio cable to connect your mobile device to the 'Output' port for live streaming.
- Mobile Device Connection (Bluetooth): Activate Bluetooth on your mobile device and pair with the G1 mixer. This allows for wireless accompaniment input.
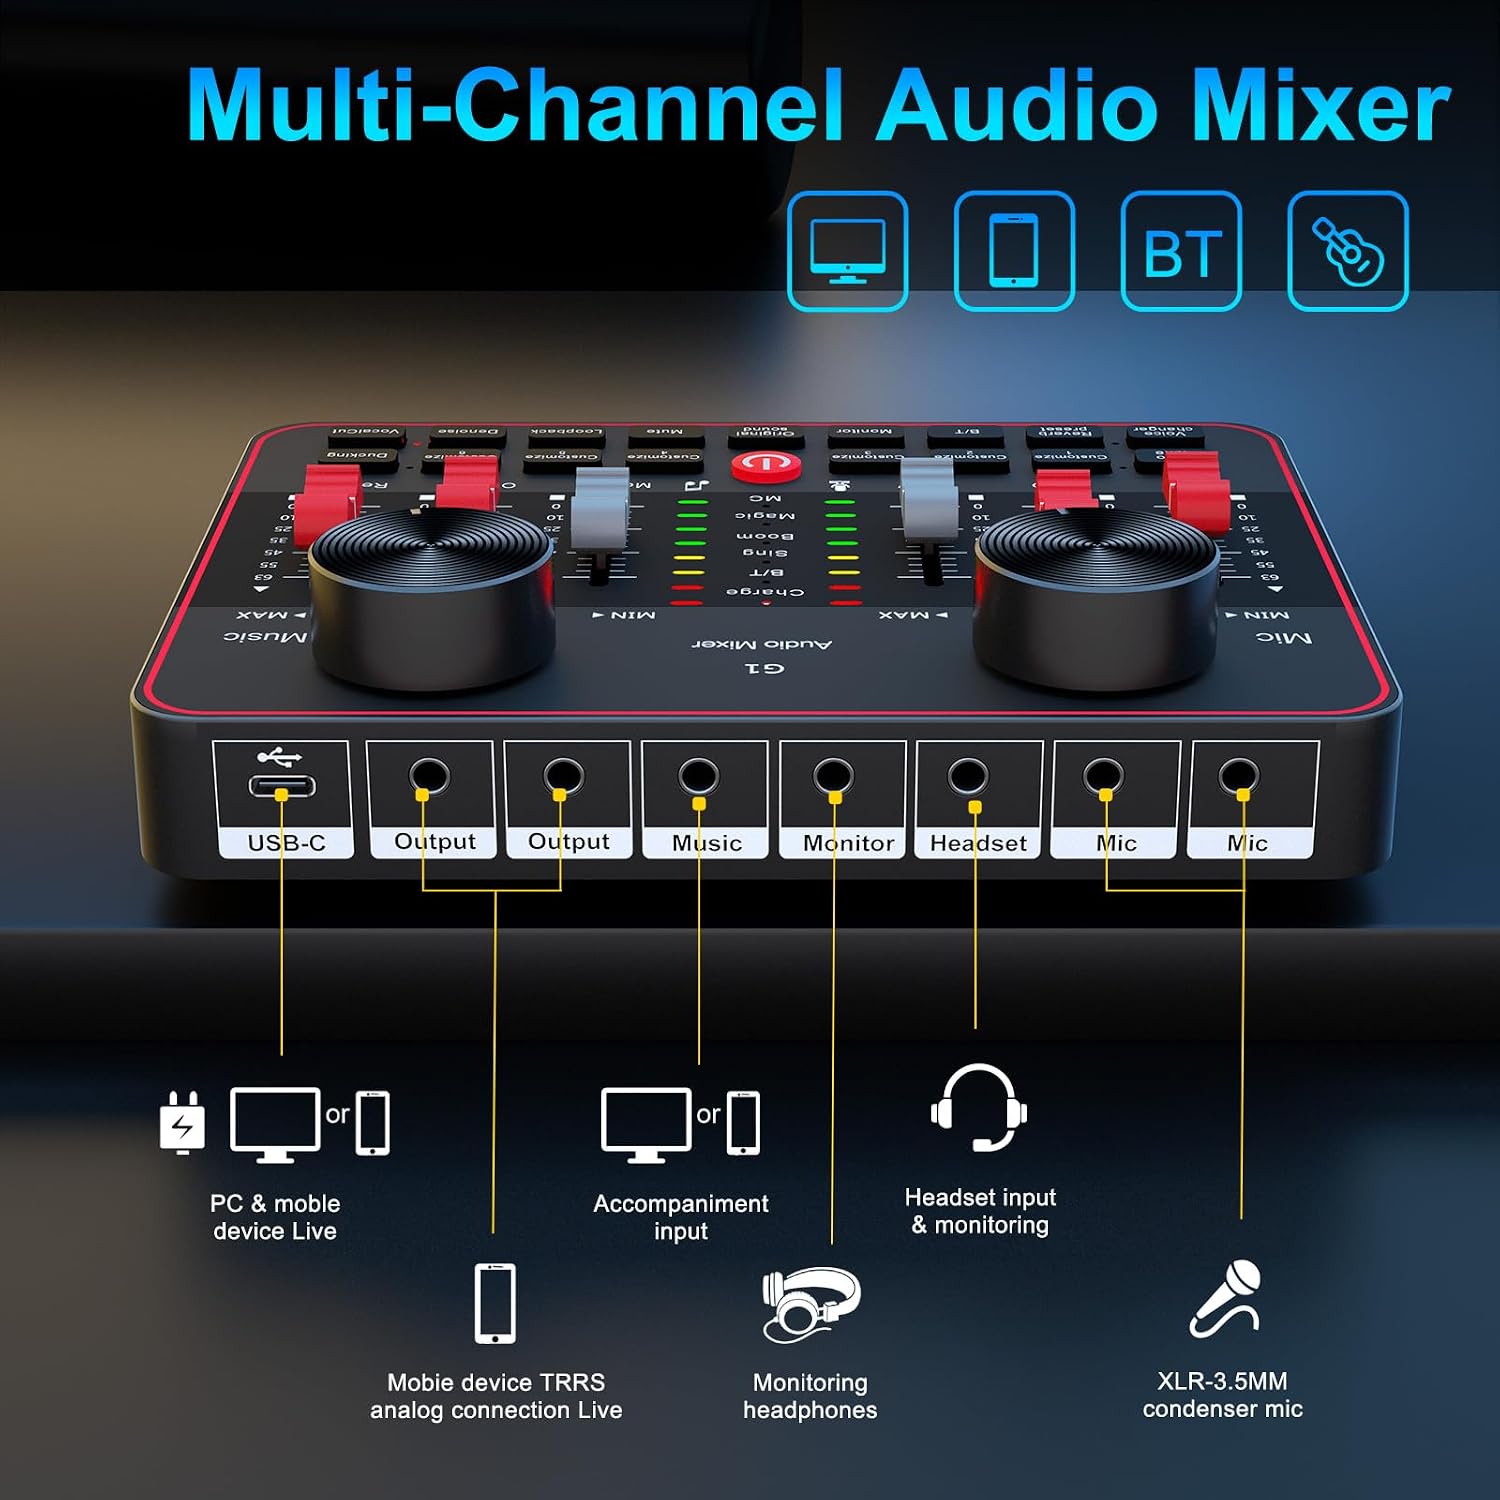
Figure 3: Connection diagram for PC, mobile devices, Bluetooth, headsets, and microphones.
4. Operating Instructions
This section details the functions of the G1 Audio Mixer's controls and features.
4.1 Volume and Tone Control
- Mic Volume: Use the 'Mic' slider to adjust the input volume of your microphone.
- Music Volume: Use the 'Music' slider to control the volume of background music or accompaniment.
- Tone Adjustment (HI, MID, LOW): Use the dedicated sliders to fine-tune the high, mid, and low frequencies of your microphone's audio.
4.2 Reverb Modes and Effects
The G1 offers four preset reverb modes and customizable reverb settings.

Figure 4: Visual representation of the four preset reverb modes: Sing, Boom, Magic, and MC.
- Preset Reverb Modes: Press the 'Reverb preset' button to cycle through 'Sing', 'Boom', 'Magic', and 'MC' modes.
- Reverb Slider: Adjust the intensity of the reverb effect using the 'Reverb' slider.
4.3 Voice Changer and Auto-Tune
Enhance your audio with voice modulation and pitch correction.

Figure 5: Voice changer options and tone controls.
- Voice Changer: Press the 'Voice changer' button to cycle through different voice effects such as female, deep, baby, or magic voices. Further adjustments to bass, treble, and reverb can personalize these effects.
- Auto-Tune: The 'Auto tune' button provides 12 steps of pitch correction for singing.
- Vocal Cut: The 'VocalCut' button can remove original vocals from a song, useful for karaoke or instrumental tracks.
4.4 Noise Reduction and Ambient Effects
Improve audio clarity and add interactive elements to your streams.

Figure 6: Smart Noise Reduction and Dodge features.
- Denoise: Press the 'Denoise' button to activate intelligent noise filtering, reducing background noise for clearer vocals.
- Ducking: The 'Ducking' feature automatically lowers background music volume when you speak and restores it when you stop.
- Customizable Interactive Effects: The G1 includes 6 customizable buttons ('Customize 1' through 'Customize 6') for adding ambient sound effects like applause or laughter.
4.5 Monitoring and Loopback
- Monitor: Use the 'Monitor' slider to adjust the volume of your headset monitoring.
- Loopback: The 'Loopback' function allows the mixer's output to be routed back as an input, useful for recording computer audio alongside your microphone.
5. Maintenance
Proper maintenance ensures the longevity and optimal performance of your G1 Audio Mixer.
- Cleaning: Use a soft, dry cloth to clean the exterior of the device. Avoid using liquid cleaners or abrasive materials.
- Battery Care: To prolong battery life, avoid fully discharging the device frequently. Charge the mixer regularly, especially if it will be stored for an extended period.
- Storage: Store the mixer in a cool, dry place away from direct sunlight, extreme temperatures, and excessive dust.
- Cable Management: Ensure all cables are connected securely and are not bent or crimped, which can cause damage or signal loss.
6. Troubleshooting
If you encounter issues with your G1 Audio Mixer, refer to the following common problems and solutions.
| Problem | Possible Cause | Solution |
|---|---|---|
| No sound output | Incorrect cable connection; volume levels too low; incorrect audio device selection. | Verify all cables are securely connected. Check 'Mic', 'Music', and 'Output' sliders. Ensure G1 is selected as the default audio device in your computer/software settings. |
| Poor sound quality or static | Faulty cable; microphone issues; high background noise; incorrect gain settings. | Try a different cable. Test the microphone with another device. Activate the 'Denoise' function. Adjust 'Mic' and tone sliders. |
| Bluetooth connection issues | Device not in pairing mode; interference; device too far. | Ensure Bluetooth is enabled on both devices. Move closer to the mixer. Restart both devices and try pairing again. |
| Voice changer effects are not as expected | Misunderstanding of effect type; settings not optimized. | The voice changer provides modulated effects, not perfect impersonations. Experiment with the 'Voice changer' button and adjust bass, treble, and reverb sliders for desired variations. |
| Settings reset after changing modes | Certain modes may have default settings that override previous adjustments. | Re-adjust settings after switching modes if necessary. Understand that some mode changes might prioritize specific audio profiles. |
If the problem persists after attempting these solutions, please contact customer support.
7. Specifications
Detailed technical specifications for the tenlamp G1 Audio Mixer.
| Feature | Specification |
|---|---|
| Model Number | G1 |
| Brand | tenlamp |
| Item Weight | 15.5 ounces |
| Product Dimensions | 6.42 x 1.73 x 4.92 inches (6.42"D x 1.73"W x 4.92"H) |
| Number of Channels | 2 |
| Connectivity Technology | 3.5mm audio cable, Bluetooth, USB |
| Power Source | Battery Powered |
| Battery Type | 1 Lithium Ion battery (included) |
| Voltage | 5 Volts |
8. Warranty and Support
tenlamp is committed to providing quality products and customer service.
- 365 Days Replacement: The product is eligible for replacement within 365 days of purchase.
- Lifetime Technical Support: tenlamp offers lifetime technical assistance for the G1 Audio Mixer.
- Customer Service: 24/7 customer service support is available for any inquiries or issues.
- Protection Plans: Extended protection plans (2-Year and 3-Year) may be available for purchase separately.
For support, please refer to the contact information provided with your product packaging or visit the official tenlamp website.