
Introduction
Welcome to the Cooyinka MA6CX 6-Channel DJ Mixer user manual. This guide provides detailed instructions for setting up, operating, and maintaining your mixer. Please read this manual thoroughly to ensure proper use and to maximize the performance of your device.
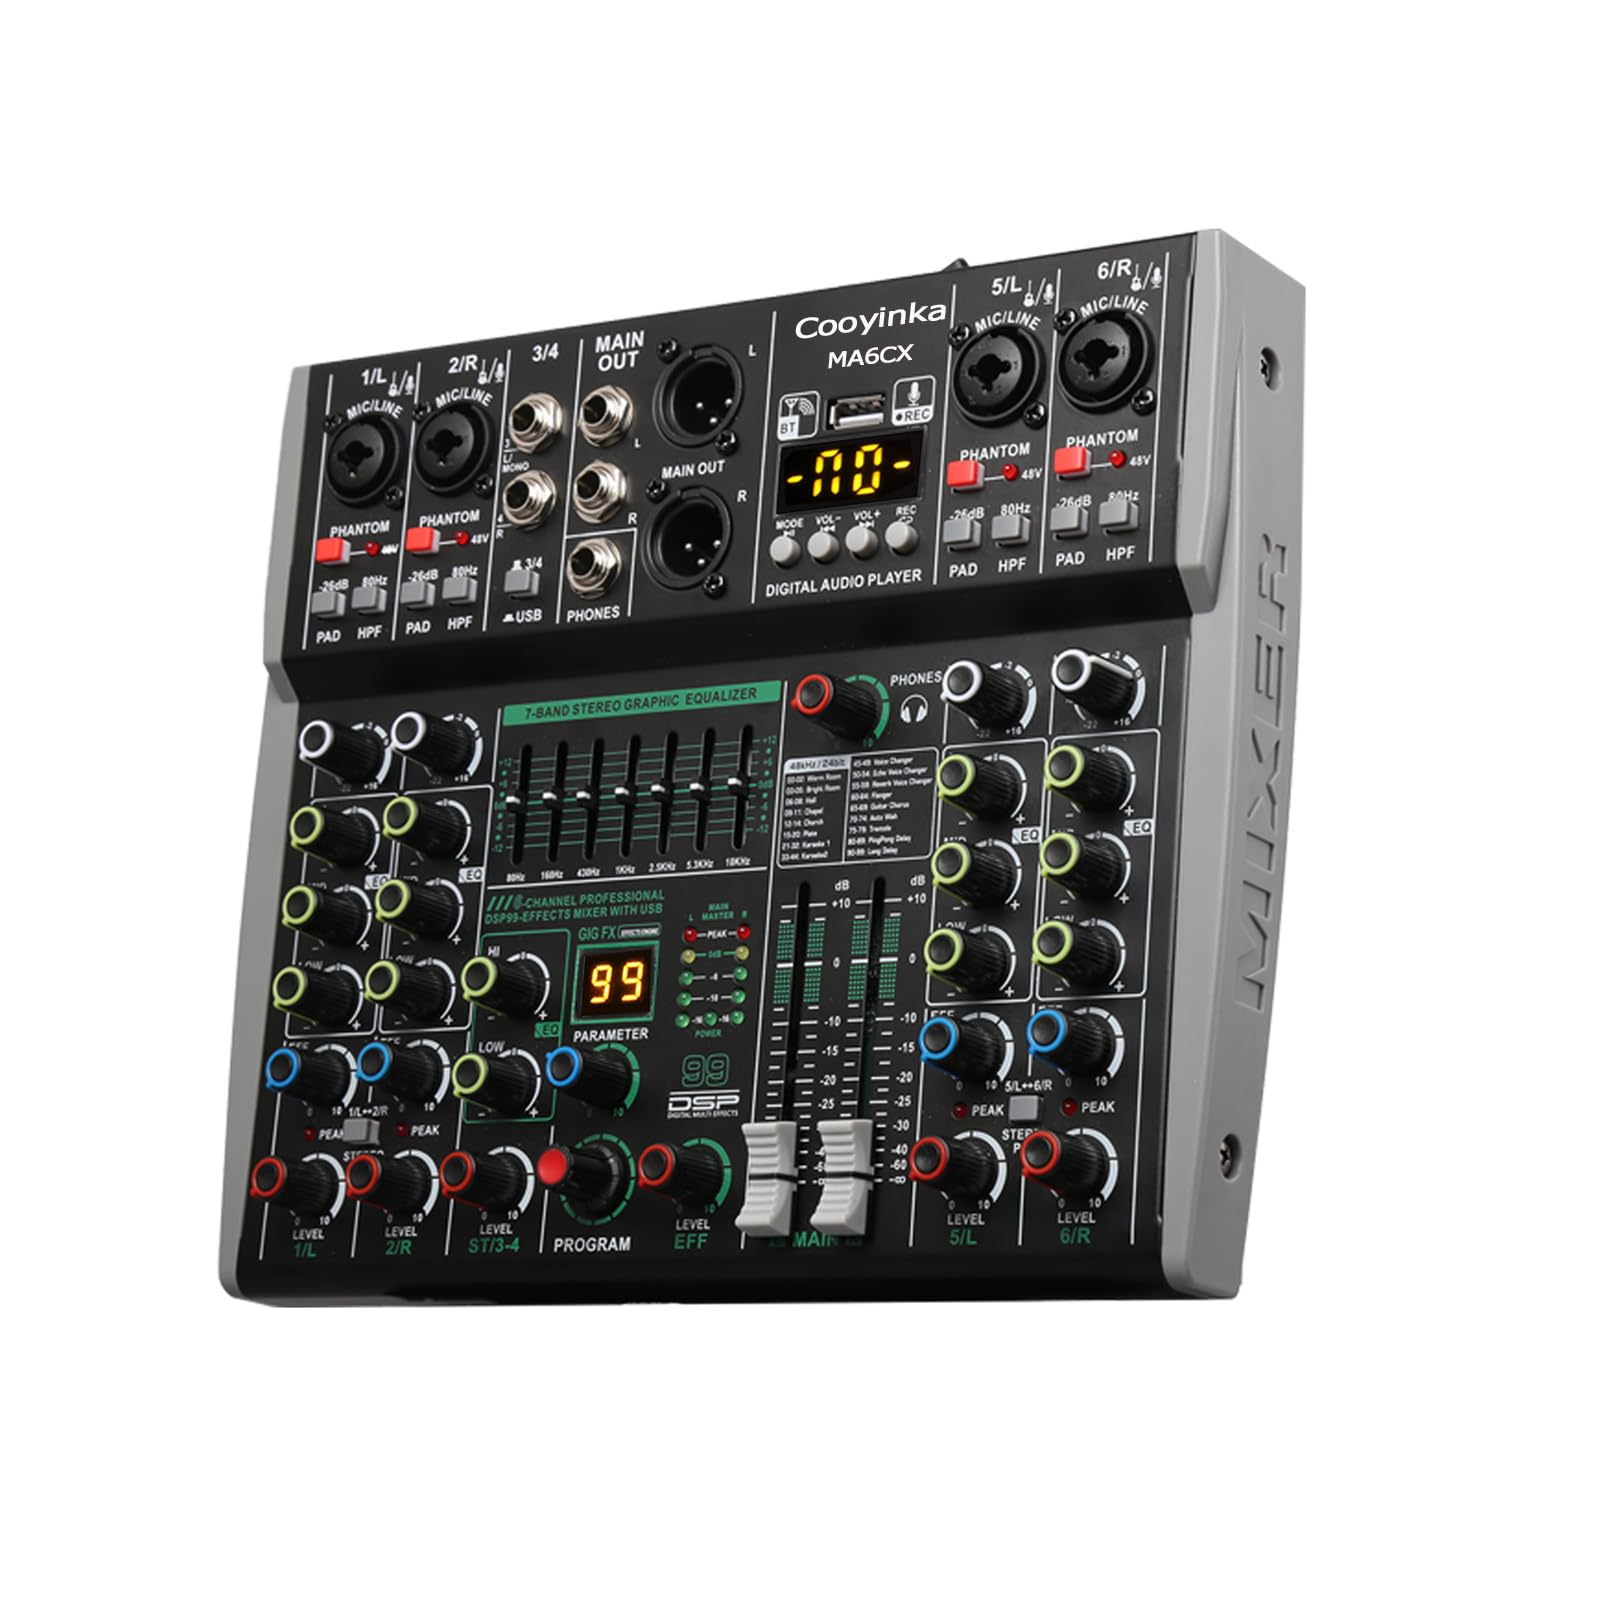
Figure 1: Cooyinka MA6CX 6-Channel DJ Mixer, front view.
Product Features
- 6-Channel Mixer Board: Features high-quality knobs and damping faders, 3-band equalization adjustment, and a 7-band stereo equalizer. Supports USB/PC/MP3 playback and monitor headphone return.
- Versatile Inputs: Channels 1/2/5/6 utilize XLR and 6.35mm input jacks. Channels 3/4 are stereo L/R channels with 6.35mm jacks. Includes 2 pairs of stereo L/R outputs and a headphone monitoring channel.
- Portable Audio Mixer: USB/MP3 playback compatible with most audio files. Integrated sound card for PC connection and audio input interface for recording.
- 99 DSP Effects Processor: Built-in digital effects for various scenarios, suitable for high-quality stage performance, live streaming, and parties.
- 48V Phantom Power: Four XLR inputs with phantom power support 48V condenser microphones, dynamic microphones, wireless microphones, and electric guitars. Activate the +48V phantom power switch when using condenser microphones.
Setup
Follow these steps to set up your Cooyinka MA6CX DJ Mixer:
- Power Connection: Connect the mixer to a power source using the provided power cable. Ensure the power switch is in the OFF position before connecting.
- Input Devices:
- For microphones, connect XLR cables to channels 1, 2, 5, or 6. If using a condenser microphone, activate the +48V phantom power for that channel.
- For line-level instruments (e.g., keyboards, guitars with preamps), use 6.35mm (1/4 inch) jacks on channels 1, 2, 5, or 6.
- For stereo sources, use the L/R 6.35mm jacks on channels 3/4.
- Output Devices:
- Connect your main speakers to the MAIN OUT L/R XLR or 6.35mm jacks.
- Connect headphones to the PHONES output for monitoring.
- USB Connection (Optional): Connect the mixer to your computer via a USB cable for recording or playback.
- Bluetooth Connection (Optional): Refer to the "Operating Instructions - Bluetooth Connectivity" section for pairing with a mobile device.
- Power On: Once all connections are secure, switch the power ON.

Figure 2: Overview of Cooyinka MA6CX Mixing Console Panels and Connections.
Operating Instructions
1. Channel Controls
Each input channel (1-6) features dedicated controls for optimal sound shaping:
- GAIN: Adjusts the input sensitivity for microphones or line-level signals. Set this to achieve a strong signal without clipping (PEAK LED should not light up consistently).
- PAD/HPF: Attenuates the input signal (PAD) or applies a High-Pass Filter (HPF) to remove low-frequency rumble.
- 3-Band EQ (HIGH, MID, LOW): Adjusts the treble, midrange, and bass frequencies for each channel.
- EFF Send: Controls the amount of signal sent to the internal DSP effects processor.
- PAN: Adjusts the stereo position (left to right) of the channel's signal.
- LEVEL: Controls the overall volume of the channel.

Figure 3: Labeled controls on the Cooyinka MA6CX Mixer.
2. Bluetooth Connectivity
To connect a Bluetooth device for audio playback:
- Ensure the mixer is powered on.
- Activate Bluetooth on your mobile device (smartphone, tablet, etc.).
- On the mixer's digital audio player section, press the MODE button until "BT" (Bluetooth) is displayed.
- Your device should discover "Cooyinka Mixer" or a similar name. Select it to pair.
- Once paired, you can play audio from your device through the mixer. Adjust the VOL- and VOL+ buttons on the digital player and the main volume fader.

Figure 4: Bluetooth connection to a smartphone.
3. USB Recording and Playback
The mixer supports USB connectivity for both recording and playing audio files.
- USB Playback: Insert a USB drive with MP3 or other compatible audio files into the USB port. Use the digital audio player controls (MODE, PLAY/PAUSE, PREV, NEXT) to navigate and play tracks.
- USB Recording: Connect the mixer to a computer via USB. The mixer acts as an audio interface. Use your preferred Digital Audio Workstation (DAW) software on your computer to record the mixed audio output.
4. 99 DSP Effects Processor
The built-in DSP effects processor offers 99 different effects to enhance your sound.
- Use the PROGRAM knob to select an effect number (1-99) displayed on the digital screen.
- Adjust the PARAMETER knob to fine-tune the selected effect.
- Use the EFF Send knob on individual channels to send signal to the effects processor.
- Adjust the LEVEL fader in the effects section to control the overall wet/dry mix of the effects.

Figure 5: 99 DSP Effect Processor controls.
5. 48V Phantom Power
Phantom power is required for condenser microphones.
- Connect your condenser microphone to an XLR input (Channels 1, 2, 5, or 6).
- Press the +48V button located near the XLR input for the corresponding channel. An indicator light will illuminate.
- CAUTION: Ensure phantom power is only activated when using condenser microphones. Activating it for dynamic microphones or other devices can cause damage.

Figure 6: Activating +48V Phantom Power for a condenser microphone.
6. 7-Band Stereo Equalizer
The master 7-band stereo equalizer allows for precise frequency adjustment of the overall mix.
- Use the individual sliders to boost or cut specific frequency bands (e.g., 80Hz, 430Hz, 1K, 2.5K, 5.3K, 10K).
- Adjust these to tailor the sound to your room acoustics or desired audio profile.

Figure 7: 7-Band Stereo Equalizer for master output adjustment.
Maintenance
Proper maintenance ensures the longevity and optimal performance of your mixer.
- Cleaning: Use a soft, dry cloth to wipe down the mixer's surface. For stubborn dirt, a slightly damp cloth can be used, followed by a dry one. Avoid abrasive cleaners or solvents.
- Dust Protection: Keep the mixer covered when not in use to prevent dust accumulation, especially in faders and knobs.
- Storage: Store the mixer in a cool, dry place away from direct sunlight and extreme temperatures.
- Avoid Liquids: Do not expose the mixer to liquids. Spills can cause severe damage.
Troubleshooting
If you encounter issues with your Cooyinka MA6CX mixer, refer to the following common problems and solutions:
| Problem | Possible Cause | Solution |
|---|---|---|
| No sound output |
|
|
| Microphone not working (condenser mic) |
|
|
| Bluetooth not connecting |
|
|
| Distorted sound |
|
|
Specifications
| Feature | Detail |
|---|---|
| Brand | Cooyinka |
| Model | MA6CX |
| Number of Channels | 6 |
| Connectivity Technology | USB, Bluetooth |
| Power Source | Cable Electric |
| Output Connector Type | XLR |
| Audio Input Type | XLR, 6.35mm Jack |
| DSP Effects | 99 Built-in effects |
| Phantom Power | +48V (on 4 XLR inputs) |
| Equalization | 3-Band EQ per channel, 7-Band Stereo Graphic Equalizer |
Warranty and Support
Cooyinka products are designed for reliability and performance. While specific warranty details are not provided in this manual, we encourage you to retain your proof of purchase.
For any questions, technical assistance, or support regarding your Cooyinka MA6CX DJ Mixer, please contact Cooyinka customer service. Our team is available to assist you with any issues you may encounter before or during use.
Please refer to the product packaging or the official Cooyinka website for the most up-to-date contact information.