1. Introduction
This manual provides detailed instructions for the HOSONGIN Audio Interface P300, a versatile sound card designed for streaming, podcasting, gaming, and recording. It features a pro-preamp, 48V phantom power, voice changer, customizable sound effects, and noise reduction capabilities.
The HOSONGIN Audio Interface P300 is engineered to provide clear and personalized audio for various applications. Please read this manual thoroughly to ensure proper setup and operation.
Package Contents:
- HOSONGIN Audio Interface P300
- USB A-C Charging Cable
- Two 3.5mm Audio Cables
- User Manual (this document)
2. Product Overview
The HOSONGIN Audio Interface P300 is a compact and feature-rich device. Familiarize yourself with its components and controls.

Figure 2.1: Front and top view of the HOSONGIN Audio Interface P300, showing main controls and indicators.
Front Panel Controls:
- MIC MIN/MAX Knob: Adjusts microphone input volume.
- Reverb MIN/MAX Knob: Controls the intensity of the reverb effect.
- Treble+, Mid+, Bass+ Knobs: Equalizer controls for microphone input.
- Record+ Knob: Adjusts the recording volume.
- Electric Sound Button: Activates electric sound effects.
- 48V Button: Toggles 48V phantom power for condenser microphones.
- Power Button: Turns the device on/off.
- Light Button: Controls indicator lights.
- Monitor Fader: Adjusts the monitoring volume for headphones.
- Accompany Fader: Adjusts the volume of background music/accompaniment.
- Sound Effect Buttons (A, B, C, D, CUSTOM): Trigger various pre-set and customizable sound effects.
- Voice Effect Buttons (Voice Change, Ducking+, Voice Change+, Eliminate): Controls for voice modulation and background noise reduction.
- MODE Button: Cycles through different operating modes.
- BT Button: Activates Bluetooth pairing mode.
- Internal Play Button: For internal audio playback.
- Denoise Button: Activates AI noise reduction.

Figure 2.2: Rear panel of the HOSONGIN Audio Interface P300, showing connectivity ports.
Rear Panel Ports:
- Charging (5V-1A) Port: USB-C port for charging the device.
- OTG/PC Live Port: USB-C port for connecting to a computer (PC/Mac) or mobile device for live streaming and recording.
- LIVE Ports (x2): 3.5mm audio output ports for connecting to mobile devices for live streaming.
- AUX-IN Port: 3.5mm audio input for external audio sources.
- Earphone Port: 3.5mm output for monitoring audio with earphones.
- Headset Port: 3.5mm output for connecting a headset (headphones with microphone).
- Condenser Mic1/Mic2 Ports: 3.5mm input ports for condenser microphones.
- 48V/Dynamic Mic Port: 6.35mm (1/4 inch) input port for dynamic microphones or condenser microphones requiring 48V phantom power (via appropriate adapter).
3. Setup Guide
Follow these steps to set up your HOSONGIN Audio Interface P300.
3.1 Initial Charging
Before first use, ensure the device is fully charged. Connect the USB A-C charging cable to the Charging (5V-1A) port on the rear panel and to a 5V USB power adapter (not included). The device requires approximately 3+ hours for a full charge. The unit will not operate while undergoing its initial charge; it must be sufficiently charged to power on.
3.2 Connecting to a Computer (PC/Mac)
- Ensure the Audio Interface P300 is charged and powered on.
- Connect the USB A-C cable from the OTG/PC Live port on the Audio Interface to a USB port on your computer.
- Your computer should automatically detect the device. You may need to select "HOSONGIN P300" as the input and output audio device in your operating system's sound settings or your recording/streaming software.

Figure 3.1: Connecting the Audio Interface to a mobile device for live streaming or recording.
3.3 Connecting to Mobile Devices (Smartphone/Tablet)
- For direct digital connection, use the USB A-C cable from the OTG/PC Live port to your mobile device (requires an OTG adapter if your device does not have a USB-C port or if using an iPhone).
- For analog connection, use the provided 3.5mm audio cables. Connect one end to a LIVE port on the Audio Interface and the other end to the 3.5mm audio jack of your mobile device. If your mobile device lacks a 3.5mm jack, an appropriate adapter (e.g., USB-C to 3.5mm or Lightning to 3.5mm) is required.
- You can use up to two LIVE ports simultaneously for multi-device streaming.
3.4 Microphone and Headphone Connections
- Dynamic Microphones: Connect to the 48V/Dynamic Mic (6.35mm) port.
- Condenser Microphones: Connect to either Condenser Mic1 or Condenser Mic2 (3.5mm ports). For condenser microphones requiring 48V phantom power, connect via an appropriate adapter to the 48V/Dynamic Mic (6.35mm) port and activate the 48V button.
- Headphones/Earphones: Connect to the Earphone port for monitoring.
- Headset: Connect a headset (headphones with integrated microphone) to the Headset port.

Figure 3.2: Connecting a microphone to the 48V/Dynamic Mic input.
4. Operating Instructions
4.1 Power On/Off
Press and hold the Power Button (red button) on the front panel to turn the device on or off.
4.2 Adjusting Microphone Input
- Use the large MIC MIN/MAX Knob to control the overall microphone input volume.
- Fine-tune your microphone's tone using the Treble+, Mid+, and Bass+ equalizer knobs.
- Activate 48V phantom power by pressing the 48V button if using a condenser microphone that requires it.
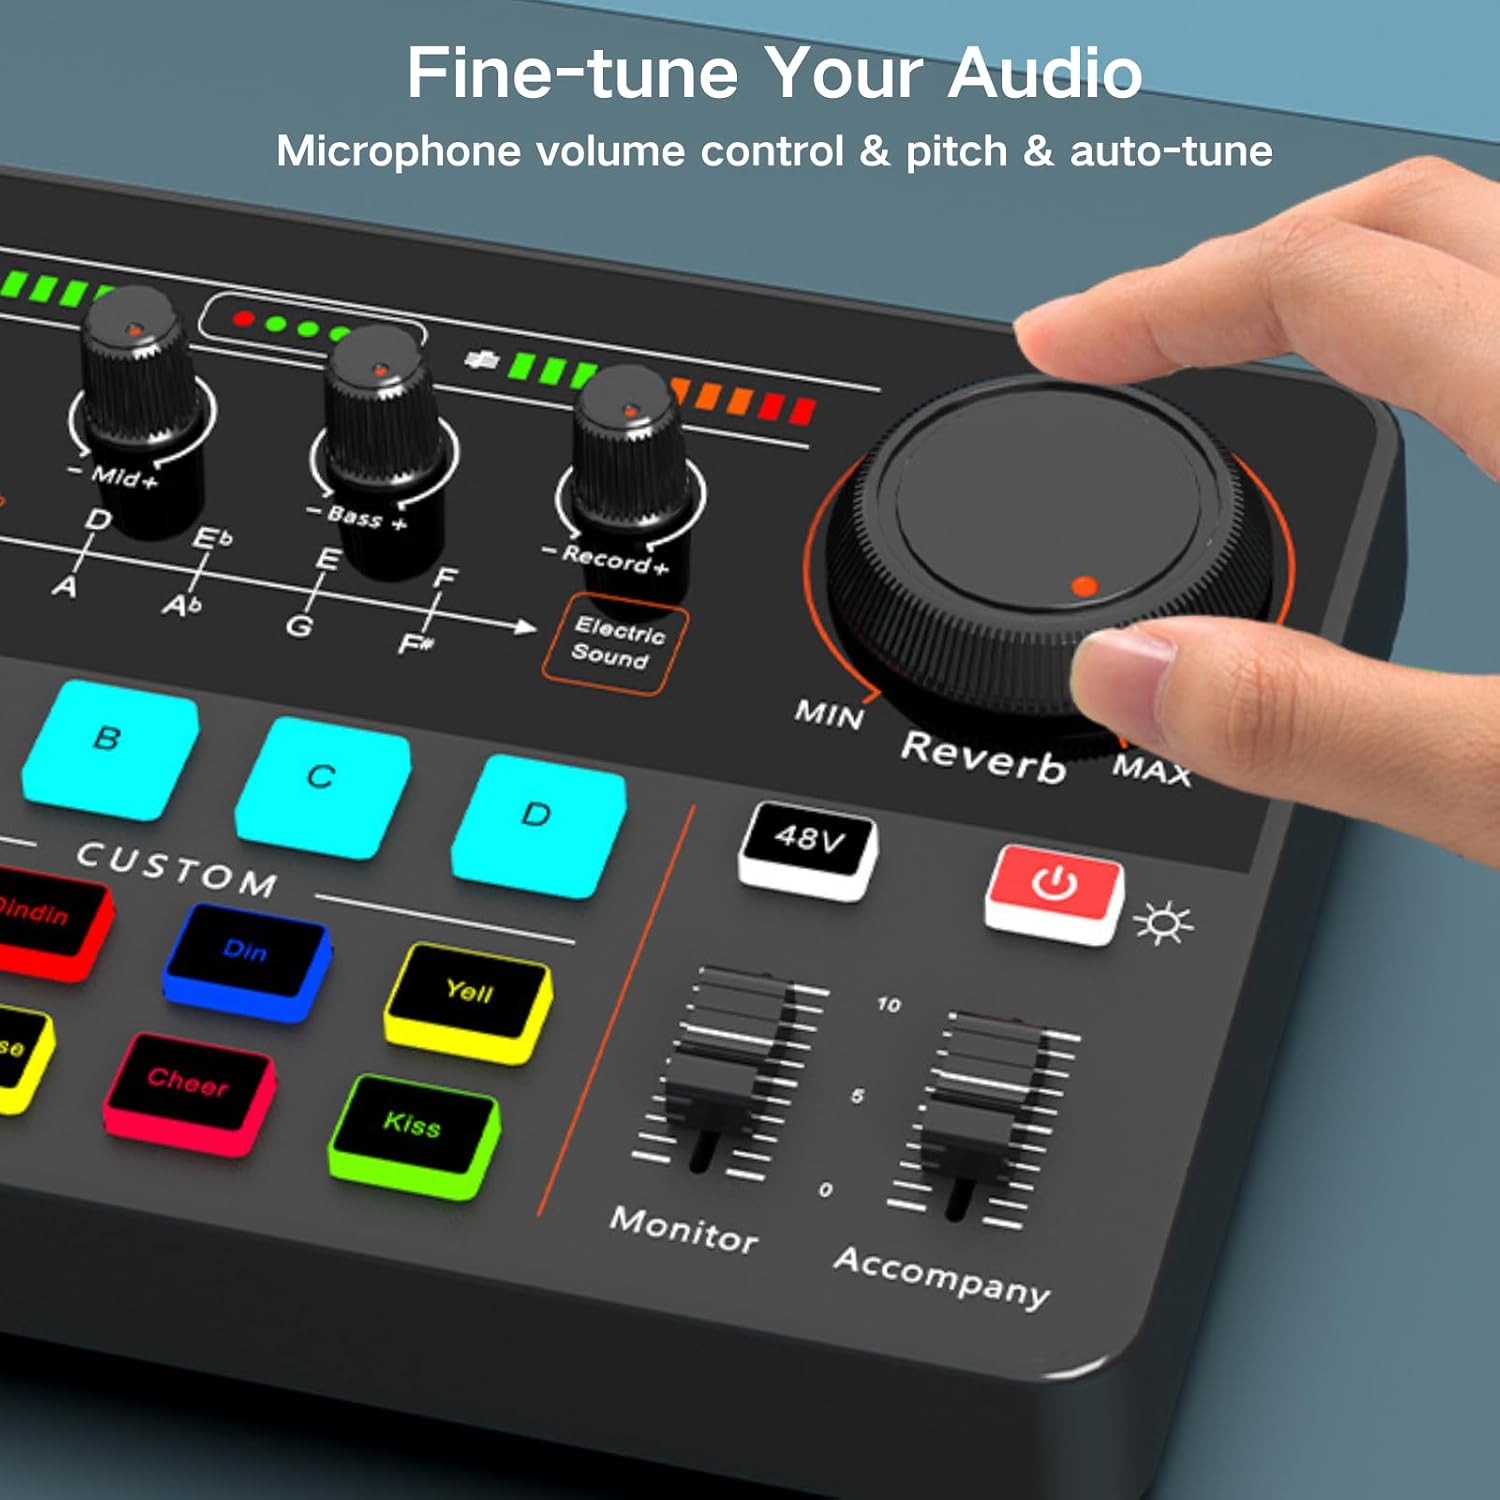
Figure 4.1: Adjusting audio controls on the interface.
4.3 Sound Effects and Voice Changing
- Reverb: Adjust the Reverb MIN/MAX Knob to add or reduce reverb to your audio.
- Electronic Sound: Press the Electric Sound button to activate various electronic tones.
- Custom Sound Effects: Use buttons A, B, C, D and the CUSTOM section (Giggle, Dindin, Din, Yell, Laughter, Applause, Cheer, Kiss) to trigger pre-recorded or custom sound effects.
- Voice Change: Use the Voice Change buttons to apply different voice modulation effects.
- Denoise: Press the Denoise button to activate AI noise reduction, minimizing background noise.
- Ducking: Use Ducking+ to automatically lower background music when speaking.

Figure 4.2: Customizable sound effect buttons.

Figure 4.3: Dynamic tone options for various audio projects.
4.4 Monitoring and Accompaniment
- Adjust the Monitor Fader to control the volume of audio heard through your connected earphones/headphones.
- Adjust the Accompany Fader to control the volume of background music or accompaniment playing through the AUX-IN or Bluetooth connection.
5. Connectivity
5.1 Bluetooth Connection
- Press the BT button on the Audio Interface. The Bluetooth indicator light will flash, indicating pairing mode.
- On your mobile device, open Bluetooth settings and search for "P300".
- Select "P300" to connect. The indicator light will become solid once paired successfully.
- You can now stream audio wirelessly from your mobile device to the Audio Interface for accompaniment.

Figure 5.1: Bluetooth pairing instructions.
5.2 OTG/PC Live Connection
As detailed in the Setup Guide, the OTG/PC Live USB-C port allows for direct digital audio transmission to and from computers and compatible mobile devices. This connection is ideal for high-quality recording and live streaming.
5.3 Analog Live Output
The two LIVE 3.5mm ports provide analog audio output for connecting to mobile devices, allowing for broad compatibility with various streaming platforms.
6. Troubleshooting
If you encounter issues with your HOSONGIN Audio Interface P300, refer to the following common problems and solutions:
- Device does not power on:
- Ensure the device is fully charged. The initial charge requires over 3 hours, and the device will not operate during this first charging cycle.
- Verify the USB-C charging cable is securely connected to the Charging (5V-1A) port and a working power source.
- No sound input from microphone:
- Check if the microphone is correctly connected to the appropriate port (6.35mm for dynamic, 3.5mm for condenser).
- For condenser microphones requiring phantom power, ensure the 48V button is activated.
- Adjust the MIC MIN/MAX Knob to increase input volume.
- Confirm the microphone is functional by testing it with another device if possible.
- No sound output (monitoring):
- Ensure headphones/earphones are securely connected to the Earphone or Headset port.
- Adjust the Monitor Fader to increase monitoring volume.
- Check your computer's or mobile device's sound settings to ensure the Audio Interface P300 is selected as the output device.
- Line-in (AUX-IN) not working:
- Verify the 3.5mm audio cable is securely connected to the AUX-IN port and the external audio source.
- Ensure the external audio source is playing and its volume is adequate.
- USB connection to PC/Mac is confusing or not detected:
- Ensure the USB-C cable is connected to the OTG/PC Live port.
- Restart your computer and the Audio Interface.
- Check your computer's sound settings (e.g., Windows Sound Control Panel, macOS System Settings > Sound) to manually select "HOSONGIN P300" as the input and output device.
- Try a different USB port on your computer.
- Bluetooth pairing issues:
- Ensure the BT button is pressed and the indicator is flashing.
- Make sure the Audio Interface is within range of your mobile device.
- Try unpairing and re-pairing the device from your mobile device's Bluetooth settings.
7. Specifications
| Brand | HOSONGIN |
| Model Number | Sound-Card-P300-Black |
| Item Weight | 1.62 pounds (0.74 Kilograms) |
| Package Dimensions | 11.69 x 6.77 x 2.4 inches |
| Batteries | 1 Lithium Ion battery required |
| Battery Type | Lithium |
| Power Source | USB Powered |
| Connectivity Technology | Bluetooth, USB, Type C |
| Number of Channels | 4 |
| Compatible Devices | Laptop, Microphone, Personal Computer, Headphone, Smartphone |
8. Maintenance
- Cleaning: Use a soft, dry cloth to clean the surface of the device. Avoid using liquid cleaners or abrasive materials.
- Storage: Store the Audio Interface in a cool, dry place away from direct sunlight and extreme temperatures.
- Battery Care: To prolong battery life, avoid fully discharging the device frequently. Charge it regularly, even if not in use for extended periods.
- Cable Management: Handle cables carefully to prevent damage to connectors and ports.
9. Warranty and Support
HOSONGIN is committed to providing quality products and customer satisfaction.
- Customer Service: For any issues or inquiries, our customer service team is available 24 hours a day to assist you. Please refer to your purchase documentation or the HOSONGIN official website for contact information.
- Warranty Information: Specific warranty details may vary by region and retailer. Please retain your proof of purchase for warranty claims.


