
1. Introduction
Thank you for choosing the HZLIMJDQ A37-I32-BL Car Dash Cam Rearview Mirror Video Recorder. This device is designed to enhance your driving safety by providing reliable video recording of your journeys. This manual will guide you through the installation, operation, and maintenance of your new dash cam. Please read it thoroughly before use to ensure proper functionality and to prevent damage.
2. Package Contents
Please verify that all items listed below are included in your package:
- 1 x Packaging box
- 1 x DVR (Dash Cam Unit)
- 1 x Power Charger (Car Charger)
- 1 x User Manual
- 1 x 1080P Night Vision Rearview Camera with 6 Meters Cable (Optional)
- 1 x 1080P Night Vision Rearview Camera (IMX 307) with 6 Meters Cable (Optional)
- 1 x Buck Line for Parking Monitoring (Optional)
- 2 x Bandage (Mounting Straps)

Image 2.1: Overview of the HZLIMJDQ A37-I32-BL dash cam and its included accessories, such as the main mirror unit, rear camera, power cable, and mounting straps.
3. Product Overview
The HZLIMJDQ A37-I32-BL is a rearview mirror dash cam featuring a 10-inch IPS touch screen. It integrates both front and rear cameras for comprehensive vehicle surveillance.
3.1 Main Components
- Main Unit: Rearview mirror with integrated front camera and 10-inch touch screen display.
- Rear Camera: External camera for rear view recording and parking assistance.
- Power Charger: Connects to your vehicle's cigarette lighter socket.
- Mounting Straps: For securing the main unit over your existing rearview mirror.

Image 3.1: Detailed diagram illustrating the dimensions of the 10-inch mirror unit and the location of its various ports and controls, including the power button, TF card slot, rear pull hole, Type-C input, and lens.
3.2 Key Features
- Dual Camera Recording: Simultaneous recording from front (2560x1440P) and rear (1920x1080P) cameras.
- 10-inch IPS Touch Screen: Provides a clear and responsive interface for control and playback.
- Wide View Angles: 170° for the front camera and 140° for the rear camera.
- Loop Recording: Automatically overwrites the oldest videos when the memory card is full.
- G-Sensor: Detects sudden impacts and locks the current video footage to prevent overwriting.
- 24-Hour Parking Mode: Provides continuous surveillance with low power consumption when the vehicle is parked (requires optional buck line).
- Night Vision: Enhanced recording capabilities in low-light conditions, especially with the IMX 307 sensor for the rear camera.
- Adjustable Front Lens: The front camera lens can be moved for optimal positioning.

Image 3.2: The dash cam's display showing simultaneous 1440P front camera and 1080P rear camera recording capabilities.

Image 3.3: Visual representation of the dash cam's features, including HD 1080P, dual video, reversing assistance, 10-inch screen, 2.5K touch screen, loop recording, motion detection, parking monitoring, 170° wide angle, G-sensor, headlight reminder, and night vision.

Image 3.4: Illustration highlighting the Super Night Vision capability, enabled by the IMX 307 sensor, which improves visibility in dark or rainy conditions.
4. Setup and Installation
4.1 Installing the Main Unit
- Secure the main unit over your vehicle's existing rearview mirror using the provided rubber straps. Ensure it is firmly attached and does not obstruct your view.
- Adjust the front camera lens to capture the desired view of the road ahead.
4.2 Installing the Rear Camera (Optional)
- Mount the rear camera on the rear of your vehicle, typically above the license plate or inside the rear window. Ensure it has a clear view.
- Route the rear camera cable to the main unit, connecting it to the designated AV-In port. Conceal the cable along the vehicle's trim for a tidy installation.
4.3 Power Connection
- Insert a Class 10 or higher Micro SD/TF card (up to 128GB) into the TF Card Slot on the main unit.
- Connect the power charger to the main unit's power input (Type-C) and plug the other end into your vehicle's cigarette lighter socket.
- When you start your vehicle's engine, the dash cam will automatically power on and begin recording.
5. Operation
5.1 Basic Functions
- Power On/Off: The device powers on automatically with vehicle ignition. Press and hold the power button to manually turn it on or off.
- Recording: Recording starts automatically when the device is powered on. A red indicator on the screen confirms recording is active.
- Touch Screen Control: Navigate menus, adjust settings, and view playback directly on the 10-inch touch screen.
5.2 Adjusting Viewing Angle
Swipe up or down on the touch screen to adjust the vertical viewing angle of the displayed camera feed. Swipe left or right to switch between front and rear camera views.
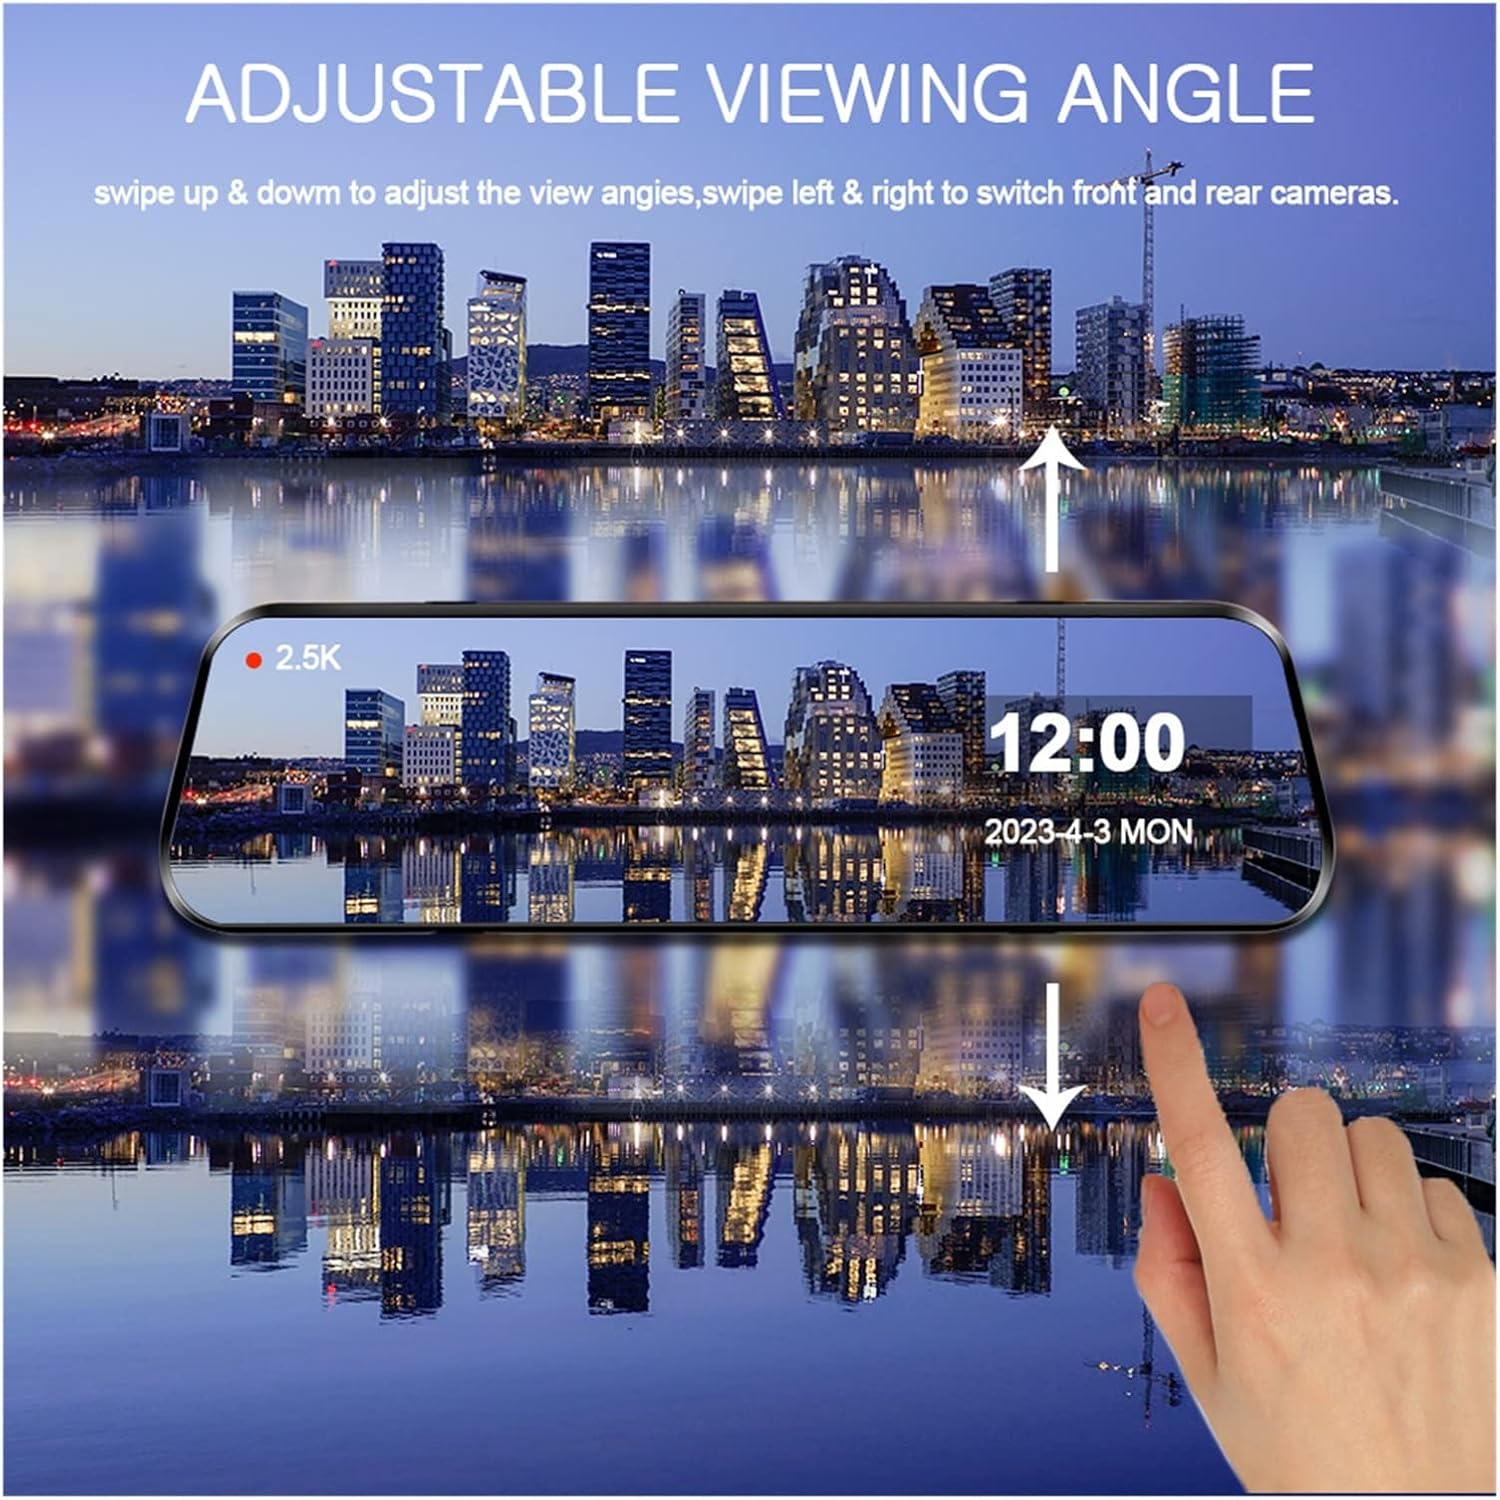
Image 5.1: Visual guide demonstrating how to swipe up/down to adjust the viewing angle and swipe left/right to switch between front and rear camera displays on the touch screen.
5.3 Split Screen Display
The device supports a 1:1 split screen display, allowing you to view both the front and rear camera feeds simultaneously. This feature can be toggled through the touch screen interface.
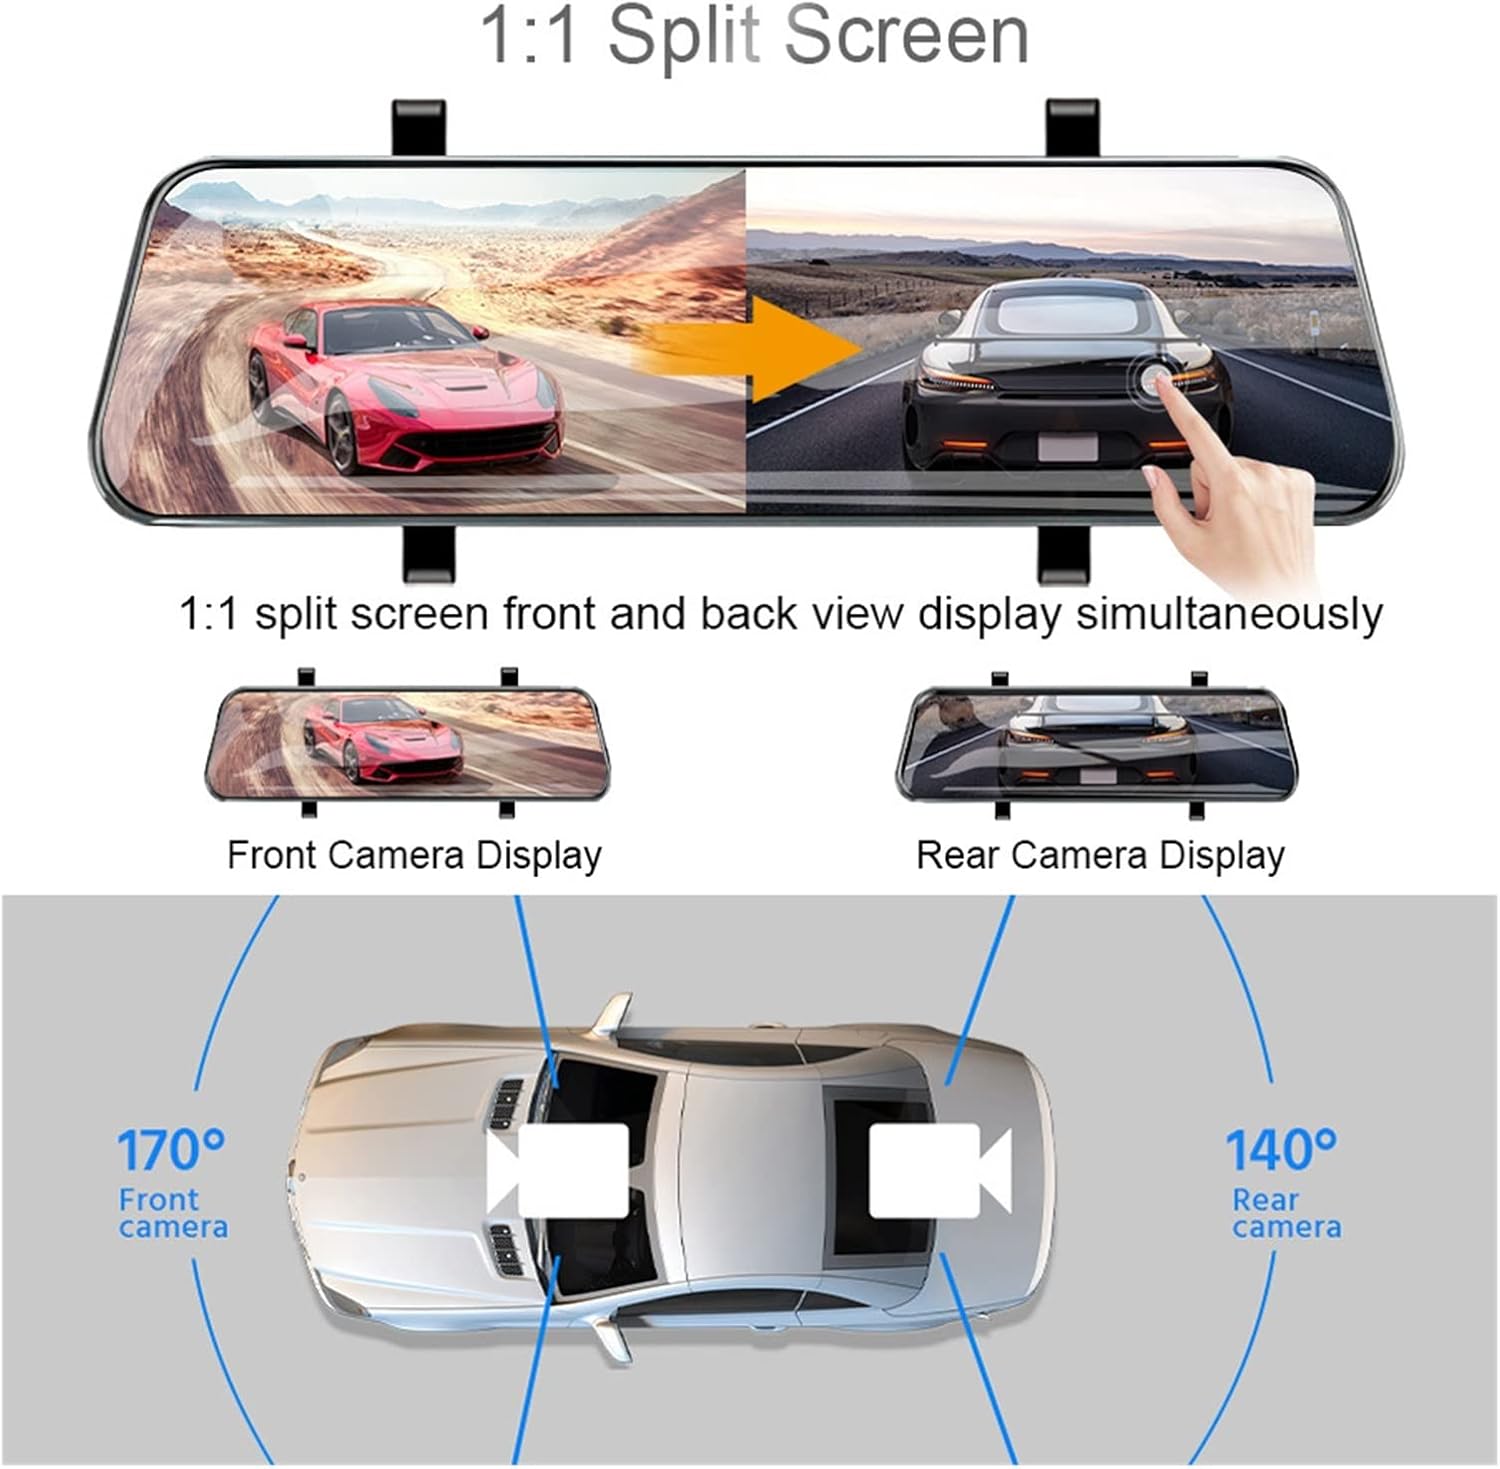
Image 5.2: Illustration of the 1:1 split screen function, showing both front and rear camera views displayed concurrently on the mirror, along with a diagram of the camera placement and their respective 170° front and 140° rear viewing angles.
6. Settings
Access the settings menu by tapping the gear icon on the touch screen. Here you can configure various parameters:
- Video Resolution: Select desired resolution for front and rear cameras.
- Loop Recording: Set the duration of video segments (e.g., 1, 3, 5 minutes).
- G-Sensor Sensitivity: Adjust the sensitivity of impact detection.
- Parking Monitor: Enable or disable parking surveillance (requires buck line).
- Date/Time: Set the correct date and time for accurate timestamps on recordings.
- OSD Language: Choose from multiple languages including Arabic, Chinese (Simplified), Czech, Dutch, English, French, German, Greek, Hebrew, Hungarian, Italian, Japanese, Korean, Lithuanian, Polish, Portuguese, Russian, Spanish, Thai, and Turkish.
- Screen Saver: Set the display to turn off after a period of inactivity to avoid distraction.
7. Maintenance
- Cleaning: Use a soft, dry cloth to clean the screen and camera lenses. Avoid abrasive cleaners.
- Memory Card: Periodically format the Micro SD card (at least once a month) to ensure optimal performance and prevent data corruption. Back up important videos before formatting.
- Temperature: Operate the device within the specified working temperature range of -20°C to 70°C. Avoid prolonged exposure to extreme heat or cold.
8. Troubleshooting
| Problem | Possible Cause | Solution |
|---|---|---|
| Device does not power on. | No power supply; faulty connection. | Check power charger connection to both the device and the car's cigarette lighter. Ensure the car's ignition is on. |
| Recording stops unexpectedly. | Memory card full; card error; power interruption. | Format the Micro SD card. Replace with a new Class 10 card if errors persist. Check power connection. |
| Poor video quality. | Dirty lens; incorrect resolution settings. | Clean camera lenses. Check video resolution settings in the menu. |
| Rear camera not displaying. | Loose cable connection; faulty camera. | Ensure the rear camera cable is securely connected to the main unit's AV-In port. |
| Screen freezes or is unresponsive. | Software glitch. | Press and hold the power button to force a restart. If issues persist, perform a factory reset via settings. |
9. Specifications
| Feature | Specification |
|---|---|
| Model | A37-I32-BL |
| Display Size | 10 Inches IPS Touch Screen |
| Front Camera Resolution | 2560x1440P @ 25FPS |
| Rear Camera Resolution | 1920x1080P @ 25FPS |
| Front View Angle | 170° |
| Rear View Angle | 140° |
| Imaging Sensor | IMX335 (Front), IMX307 (Rear, optional) |
| Max External Memory | 128GB (Class 10 Micro SD/TF Card) |
| Video Code / Format | H.264 / AVI |
| Battery Capacity | 500mAh (Built-in) |
| Working Temperature | -20°C to 70°C |
| Dimensions (W x H x D) | 257mm x 72mm (Main Unit) |
| Weight | 700g (approximate) |
| Interface | AV-In, USB2.0, Micro SD/TF |
| OSD Language | Multi-language support |
10. Safety Information
- Do not operate the device or adjust settings while driving. Always pull over safely before making any adjustments.
- Ensure the dash cam is installed securely and does not obstruct your view of the road or interfere with vehicle controls.
- Use only the provided power charger to avoid damage to the device.
- Keep the device away from water and extreme temperatures.
- Do not attempt to disassemble or repair the device yourself. Contact customer support for assistance.
11. Warranty and Support
For warranty information or technical support, please refer to the contact details provided with your purchase or visit the official HZLIMJDQ website. Keep your purchase receipt as proof of purchase for warranty claims.