HZLIMJDQ JC400
HZLIMJDQ JC400 Dashcam User Manual
Model: JC400
Introduction
This manual provides comprehensive instructions for the installation, operation, and maintenance of your HZLIMJDQ JC400 Dashcam. The JC400 is a dual-camera system designed for vehicle recording, offering front and rear/inside views, live streaming capabilities, and advanced tracking features. Please read this manual thoroughly before using the device to ensure proper functionality and safety.
Package Contents
Upon opening the package, verify that all components are present and in good condition. The standard package includes:
- JC400 Main Dashcam Unit
- Rear or Inside Camera (depending on variant)
- Power Cable
- Relay
- SOS Button
- SIM Card Lock
- Mounting Accessories
- User Manual

Figure 1: Overview of the JC400 Dashcam components and accessories included in the package.
Setup and Installation
Proper installation is crucial for optimal performance of your dashcam. It is recommended to have the device professionally installed if you are unfamiliar with vehicle electrical systems.
1. Main Unit Placement
Mount the main JC400 dashcam unit on the front windshield, typically behind the rearview mirror, ensuring it does not obstruct the driver's view. The lens can be moved back and forth for optimal positioning. Ensure the unit is securely attached using the provided mounting accessories.

Figure 2: The JC400 main dashcam unit with its integrated front camera and connection for the secondary camera.
2. Secondary Camera Installation (Rear/Inside)
Install the secondary camera (rear or inside cabin camera) in the desired location. For an inside camera, mount it to capture the vehicle's interior. For a rear camera, install it at the back of the vehicle, ensuring a clear view of the road behind. Connect the secondary camera to the main unit using the provided cable.

Figure 3: Illustration of the dual camera setup, showing the front camera's wide view and the inward camera's cabin view.
3. Power Connection
Connect the dashcam to your vehicle's power source using the provided power cable. Ensure a stable power supply for continuous operation. The device is designed to automatically start recording when the engine is started.
4. SIM Card and SD Card Insertion
Insert a compatible SIM card (for network connectivity and live streaming) and a Class 10 or higher speed Micro SD card (up to 256GB) into their respective slots on the dashcam unit. Ensure the SIM card is locked securely.
Operating Instructions
1. Automatic Recording
Once powered on, the JC400 Dashcam will automatically begin recording. It features loop recording, where older videos are overwritten when the SD card is full. Recordings are typically saved in 3-minute segments.
2. G-Sensor Functionality
The built-in G-sensor automatically detects sudden shakes or collisions. In such events, the footage is locked to prevent it from being overwritten during loop recording, preserving critical incident data.
3. Live Stream and Tracking (APP/PC)
The JC400 supports live video streaming from both cameras and real-time vehicle tracking via a dedicated mobile application (compatible with Android 8.1 systems) or PC. This feature requires an active SIM card with data connectivity.

Figure 4: The mobile application interface showing live video feed from the dashcam and real-time vehicle location on a map.

Figure 5: Illustrates the 4G connectivity feature, enabling remote access and live viewing of the dashcam feed.
4. 24-Hour Parking Mode
When the vehicle is parked and the engine is off, the dashcam automatically enters parking mode. With time-lapse recording, it provides continuous surveillance with low power consumption, offering all-weather protection for your vehicle.
5. Remote Control Features
Through the mobile application, you can access advanced remote control features such as:
- Vibration Alarm: Receive alerts on your phone if the vehicle experiences a significant vibration.
- SOS Emergency Calling: Utilize the SOS button for emergency situations.
- Oil Cut-off: Remotely cut off the vehicle's oil supply (requires professional installation and wiring).
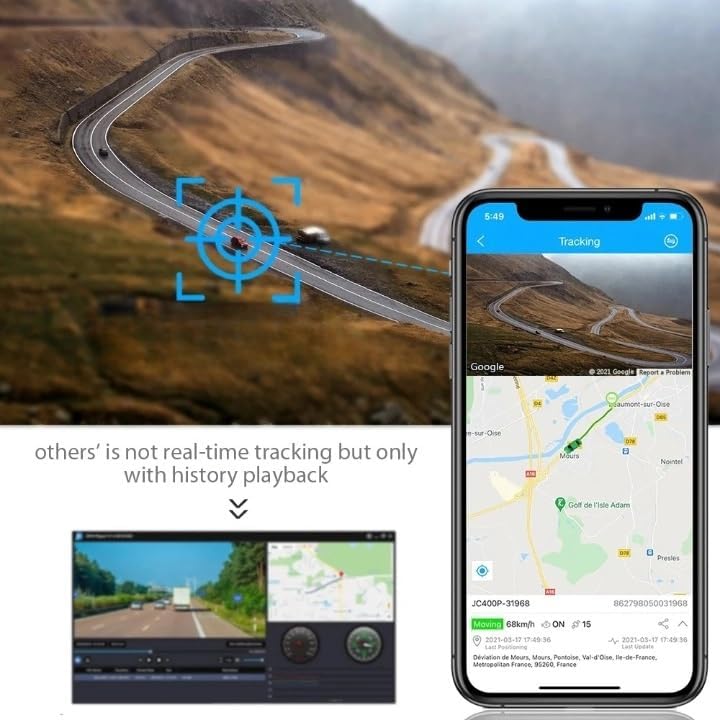
Figure 6: Key operational features including remote fuel/power cut-off, parking monitoring, and G-sensor event capture.
Maintenance
Regular maintenance ensures the longevity and optimal performance of your JC400 Dashcam.
- SD Card Management: Periodically back up important footage and format the SD card to maintain performance and prevent data corruption.
- Lens Cleaning: Gently clean the camera lenses with a soft, lint-free cloth to ensure clear recordings. Avoid abrasive materials.
- Firmware Updates: Check the manufacturer's website or app for available firmware updates to ensure your device has the latest features and bug fixes.
- Temperature Considerations: The dashcam is designed to operate within a temperature range of -20°C to 70°C. Avoid exposing the device to extreme temperatures outside this range for prolonged periods.
Troubleshooting
If you encounter issues with your JC400 Dashcam, refer to the following common problems and solutions:
| Problem | Possible Cause | Solution |
|---|---|---|
| Dashcam not powering on. | No power supply; loose connection; faulty power cable. | Check power cable connection; ensure vehicle's power outlet is functional; test with another power source if possible. |
| Recording stops or freezes. | SD card full or corrupted; incompatible SD card; faulty SD card. | Format the SD card; replace with a new Class 10 (or higher) SD card; ensure SD card is properly inserted. |
| Live stream not working. | No SIM card; no data plan; weak network signal; incorrect APP settings. | Ensure SIM card is inserted and active; check network coverage; verify APP settings and permissions. |
| Poor video quality. | Dirty lens; protective film still on lens; low light conditions. | Clean the lens; remove any protective film; ensure adequate lighting for optimal recording. |
If the problem persists after attempting these solutions, please contact customer support.
Specifications
| Feature | Detail |
|---|---|
| Model Name | JC400 Dashcam |
| Working Temperature | -20°C to 70°C |
| Dimensions (W x H x D) | 109 x 69 x 52 mm |
| Weight | 1 kg (approximate) |
| Battery Capacity | 450mAH (external battery) |
| Power Source | Corded Electric (9-30V Operating Voltage) |
| Built-in Screen | No |
| Loop-Cycle Recording | Yes |
| Audio Recorded | Yes (Built-in MIC & Speaker) |
| NightShot Function | Yes (Infrared lights for cabin camera) |
| Rear Camera | Yes (or Inside Camera, depending on variant) |
| Max External Memory | 256GB (Micro SD, Class 10 required) |
| Number Of Lenses | 2 (Front and Rear/Inside) |
| Front Camera View Angle | 140° (Full 3-lane coverage) |
| Inside Camera View Angle | 100° (Inward cam) |
| Camera Resolution | 1920x1080 (1080p HD) |
| Frames Per Second | 30 FPS |
| Video Codec | H.264 |
| Video Format | MP4 |
| Special Features | G-Sensor, Real Time Surveillance, Voice Control, Speed and Coordinates Recording, Vibration Alarm, SOS, Oil Cut-off |
| Network | 2G/3G/4G (Hotspot support for 5-6 cellphones) |
| Compatible OS | Android 8.1 systems (APP for real time video position) |
| OSD Language | Arabic, Dutch, English, French, German, Greek, Hebrew, Hungarian, Polish, Portuguese, Russian, Spanish, Thai |
Warranty and Support
For warranty information, please refer to the specific terms provided at the time of purchase or contact your retailer. HZLIMJDQ provides support for its products.
If you require technical assistance, have questions about installation, or need to report a defect, please contact the manufacturer or your point of purchase. Have your product model number (JC400) and purchase details ready when contacting support.
For the most up-to-date support resources, including FAQs and contact information, please visit the official HZLIMJDQ website.
Ask a question about this manual
Ask about setup, troubleshooting, compatibility, parts, safety, or missing instructions. Manuals+ will review the question and use this page’s manual context to help answer it.