HZLIMJDQ maifengling
HZLIMJDQ Universal Car DVR Dash Cam with Rearview Camera User Manual
Model: maifengling
Introduction
This manual provides detailed instructions for the installation, operation, and maintenance of your HZLIMJDQ Universal Car DVR Dash Cam with Rearview Camera. Please read this manual thoroughly before using the product to ensure proper functionality and safety.
Product Overview
The HZLIMJDQ Universal Car DVR is a comprehensive vehicle recording system designed to enhance driving safety and provide evidence in case of incidents. It features a high-definition dash camera, a rearview camera, and multimedia compatibility including Android Auto and Apple CarPlay.

Figure 1: HZLIMJDQ Universal Car DVR Dash Cam with its main components, including the display unit, mounting bracket, power cable, and rearview camera.

Figure 2: Different display modes of the DVR, including the home screen, CarPlay interface, the back of the product showing ports, combined CarPlay and front camera view, front camera view, and rearview camera view.
Setup and Installation
Proper installation ensures optimal performance and safety. It is recommended to have this device installed by a professional if you are unfamiliar with car electronics.
1. Mounting the Dash Cam
- Choose a suitable location on your dashboard or windshield that does not obstruct your view.
- Attach the mounting bracket securely to the chosen location.
- Slide the dash cam unit onto the mounting bracket until it clicks into place.
- Adjust the camera lens angle to ensure a clear view of the road ahead. The lens can be moved back and forth for optimal positioning.
2. Connecting Power
- Connect the provided power cable to the dash cam's power input port.
- Plug the other end of the power cable into your vehicle's 12V power outlet (cigarette lighter socket).
- Route the cable neatly along the vehicle's interior to avoid interference with driving.
3. Installing the Rearview Camera (If applicable)
- Mount the rearview camera at the rear of your vehicle, typically above the license plate or on the rear window.
- Connect the rearview camera cable to the designated AV-In port on the main dash cam unit.
- Ensure the cable is routed safely and securely to prevent damage or entanglement.
4. Inserting the Memory Card
- Locate the Micro SD/TF card slot on the dash cam unit.
- Insert a compatible Micro SD/TF card (Class 4 or higher, up to 128GB) into the slot until it clicks.
- The device will automatically format the card upon first use or prompt you to do so.
Operating Instructions
1. Power On/Off and Automatic Recording
- The dash cam will automatically power on and begin recording when your vehicle's engine starts.
- It will automatically power off when the engine is turned off.
2. Loop Recording
- The device records video in continuous loops (e.g., 3-minute segments).
- When the memory card is full, the oldest unlocked videos will be overwritten by new recordings.
3. G-Sensor Function

Figure 3: The G-Sensor automatically detects sudden acceleration, braking, or collisions. When triggered, it locks the current video footage to prevent it from being overwritten during loop recording, securing critical evidence.
- The built-in G-sensor automatically detects sudden impacts or collisions.
- Upon detection, the current video segment is automatically locked and protected from being overwritten, ensuring important footage is preserved.
- Sensitivity settings for the G-sensor can typically be adjusted in the device's menu.
4. 24-Hour Parking Mode
- When the engine is turned off, the dash cam can automatically switch to parking mode.
- This mode often uses time-lapse recording or motion detection to provide continuous surveillance with low power consumption, protecting your vehicle while parked.
5. Multimedia and Display Modes
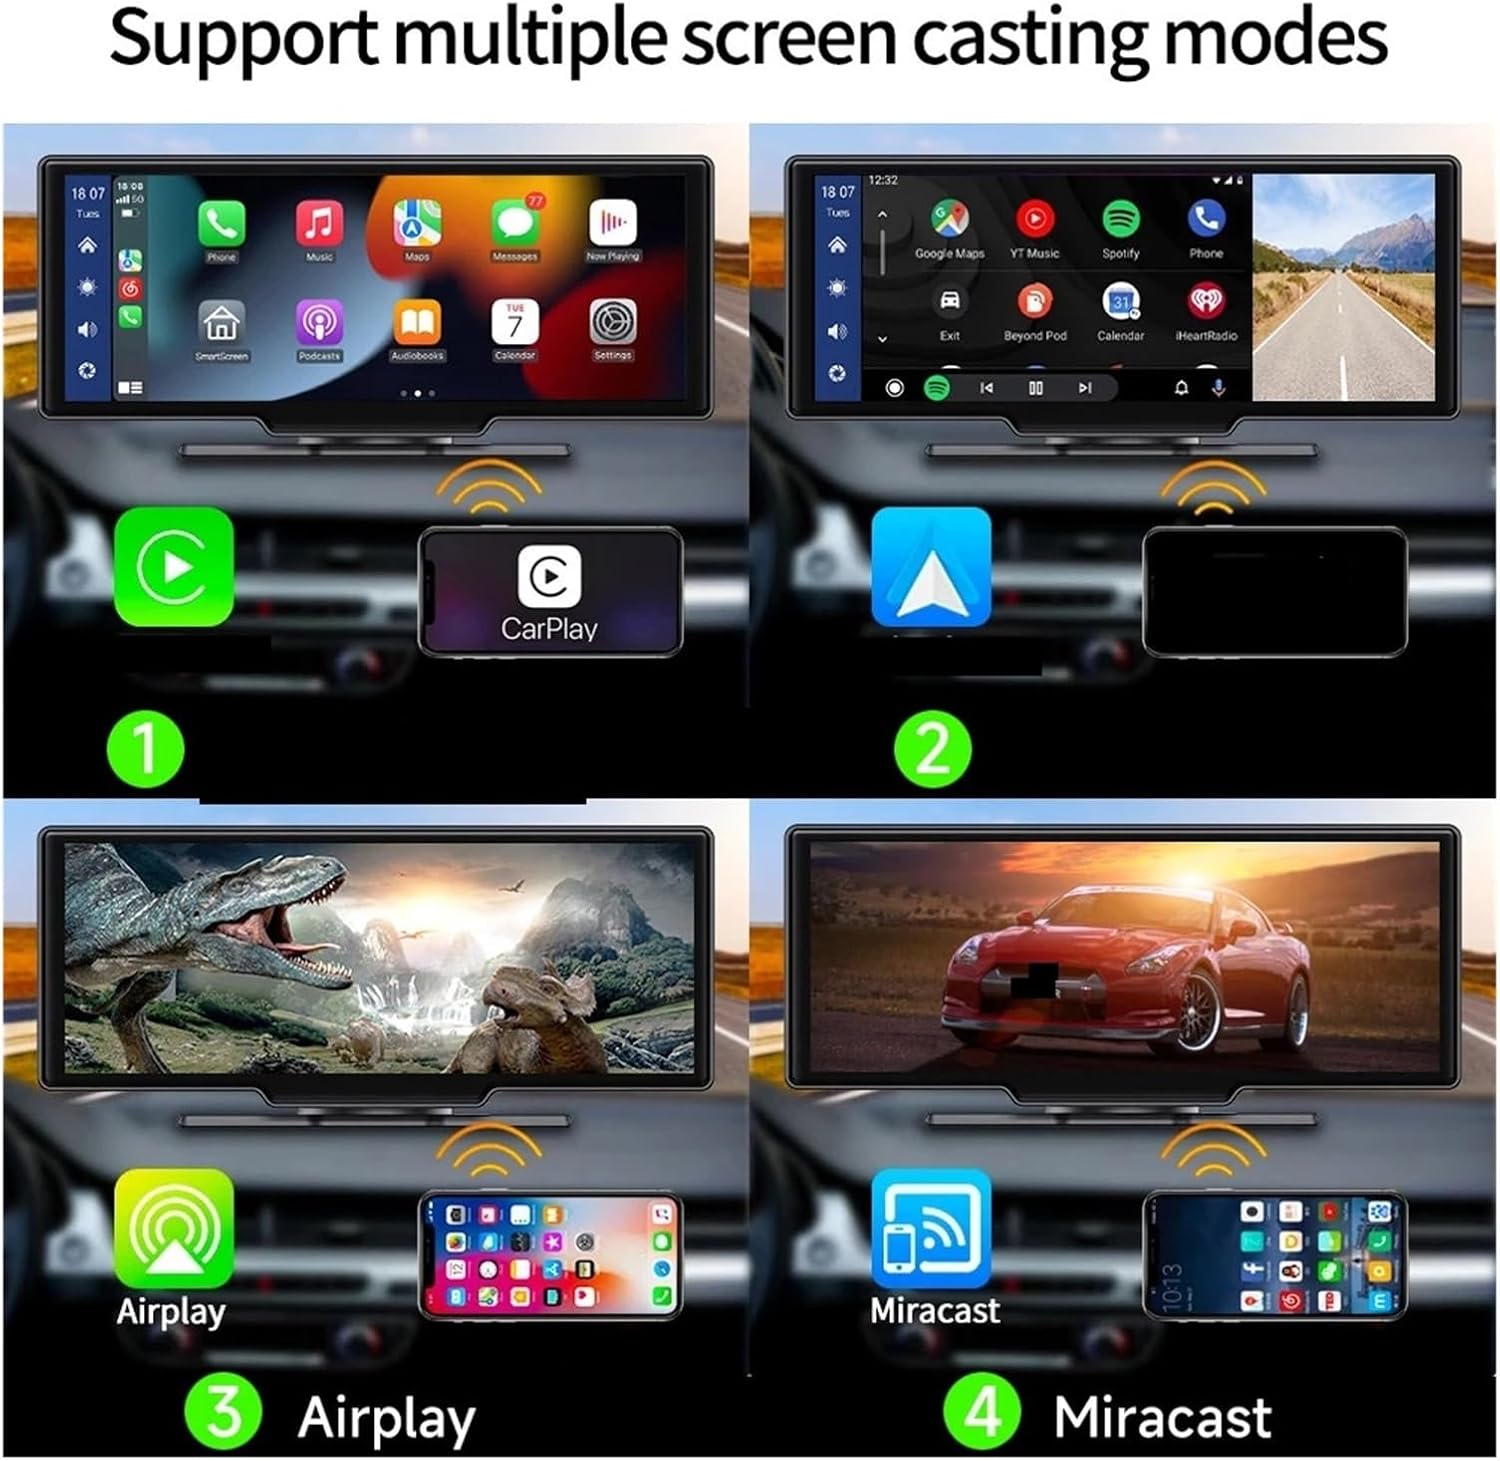
Figure 4: The device supports multiple screen casting modes, including Apple CarPlay, Airplay, and Miracast, allowing seamless integration with various smartphones for navigation, music, and other applications.
- The device supports Android Auto and Apple CarPlay for seamless smartphone integration.
- Navigate through the touch screen interface to select desired applications or camera views (front, rear, or split-screen).
- The display can show navigation, music, phone calls, and other compatible apps from your smartphone.
6. Audio Output Options

Figure 5: The DVR offers four audio output modes: its built-in speaker, AUX output for direct connection to the car's audio system, FM transmission to broadcast audio to the car's radio, and Bluetooth audio for wireless connection.
- Built-in Speaker: Audio can be played directly through the device's integrated speaker.
- AUX Out: Connect the device to your car's AUX input for higher quality audio output.
- FM Audio: Transmit audio wirelessly to your car's FM radio by tuning both devices to the same frequency.
- Bluetooth Audio: Connect wirelessly to your car's Bluetooth system for audio playback.
7. Mobile Interconnection Function

Figure 6: The mobile interconnection function allows users to connect their smartphone to the dash cam via a mobile hotspot. This enables real-time viewing of camera feeds, access to recorded files, and management of device settings through a dedicated mobile application.
- Connect the dash cam to your mobile phone's hotspot.
- Download the recommended mobile application (e.g., "Vildure" as shown in the image) to your smartphone.
- Through the app, you can view real-time camera feeds, access recorded videos, and manage device settings.
Maintenance
- Cleaning: Use a soft, dry cloth to clean the display screen and camera lenses. Avoid abrasive cleaners or solvents.
- Memory Card: Regularly format your Micro SD/TF card (at least once a month) to maintain optimal recording performance and prevent data corruption. Back up important files before formatting.
- Firmware Updates: Check the manufacturer's website periodically for firmware updates to ensure your device has the latest features and bug fixes.
- Temperature: Avoid exposing the device to extreme temperatures for prolonged periods, as this can affect battery life and component integrity. The operating temperature range is -20°C to 65°C.
Troubleshooting
| Problem | Possible Cause / Solution |
|---|---|
| Device does not power on. |
|
| Recording stops or freezes. |
|
| Poor video quality. |
|
| G-sensor is too sensitive/not sensitive enough. |
|
| Rearview camera not displaying. |
|
Specifications
| Brand | HZLIMJDQ |
| Model Name | maifengling |
| Display Size | 10.26 inches |
| Display Type | IPS Touch Screen |
| Screen Ratio | 16:9 |
| Camera Resolution | 1920x1080 (1080p) |
| Pixels | 300 Mega |
| Number of Lenses | 2 (Front & Rear) |
| View Angle | 170° |
| Frames Per Second (FPS) | 30 |
| Video Code | H.264 |
| Max External Memory | 128GB (Micro SD/TF) |
| Memory Card Required Speed | Class 4 or higher |
| Loop-Cycle Recording | Yes |
| G-Sensor | Yes (Built-in sensitivity G-sensor) |
| NightShot Function | Yes |
| Audio Recorded | Yes |
| Rear Camera | Yes |
| Interface | AV-In, WI-FI, Micro SD/TF |
| Power Source | Corded Electric (No internal battery for operation) |
| Working Temperature | -20°C to 65°C |
| Item Weight | 50 Grams (1.76 ounces) |
| Assembly Mode | Portable Recorder |
Warranty and Support
For warranty information, technical support, or any inquiries regarding your HZLIMJDQ Universal Car DVR, please refer to the contact information provided with your purchase or visit the official HZLIMJDQ website. Keep your purchase receipt as proof of purchase for warranty claims.
Ask a question about this manual
Ask about setup, troubleshooting, compatibility, parts, safety, or missing instructions. Manuals+ will review the question and use this page’s manual context to help answer it.