AlienRider M901
AlienRider M901 Smart Motorcycle Spotlight User Manual
Model: M901
Introduction
This manual provides detailed instructions for the installation, operation, and maintenance of your AlienRider M901 Smart Motorcycle Spotlight. Please read this manual thoroughly before use to ensure proper function and safety.
Product Features
- Smart Cornering Light System: Features a built-in six-axis gyroscope that intelligently adjusts left and right cornering lights based on the motorcycle's tilt angle, providing enhanced illumination during turns.
- Automatic Brightness Adjustment: Equipped with external multi-pole light sensors to detect ambient brightness, automatically switching to low beam in low-light conditions (e.g., tunnels) and turning off when brightness is restored.
- Ultra-High Brightness and Wide Angle Lighting: Utilizes 180W high-quality light beads, delivering up to 15,000 lumens for the high beam. The 120° wide-angle optical spherical lens, with independent yellow low beam and white high beam designs, ensures clear visibility.
- Durable and IP67 Protection: Constructed with an aluminum alloy housing for efficient heat dissipation. Rated IP67 for waterproof and dustproof protection, and resistant to high temperatures and UV rays, suitable for harsh environments.
- Convenient Quick-Release and Multi-Angle Mounting: Designed for easy installation and removal without cutting wires. Features modular installation and multiple mounting holes for flexible positioning.
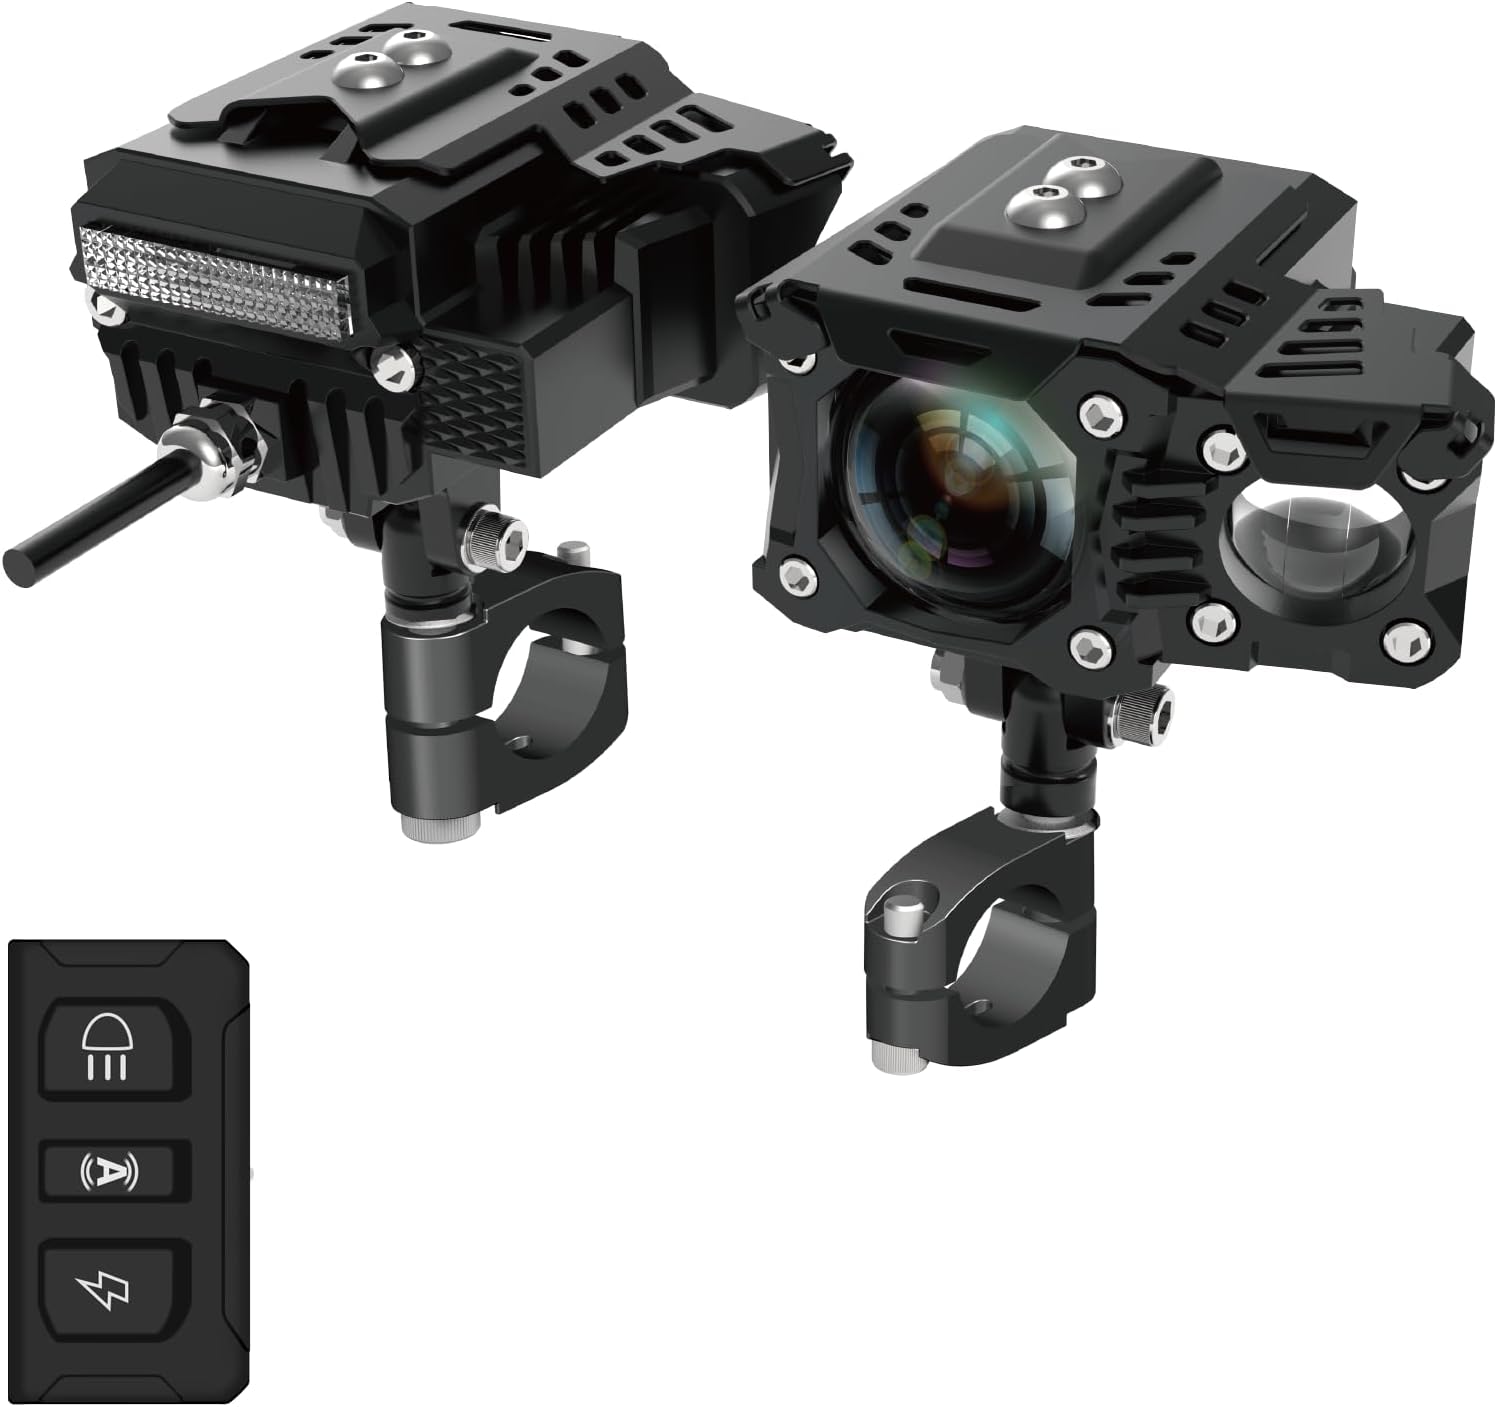
Figure 1: AlienRider M901 Smart Motorcycle Spotlight with remote control. Shows the two light units and the compact remote.
Package Contents
Verify that all components are present before beginning installation:
- M901 Spotlight Units (2)
- Power Box
- Main Control Box
- Handlebar Mounted Control Buttons
- Mounting Brackets and Hardware (including ring brackets, diameter changing rings)
- Wiring Harness with Inline Fuse
- Allen Wrenches
- 3M Tape
- Small Zip Ties

Figure 2: Key components of the M901 system, including the Power Box, Main Control Box, and control buttons.
Setup and Installation
Important Safety Note: Disconnect the motorcycle's battery before beginning any electrical installation. If you are not comfortable with electrical wiring, seek professional assistance.
1. Mounting the Spotlights
- Select a suitable mounting location on your motorcycle's handlebars or crash bars. Ensure the lights will not obstruct steering or other controls.
- Attach the ring brackets to the desired location. Use the appropriate diameter changing rings for a secure fit.
- Mount the spotlight units onto the quick-release bases, then attach the bases to the ring brackets. The quick-release design allows for easy attachment and detachment.
- Adjust the angle of the spotlights to ensure optimal illumination. The universal bracket allows for 360° rotation.

Figure 3: Illustration of the quick disassembly function and the 360° universal bracket for flexible mounting.

Figure 4: Detailed wiring diagram and exploded view of the spotlight installation components.
2. Wiring the System
- Connect the positive pole (red wire) to the motorcycle's positive battery terminal or a switched 12V power source (ACC).
- Connect the negative pole (black wire) to the motorcycle's negative battery terminal or a suitable ground point.
- Connect the horn signal line (yellow wire) if you wish to integrate the lights with your horn for a flash function (optional).
- Connect the left and right spotlight connectors from the Power Box to their respective spotlight units.
- Connect the control buttons to the Main Control Box, then connect the Main Control Box to the Power Box.
- Secure all wiring using zip ties and ensure connections are tight and protected from elements. The inline fuse on the power wire provides essential circuit protection.
Operating Instructions
The M901 system offers intelligent lighting modes controlled via the handlebar-mounted buttons.
Control Button Functions
- Light Sensor Button: Activates or deactivates the automatic brightness adjustment feature. When active, the system uses external sensors to detect ambient light and adjust beam intensity.
- Flash Button: Toggles the flash function.
- Auto Button: Engages the smart cornering light system, utilizing the six-axis gyroscope to adjust illumination based on the motorcycle's lean angle.
- High/Low Beam Button: Manually switches between high beam (white light) and low beam (yellow light).

Figure 5: Visual comparison demonstrating the enhanced illumination provided by the M901 auxiliary low beam compared to a standard motorcycle low beam.
Smart Cornering Light Operation
When the "Auto" button is engaged, the built-in six-axis gyroscope continuously monitors the motorcycle's lean angle. As you lean into a turn, the system automatically activates and adjusts the auxiliary lights on the corresponding side, illuminating the curve ahead. This provides a wider field of vision and improves safety during night riding.

Figure 6: Depiction of the smart cornering light system in action, showing how the light beam follows the motorcycle's lean into a turn.
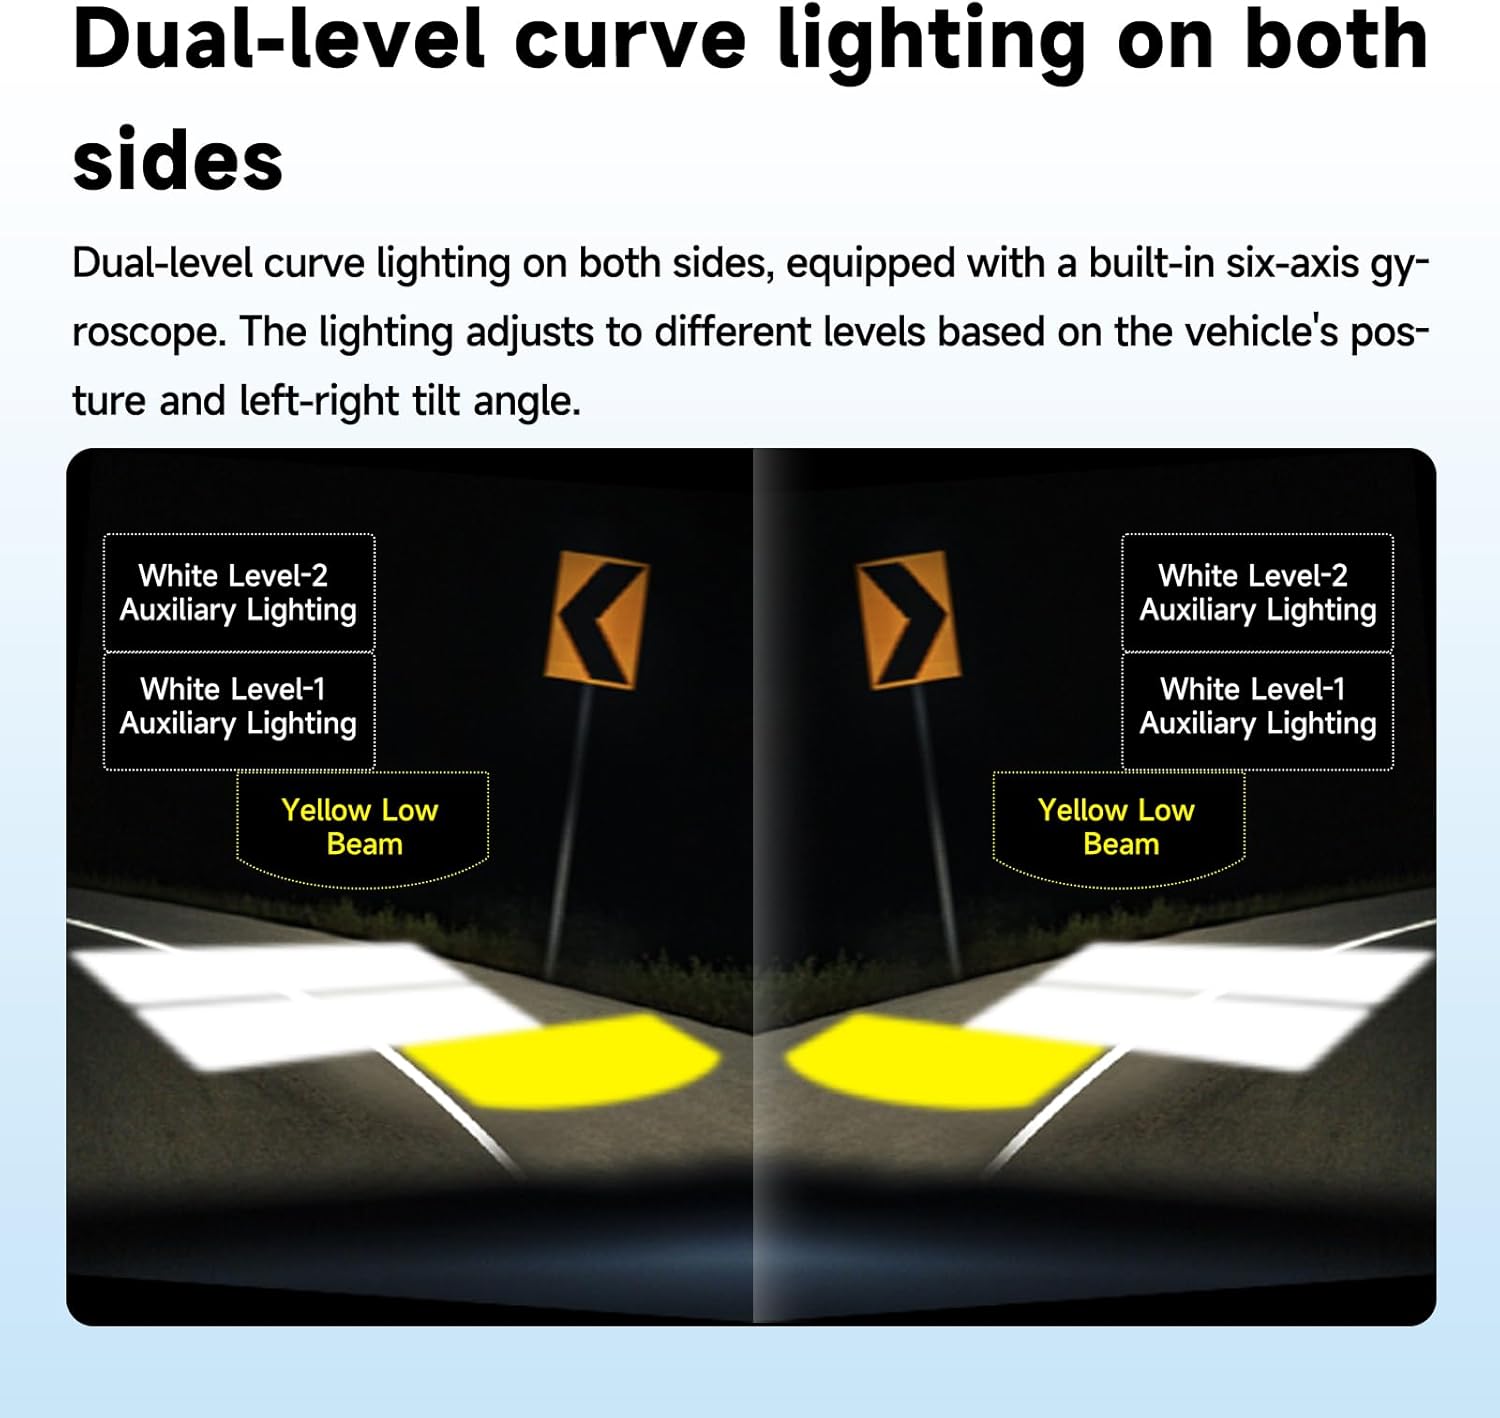
Figure 7: Diagram illustrating the dual-level curve lighting, showing how auxiliary lights activate and adjust based on the vehicle's tilt angle.
Automatic Brightness Adjustment
With the "Light Sensor" function active, the external multi-pole light sensors continuously monitor ambient light. For example, when entering a tunnel, the system will automatically switch to the yellow low beam for immediate visibility. Upon exiting the tunnel and returning to brighter conditions, the system will automatically turn off the low beam.
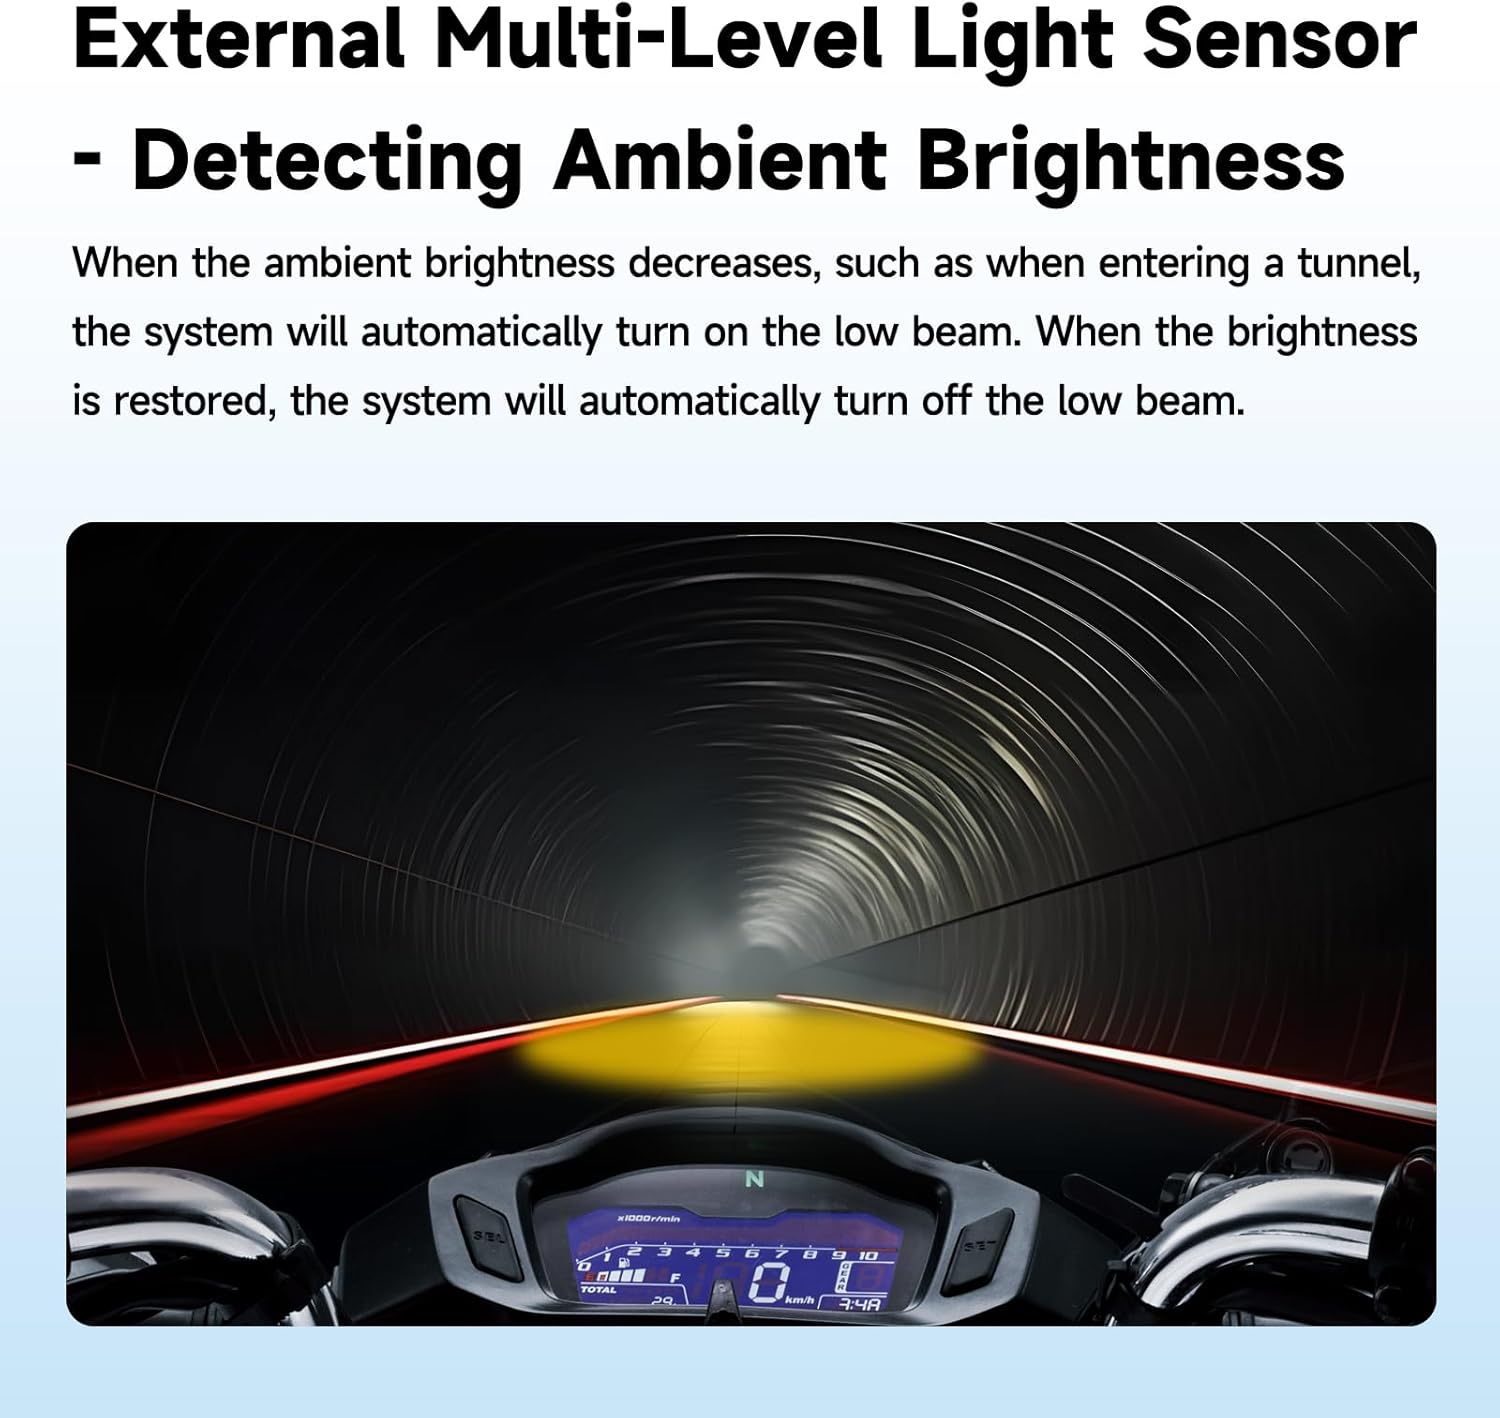
Figure 8: Example of automatic brightness adjustment, showing the low beam activating as a motorcycle enters a tunnel.
Maintenance
- Cleaning: Regularly clean the spotlight lenses and housing with a soft, damp cloth. Avoid abrasive cleaners that could scratch the surface.
- Inspection: Periodically check all wiring connections for tightness and signs of wear or corrosion. Ensure mounting brackets are secure.
- Waterproofing: The M901 is IP67 rated. While designed for harsh environments, avoid directing high-pressure water jets directly at the light units or control boxes during washing.
- Heat Dissipation: Ensure the aluminum alloy housing remains clear of obstructions to allow for proper heat dissipation.
Troubleshooting
| Problem | Possible Cause | Solution |
|---|---|---|
| Lights do not turn on. | No power, loose connection, blown fuse. | Check battery connections. Verify all wiring is secure. Inspect and replace the inline fuse if blown. |
| Cornering lights do not activate or activate incorrectly. | "Auto" mode not engaged, gyroscope calibration issue, sensor obstruction. | Ensure "Auto" button is pressed. Check for obstructions around the light units. Refer to the installation diagram for proper orientation. |
| Automatic brightness adjustment is not working. | "Light Sensor" mode not engaged, sensor obstruction, dirty sensor. | Ensure "Light Sensor" button is pressed. Clean the external light sensors. |
| Lights flicker or dim. | Unstable power supply, loose connection, insufficient voltage. | Check battery voltage. Ensure all electrical connections are tight and free of corrosion. |
Specifications
| Model | M901 |
| Brand | AlienRider |
| Light Source Type | Light Emitting Diode (LED) |
| Wattage | 180 Watts |
| Brightness (High Beam) | Up to 15,000 Lumens |
| Beam Angle | 120 Degrees |
| Material | Aluminum Alloy |
| Finish Type | Powder Coated |
| IP Rating | IP67 (Waterproof and Dustproof) |
| Product Dimensions | 2.8"L x 3.55"W x 2.8"H |
| Item Weight | 5.85 pounds |
| Mounting Type | Handlebar Mount |
| Special Features | Built-in Six-Axis Gyroscope, Automatic Brightness Adjustment, Quick-Release Design |
Warranty Information
AlienRider products are designed for durability and performance. For specific warranty terms and conditions, please refer to the warranty card included with your product or visit the official AlienRider website. Keep your proof of purchase for warranty claims.
Customer Support
If you encounter any issues or have questions regarding your AlienRider M901 Smart Motorcycle Spotlight, please contact AlienRider customer support through the following channels:
- Online Support: Visit the AlienRider official website for FAQs and support resources.
- Email: Refer to your product packaging or the official website for customer service email addresses.
- Phone: Contact details may be available on the official AlienRider website.
Please have your product model (M901) and purchase information ready when contacting support.
Ask a question about this manual
Ask about setup, troubleshooting, compatibility, parts, safety, or missing instructions. Manuals+ will review the question and use this page’s manual context to help answer it.