1. Introduction
Thank you for choosing the VEVOR Steam Cleaner, Model CB-108A. This manual provides essential information for the safe operation, maintenance, and troubleshooting of your steam cleaner. Please read this manual thoroughly before first use and retain it for future reference.
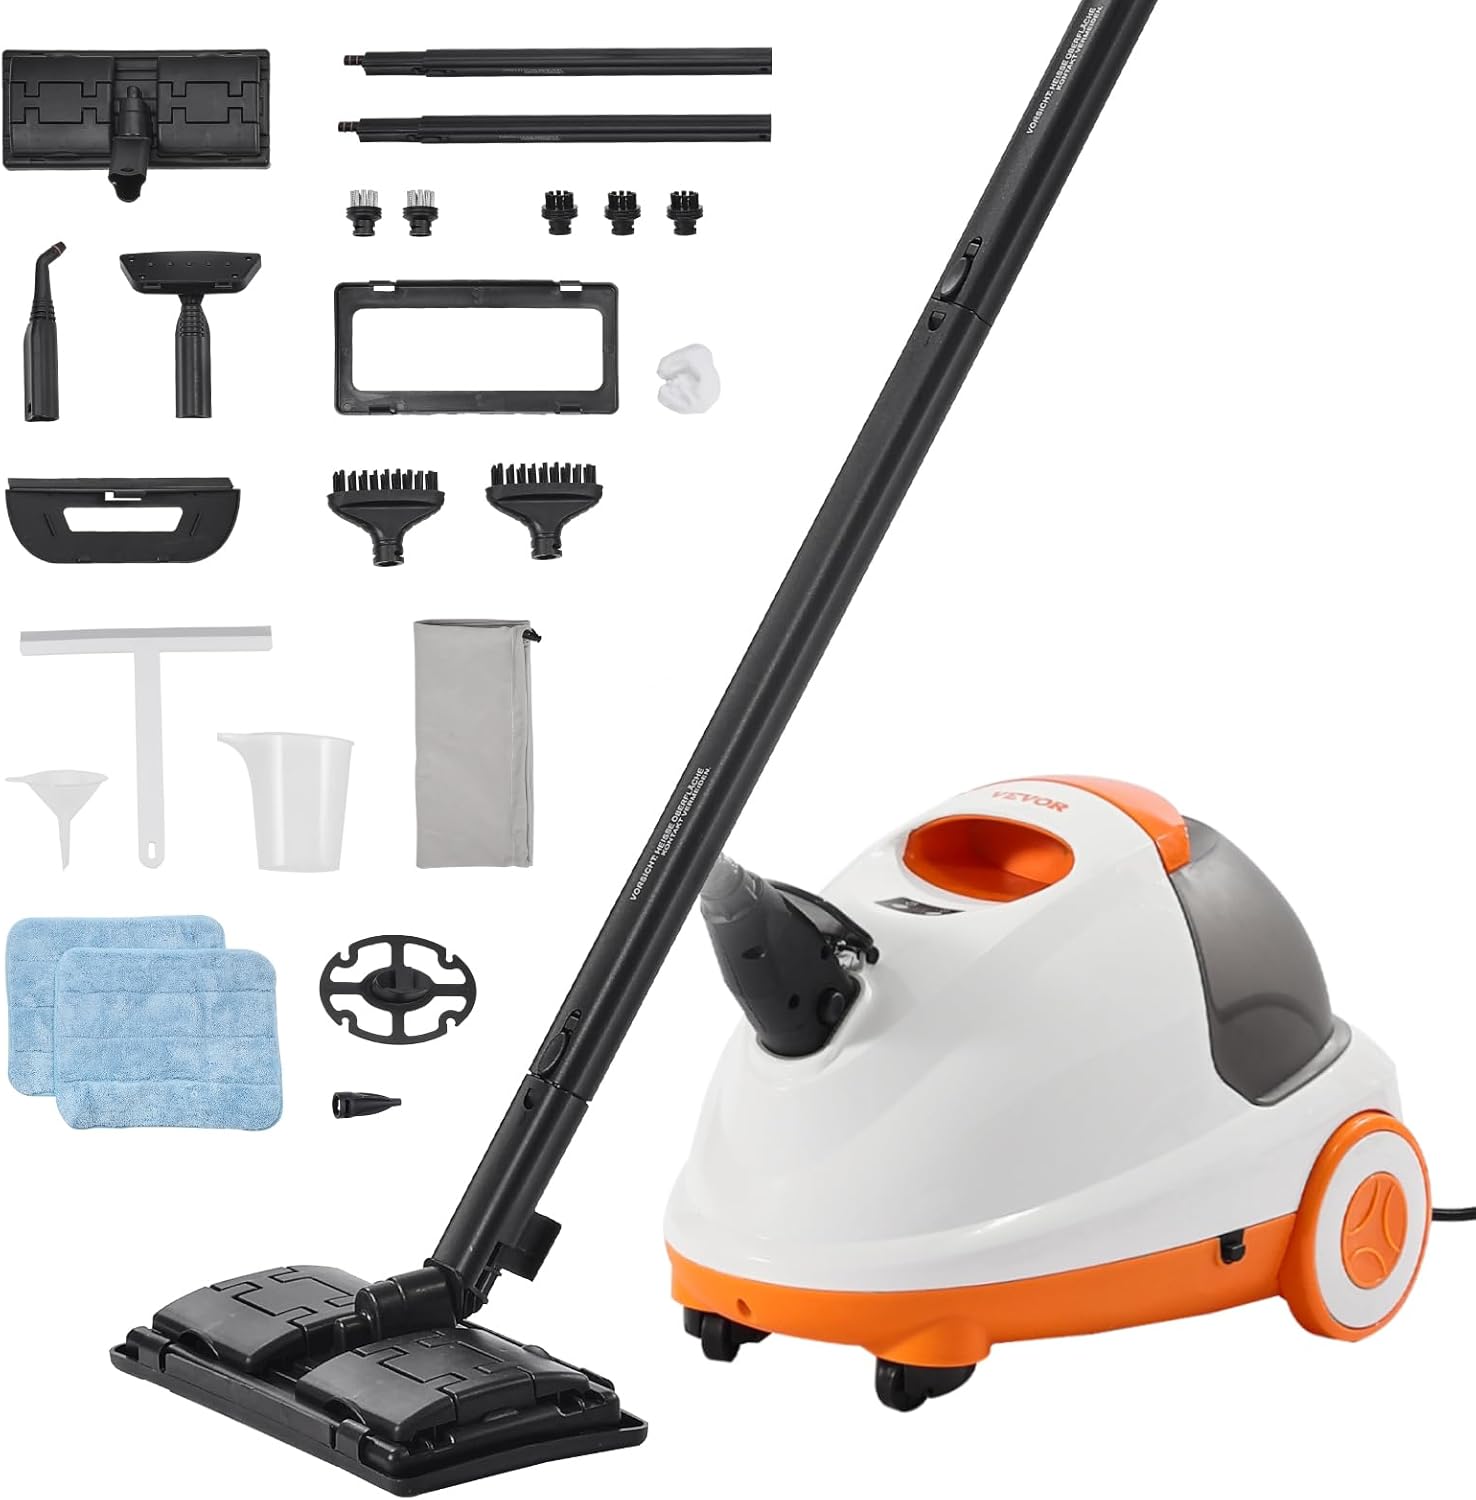
This image displays the VEVOR Steam Cleaner unit, model CB-108A, alongside its comprehensive set of accessories, including various brushes, nozzles, and cleaning pads.
2. Safety Instructions
To ensure safe operation and prevent injury or damage, always adhere to the following safety precautions:
- Read all instructions carefully before using the appliance.
- Keep the appliance out of reach of children and pets.
- Do not direct steam at people, animals, or electrical appliances. Steam is extremely hot and can cause severe burns.
- Use the appliance only for its intended purpose as described in this manual.
- Always unplug the steam cleaner from the electrical outlet when not in use, before cleaning, or before performing any maintenance.
- Never open the water tank cap when the appliance is hot or under pressure. Allow it to cool down completely before refilling.
- Use only distilled or demineralized water to prevent mineral buildup and extend the life of the appliance.
- Ensure adequate ventilation when operating the steam cleaner.
- Do not immerse the main unit in water or any other liquid.
- Inspect the power cord and hose for any damage before each use. Do not operate if damaged.
3. Product Overview
3.1 Components and Accessories
Your VEVOR Steam Cleaner comes with a comprehensive set of 23 accessories designed for various cleaning tasks. Familiarize yourself with each component:

A detailed diagram showcasing each of the 23 accessories provided with the steam cleaner, with labels for easy identification.
- A. Extension Tube (x2): For extended reach, especially with the floor brush.
- B. Floor Brush: For cleaning large floor surfaces.
- C. Mop Pad (x2): Attaches to the floor brush for absorbing dirt and moisture.
- D. Carpet Glider: Used with the floor brush for refreshing carpets.
- E. Round Brush (Nylon) (x3): For general scrubbing of various surfaces.
- F. Round Brush (Stainless) (x2): For tougher, more abrasive cleaning tasks.
- G. Magnetic Seam Brush (x2): Specialized brushes for cleaning narrow gaps and seams.
- H. Flat Brush: For broader, flat surfaces.
- I. Cloth Cover: For use with certain brushes to protect delicate surfaces.
- J. Glass Brush: For streak-free cleaning of glass surfaces.
- K. Wiper: For squeegeeing liquids from smooth surfaces.
- L. Big Nozzle: For concentrated steam output on stubborn dirt.
- M. Straight Nozzle: For precise steam application in tight spaces.
- N. Funnel: For easy and spill-free water refilling.
- O. Measuring Cup: For accurate water measurement during refilling.
- P. Cord Rewinder: Integrated storage for the power cord.
- Q. Bag: For convenient storage of accessories.
4. Setup
4.1 Unpacking and Assembly
- Carefully remove all components from the packaging.
- Inspect the unit and accessories for any signs of damage. Do not use if damaged.
- Attach the desired accessory (e.g., extension tubes, floor brush) by aligning and twisting until secure.
4.2 Filling the Water Tank
- Ensure the steam cleaner is unplugged and cool.
- Unscrew the water tank cap.
- Using the provided measuring cup and funnel, carefully pour up to 85 oz (2.5 L) of distilled or demineralized water into the tank. Do not overfill.
- Securely replace the water tank cap.
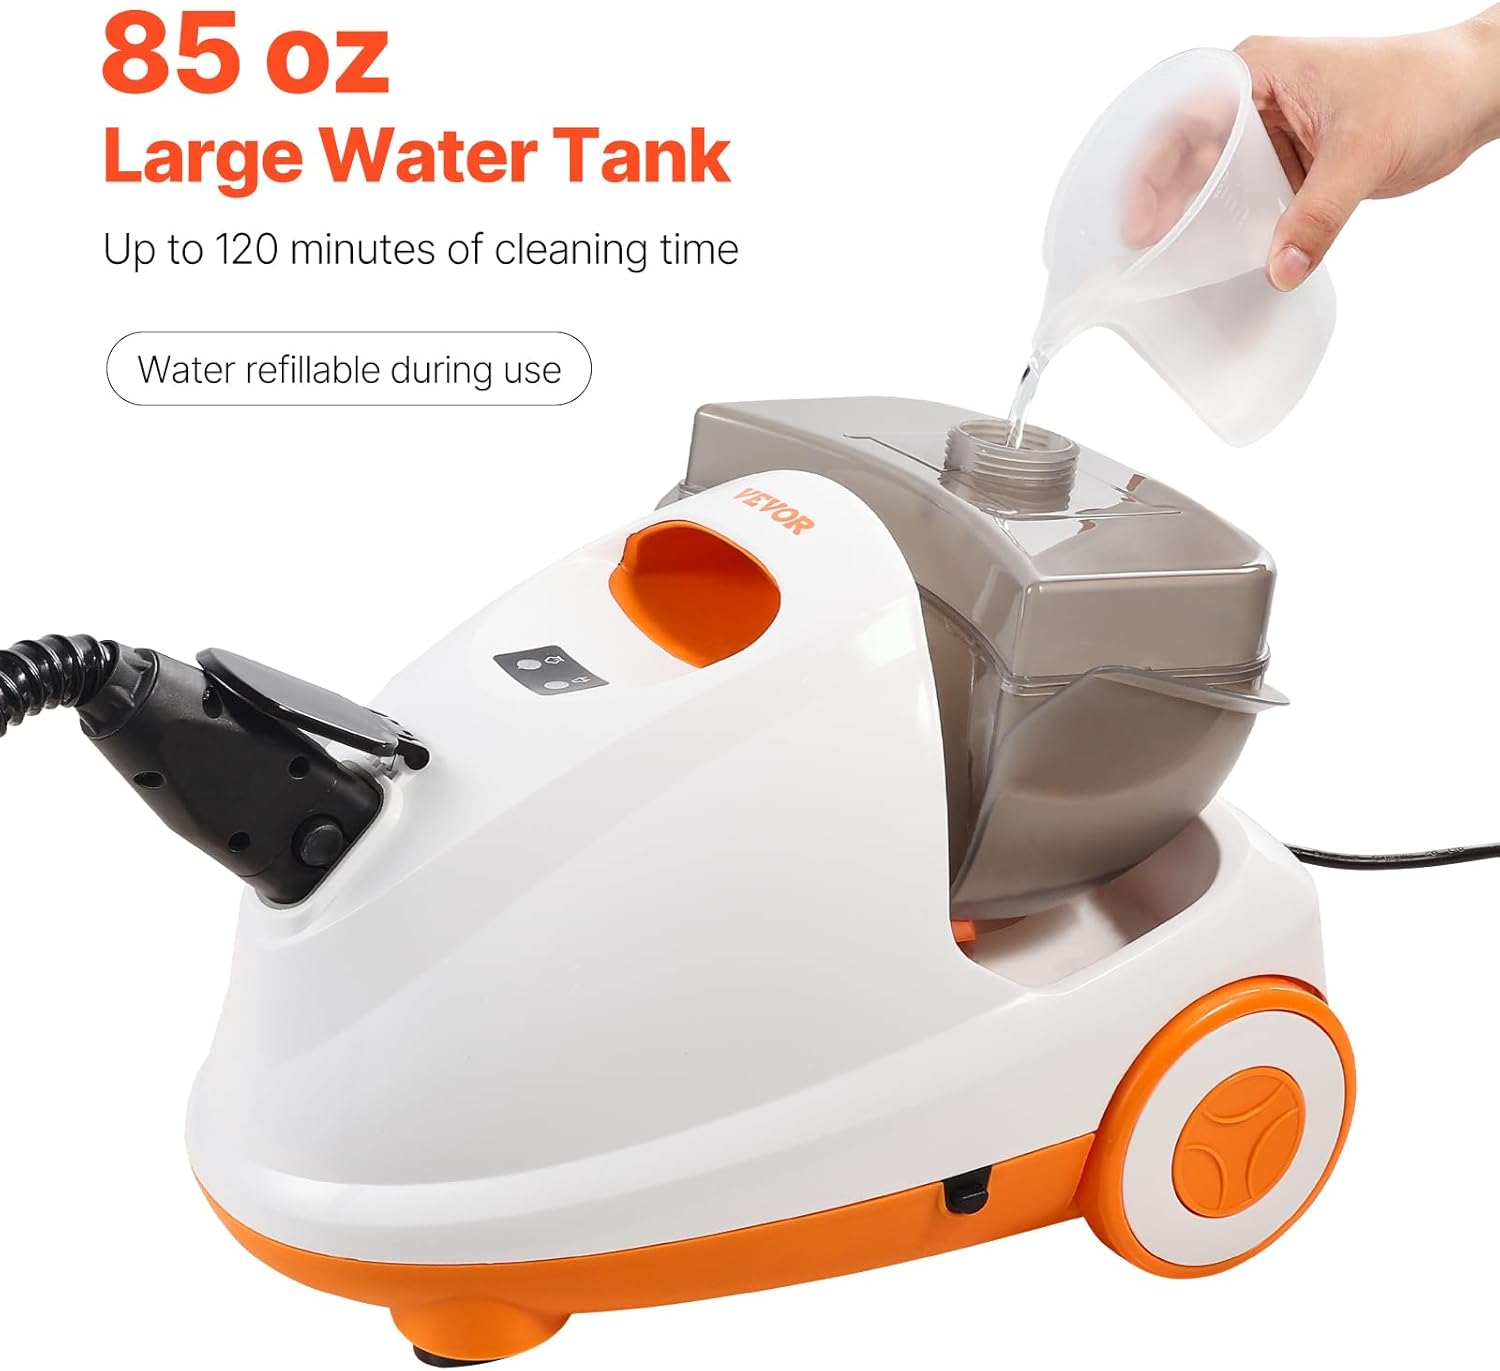
An image demonstrating the process of refilling the large 85 oz (2.5 L) water tank of the steam cleaner, which allows for extended cleaning sessions.
5. Operating Instructions
5.1 Powering On and Heating
- Plug the power cord into a grounded electrical outlet (110 Volts).
- The indicator light will turn red, signifying that the unit is heating.
- Allow approximately 5-8 minutes for the steam cleaner to reach its operating temperature. The indicator light will turn green when ready for use.

This image highlights the rapid heat-up capability of the VEVOR Steam Cleaner, demonstrating its ability to reach 212°F steam temperature in approximately 2 minutes, significantly faster than typical steam cleaners.
5.2 Steam Application
- Once the green indicator light is on, press the steam trigger on the handle to release steam.
- Adjust the steam flow as needed for different cleaning tasks.
- For effective cleaning, ensure the nozzle or brush head is in direct contact with the surface. The steam temperature is highest at the point of contact.

This diagram illustrates the principle of steam cleaning, showing that the highest temperature (212°F) is achieved when the nozzle is directly on the surface. It also serves as a safety reminder to avoid touching the hot nozzle or brush during use.
5.3 Cleaning Applications
The VEVOR Steam Cleaner is versatile for various surfaces:
- Floors (Tile, Marble, Wood): Use the floor brush with a mop pad. For wood floors, test a small inconspicuous area first and use steam sparingly.
- Grout: Use a nylon or stainless brush with concentrated steam.
- Carpets: Use the carpet glider with the floor brush to refresh and deodorize.
- Appliances & Kitchen Surfaces: Use the big nozzle or various brushes for grease and grime.
- Glass: Use the glass brush or wiper for streak-free results.
- Hard-to-Reach Areas: Utilize the straight nozzle or magnetic seam brushes.

A composite image showcasing the versatility of the VEVOR Steam Cleaner, with individual pictures demonstrating how different attachments are used for specific cleaning challenges around the home, including kitchens, windows, upholstery, and floors.
The large 85 oz (2.5 L) water tank provides 62-120 minutes of continuous steam, and water can be added during use without waiting for the unit to cool down.
6. Maintenance
6.1 After Each Use
- Unplug the appliance and allow it to cool completely.
- Carefully unscrew the water tank cap and drain any remaining water.
- Clean all used accessories with water and mild detergent, then allow them to air dry.
- Wipe the main unit with a damp cloth.
6.2 Storage
Store the steam cleaner and its accessories in a cool, dry place. Utilize the integrated cord reel for tidy power cord storage and the steam head storage rack for convenience.

This image highlights the convenient design features of the steam cleaner, including a built-in power cord reel for tidy storage and a dedicated rack for the steam head.
7. Troubleshooting
If you encounter issues with your VEVOR Steam Cleaner, refer to the following common problems and solutions:
| Problem | Possible Cause | Solution |
|---|---|---|
| No steam output | Unit not plugged in; No water in tank; Not heated sufficiently | Check power connection; Refill water tank; Allow 5-8 minutes for heating (green light on) |
| Low steam pressure | Low water level; Unit not fully heated | Refill water tank; Wait for green indicator light |
| Water leaking from connections | Accessories not securely attached; Tank cap loose | Ensure accessories are twisted on tightly; Securely fasten water tank cap |
| Unit not heating | Power cord not connected; Electrical outlet issue; Internal fault | Check power cord and outlet; Try a different outlet; Contact customer support if problem persists |
8. Specifications
Key technical specifications for the VEVOR Steam Cleaner CB-108A:

A comprehensive diagram providing an overview of the VEVOR Steam Cleaner model CB-108A, detailing its dimensions and technical specifications.
- Model Name: Steam Cleaner
- Model Number: CB-108A
- Brand: VEVOR
- Power: 1500 Watts
- Voltage: 110 Volts
- Water Tank Capacity: 85 oz / 2.5 Liters
- Heat-Up Time: Approximately 5-8 minutes
- Continuous Steam Time: 62-120 minutes (depending on usage)
- Steam Temperature: 212°F (100°C)
- Steam Pressure: 6.5 BAR / 94.2 PSI
- Hose Length: 4.9 ft / 1.5 m
- Power Cord Length: 16.4 ft / 5 m
- Product Dimensions: 15.75 x 11.02 x 11.02 inches (400 x 280 x 280 mm)
- Item Weight: 13.01 pounds / 5.9 kg
- Color: White+Orange
- Special Features: Large Capacity Tank, Dry Burn Prevention, Power Cut Security, Auto-Reset
9. Warranty and Support
Information regarding product warranty and customer support is typically provided with your purchase documentation or on the manufacturer's official website. Please refer to those resources for details on warranty coverage, service, and contact information for technical assistance.