1. Introduction
The fishkeeper FK112-18W Aquarium Internal Filter is designed to maintain a healthy and clean aquatic environment for fish tanks ranging from 80 to 300 gallons. This submersible filter integrates four essential functions: filtration, aeration, wave-making, and water circulation. Its ultra-quiet operation and adjustable water flow make it suitable for various aquatic species in both freshwater and saltwater aquariums.

Image 1.1: The fishkeeper FK112-18W Aquarium Internal Filter installed in an aquarium.
2. Package Contents
Please verify that all the following components are included in your package:
- 1x Internal Filter with Power Cord
- 1x Suction Cup Holder
- 4x Rubber Suction Cups
- 1x Aeration Connector
- 1x Air Tube with Regulator
- 1x Suction Nozzle
- 1x L-shaped Tube
- 1x Rain Shower Tube with Regulator
- 1x Activated Carbon Sponge
- 1x Blue Sponge
- 1x User Manual

Image 2.1: All components included in the filter package.
3. Specifications
| Feature | Specification |
|---|---|
| Model | FK112-18W |
| Power | 18W |
| Flow Rate | 450 GPH (1700 L/H) |
| Recommended Aquarium Size | 80-300 Gallons (300-1130 L) |
| Voltage/Frequency | AC110-120V/60Hz (US Standard) |
| Item Weight | 1.26 pounds |
| Item Package Dimensions | 9.45 x 4.06 x 3.31 inches |
| Color | Blue |
| Specific Uses | Aquarium Filtration |
4. Safety Information
- Always disconnect the power supply before performing any maintenance, installation, or removal of the filter.
- Ensure the filter is fully submerged in water during operation to prevent damage to the motor and ensure quiet performance.
- Do not operate the filter if the power cord or plug is damaged.
- This product is intended for indoor aquarium use only.
- Keep out of reach of children.
5. Setup and Installation
Follow these steps for proper installation of your internal aquarium filter:
- Prepare the Filter: Unpack all components and ensure they are clean.
- Attach Suction Cups: Secure the four rubber suction cups to the suction cup holder on the back of the filter unit.
- Choose Installation Method: Decide on your preferred water outlet method (rain shower pipe or flat water outlet) and aeration option. Refer to Image 5.1 for different installation configurations.
- Install Water Outlet:
- For Rain Shower Pipe: Connect the L-shaped tube to the filter's outlet, then attach the rain shower tube with regulator.
- For Flat Water Outlet: Attach the suction nozzle directly to the filter's outlet.
- Install Aeration Tube (Optional): If aeration is desired, connect the aeration connector to the filter's air intake, then attach the air tube with regulator. Position the air tube above the water surface. Refer to Image 5.3 for detailed steps.
- Position the Filter: Submerge the filter completely in your aquarium. Use the suction cups to firmly attach the filter to the inside wall of the tank. Ensure the filter is 100% submerged in water before plugging it in.

Image 5.1: Different installation methods for the filter.

Image 5.2: The filter pump must be 100% submerged in water.

Image 5.3: Rainwater pipe and aerator tube installation steps.
6. Operation
Once installed and fully submerged, plug the filter into a suitable power outlet. The filter will begin operating immediately, performing its 4-in-1 functions:
- Filtration: Water is drawn through the biochemical sponge filter media.
- Aeration: If the air tube is installed, air is drawn in and mixed with the water, increasing oxygen levels.
- Wave-making/Water Circulation: The outflow creates gentle water movement, distributing heat and nutrients.
Adjusting Water Flow: The filter features an adjustable flow rate. Rotate the knob on the water outlet to control the intensity of the water movement, tailoring it to the needs of your aquatic inhabitants.
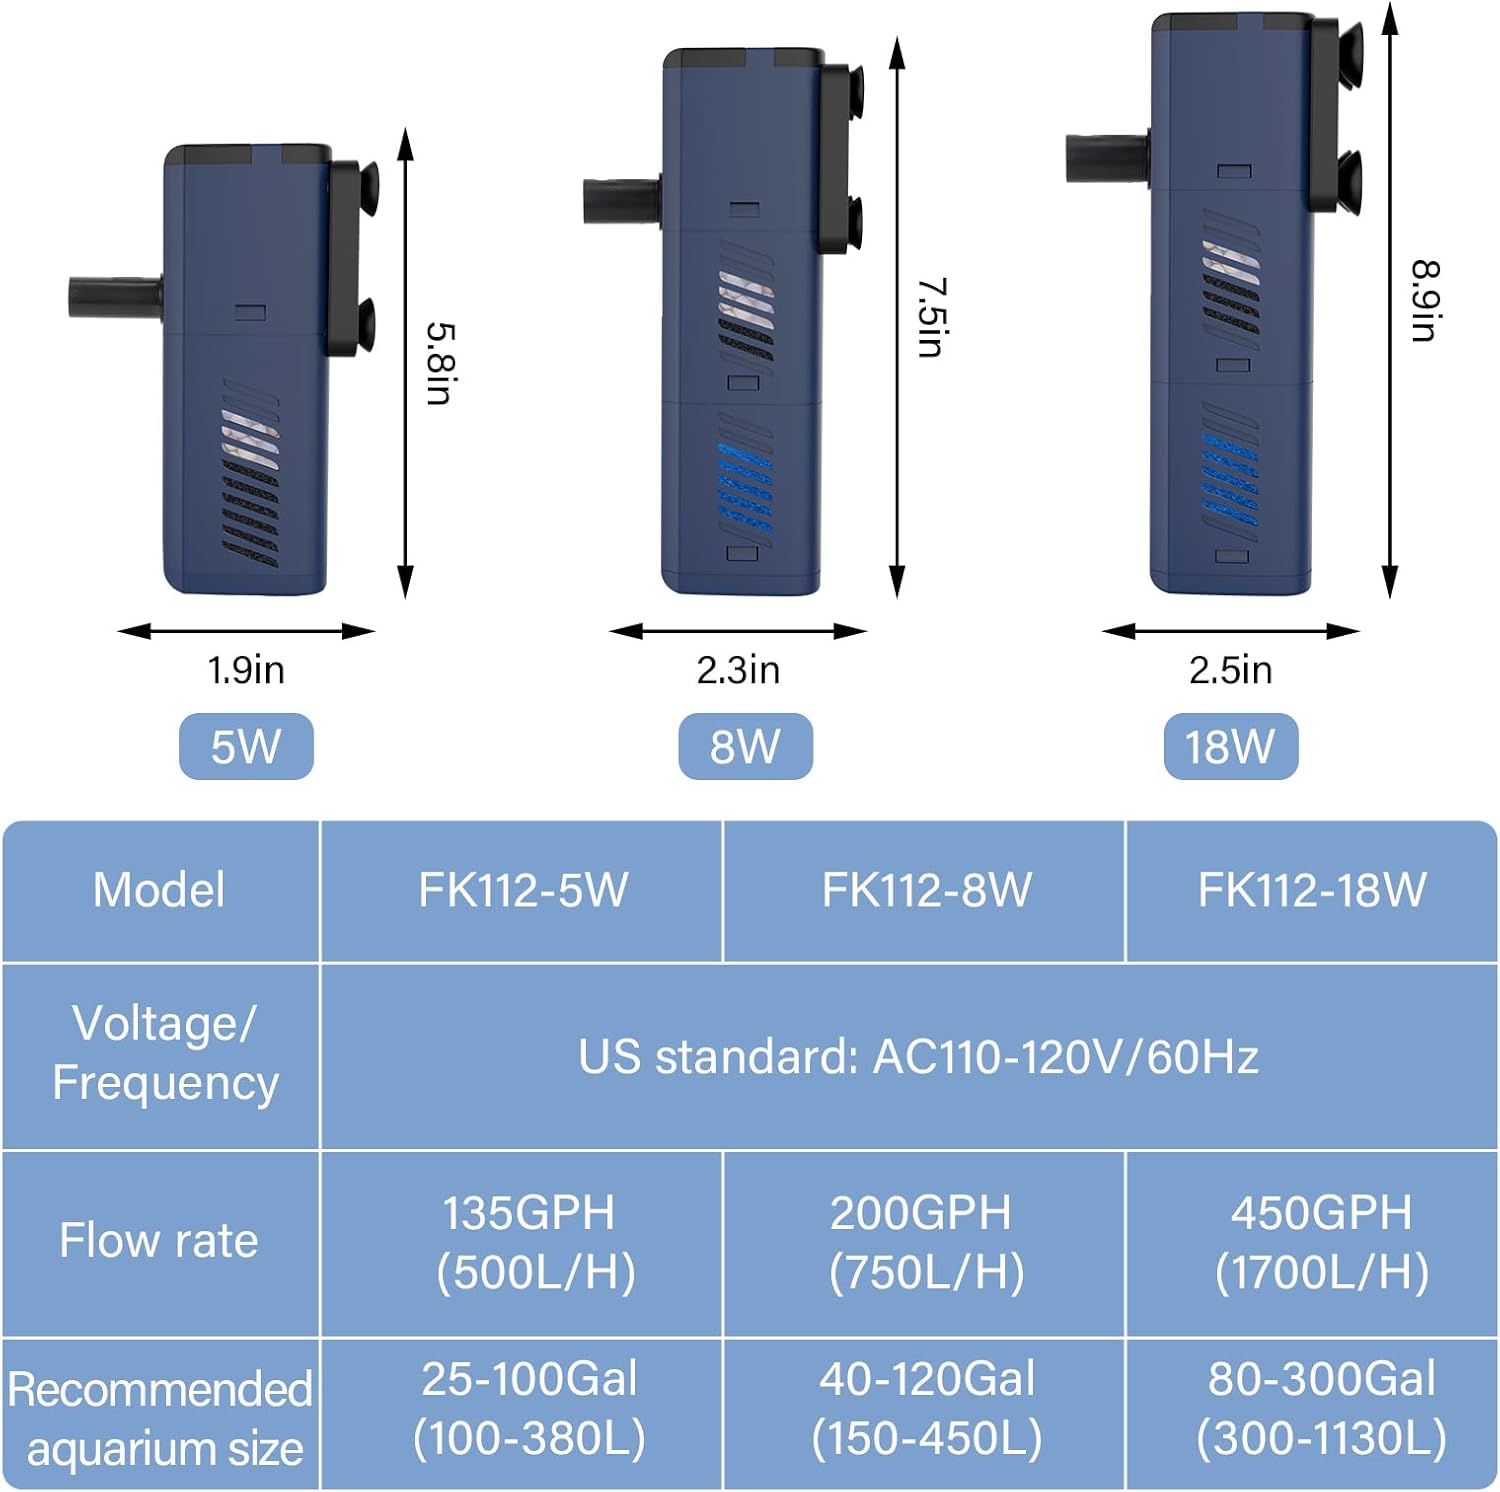
Image 6.1: Adjustable water flow mechanism.
Quiet Operation: The filter is designed with an advanced magnetic rotor noise-reduction system, ensuring operation with minimal sound. This contributes to a peaceful environment for both you and your aquarium inhabitants.

Image 6.2: Ultra-quiet operation.
7. Maintenance
Regular maintenance is crucial for the optimal performance and longevity of your filter. Always unplug the filter before performing any maintenance.
7.1. Cleaning the Filter Sponges
The biochemical sponge filter effectively captures waste and cultivates beneficial bacteria. The sponges are washable and reusable.
- Remove Filter: Unplug the filter and carefully remove it from the aquarium.
- Disassemble: Hold the filter with both hands and turn the filter bucket to separate the filter housing.
- Remove Sponges: Take out the activated carbon sponge and blue sponge.
- Clean Sponges: Rinse the sponges thoroughly in old aquarium water (from a water change) to preserve beneficial bacteria, or in dechlorinated tap water if a deep clean is needed. Avoid using untreated tap water as chlorine can kill beneficial bacteria.
- Reassemble: Place the clean sponges back into the filter housing and reassemble the unit.

Image 7.1: Easy cleaning steps for filter sponges.

Image 7.2: Dual filtration system components.
7.2. Cleaning the Impeller
To maintain quiet operation and efficient water flow, it is suggested to clean the impeller monthly.
- Separate Pump and Filter: Unplug the filter and separate the pump section from the filter housing.
- Remove Impeller Cover: Carefully remove the impeller cover.
- Remove Impeller: Gently pull out the impeller.
- Clean Components: Clean the impeller and the impeller chamber with a soft brush (not included) to remove any debris or buildup.
- Reassemble: Reinsert the impeller, replace the impeller cover, and reattach the pump to the filter housing.

Image 7.3: Filter noise solution and impeller cleaning steps.
8. Troubleshooting
If you encounter issues with your fishkeeper FK112-18W filter, refer to the following common problems and solutions:
| Problem | Possible Cause | Solution |
|---|---|---|
| Reduced Water Flow | Clogged filter sponges or impeller. | Clean filter sponges and impeller as described in Section 7. |
| Filter is Noisy | Impeller is dirty, damaged, or not seated correctly. Air trapped in the pump. | Clean the impeller and impeller chamber. Ensure the impeller is properly seated. Gently shake the filter while submerged to release trapped air. Ensure filter is fully submerged. |
| Filter Not Starting | No power. Impeller jammed. | Check power connection. Ensure filter is plugged in. Disconnect power, remove and clean the impeller, then reassemble. |
| Poor Aeration | Air tube clogged or not positioned correctly. | Check and clean the air tube and regulator. Ensure the air tube's intake is above the water surface. |
9. Warranty and Support
The fishkeeper FK112-18W Aquarium Internal Filter comes with a 24-month (2-year) warranty from the date of purchase. This warranty covers manufacturing defects and ensures the product is free from defects in material and workmanship under normal use.
If you experience any issues with your product or require assistance, please contact our customer support team. Our friendly support staff are available to help you with troubleshooting, parts replacement, or any other inquiries you may have.
For support, please refer to the contact information provided on the product packaging or the official fishkeeper website.