Introduction
This user manual provides comprehensive instructions for the setup, operation, and maintenance of your Prechen 12.3-inch Portable Touchscreen Monitor. Designed for versatility and portability, this monitor enhances your productivity and entertainment experience across various devices.
Key Features
- FHD Portable Touchscreen: 12.3-inch IPS display with 1920x720 resolution for vibrant colors and clear images. Features responsive 10-point capacitive touch functionality.
- Ultimate Portability and Flexibility: Lightweight design with a foldable stand, ideal for use in the office, home, or while traveling.
- Multiple Connection Options: Supports HDMI and USB-C connections for compatibility with laptops, phones, and other devices.
- Built-in Speakers & CNC Materials: Equipped with dual speakers for clear audio. Constructed with precise CNC technology to ensure accurate dimensions and improved overall quality.
- Real-Time System Monitoring: Seamlessly integrates with AIDA64 (software not included) for monitoring CPU, GPU, and system health on Windows.

Figure 1: The Prechen 12.3-inch monitor highlighting its 10-point multi-touch capability and CNC metal shell design.
Package Contents
Please ensure all items are present in the package:
- Prechen 12.3" Portable Touchscreen Monitor
- Foldable Stand/Protective Cover
- USB-C to USB-C Cable (for power, video, and touch)
- HDMI to HDMI Cable (for video)
- USB-A to USB-C Cable (for power/touch when using HDMI)
- Power Adapter
- User Manual (this document)
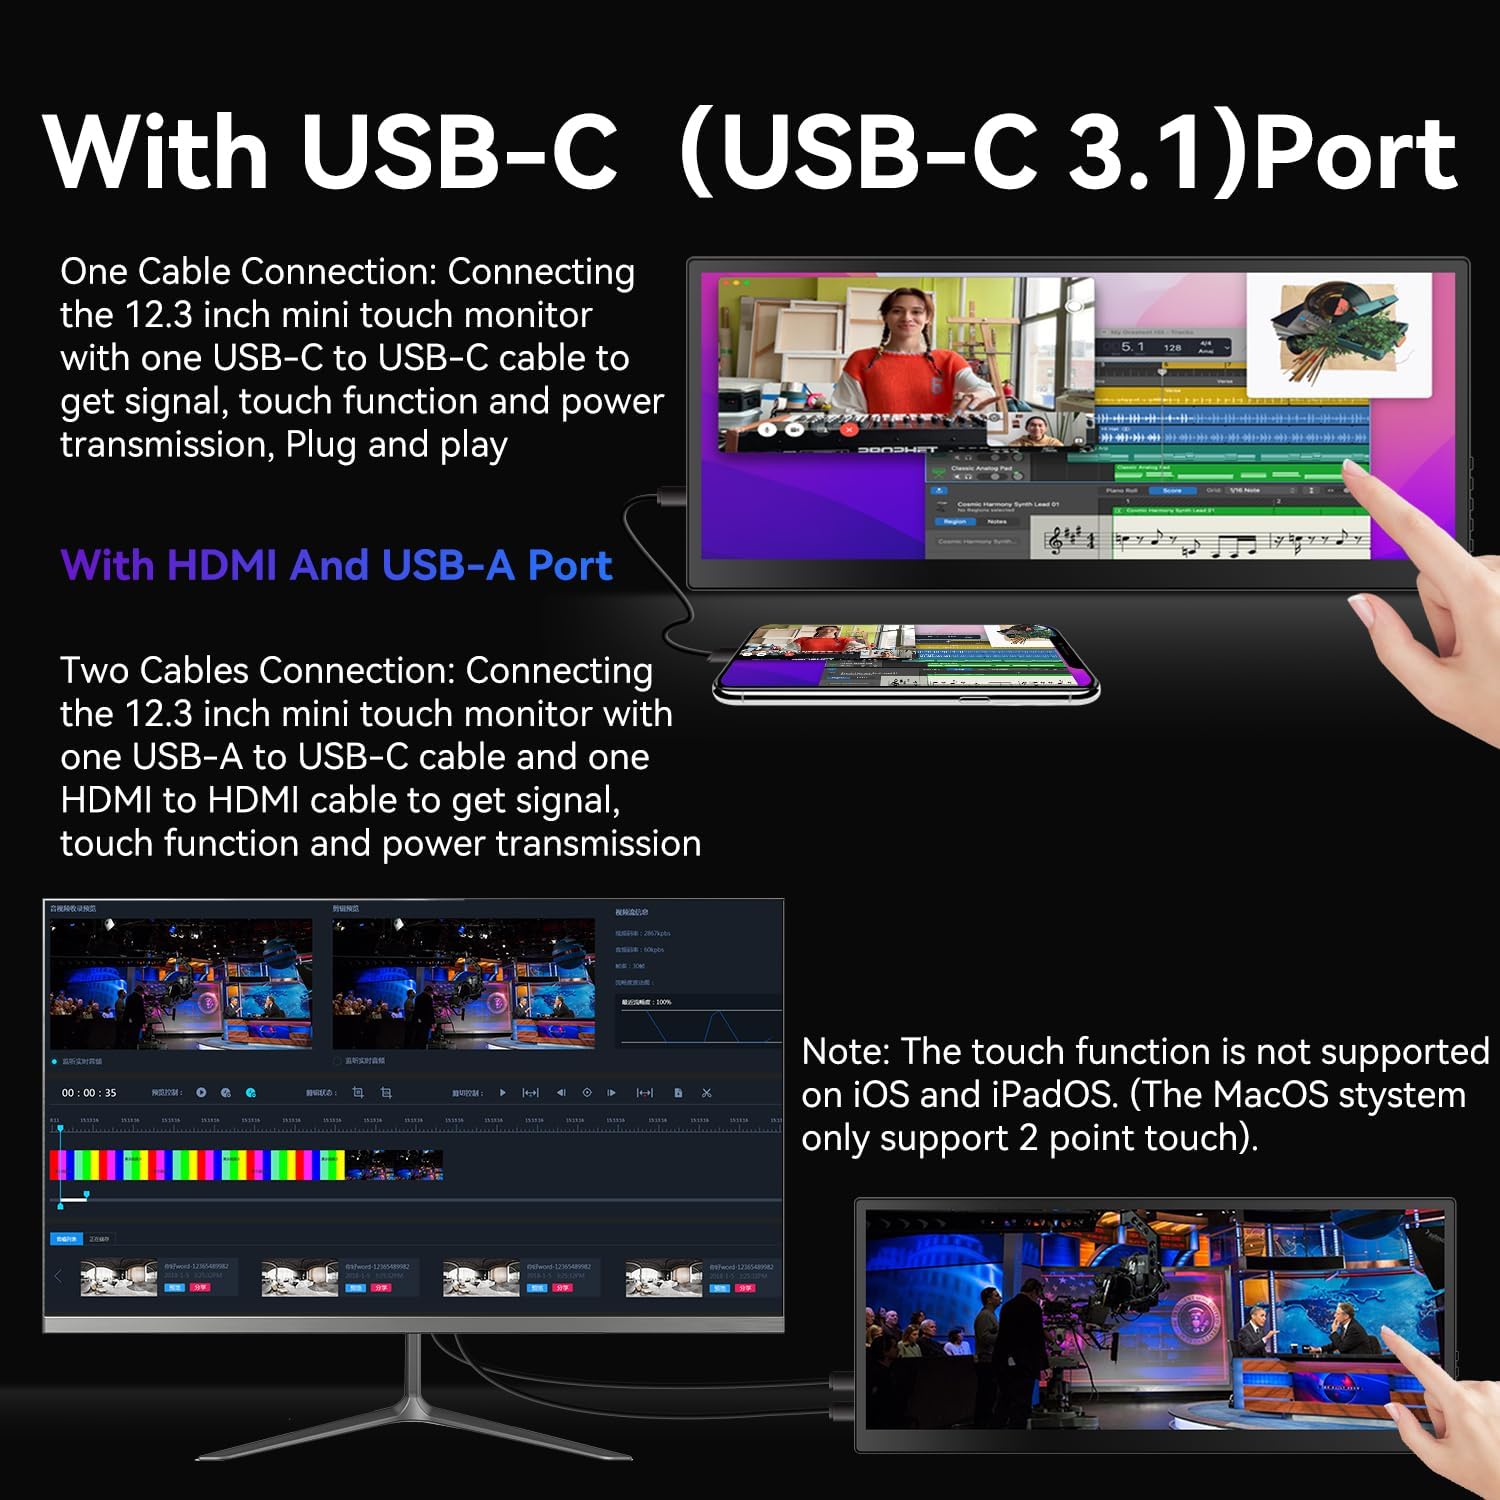
Figure 2: Contents of the package, including the monitor, cables, and power adapter.
Setup
The Prechen portable monitor offers flexible connectivity options:
1. Single Cable Connection (USB-C 3.1 DP ALT-MODE or Thunderbolt 3/4)
For devices with a full-featured USB-C port (supporting DisplayPort Alternate Mode or Thunderbolt), a single USB-C to USB-C cable can provide power, video, and touch functionality.
- Connect one end of the included USB-C to USB-C cable to the monitor's USB-C port.
- Connect the other end of the USB-C to USB-C cable to your device's compatible USB-C port.
- The monitor should automatically detect the signal and power on.

Figure 3: Illustration of connecting the monitor using a single USB-C cable for power, video, and touch.
2. Dual Cable Connection (HDMI + USB-A)
For devices without a full-featured USB-C port, you will need to use both an HDMI cable for video and a USB-A to USB-C cable for power and touch functionality.
- Connect one end of the included HDMI cable to the monitor's HDMI port and the other end to your device's HDMI port.
- Connect the USB-C end of the USB-A to USB-C cable to the monitor's USB-C port.
- Connect the USB-A end of the USB-A to USB-C cable to your device's USB-A port or a power adapter.
- Ensure both cables are securely connected for proper operation and touch functionality.

Figure 4: Setup using HDMI for video and USB-A to USB-C for power and touch.
Important Notes for Setup:
- Power Supply: If your device cannot provide sufficient power via USB-C, please use the included power adapter to ensure stable operation.
- Touch Functionality:
- MacBook only supports 1-point touch. Ensure the mouse cursor is on the monitor for touch input.
- iPhone, iPad, and Game Devices (e.g., PS3/4/5, Switch, X-box, Steam-Deck, Fire TV stick/cube) DO NOT support the touch function due to system limitations.
- For Windows, you may need to go to "Tablet PC Settings" in the Control Panel to set up the touch function if it's the first touchscreen connected.
Operating the Monitor
Basic Controls
The monitor features intuitive buttons for control:
- ON/OFF: Press and hold to power the monitor on or off.
- UP/DOWN: Navigate menu options or adjust settings.
- Menu: Access the on-screen display (OSD) menu.
- Return: Go back to the previous menu or exit the OSD.
- Audio Jack: Connect external headphones or speakers.

Figure 5: Overview of the monitor's control buttons and input/output ports.
Display Modes
Once connected, you can configure your computer's display settings to utilize the portable monitor in various modes:
- Extended Mode: Extends your desktop across both screens, providing more workspace. This is ideal for multitasking.
- Duplicated Mode: Mirrors your primary display, showing the same content on both screens. Useful for presentations or sharing content.
- Second Screen Only Mode: Displays content only on the portable monitor, turning off your primary display.

Figure 6: The monitor set up in Extended Mode, providing additional screen real estate.

Figure 7: The monitor displaying content in Duplicated Mode, mirroring the main screen.
Touch Functionality
The 10-point capacitive touchscreen allows for intuitive interaction:
- Use gestures like tap, pinch-to-zoom, and swipe for navigation and control.
- Adjust text size or image zoom directly on the screen.
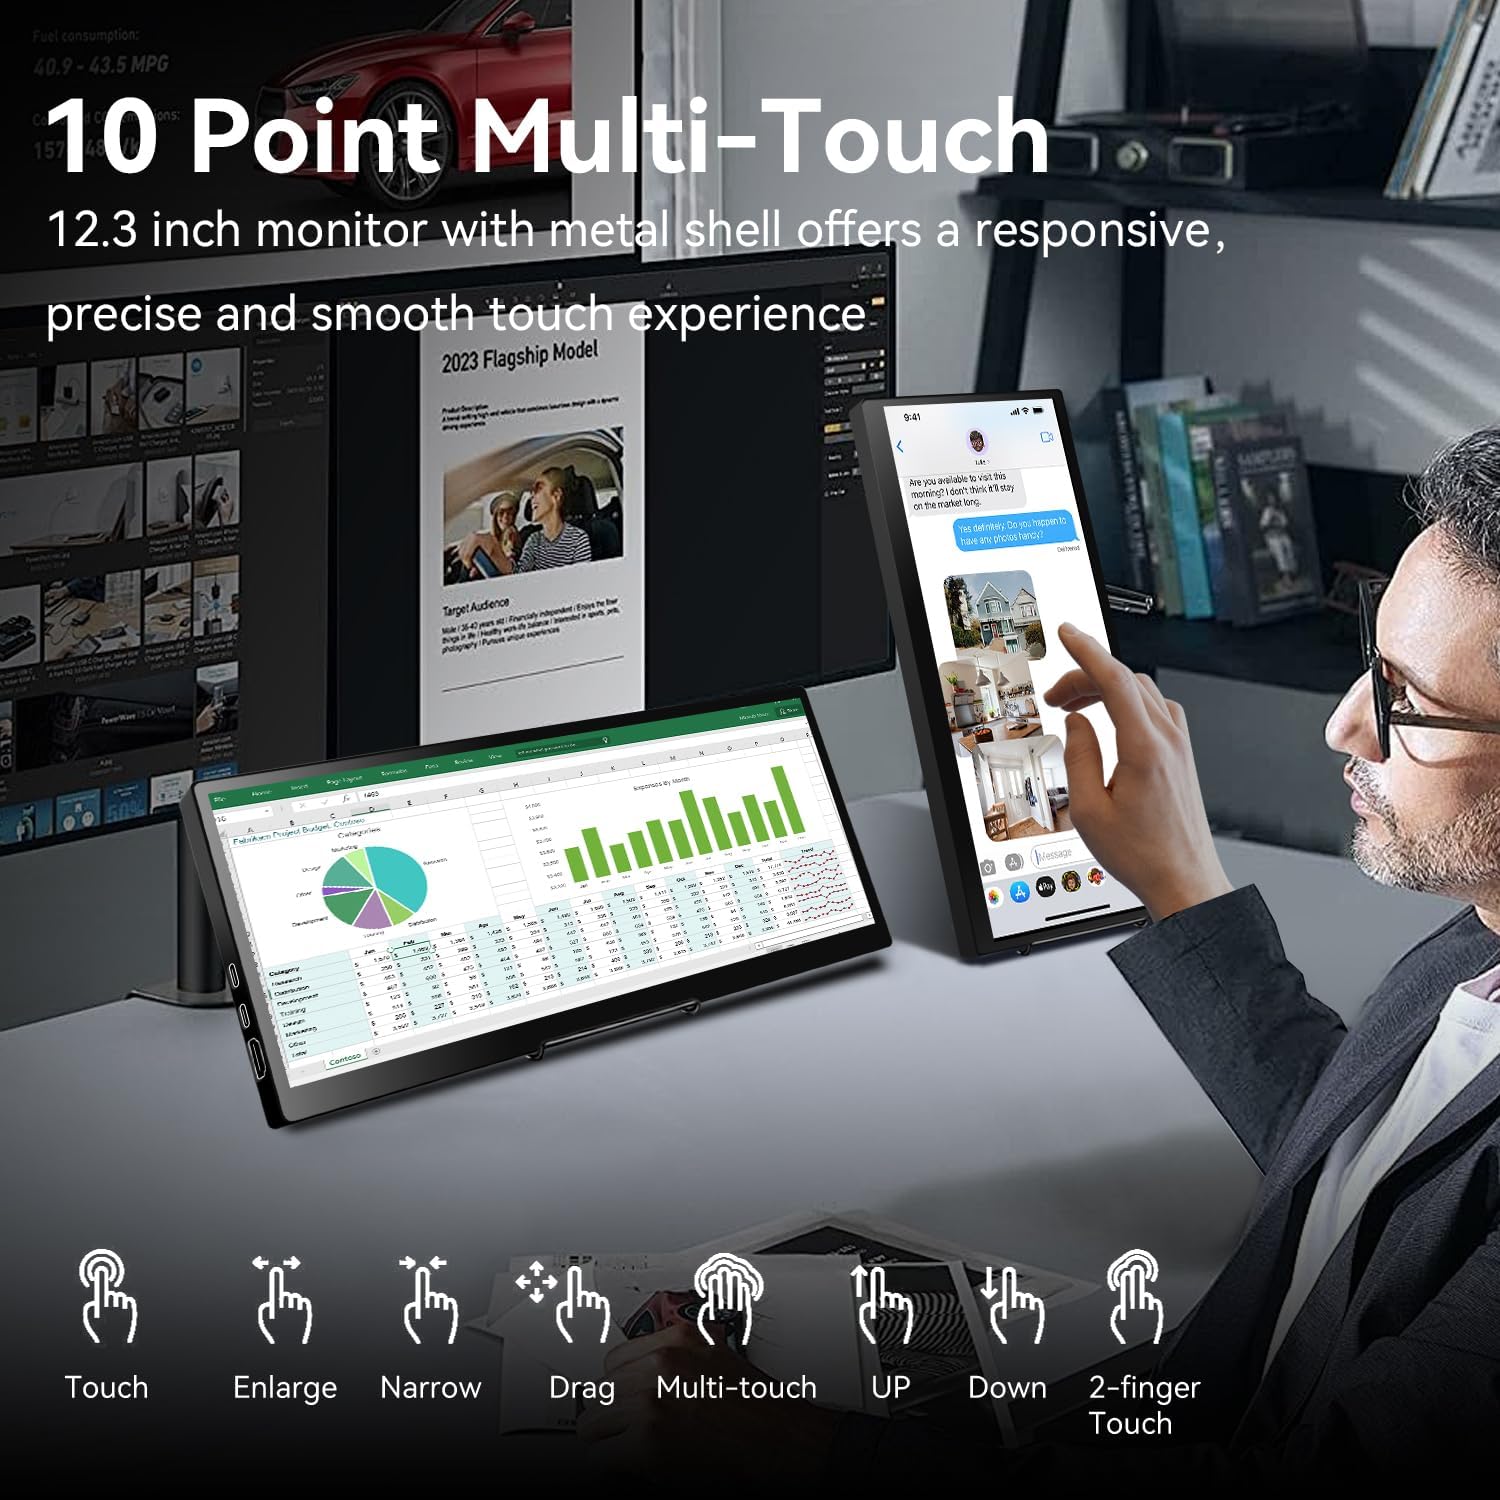
Figure 8: Various multi-touch gestures supported by the monitor, including touch, enlarge, narrow, drag, and 2-finger touch.
System Monitoring (AIDA64)
For Windows users, the monitor can be used for real-time system monitoring:
- Integrate with AIDA64 (software not included) to display CPU, GPU, and other system performance metrics.
- This provides a quick glance at your computer's health without interrupting your main workflow.
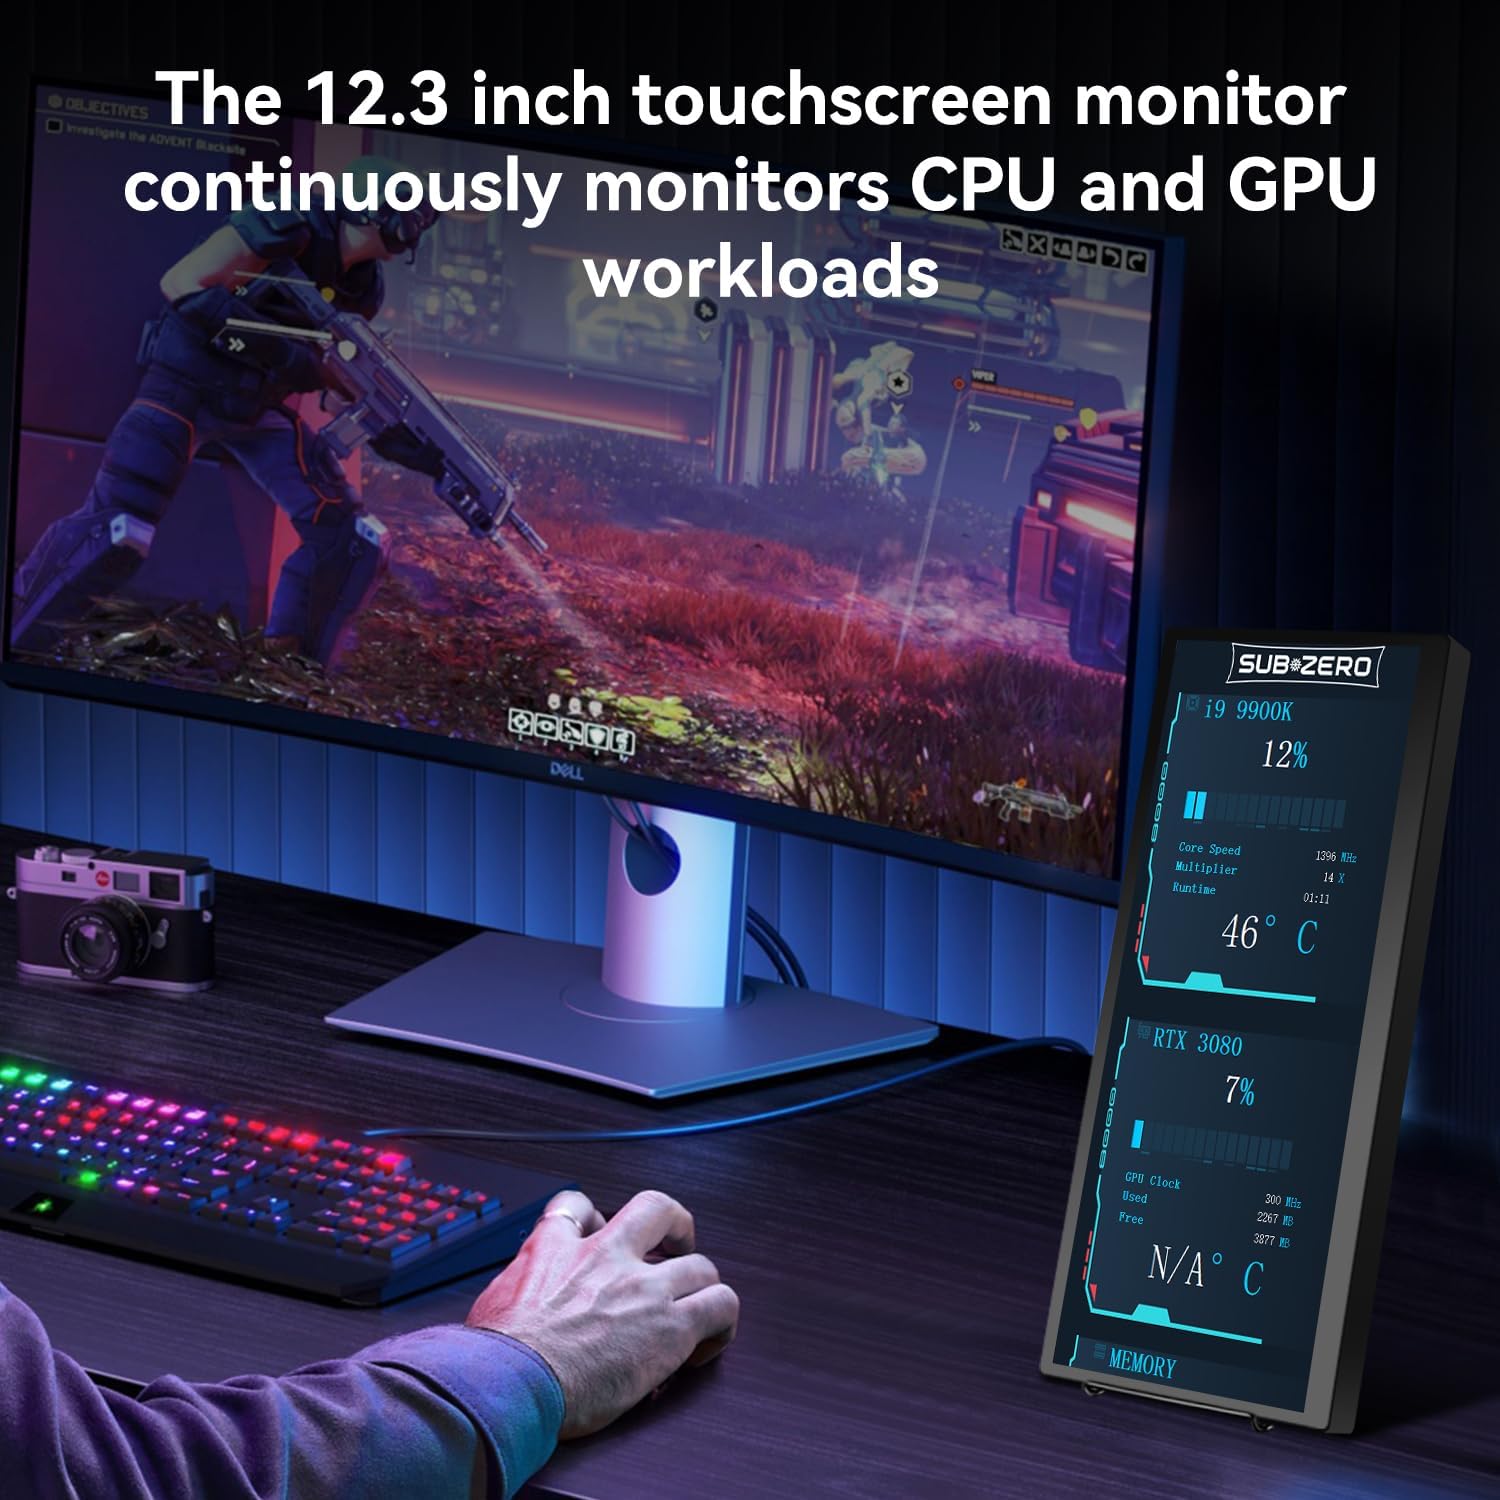
Figure 9: The monitor used to display real-time CPU and GPU workload information.
Maintenance
- Cleaning: Use a soft, lint-free cloth to clean the screen. For stubborn smudges, slightly dampen the cloth with water or a screen-safe cleaner. Avoid harsh chemicals.
- Handling: Always handle the monitor with care. Avoid dropping it or placing heavy objects on it.
- Storage: When not in use, store the monitor in its protective cover to prevent scratches and damage.
- Temperature: Avoid exposing the monitor to extreme temperatures or direct sunlight for prolonged periods.
Troubleshooting
If you encounter issues with your Prechen monitor, please refer to the following common solutions:
- No Display/Power:
- Ensure all cables (USB-C, HDMI, power) are securely connected.
- If using a single USB-C cable, verify your device's USB-C port supports DisplayPort Alternate Mode and sufficient power delivery. Try connecting the external power adapter.
- Test with different cables if possible.
- Touch Function Not Working:
- Confirm that the USB-A to USB-C cable (for HDMI connections) or the full-featured USB-C cable is connected, as touch requires a USB data connection.
- For Windows, navigate to "Control Panel" > "Tablet PC Settings" and follow the setup prompts to calibrate the touchscreen.
- Remember that iPhone, iPad, and most game devices do not support touch functionality with this monitor. MacBook supports only 1-point touch.
- Display is Squished or Stretched:
- Adjust the aspect ratio settings on your connected device (laptop/PC display settings).
- The monitor's native resolution is 1920x720. Ensure your device's output resolution is compatible or set to extend mode for optimal display.
- No Sound from Monitor Speakers:
- Check your device's audio output settings to ensure sound is directed to the Prechen monitor.
- Adjust the volume on both your device and the monitor.
Specifications
| Feature | Detail |
|---|---|
| Brand | Prechen |
| Model Number | HD-123 |
| Screen Size | 12.3 Inches |
| Resolution | 1920x720 Pixels |
| Aspect Ratio | 16:9 |
| Image Brightness | 450 Candela |
| Screen Surface | Glossy |
| Product Dimensions | 0.59 x 11.8 x 5.1 inches |
| Item Weight | 2.97 pounds |
| VESA Compatibility | 75x75mm (as per images) |
Customer Support
For further assistance, technical support, or warranty inquiries, please contact Prechen customer service through the retailer's platform or visit the official Prechen website.
Visit the Prechen Store on Amazon for more information.