1. Introduction
The XWJNE 1200 Watt Pure Sine Wave Inverter is designed to convert 12V DC power from batteries into stable 120V AC power, suitable for a wide range of electronic devices and appliances. With a continuous output of 1200W and a peak power of 2400W, this inverter is ideal for off-grid solar systems, RVs, semi-trailer trucks, and various outdoor applications. Its pure sine wave output ensures compatibility with sensitive electronics, providing clean and reliable power comparable to utility grid electricity.

The XWJNE 1200W Pure Sine Wave Inverter is a reliable solution for converting DC to AC power in various environments.
2. Key Features
- 1200W Continuous / 2400W Peak Power: Provides stable 1200W continuous power output with a 2400W peak capacity for starting high-load devices.
- Pure Sine Wave Output: Delivers high-quality AC power, ensuring safe and efficient operation for sensitive electronics without humming or interference.
- High Conversion Efficiency: Achieves over 90% energy conversion efficiency, minimizing power loss.
- Comprehensive 6-Point Protection: Features undervoltage, overvoltage, overload, over-temperature, short circuit, and reverse connection protection for enhanced safety.
- LED Display & Remote Controller: Equipped with an accurate LED screen for real-time status monitoring and a 16.4ft wired remote controller for convenient operation.
- Multiple Output Ports: Includes two 120V AC output ports and one 5V 2.4A USB port for versatile connectivity.
- Durable Construction: Built with aluminum and plastic for robust protection against impacts and efficient heat dissipation.
- Smart Cooling Fan: An intelligent fan system automatically activates when internal temperature rises, ensuring optimal operating conditions.

The inverter produces a pure sine wave output, ensuring high efficiency and compatibility with sensitive electronics.
3. Safety Information
Please read all safety instructions carefully before installing and operating the inverter. Failure to follow these instructions may result in electric shock, fire, or serious injury.
General Safety Precautions:
- Do not open the inverter casing. There are no user-serviceable parts inside.
- Ensure proper ventilation around the inverter to prevent overheating.
- Keep the inverter away from water, moisture, flammable materials, and corrosive substances.
- Connect the inverter only to a 12V DC power source. Connecting to other voltages may cause damage.
- Always disconnect the battery before performing any maintenance or wiring.
- Ensure all connections are tight and secure to prevent loose connections and arcing.
- Use appropriate wiring gauges as specified in the installation section.
Built-in Protections:
The XWJNE inverter is equipped with six types of protection functions to ensure safe operation:
- Undervoltage Protection: Shuts down the inverter if the input DC voltage drops too low.
- Overvoltage Protection: Protects the inverter and connected devices from excessively high input DC voltage.
- Overload Protection: Prevents damage by shutting down if the connected load exceeds the inverter's capacity.
- Over-temperature Protection: Activates if the internal temperature becomes too high, preventing thermal damage.
- Short Circuit Protection: Automatically disconnects power in case of a short circuit in the output.
- Reverse Connection Protection: Safeguards against damage from incorrect battery polarity connection.

The inverter incorporates multiple safety features for reliable and secure operation.
4. Package Contents
Please verify that all items listed below are included in your package:
- XWJNE 1200 Watt Pure Sine Wave Inverter
- Car Battery Cables (2.62ft 7AWG positive and negative)
- Remote Controller (with 16.4ft cable)
- Ground Wire (1.64ft)
- Instruction Manual (this document)
- Wrench
- Fuses (2 x 40A 32V)
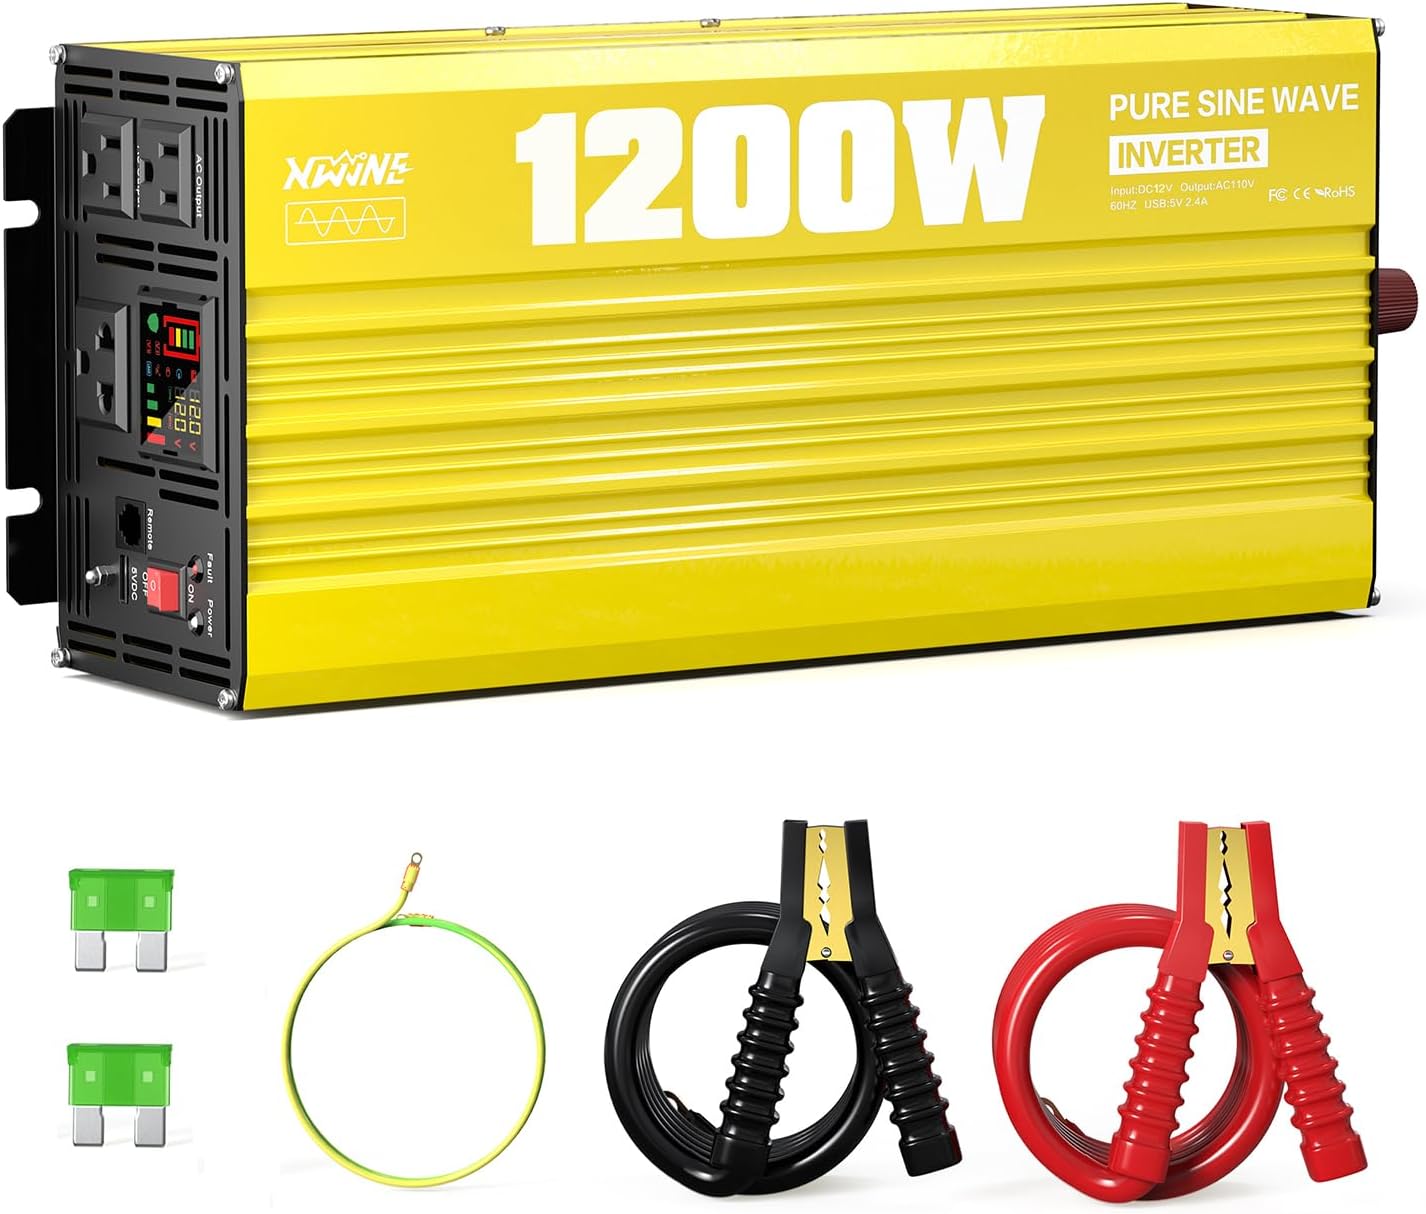
The complete package includes the inverter, battery cables, remote, ground wire, fuses, and a wrench.

Detailed view of the inverter's dimensions and the accessories provided in the box.
5. Product Components and Display
Inverter Layout:
Familiarize yourself with the different parts of your XWJNE inverter:

Front and rear panel components of the XWJNE 1200W Pure Sine Wave Inverter.
- Power Switch: Turns the inverter ON/OFF.
- Fault Indicator Lamp: Illuminates to indicate an error or protection mode.
- LED Display: Shows real-time operational data and fault codes.
- AC Output Ports: Two 120V AC outlets (x15A).
- USB Port: One 5V 2.4A 12W USB output.
- Remote Controller Port: Connects the wired remote control.
- Earth Wire Terminal: For grounding the inverter.
- Positive Terminal (DC+): Connects to the positive terminal of the 12V battery.
- Negative Terminal (DC-): Connects to the negative terminal of the 12V battery.
- Intelligent Cooling Fans: Automatically regulate temperature.
LED Screen Display:
The LED display provides crucial information about the inverter's status:

Understanding the various indicators on the inverter's LED display.
- Battery Level: Indicates the charge level of the connected battery.
- Frequency: Displays the output AC frequency (e.g., 60Hz).
- Input Voltage: Shows the current DC input voltage from the battery.
- Output Voltage: Displays the current AC output voltage.
- Output Load Percent: Indicates the percentage of the inverter's capacity currently being used.
- Power On Indicator: Shows when the inverter is active.
- Battery Connected Indicator: Confirms proper battery connection.
- Inverter Normal Working Indicator: Confirms the inverter is operating correctly.
6. Setup and Installation
Proper installation is crucial for the safe and efficient operation of your inverter. Please follow these steps carefully.
Choosing a Location:
- Install the inverter in a dry, well-ventilated area, away from direct sunlight, heat sources, and moisture.
- Ensure there is sufficient clearance around the inverter for airflow, especially around the cooling fans.
- Mount the inverter on a stable, non-flammable surface.
Battery Requirements:
For optimal performance and safety, use a deep cycle battery with at least 80% discharge depth. The inverter is compatible with various battery types including LI (Lithium), SLD (Sealed Lead-Acid), FLD (Flooded Lead-Acid), GEL, and AGM batteries.

The inverter supports multiple battery input types and can power various household and vehicle appliances.
Connection Steps:
- Prepare Cables: Use the provided 7AWG positive (red) and negative (black) battery cables. Ensure the cable length is appropriate for your setup to minimize voltage drop.
- Connect Ground Wire: Connect one end of the green ground wire (provided) to the inverter's earth terminal and the other end to a reliable ground point (e.g., vehicle chassis, ground rod).
- Connect Battery Cables to Inverter: Connect the positive (red) battery cable to the inverter's positive (DC+) terminal and the negative (black) battery cable to the inverter's negative (DC-) terminal. Ensure connections are tight.
- Connect Battery Cables to Battery: Connect the other end of the positive (red) cable to the positive terminal of your 12V battery. Then, connect the other end of the negative (black) cable to the negative terminal of your 12V battery.
- Connect Remote Controller (Optional): If desired, plug the remote controller cable into the designated port on the inverter.
- Verify Connections: Double-check all connections to ensure they are secure and correctly polarized.

Connection diagrams for independent battery use and integration into an off-grid solar system.
7. Operation Guide
Turning On/Off:
- Ensure all connections are secure.
- Flip the main power switch on the inverter to the 'ON' position. The LED display will illuminate, showing input/output voltage and other parameters.
- To turn off, flip the main power switch to the 'OFF' position.
Using the Remote Controller:
The wired remote controller allows you to turn the inverter on and off from a distance, which is convenient for installations where the inverter is not easily accessible. Simply use the switch on the remote to control the inverter's power state.
Cooling Fan Operation:
The inverter features intelligent cooling fans. These fans will automatically activate when the internal temperature reaches approximately 50 degrees Celsius or when the load reaches half of the inverter's capacity. This ensures efficient heat dissipation and maintains optimal operating temperature, contributing to the inverter's durability.

The inverter's dual cooling fans operate efficiently to maintain optimal temperature.
8. Maintenance
Regular maintenance helps ensure the longevity and reliable performance of your XWJNE inverter.
- Cleaning: Periodically clean the exterior of the inverter with a dry, soft cloth. Ensure ventilation openings and cooling fans are free from dust and debris. Do not use liquid cleaners or solvents.
- Connection Check: Regularly inspect all electrical connections (battery cables, ground wire) to ensure they remain tight and free from corrosion. Loose connections can cause overheating and damage.
- Fuse Replacement: The inverter is protected by internal fuses. If a fuse blows, the inverter may stop functioning. Replacement should only be performed by qualified personnel. Use only 40A 32V fuses as replacements.
- Storage: If storing the inverter for an extended period, ensure it is clean, dry, and stored in a cool, well-ventilated area. Disconnect it from all power sources.
9. Troubleshooting
This section provides solutions to common issues you might encounter with your inverter. The LED display will show fault codes to help diagnose problems.
Fault Display Codes:

Understanding the fault codes displayed on the inverter's screen for quick diagnosis.
| Code | Description | Possible Cause / Solution |
|---|---|---|
| F01 | Parameter Configuration Fault | Internal error. Contact customer support. |
| F02 | Sampling Circuit Fault | Internal error. Contact customer support. |
| F03 | DC Bus Voltage too Low | Input voltage is too low. Check battery charge level. |
| F04 | Other power source connected with the output cables | Ensure no other power source is connected to the AC output. |
| F05 | Output Short Circuit | Check for short circuits in connected appliances or wiring. Disconnect load and restart. |
| F06 | Output Overcurrent | Connected load draws too much current. Reduce load. |
| F07 | Output Overload | Total power of connected devices exceeds 1200W. Reduce load. |
| F08 | Over-temperature Protection | Inverter is overheating. Ensure proper ventilation, reduce load, allow to cool. |
| F09 | Other power source connected with the output cables | Similar to F04. Ensure no external AC power is connected to the inverter's output. |
| F10 | Battery Overvoltage | Input voltage is too high. Check battery charging system. |
| F11 | DC Bus Overvoltage | Internal overvoltage. Contact customer support. |
| F12 | Battery Undervoltage | Input voltage is too low. Recharge or replace battery. |
| F13 | Data Read Error | Internal data error. Contact customer support. |
General Troubleshooting Tips:
- No Power Output: Check battery connections, battery voltage, and ensure the inverter is switched on.
- Inverter Shuts Down: This is often due to a protection feature. Check for overload, low/high battery voltage, or overheating. Reduce load, charge battery, or allow to cool.
- Noisy Operation: A slight fan noise is normal when under load or hot. Excessive noise might indicate a fan obstruction or internal issue.
10. Technical Specifications
| Specification | Value |
|---|---|
| Product Dimensions | 8.9 x 7.99 x 15.59 inches |
| Item Weight | 7.91 pounds |
| Item Model Number | 24IVA-12HW-12V-110 |
| Brand | XWJNE |
| Recommended Uses | Home, Off-Grid, RV, Truck, Vehicle |
| Power Source | Battery Powered |
| Wattage (Continuous) | 1200 watts |
| Peak Power | 2400 watts |
| Input Voltage | 12V DC |
| Output Voltage | 120V AC |
| Output Waveform | Pure Sine Wave |
| Efficiency | >90% |
| USB Output | 5V 2.4A |
| Manufacturer | XWJNE |
| Date First Available | January 29, 2025 |
11. Customer Support
For any questions, technical assistance, or warranty inquiries regarding your XWJNE 1200 Watt Pure Sine Wave Inverter, please contact our customer service team. We offer 24-hour customer service to assist you when needed.
Please refer to your purchase documentation for specific contact details or visit the official XWJNE website for support information.