1. Introduction
Thank you for choosing the XWJNE 2000 Watt Pure Sine Wave Inverter. This manual provides important information regarding the installation, operation, maintenance, and troubleshooting of your inverter. Please read this manual carefully before use to ensure safe and optimal performance.
The XWJNE 2000W Pure Sine Wave Inverter converts 12V DC battery power to clean, stable 120V AC energy, making it ideal for RVs, trucks, campers, off-grid solar setups, and home backup power. It delivers up to 4000W peak power with over 90% energy efficiency.
Safety Instructions:
- Always ensure proper grounding of the inverter.
- Do not use the inverter in the presence of flammable gases or liquids.
- Ensure adequate ventilation around the inverter to prevent overheating.
- Connect the inverter to batteries with correct polarity (red to positive, black to negative).
- For best performance, use with deep-cycle batteries rated for 80% discharge or higher.

Figure 1: XWJNE 2000W Pure Sine Wave Inverter in various application settings.
Video 1: An overview of the XWJNE high watt pure sine wave inverter, demonstrating its features and applications.
2. Package Contents
The XWJNE 2000 Watt Pure Sine Wave Inverter package includes the following items:
- 1 x XWJNE 2000W Pure Sine Wave Inverter
- 2 x Car Battery Cables (Red for Positive, Black for Negative)
- 1 x Remote Controller with 16.4-ft cable
- 1 x Instruction Manual
- 1 x Wrench (14mm/17mm)
- 4 x Fuses (40A)
- 1 x Earth Wire (1.64ft)

Figure 2: All items included in the XWJNE 2000W Pure Sine Wave Inverter package.
3. Product Overview
The XWJNE 2000W Inverter features a robust design with multiple input/output options and an intuitive display for easy monitoring.
Front Panel Components:
- Power Switch: Main ON/OFF switch for the inverter.
- Fault Indicator Lamp: Illuminates to indicate system errors or protection activation.
- LED Display: Shows input/output voltage, load, battery status, and error codes.
- AC Outlets (2x): Standard 120V AC outlets for connecting appliances.
- USB Port (5V/2.4A): For charging USB-powered devices.
- Remote Control Port: Connects the wired remote controller.
- AC Terminal Board: For hardwiring AC output connections (Line, Neutral, Earth).
- Earth Wire Terminal: For grounding the inverter.
Rear Panel Components:
- Positive Terminal (DC+): Connects to the positive terminal of the 12V battery.
- Negative Terminal (DC-): Connects to the negative terminal of the 12V battery.
- Intelligent Cooling Fans (2x): Automatically adjust speed based on load and temperature to maintain optimal operating conditions.

Figure 3: Detailed view of the inverter's components.
Remote Controller & LED Display:
The wired remote controller allows for convenient operation from a distance, especially useful when the inverter is installed in cramped or hard-to-reach spaces. The integrated LED display on both the inverter and the remote provides real-time monitoring of key parameters.

Figure 4: Remote Operation Switch for convenient control.
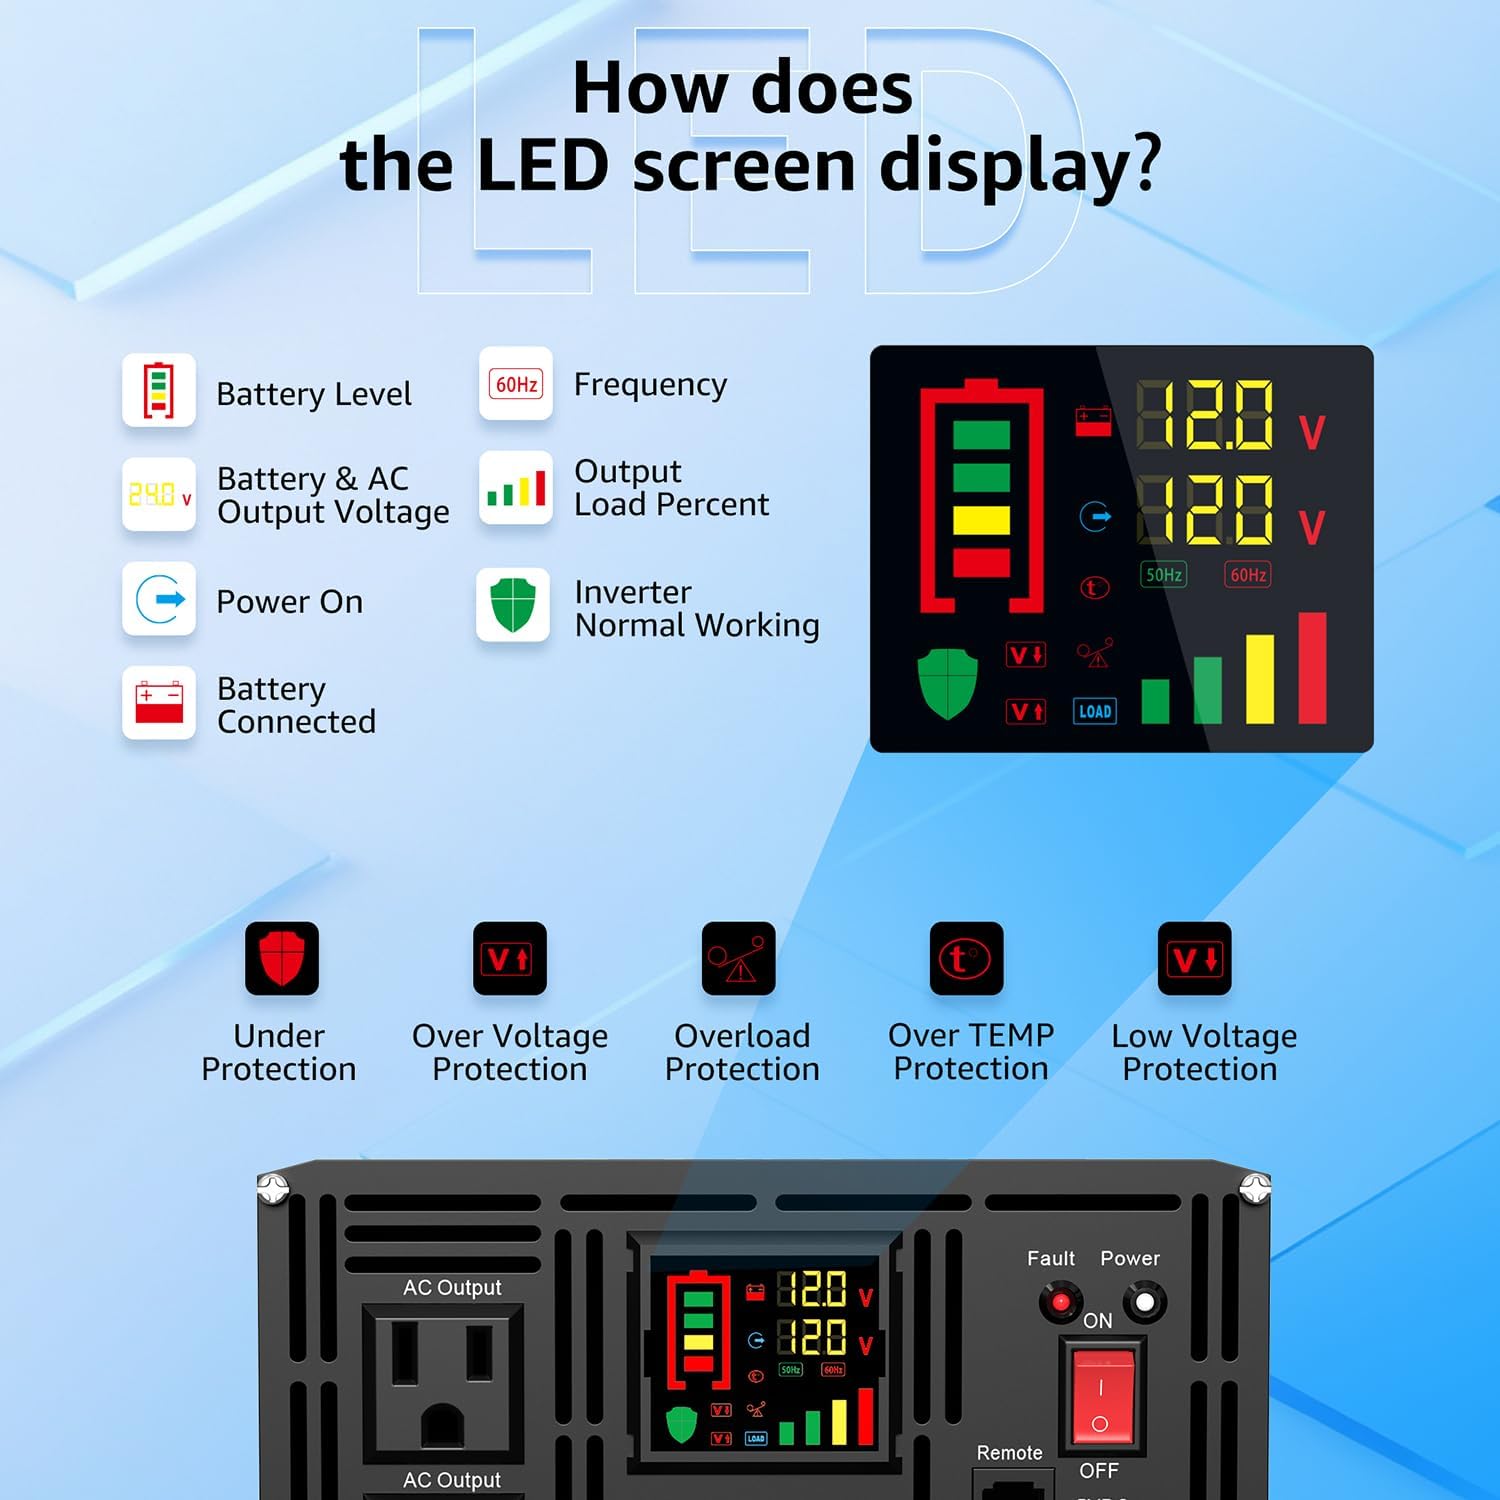
Figure 5: Understanding the LED screen display.
4. Setup & Installation
Proper installation is crucial for the safe and efficient operation of your inverter. Always ensure the inverter is placed in a well-ventilated, cool, and dry environment.
4.1 Battery Connection:
- Ensure the inverter's power switch is in the OFF position.
- Connect the red battery cable to the inverter's Positive (DC+) terminal and the positive terminal of your 12V battery.
- Connect the black battery cable to the inverter's Negative (DC-) terminal and the negative terminal of your 12V battery.
- Ensure all connections are tight and secure to prevent loose connections, which can cause overheating and damage.
- If connecting multiple batteries in parallel, ensure proper wiring to balance the load across all batteries.

Figure 6: Battery connection diagram.
4.2 Grounding:
Connect the provided earth wire from the inverter's grounding terminal to a proper grounding point (e.g., vehicle chassis, building ground). This is essential for safety and to prevent electrical shock.
4.3 Remote Control Setup:
Plug the remote controller cable into the 'Remote Control' port on the inverter's front panel. The remote can then be mounted in a convenient location for easy access.
Video 2: Instructions on how to replace the fuse of the pure sine wave inverter.
5. Operating Instructions
Once the inverter is properly installed and connected to your battery system, you can begin operation.
5.1 Powering On/Off:
- Ensure all appliances are disconnected from the inverter.
- Flip the main power switch on the inverter's front panel to the 'ON' position. The LED display will illuminate.
- Alternatively, use the ON/OFF button on the remote controller to power the inverter on or off.
- To power off, reverse the steps. It is recommended to turn off the inverter when not in use to conserve battery power.
5.2 Connecting Appliances:
- Plug your 120V AC appliances into the AC outlets on the inverter's front panel.
- For hardwired applications, connect your AC wiring to the AC terminal board (L, N, PE).
- Connect USB-powered devices to the USB port for charging.
- Ensure the total wattage of connected devices does not exceed the inverter's continuous power rating (2000W).

Figure 7: Inverter powering various devices from multiple battery inputs.

Figure 8: Pure Sine Wave Performance benefits.
6. Safety Features & Protections
The XWJNE 2000W Inverter is equipped with comprehensive protection mechanisms to ensure safe and reliable operation for both the unit and your connected devices.
- Undervoltage Protection: Shuts down the inverter if the input voltage drops below a safe threshold.
- Overvoltage Protection: Protects against excessive input voltage.
- Overload Protection: Automatically shuts down if the connected load exceeds the inverter's capacity.
- Short-Circuit Protection: Prevents damage from short circuits in the output.
- Over-Temperature Protection: Activates if the internal temperature exceeds safe limits, often engaging cooling fans.
- Reverse-Polarity Protection: Guards against damage from incorrect battery connections.

Figure 9: Six-way protection mechanisms for the inverter.
7. Specifications
Below are the detailed specifications for the XWJNE 2000 Watt Pure Sine Wave Inverter (Model: 24IVA-2KW-12V-110).
| Feature | Specification |
|---|---|
| Model Number | 24IVA-2KW-12V-110 |
| Continuous Power | 2000 Watts |
| Peak Power | 4000 Watts |
| Input Voltage | 12V DC |
| Output Voltage | 120V AC |
| Output Frequency | 60Hz |
| Waveform | Pure Sine Wave |
| USB Output | 5V/2.4A |
| Efficiency | >90% |
| Product Dimensions | 9.2 x 9 x 18 inches |
| Item Weight | 8.98 pounds |

Figure 10: Load compatibility table.
8. Maintenance
Regular maintenance ensures the longevity and optimal performance of your XWJNE inverter.
- Cleaning: Keep the inverter clean and free from dust and debris. Use a dry cloth to wipe the exterior. Ensure ventilation openings are clear.
- Fan Operation: The intelligent cooling fans automatically adjust their speed based on the internal temperature and load. Ensure the fans are not blocked.
- Connection Check: Periodically check all battery and output connections for tightness and corrosion.
- Fuse Replacement: In case of an overload or short circuit, the internal fuses may blow. Refer to the manual for fuse specifications and replacement procedures.

Figure 11: Intelligent Cooling Fan system.
9. Troubleshooting
The inverter's LED display provides error codes to help diagnose and resolve common issues. Refer to the table below for guidance.
| Error Code | Description | Possible Cause | Solution |
|---|---|---|---|
| F01 | Parameter Configuration Fault | Internal parameter error | Contact customer service. |
| F05 | Output Short Circuit | Short circuit at AC output | Remove short circuit, restart. |
| F07 | Output Overload | Connected load exceeds capacity | Reduce load, restart. |
| F08 | Over-temperature Protection | Inverter overheating | Ensure ventilation, reduce load. |
| F10 | Battery Overvoltage | Input voltage too high | Check battery voltage. |
| F12 | Battery Undervoltage | Input voltage too low | Recharge battery. |

Figure 12: Fault display indicators.
10. Warranty & Support
The XWJNE 2000 Watt Pure Sine Wave Inverter comes with a standard warranty. For specific warranty terms and conditions, please refer to the product packaging or contact XWJNE customer service.
For any technical assistance or support, please contact XWJNE customer service. Our team is available 24/7 to provide prompt and helpful solutions.