1. Introduction
The AlienRider M12S Motorcycle Smart System is an advanced all-in-one solution designed to enhance motorcycle safety, connectivity, and recording capabilities. This manual provides detailed instructions for the proper installation, operation, and maintenance of your device, ensuring optimal performance and longevity.
2. Product Overview and Components
The AlienRider M12S system integrates multiple features including a 77G millimeter-wave radar for blind spot detection, front and rear dash cameras, wireless CarPlay/Android Auto, and real-time Tire Pressure Monitoring System (TPMS).
2.1 Included Components
- Main Display Unit (Host)
- Front Camera
- Rear Camera
- 77G Millimeter Wave Radar Sensor
- TPMS Sensors (2 units)
- Wired Remote Control
- Power Cables and Wiring Harness
- Mounting Brackets and Adhesives
- User Manual

3. Setup and Installation
Proper installation is crucial for the system's performance. It is recommended to have this installed by a qualified technician if you are unsure about any steps.
3.1 Main Unit Mounting
Select a suitable location on your motorcycle's dashboard or handlebars for the main display unit. Use the provided mounting brackets and hardware to securely attach the unit. Ensure the unit is positioned for clear visibility and easy access to controls without obstructing your view of the road or motorcycle instruments.

3.2 Camera Installation
Install the front and rear cameras in positions that provide a clear, unobstructed view of the road. The cameras come with 3M adhesive for secure attachment. Ensure the lenses are clean and free from obstructions. The cameras support 1080P recording and night vision.
3.3 Radar Sensor Installation
Mount the 77G millimeter-wave radar sensor at the rear of the motorcycle, ensuring it has a clear line of sight to detect vehicles in your blind spots. Follow the specific instructions in the full manual for optimal angle and placement.
3.4 TPMS Sensor Installation
Attach the TPMS sensors to the valve stems of your motorcycle tires. Ensure they are securely fastened to provide accurate real-time tire pressure and temperature readings.

3.5 Wired Remote Control Installation
Install the wired remote control on your handlebars in a position that allows for easy and safe operation while riding. Use the provided adhesive to secure it.
3.6 Power Connection
Connect the main unit's power cable to your motorcycle's battery. The power supply has three wires: GND (ground, negative pole), Battery+ (constant power, positive pole), and ACC (switched power, positive pole). Ensure all connections are secure and correctly wired to prevent electrical issues.
4. Operating Instructions
Once installed, the AlienRider M12S system offers a range of functionalities accessible via its high-brightness touchscreen display.
4.1 Display and Interface
The 1200 nit high-brightness IPS touchscreen ensures clear visibility even under direct sunlight. The intuitive interface allows easy navigation through various functions.

4.2 Wireless CarPlay and Android Auto
Connect your smartphone wirelessly to enable CarPlay or Android Auto. This allows for seamless navigation, music playback, and communication directly from the M12S display.

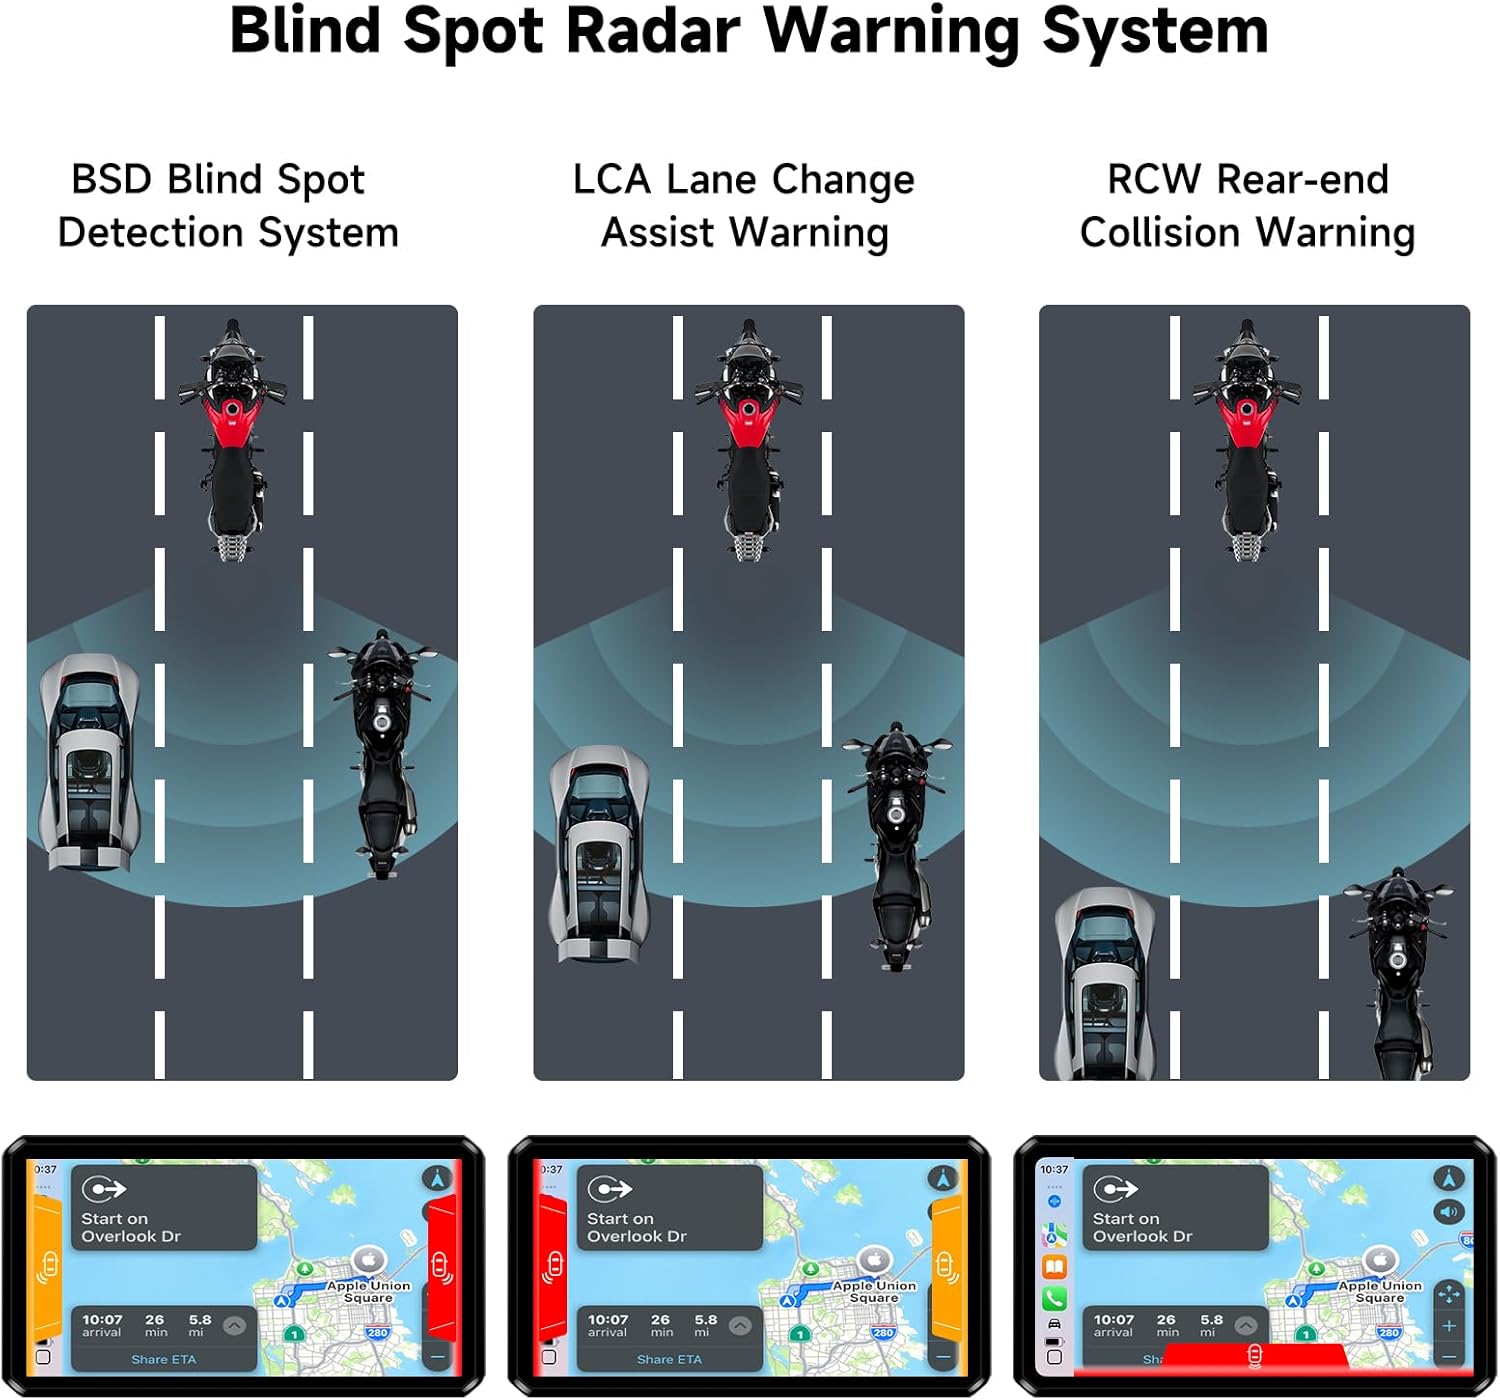
4.3 Blind Spot Warning System (BSD, LCA, RCW)
The 77G millimeter-wave radar provides real-time monitoring of blind spots. The system offers primary (yellow pop-up) and secondary (red pop-up with rear view switch) warnings for approaching vehicles, enhancing driving safety.

4.4 Dash Cam Recording
The system continuously records 1080P video from both front and rear cameras. Features include loop recording, night vision, and G-Sensor activated emergency accident video saving to prevent overwriting important footage.
5. Maintenance
To ensure the longevity and optimal performance of your AlienRider M12S system, follow these maintenance guidelines:
- Cleaning: Regularly clean the display screen, camera lenses, and radar sensor with a soft, damp cloth. Avoid abrasive cleaners.
- Waterproof Design: The unit features an IP68 waterproof design, making it resistant to harsh weather. However, avoid direct high-pressure water jets on sensitive areas.
- Firmware Updates: Check the manufacturer's website periodically for firmware updates to ensure you have the latest features and bug fixes.
- Cable Inspection: Periodically inspect all cables and connections for wear, damage, or loose fittings.
6. Troubleshooting
If you encounter issues with your AlienRider M12S system, refer to the following common troubleshooting steps:
- No Power: Check all power connections (GND, Battery+, ACC) to ensure they are secure and correctly wired. Verify your motorcycle battery voltage.
- Cameras Not Displaying: Ensure camera cables are securely connected to the main unit. Check camera settings in the system menu.
- CarPlay/Android Auto Connectivity Issues: Ensure Bluetooth and Wi-Fi are enabled on your smartphone and the M12S unit. Try restarting both devices.
- Inaccurate TPMS Readings: Verify TPMS sensors are correctly installed and tightened on the valve stems. Check for any physical damage to the sensors.
- Radar Warnings Not Functioning: Ensure the radar sensor is clean and has an unobstructed view. Check radar settings in the system menu.
7. Specifications
| Feature | Specification |
|---|---|
| Model Name | M12S-Series |
| Display | 1200 nit High-Brightness IPS Touchscreen |
| Video Resolution | 1080p (Front & Rear Cameras) |
| Radar Technology | 77G Millimeter Wave Radar |
| Connectivity | Wireless CarPlay, Android Auto, Bluetooth |
| Waterproof Rating | IP68 |
| Special Features | Night Vision, TPMS, G-Sensor, Loop Recording |
| Product Dimensions | 1.18 x 5.31 x 3.07 inches |
| Item Weight | 4.07 pounds (1.85 Kilograms) |
8. Warranty and Support
For warranty information and technical support, please refer to the documentation included in your product packaging or visit the official AlienRider website. Contact customer service for assistance with any product-related inquiries or issues.


