1. Introduction
This manual provides essential information for the safe operation, assembly, maintenance, and troubleshooting of your AMERISUN 24-Inch 212cc Two-Stage Gas Snow Blower, Model AM7109A. Please read and understand all instructions before operating the machine. Keep this manual for future reference.

Image 1.1: Overview of the AMERISUN 24-Inch Two-Stage Gas Snow Blower.
2. Safety Information
Operating a snow blower requires caution. Failure to follow safety instructions can result in serious injury or death. Always prioritize safety.
- Read the Manual: Familiarize yourself with all controls and safety decals before operation.
- Personal Protective Equipment (PPE): Wear appropriate winter clothing, non-slip footwear, and eye protection. Avoid loose clothing that could get caught in moving parts.
- Clear the Area: Before starting, remove all foreign objects from the area to be cleared, such as rocks, toys, or wires, which could be thrown by the auger.
- Keep Bystanders Away: Ensure children, pets, and other people are at a safe distance from the operating area.
- Fuel Handling: Handle gasoline with extreme care. Store fuel in approved containers, in a well-ventilated area, away from ignition sources. Do not refuel a hot or running engine.
- Engine Exhaust: Operate the snow blower in a well-ventilated area. Engine exhaust contains carbon monoxide, a colorless, odorless, and deadly gas.
- Avoid Obstructions: Do not direct discharge towards people, vehicles, or property. Be aware of the discharge chute direction.
- Never Clear Clogs by Hand: If the discharge chute becomes clogged, turn off the engine, remove the ignition key, and wait for all moving parts to stop before attempting to clear the clog with a clearing tool.
- Slope Operation: Exercise extreme caution when operating on slopes. Clear snow across the face of slopes, never up and down.
- Machine Inspection: Regularly inspect the machine for loose fasteners, damaged parts, or fuel leaks. Address any issues before operation.
3. Assembly
The AMERISUN snow blower requires some assembly upon unboxing. Refer to the included assembly guide for detailed, step-by-step instructions. Typically, this involves attaching the handle assembly, chute, and any control cables. Ensure all fasteners are securely tightened before proceeding to setup.
4. Setup
Before starting the snow blower, perform the following setup steps:
4.1 Fuel and Oil
- Engine Oil: This unit is equipped with a 212cc 4-cycle OHV engine. Ensure the engine oil reservoir is filled to the proper level with the recommended oil type (refer to the engine manual for specifics). Check oil level before each use.
- Fuel: Fill the fuel tank with fresh, unleaded gasoline. Do not use E85 or other high-ethanol fuels. Always use a fuel stabilizer if storing fuel for extended periods.

Image 4.1: The 212cc 4-cycle OHV engine.
4.2 Controls Overview
Familiarize yourself with the control panel and levers before starting the engine.

Image 4.2: Control panel layout with labeled functions.
5. Operating Instructions
5.1 Starting the Engine
The snow blower features both electric start and a manual pull start.
- Electric Start: Connect the power cord to a grounded 120V AC outlet. Press and hold the electric start button until the engine starts. Disconnect the power cord once the engine is running.
- Manual Pull Start: Ensure the ignition key is inserted. Set the choke and throttle according to the engine manufacturer's recommendations for cold or warm starts. Pull the starter rope firmly until the engine starts.


Image 5.1: Electric start button (left) and manual pull start handle (right).
5.2 Engaging Drive and Auger
- Drive Control: This snow blower features a self-propelled drive system with 6 forward and 2 reverse speeds. Select the desired speed using the gear control lever. Engage the drive control lever on the handle to move the unit forward or backward.
- Auger Control: Engage the auger control lever to activate the steel auger and impeller for snow clearing. Release the lever to stop the auger.


Image 5.2: Operating the drive control (left) and the steel auger (right).
5.3 Clearing Snow
The snow blower is designed with a 24-inch clearing width and 20-inch intake height, capable of clearing up to 12 inches of snow and throwing it up to 45 feet.
- Chute Adjustment: Use the chute rotation handle to adjust the discharge direction up to 180 degrees. Adjust the chute deflector to control the throwing distance.
- Clearing Technique: Overlap each pass slightly to ensure complete snow removal. For very deep or heavy snow, reduce your forward speed or take narrower cuts.
- LED Headlight: Activate the LED headlight for improved visibility during low-light conditions.
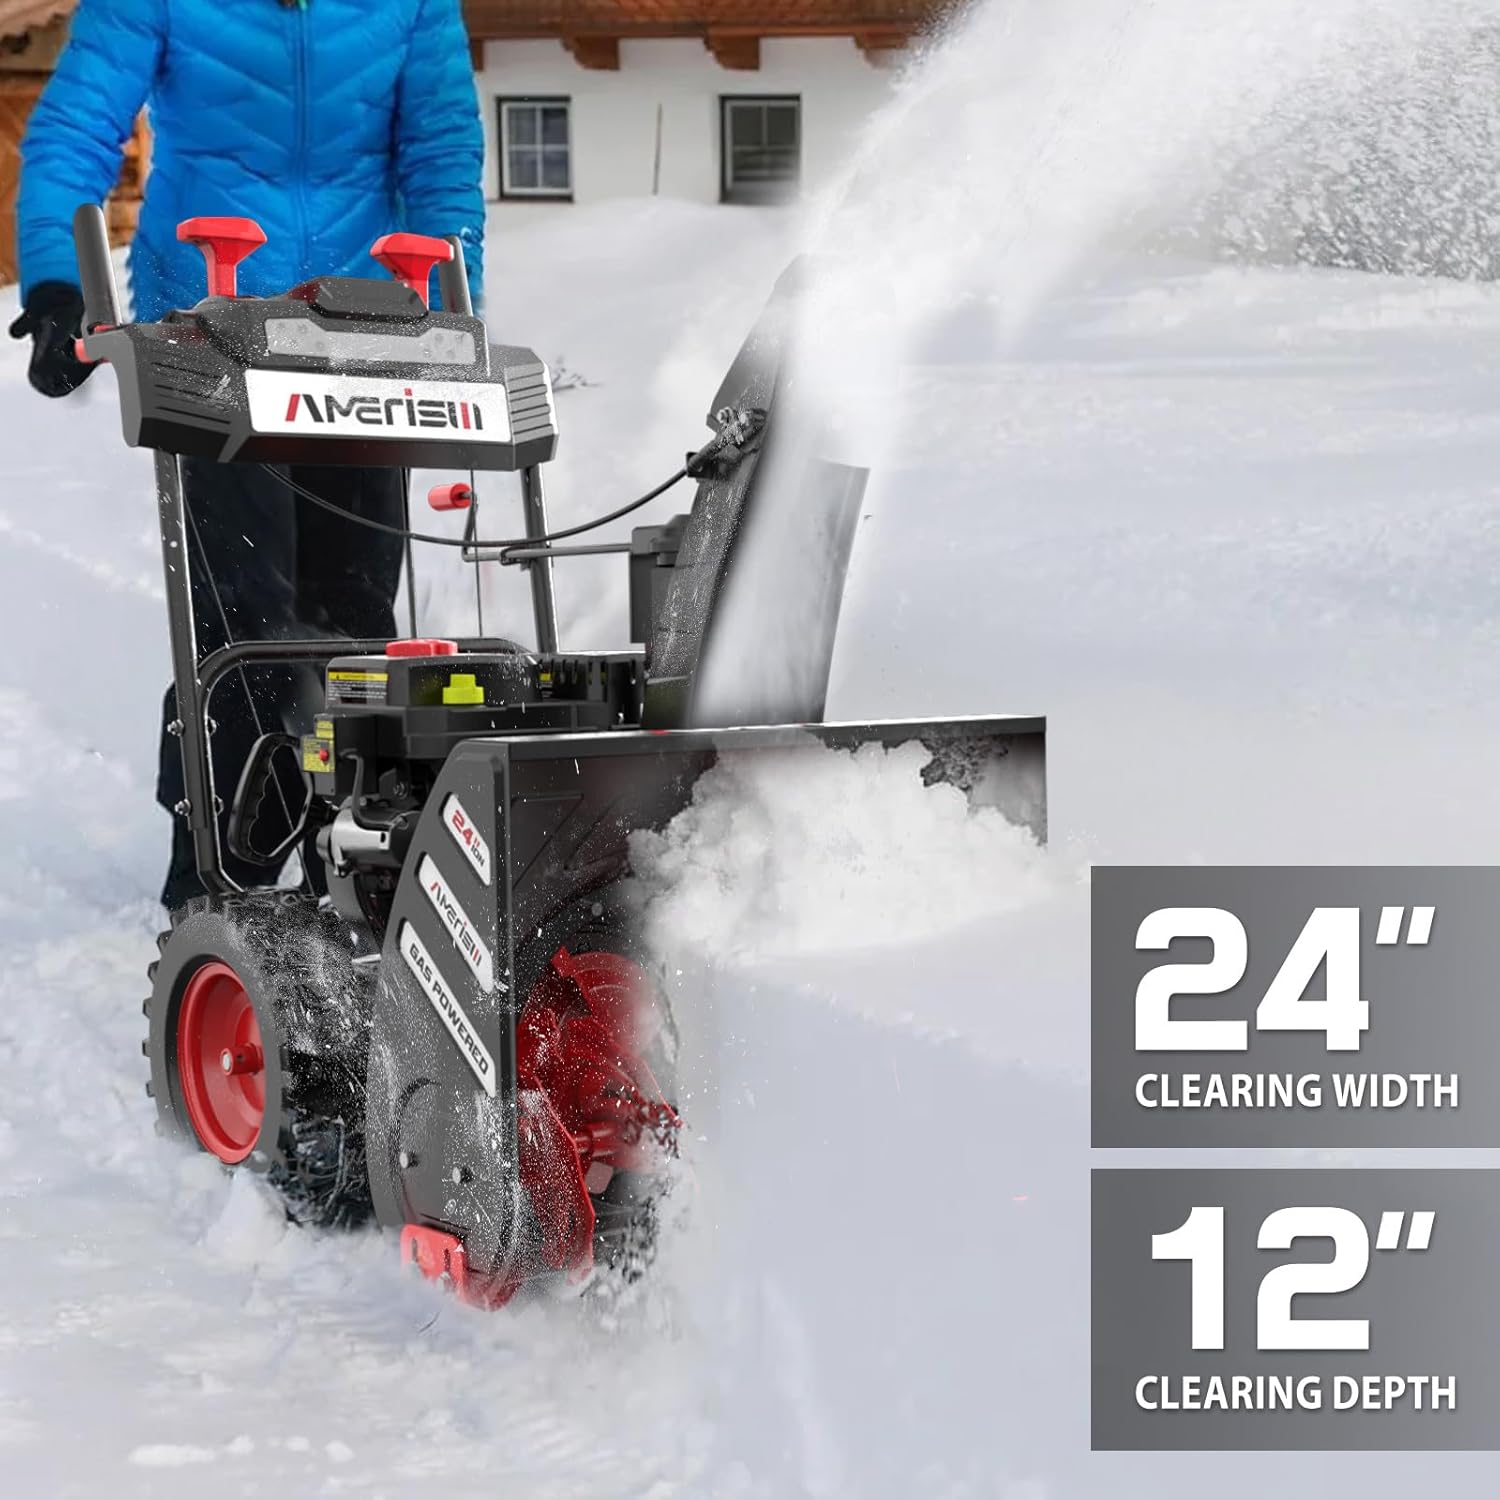
Image 5.3: Snow blower in operation, demonstrating clearing capabilities.

Image 5.4: The 180-degree rotating discharge chute.
5.4 Stopping the Engine
To stop the engine, release the auger and drive control levers, then turn the ignition key to the OFF position or press the engine stop button if available. Always remove the ignition key when the machine is unattended.
6. Maintenance
Regular maintenance ensures optimal performance and extends the life of your snow blower.
- Engine Oil: Change engine oil after the first 5 hours of operation, then every 25 hours or annually, whichever comes first.
- Spark Plug: Inspect and clean the spark plug annually. Replace if worn or fouled.
- Air Filter: Check and clean the air filter regularly, especially in dusty conditions. Replace if damaged.
- Shear Pins: Inspect shear pins regularly. These are designed to break to protect the auger and gearbox from damage if an obstruction is encountered. Replace with genuine AMERISUN shear pins only.
- Tires: The 13-inch x 4-inch snow tires provide traction. Check tire pressure periodically.
- Storage: Before long-term storage, drain the fuel tank or add a fuel stabilizer. Clean the machine thoroughly and store it in a dry, protected area.

Image 6.1: The 13-inch all-terrain snow tires.
7. Troubleshooting
This section addresses common issues you might encounter with your snow blower.
| Problem | Possible Cause | Solution |
|---|---|---|
| Engine does not start | No fuel, stale fuel, incorrect choke setting, fouled spark plug, ignition key not inserted. | Check fuel level, use fresh fuel, adjust choke, clean/replace spark plug, insert ignition key. |
| Poor snow clearing performance | Clogged chute, worn auger paddles, broken shear pins, incorrect engine speed. | Clear chute (engine off!), inspect/replace auger paddles, replace shear pins, ensure full throttle. |
| Snow blower not moving | Drive belt issue, transmission problem, drive control not engaged. | Check drive belt, ensure drive control is fully engaged. Consult service if transmission suspected. |
| Excessive vibration | Loose fasteners, bent auger, damaged impeller. | Inspect for loose parts, check auger/impeller for damage. Seek professional service if necessary. |
8. Specifications
Key specifications for the AMERISUN 24-Inch 212cc Two-Stage Gas Snow Blower, Model AM7109A:
| Feature | Detail |
|---|---|
| Brand | AMERISUN |
| Model Number | AM7109A |
| Power Source | Gas Powered |
| Engine Type | 212cc 4-Cycle OHV |
| Clearing Width | 24 Inches |
| Intake Height | 20 Inches |
| Ideal Snow Depth | Up to 12 Inches |
| Throw Distance | Up to 45 Feet |
| Start Type | Electric Start, Manual Pull Start |
| Drive System | Self-Propelled (6 Forward, 2 Reverse Speeds) |
| Tires | 13-inch x 4-inch Snow Tires |
| Chute Rotation | 180 Degrees |
| Product Dimensions (D x W x H) | 42.9"D x 24"W x 42.1"H |
| Item Weight | 126 Pounds |
| UPC | 840432701492 |

Image 8.1: Dimensional overview of the snow blower.

Image 8.2: Snow blower application guidelines.
9. Warranty and Support
Your AMERISUN snow blower is covered by a manufacturer's warranty. Please refer to the warranty card included with your product for specific terms and conditions. For technical assistance, parts, or warranty claims, please contact AMERISUN customer support.
You can find additional information and support resources by visiting the official AMERISUN Store.


