CHARMAID CD10928US-WH-UH
CHARMAID Vanity Desk CD10928US-WH-UH: Assembly and Operating Instructions
Model: CD10928US-WH-UH | Brand: CHARMAID
Introduction
This manual provides detailed instructions for the assembly, operation, and maintenance of your CHARMAID White Vanity Desk with Barn-Style Sliding Mirror and Lights. Please read all instructions carefully before assembly and use to ensure safe and proper functionality of the product.
Important Safety Information
- Always unplug the vanity before assembly or disassembly.
- Keep the vanity away from heat sources and moisture.
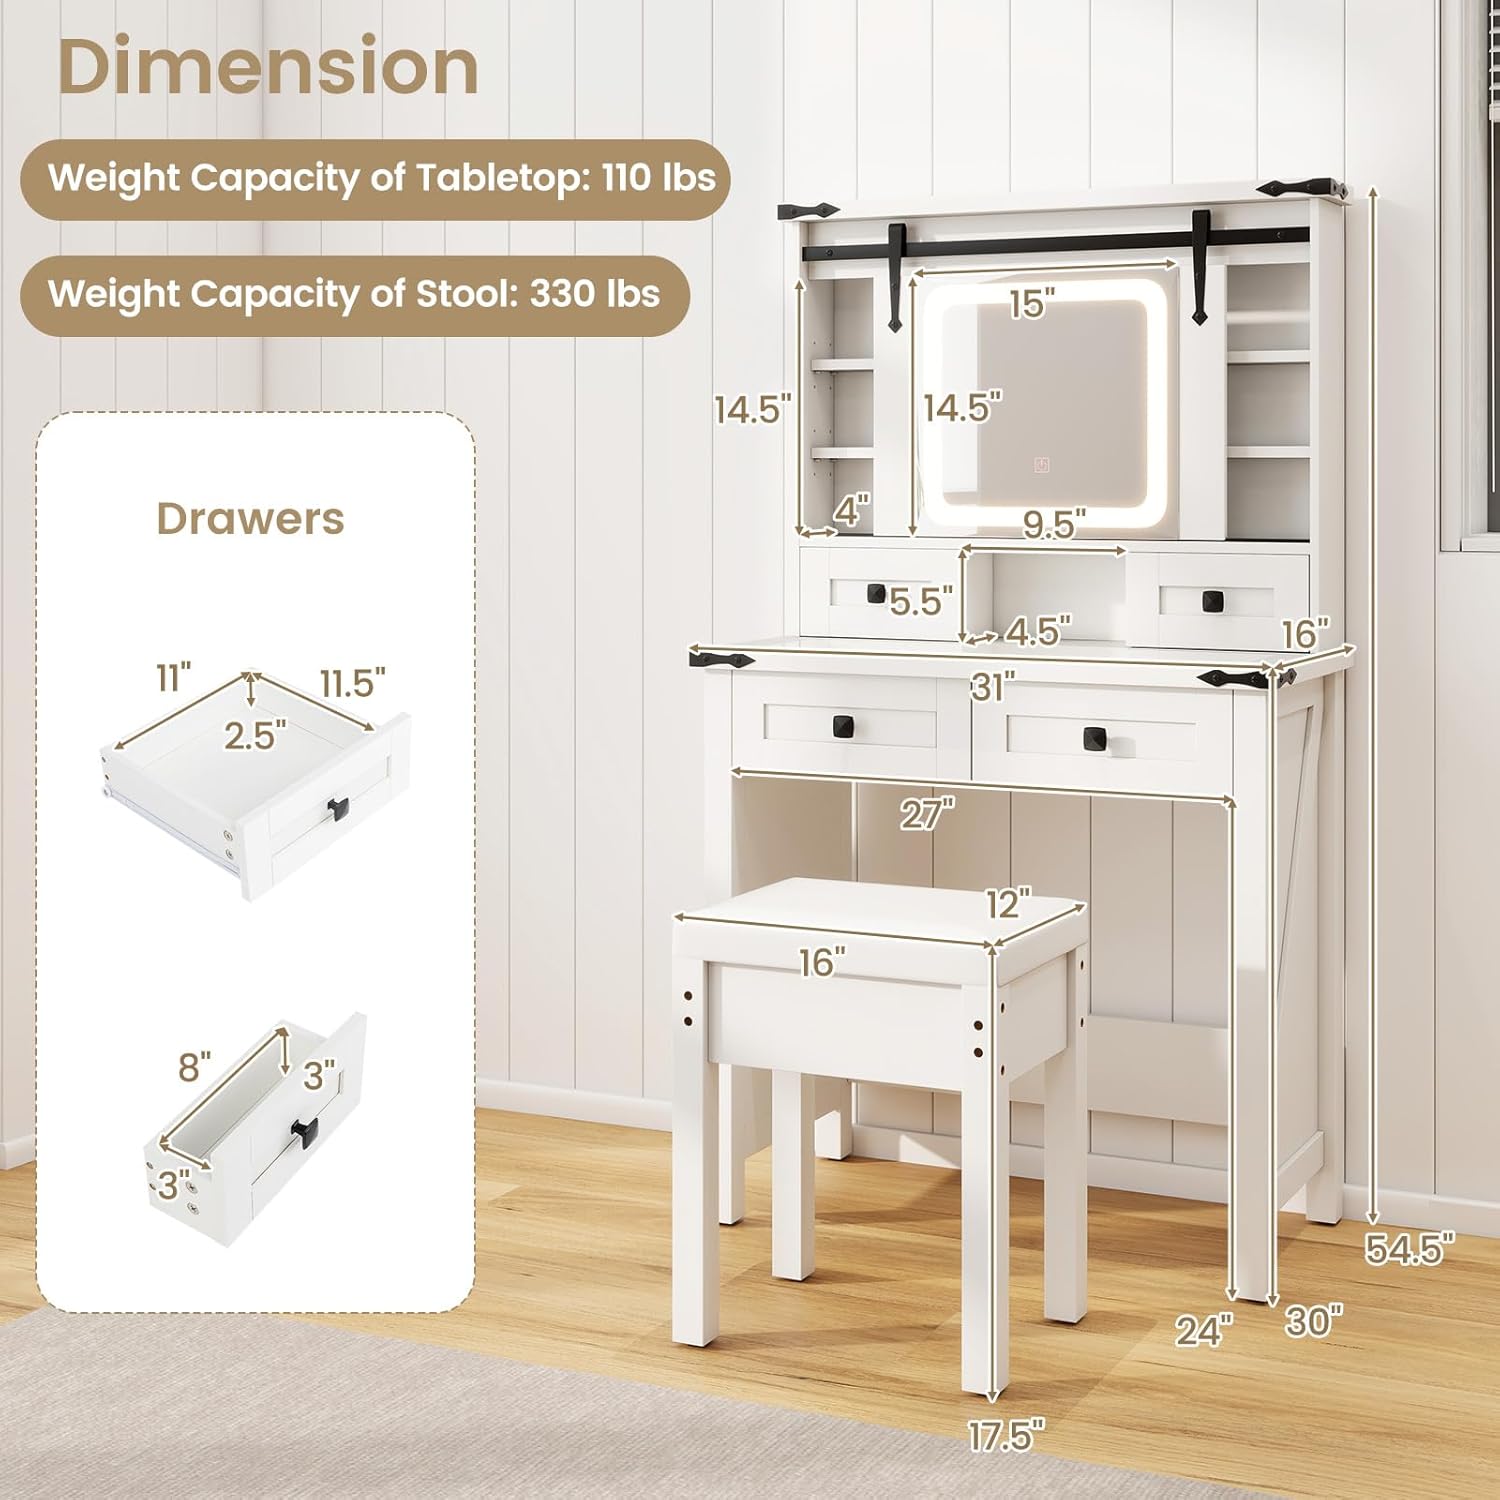
- Do not exceed the weight capacity of the tabletop (110 lbs) and stool (330 lbs).
- Always use the anti-toppling kits when fixing the vanity to the wall to prevent accidental tipping.
- Keep the vanity out of reach of children and pets.
- Ensure all electrical connections are secure before use.

Package Contents
Please verify that all components are present before beginning assembly. If any parts are missing or damaged, please contact customer support.
- Vanity Desk Components (panels, drawers, hardware)
- Sliding Mirror with LED Lights
- Stool Components
- Assembly Hardware (screws, dowels, cam locks, etc.)
- Anti-Toppling Kit
- Instruction Manual (this document)
Setup and Assembly
Assembly typically requires two adults. Ensure you have a clear, spacious area for assembly. A Phillips head screwdriver is generally required (sometimes included).
Step 1: Assemble the Base Frame
Begin by connecting the main side panels to the bottom and back support panels using the provided hardware. Ensure all connections are snug but do not overtighten.

Step 2: Install Drawers and Sliding Mirror Mechanism
Assemble the drawers according to the individual drawer instructions. Install the metal drawer slides onto the vanity frame and the drawers. Carefully attach the sliding mirror mechanism to the top section of the vanity. Ensure the rails are aligned for smooth operation.

Step 3: Attach the Glass Tabletop and Mirror
Carefully place the tempered glass tabletop onto the designated area. Ensure it is seated securely. Mount the LED mirror into its frame, connecting any necessary electrical components as per the specific mirror instructions.

Step 4: Assemble the Stool
Assemble the stool by attaching the legs to the seat base. Ensure all screws are tightened for stability. The padded seat cushion should be attached or placed securely.
Step 5: Secure with Anti-Toppling Kit
For safety, especially in households with children or pets, it is highly recommended to secure the vanity to a wall using the provided anti-toppling kit. Follow the kit's specific instructions for proper installation.
Operating Instructions
Sliding Mirror Operation
The barn-style mirror is designed to slide smoothly along its top rail. Gently push the mirror to the left or right to reveal the hidden storage shelves behind it. Ensure no objects obstruct its path.
LED Light Control
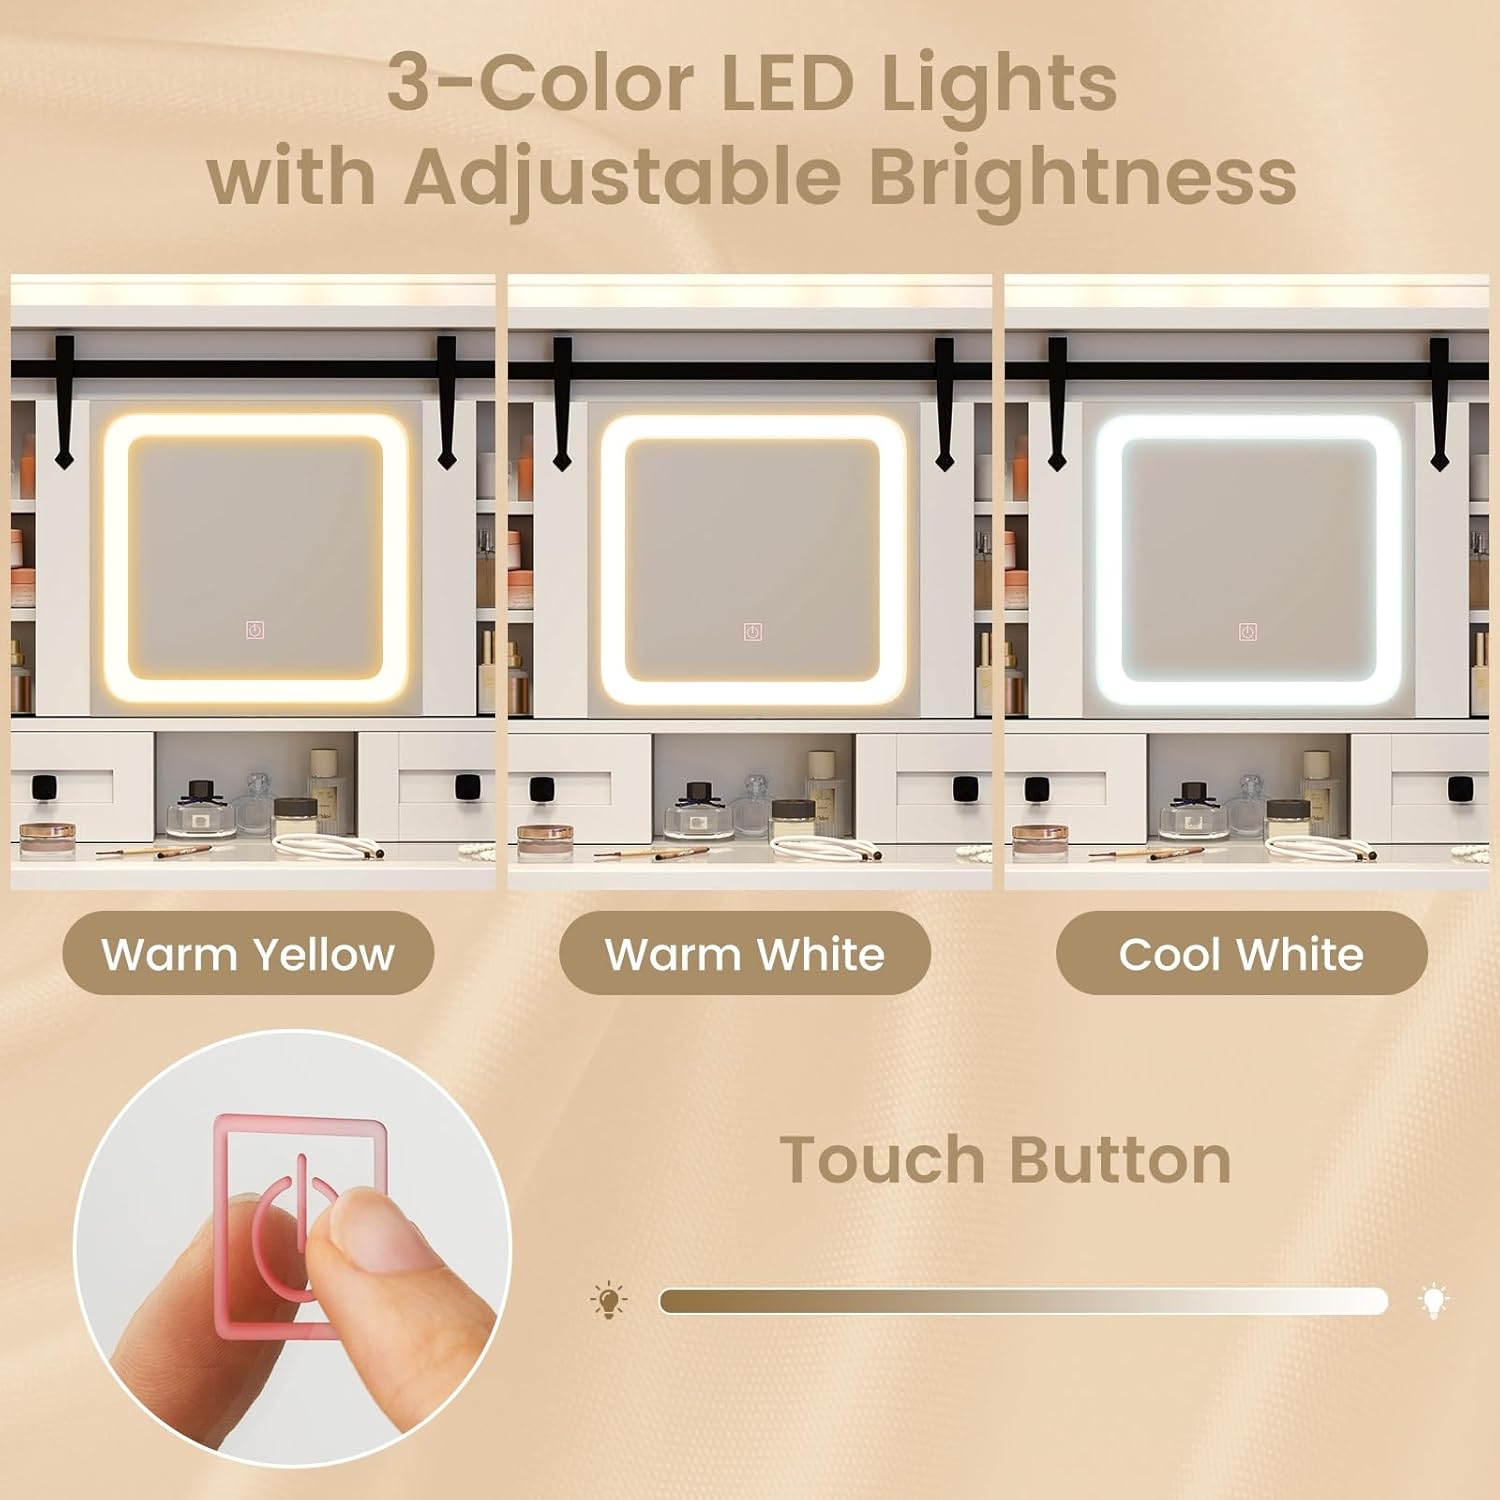
The mirror features integrated LED lights with three adjustable color settings: warm yellow, warm white, and cool white. A touch-sensitive button on the mirror controls these settings and brightness.
- Power On/Off: Tap the touch button once to turn the lights on or off.
- Change Color Mode: With the lights on, tap the touch button repeatedly to cycle through warm yellow, warm white, and cool white modes.
- Adjust Brightness: With the lights on, press and hold the touch button to gradually increase or decrease the brightness. Release the button when the desired brightness is reached.
Drawer and Shelf Usage
The vanity includes various drawers and shelves for storage. The transparent glass tabletop allows for easy viewing of items in the top drawers. The hidden shelves behind the sliding mirror have adjustable height options to accommodate different sized items.
Maintenance and Care
- Cleaning: Wipe surfaces with a soft, damp cloth. Avoid abrasive cleaners or harsh chemicals that may damage the finish or glass. For the glass tabletop, use a glass cleaner.
- Dusting: Regularly dust all surfaces with a dry, soft cloth.
- Mirror Care: Clean the mirror surface with a non-ammonia glass cleaner and a soft, lint-free cloth.
- Hardware: Periodically check all screws and connections to ensure they remain tight. Retighten if necessary.
- Avoid Direct Sunlight: Prolonged exposure to direct sunlight may cause fading or damage to the finish.
- Spills: Clean up spills immediately to prevent staining or damage to the wood and finish.
Troubleshooting
| Problem | Possible Cause | Solution |
|---|---|---|
| LED lights not turning on. | Power cable not connected; power outlet not working; touch button malfunction. | Ensure the power cable is securely plugged into a functional outlet. Try a different outlet. If the issue persists, contact customer support. |
| Mirror not sliding smoothly. | Obstruction in the rail; misaligned rail; debris in the track. | Check for any objects blocking the mirror's path. Clean the sliding track of any dust or debris. Ensure the rail is properly installed and aligned. |
| Drawers are stiff or difficult to open/close. | Drawer slides are misaligned or dirty; drawer is overloaded. | Check if the drawer slides are clean and properly aligned. Ensure the drawer is not overloaded beyond its capacity. |
| Vanity feels unstable. | Loose connections; uneven floor; anti-toppling kit not installed. | Check and tighten all assembly screws. Ensure the vanity is placed on a level surface. Install the anti-toppling kit if not already done. |
Product Specifications
| Model Number | CD10928US-WH-UH |
| Brand | CHARMAID |
| Color | White |
| Material | Engineered Wood, MDF, Mirror, Tempered Glass, PVC Leather, Sponge |
| Product Dimensions (L x W x H) | 31" x 16" x 54.5" |
| Item Weight | 79.5 pounds |
| Tabletop Weight Capacity | 110 lbs |
| Stool Weight Capacity | 330 lbs |
| Assembly Required | Yes |
| LED Light Modes | Warm Yellow, Warm White, Cool White (Adjustable Brightness) |
Warranty and Customer Support
CHARMAID is committed to providing high-quality products. For any questions regarding assembly, missing parts, product defects, or operational issues, please contact our customer support team. Refer to your purchase documentation for specific warranty details.
You can typically find contact information on the seller's page or within your order details. Please have your model number (CD10928US-WH-UH) and purchase date ready when contacting support.