1. Introduction
This manual provides essential information for the safe and effective operation of your Baomain 24-Hour Indoor Mechanical Timer, Model BND-60/U39N. This device is designed to automate the ON/OFF cycles of electrical appliances, offering convenience and energy management for indoor use.
2. Safety Instructions
- Indoor Use Only: This timer is designed exclusively for indoor applications. Do not use it outdoors or in wet conditions.
- Electrical Ratings: Do not exceed the specified electrical ratings: 125V~, 60Hz, 15A/1875W Resistive and Tungsten, 1HP. Overloading the timer can cause damage or fire.
- Grounded Connection: Always plug the timer into a properly grounded 3-prong outlet. Ensure the connected appliance also has a grounded plug if required.
- Unplug Before Cleaning: Disconnect the timer from the power outlet before cleaning. Use a dry cloth for cleaning.
- Avoid Disassembly: Do not attempt to disassemble or repair the timer. Refer all servicing to qualified personnel.
- Keep Away from Children: Store the timer out of reach of children.
3. Product Overview
Familiarize yourself with the components of your mechanical timer:

Image 3.1: Functional Description of the Baomain Mechanical Timer. This image highlights the Clock Dial, Arrow, Push Pins, Grounded Outlet, Output Indicating Light, and the ON/Timer Slide Switch.
- Clock Dial: The rotating dial marked with 24 hours (1-24) for setting the current time and program.
- Push Pins: Small segments around the clock dial. Each pin represents a 15-minute interval. Pushed down pins activate the connected device (ON), while pins in the up position deactivate it (OFF).
- Arrow: Indicates the current time on the clock dial.
- Slide Switch (ON/Timer): Located on the side, this switch allows you to select between continuous ON operation or automatic timer control.
- Grounded Outlet: The 3-prong receptacle where you plug in your appliance.
- Output Indicating Light: A small red light that illuminates when the connected device is receiving power.
4. Setup and Operating Instructions
4.1. Setting the Timer Program (ON/OFF Times)
- Pull Up All Pins: Before programming, use a small tool (like a pen tip) to pull all the black push pins around the clock dial to the 'up' position. This ensures a clean slate for your program.
- Set ON Times: Push down the pins corresponding to the time intervals when you want your connected device to be ON. Each pin represents 15 minutes. For example, to turn a device ON from 6:00 PM to 11:00 PM, push down all pins between the '18' (6 PM) and '23' (11 PM) marks on the dial.
- Set OFF Times: Pins that remain in the 'up' position will keep the connected device OFF during those intervals.

Image 4.1: Setting the ON/OFF program by pushing down the individual 15-minute pins on the timer dial.
4.2. Setting the Current Time
- Rotate Dial: Gently rotate the entire clock dial clockwise until the arrow on the timer aligns with the current time. The dial is marked with 24 hours (0-23 or 1-24, with AM/PM indicators).

Image 4.2: The main view of the timer, illustrating the clock dial and the arrow for setting the current time.
4.3. Activating the Timer
- Plug In: Plug the Baomain Mechanical Timer into a grounded 3-prong wall outlet.
- Connect Device: Plug the appliance you wish to control into the grounded outlet on the timer. Ensure the appliance is switched to its 'ON' position if it has one.
- Select Mode: Use the slide switch on the side of the timer to select your desired operating mode:
- 'ON' Position (Light Bulb Icon): The connected device will remain continuously ON, bypassing the timer program.
- 'TIMER' Position (Clock Icon): The connected device will operate according to the ON/OFF program you set with the push pins.
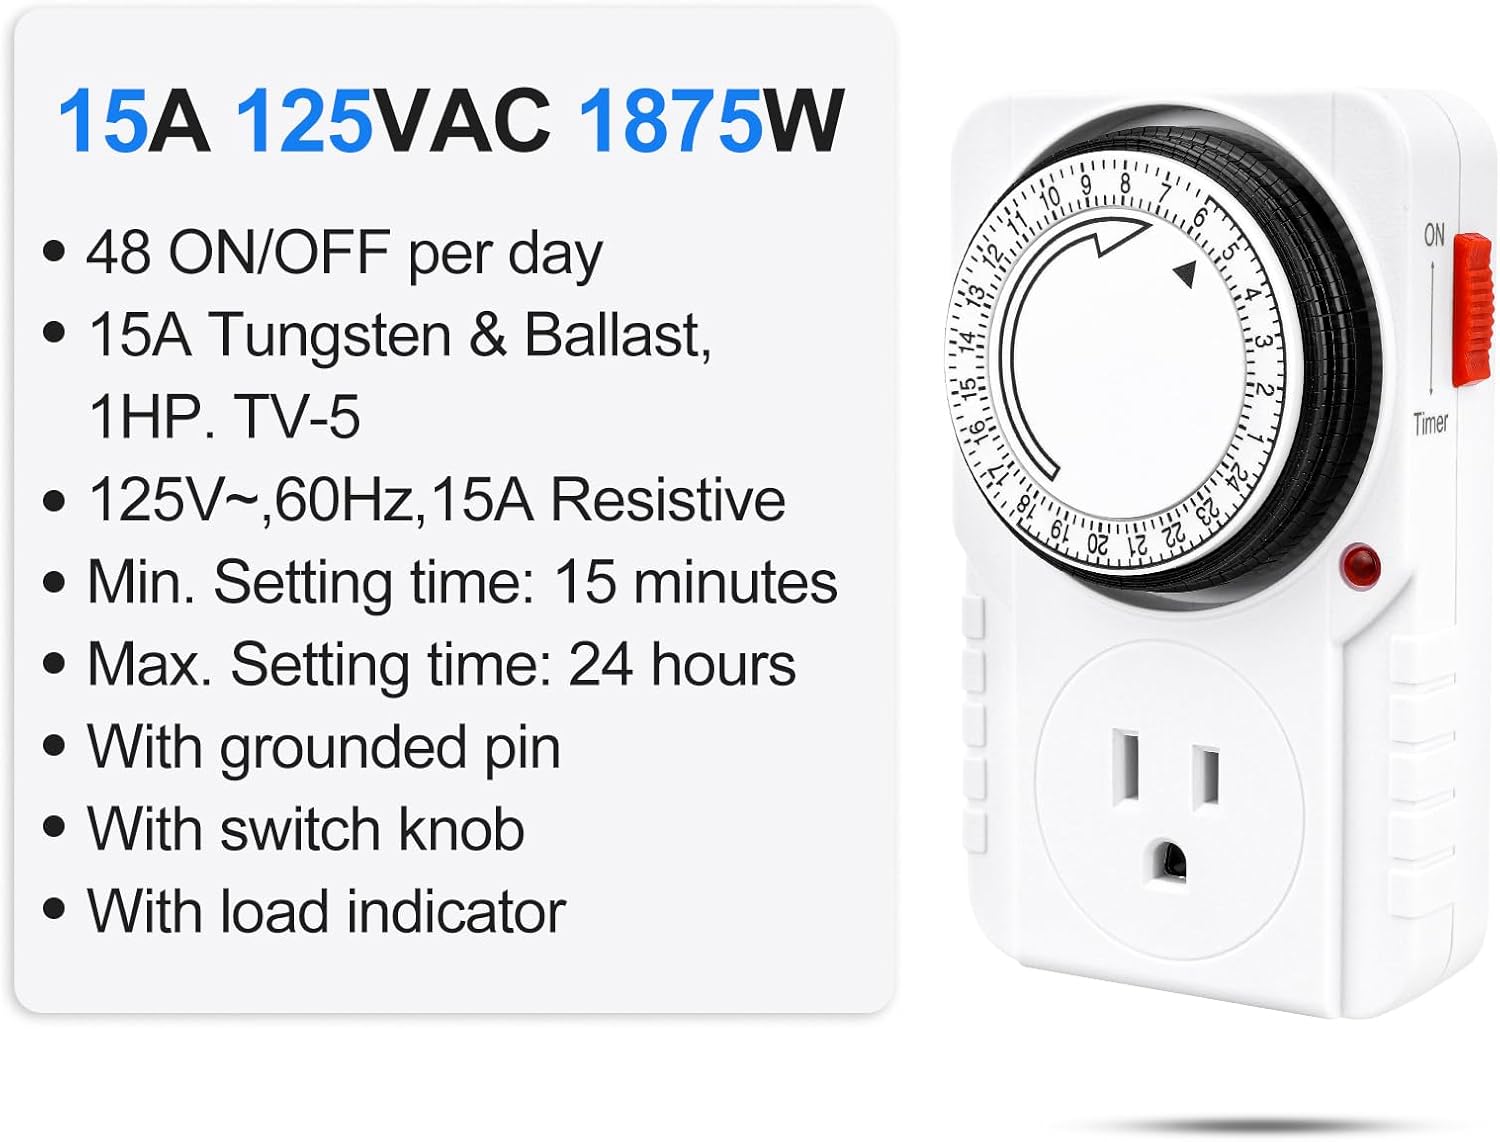
Image 4.3: The side switch allows selection between continuous ON mode (light bulb icon) and automatic TIMER mode (clock icon).
4.4. Official Product Video: Setup and Operation
Video 4.1: This official Baomain video demonstrates the setup and operation of the 24-Hour Indoor Mechanical Timer, including how to set the ON/OFF pins and align the current time.
5. Maintenance
- Cleaning: Unplug the timer from the wall outlet before cleaning. Wipe the exterior with a dry, soft cloth. Do not use liquid cleaners or immerse the timer in water.
- Storage: When not in use, store the timer in a cool, dry place away from direct sunlight and moisture.
6. Troubleshooting
| Problem | Possible Cause | Solution |
|---|---|---|
| Device does not turn ON/OFF at programmed times. | 1. Slide switch is in 'ON' position. 2. Pins are not correctly set. 3. Current time is not aligned with the arrow. | 1. Move slide switch to 'TIMER' position. 2. Ensure pins are pushed down for ON times and up for OFF times. 3. Rotate the dial to align the arrow with the current time. |
| Device is continuously ON or OFF. | Slide switch is in 'ON' position (continuous ON) or all pins are up (continuous OFF). | Move slide switch to 'TIMER' position for programmed operation. Adjust pins as needed. |
| Timer is not receiving power. | Wall outlet is not functional. | Test the wall outlet with another appliance to ensure it is working. Check circuit breaker. |
7. Specifications
- Model Number: BND-60/U39N
- Voltage: 125VAC
- Frequency: 60Hz
- Current: 15A
- Power Rating: 1875W Resistive and Tungsten
- Motor Rating: 1HP
- Minimum Setting Interval: 15 minutes
- Daily Programs: Up to 48 ON/OFF programs
- Plug Type: 3-Prong Grounded
- Dimensions: 4.7"H x 2.7"W x 3"D (120.2mm H x 72.2mm W x 70mm D)
- Weight: 5.6 ounces (0.16 Kilograms)
- Material: Plastic
- Color: White
- Certifications: ETL Listed

Image 7.1: Rear view of the timer displaying electrical specifications and ETL certification details.
8. Warranty and Support
For warranty information or technical support, please refer to the product packaging or contact Baomain customer service directly. Keep your purchase receipt for any warranty claims.
You can visit the official Baomain store for more information: Baomain Store


