1. Introduction
This manual provides detailed instructions for the safe and efficient operation, maintenance, and care of your Happybuy Insulated Beverage Dispenser, Model KF-40. This 10-gallon capacity dispenser is designed to keep both hot and cold beverages at their optimal temperature for extended periods, making it suitable for various commercial and personal uses.

Image 1: Happybuy 10 Gallon Insulated Beverage Dispenser. This image shows the overall design of the black insulated beverage dispenser, highlighting its large capacity suitable for serving many cups of drinks.
2. Safety Instructions
- Always place the dispenser on a stable, level surface to prevent tipping.
- Exercise caution when handling hot liquids to avoid burns.
- Do not immerse the entire unit in water. Clean according to the "Maintenance and Cleaning" section.
- Keep out of reach of children when filled with hot beverages.
- Do not use abrasive cleaners or scouring pads, as these can damage the surface.
- Ensure the lid is securely latched to maintain temperature and prevent spills.
3. Product Components
The Happybuy Insulated Beverage Dispenser KF-40 consists of several key components designed for optimal performance and durability:
- Dispenser Body: Constructed from food-grade LL9450UP material.
- Insulation Layer: A 30 mm (1.18 inch) thick PU foam layer for superior temperature retention.
- Lid: Features a multi-seal design with an air outlet sealing ring to prevent leaks and maintain temperature.
- Reinforced Nylon Latches: Two latches secure the lid firmly to the body.
- Two-Stage Spigot: A drip-proof spigot made of food-grade PP, designed for precise flow control and features a press-to-stay-open function. Includes an extended silicone spigot sealing ring.
- Ergonomic Handles: Integrated handles on the top for easy transport.

Image 2: Insulation Layer Diagram. This image illustrates the internal structure of the dispenser, showing the food-grade LL9450UP interior and exterior, and the 30mm thick PU insulation layer.

Image 3: Multi-Seal Design Components. This image details the reinforced nylon latch, extended silicone spigot sealing ring, and air outlet sealing ring, all contributing to the dispenser's leak-proof design.
4. Setup
- Unpack: Carefully remove the beverage dispenser from its packaging. Inspect for any damage during transit.
- Initial Cleaning: Before first use, wash the interior and exterior of the dispenser, including the lid and spigot, with warm water and mild detergent. Rinse thoroughly and dry completely.
- Placement: Place the dispenser on a stable, flat, and heat-resistant surface. Ensure there is enough space around the spigot for cups or mugs.
- Spigot Check: Ensure the two-stage spigot is securely attached and in the closed position before filling.
5. Operating Instructions
- Prepare Beverage: Prepare your desired hot or cold beverage.
- Fill Dispenser: Open the lid and carefully pour the beverage into the dispenser. Do not overfill; leave some space at the top.
- Secure Lid: Place the lid firmly on the dispenser and engage both reinforced nylon latches to ensure a tight seal. This is crucial for maintaining temperature.
- Dispensing:
- To dispense, place a cup under the spigot.
- Push the spigot handle down for a continuous flow (press-to-stay-open function).
- Release the handle to stop the flow.
- Temperature Retention: The 1.18-inch PU insulation layer will keep beverages hot or cold for over 10 hours without electricity, provided the lid is securely latched.

Image 4: Dispensing Beverage with Two-Stage Spigot. This image shows the dispenser in use, with a cup being filled from the two-stage spigot, demonstrating its ease of operation.
6. Maintenance and Cleaning
Regular cleaning and maintenance will ensure the longevity and hygienic operation of your beverage dispenser.
- After Each Use:
- Empty any remaining beverage.
- Wash the interior with warm, soapy water using a soft brush or sponge.
- Clean the spigot by running warm, soapy water through it. You may need to operate the spigot several times to ensure thorough cleaning.
- Rinse all parts thoroughly with clean water.
- Dry the interior completely before storing to prevent odors or mold.
- Exterior Cleaning: Wipe the exterior with a damp cloth and mild detergent. Do not use abrasive cleaners.
- Spigot Disassembly (if necessary): For deep cleaning, the spigot can be carefully unscrewed from the dispenser. Refer to the product diagram for proper reassembly, ensuring all seals are correctly seated to prevent leaks.
- Storage: Store the dispenser with the lid slightly ajar to allow air circulation and prevent odors.
7. Troubleshooting
| Problem | Possible Cause | Solution |
|---|---|---|
| Beverage not staying hot/cold | Lid not sealed properly; latches not engaged. | Ensure the lid is firmly closed and both nylon latches are securely fastened. Check the lid's sealing ring for damage. |
| Spigot is leaking | Spigot not tightened; sealing ring misplaced or damaged. | Tighten the spigot. If disassembled for cleaning, ensure the silicone sealing ring is correctly positioned during reassembly. Replace if damaged. |
| Slow beverage flow from spigot | Spigot partially clogged; air vent blocked. | Clean the spigot thoroughly. Ensure the air outlet sealing ring on the lid is not blocked or obstructed. |
8. Specifications
- Model Number: KF-40
- Capacity: 37.6 L / 10 Gallons
- Net Weight: 10.8 kg / 23.8 lbs
- Product Dimensions (L x W x H): 515 x 420 x 560 mm / 20.3 x 16.5 x 22 inches
- Insulation Layer Material: 30 mm / 1.18 inch PU
- Interior & Exterior Material: Food-grade LL9450UP
- Color: Black
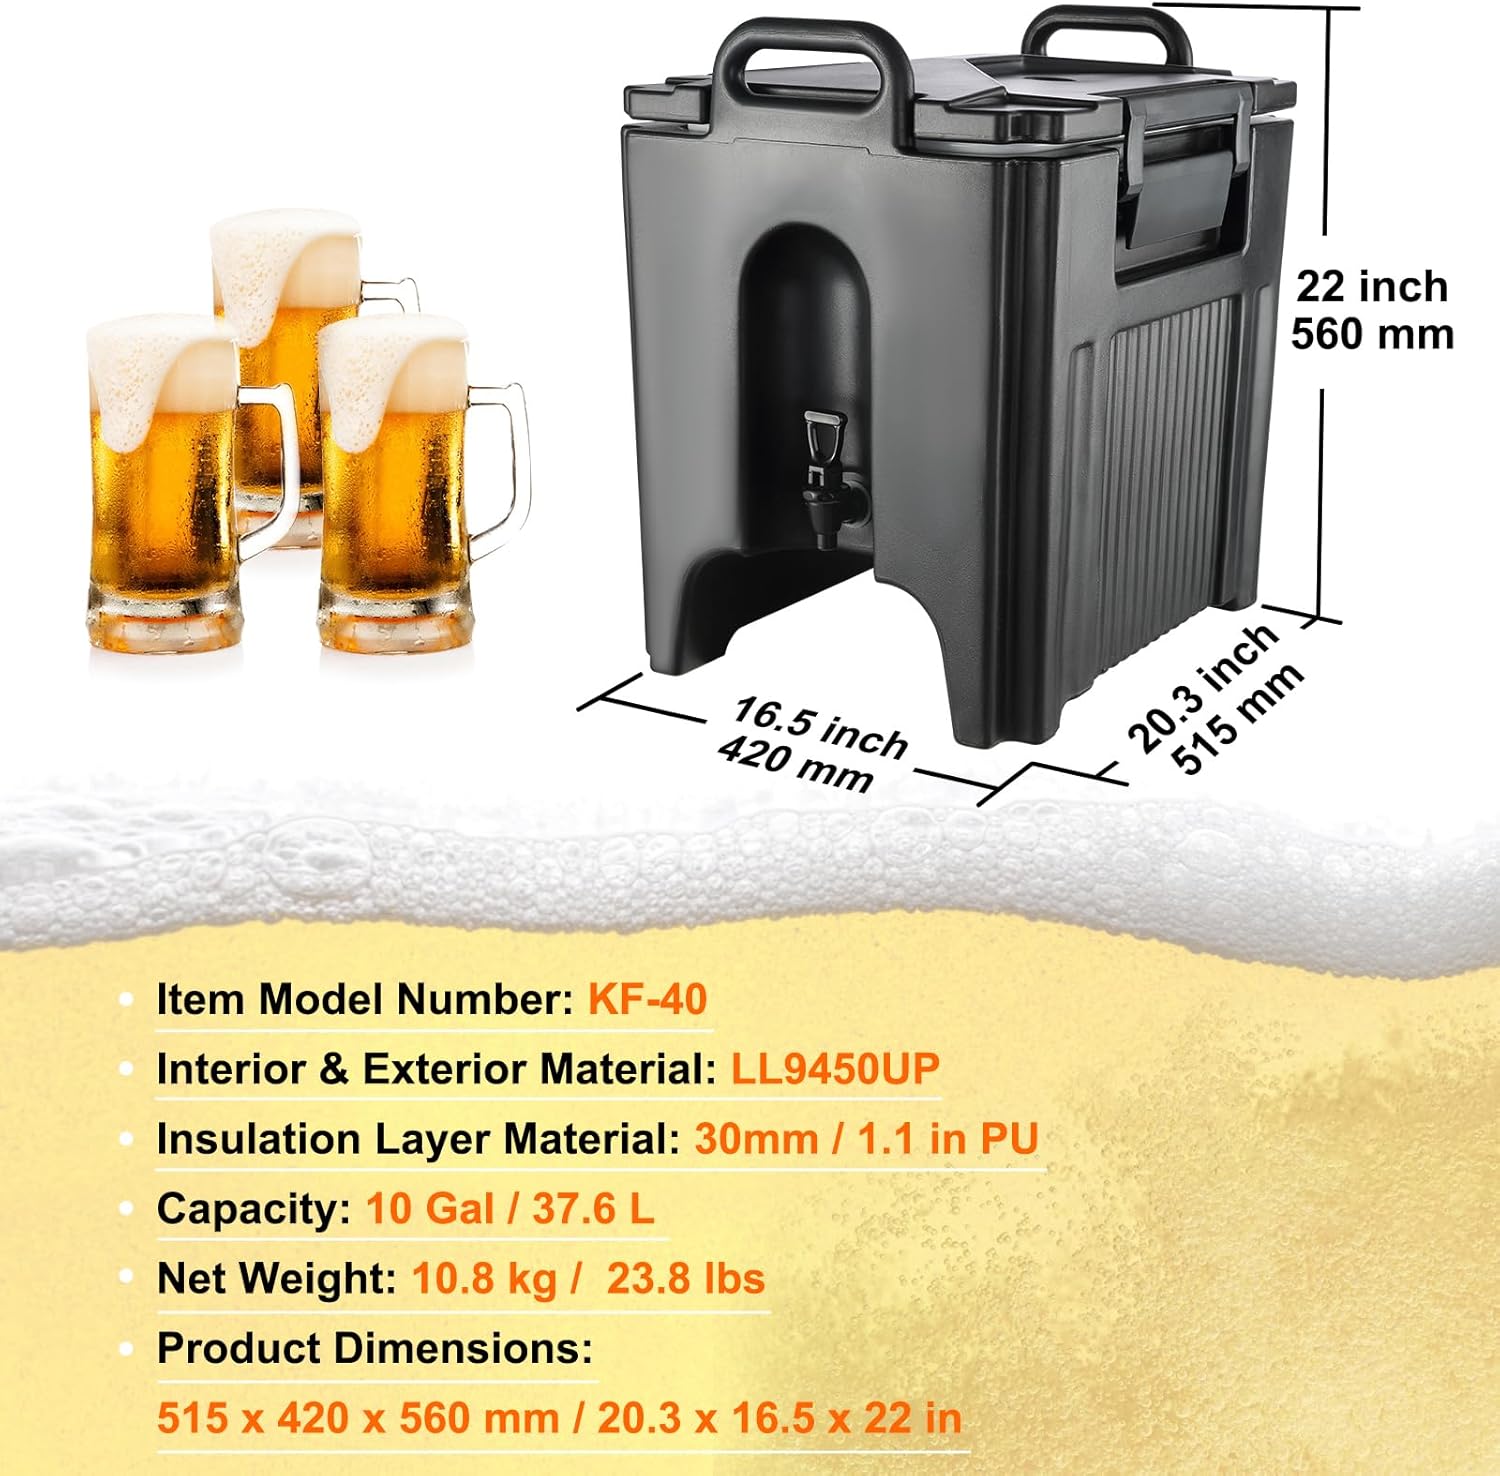
Image 5: Happybuy Beverage Dispenser Dimensions. This image provides a visual representation of the dispenser's key dimensions: 20.3 inches (515 mm) length, 16.5 inches (420 mm) width, and 22 inches (560 mm) height.
9. Warranty and Support
For warranty information or technical support, please refer to the Happybuy official website or contact their customer service department. Keep your purchase receipt as proof of purchase for any warranty claims.


