1. Introduction
The VGVGV M503 High Accuracy Linear Scale Encoder is a precise measurement system designed for various industrial applications, including woodworking, lathe machines, and milling machines. It provides accurate digital readouts (DRO) for linear displacement using a magnetic scale and sensor. This manual provides essential information for the proper installation, operation, and maintenance of your M503 system.
2. Product Overview
The M503 system consists of a digital display unit, a magnetic sensor (read head), and a magnetic tape. These components work together to provide highly accurate linear measurements.
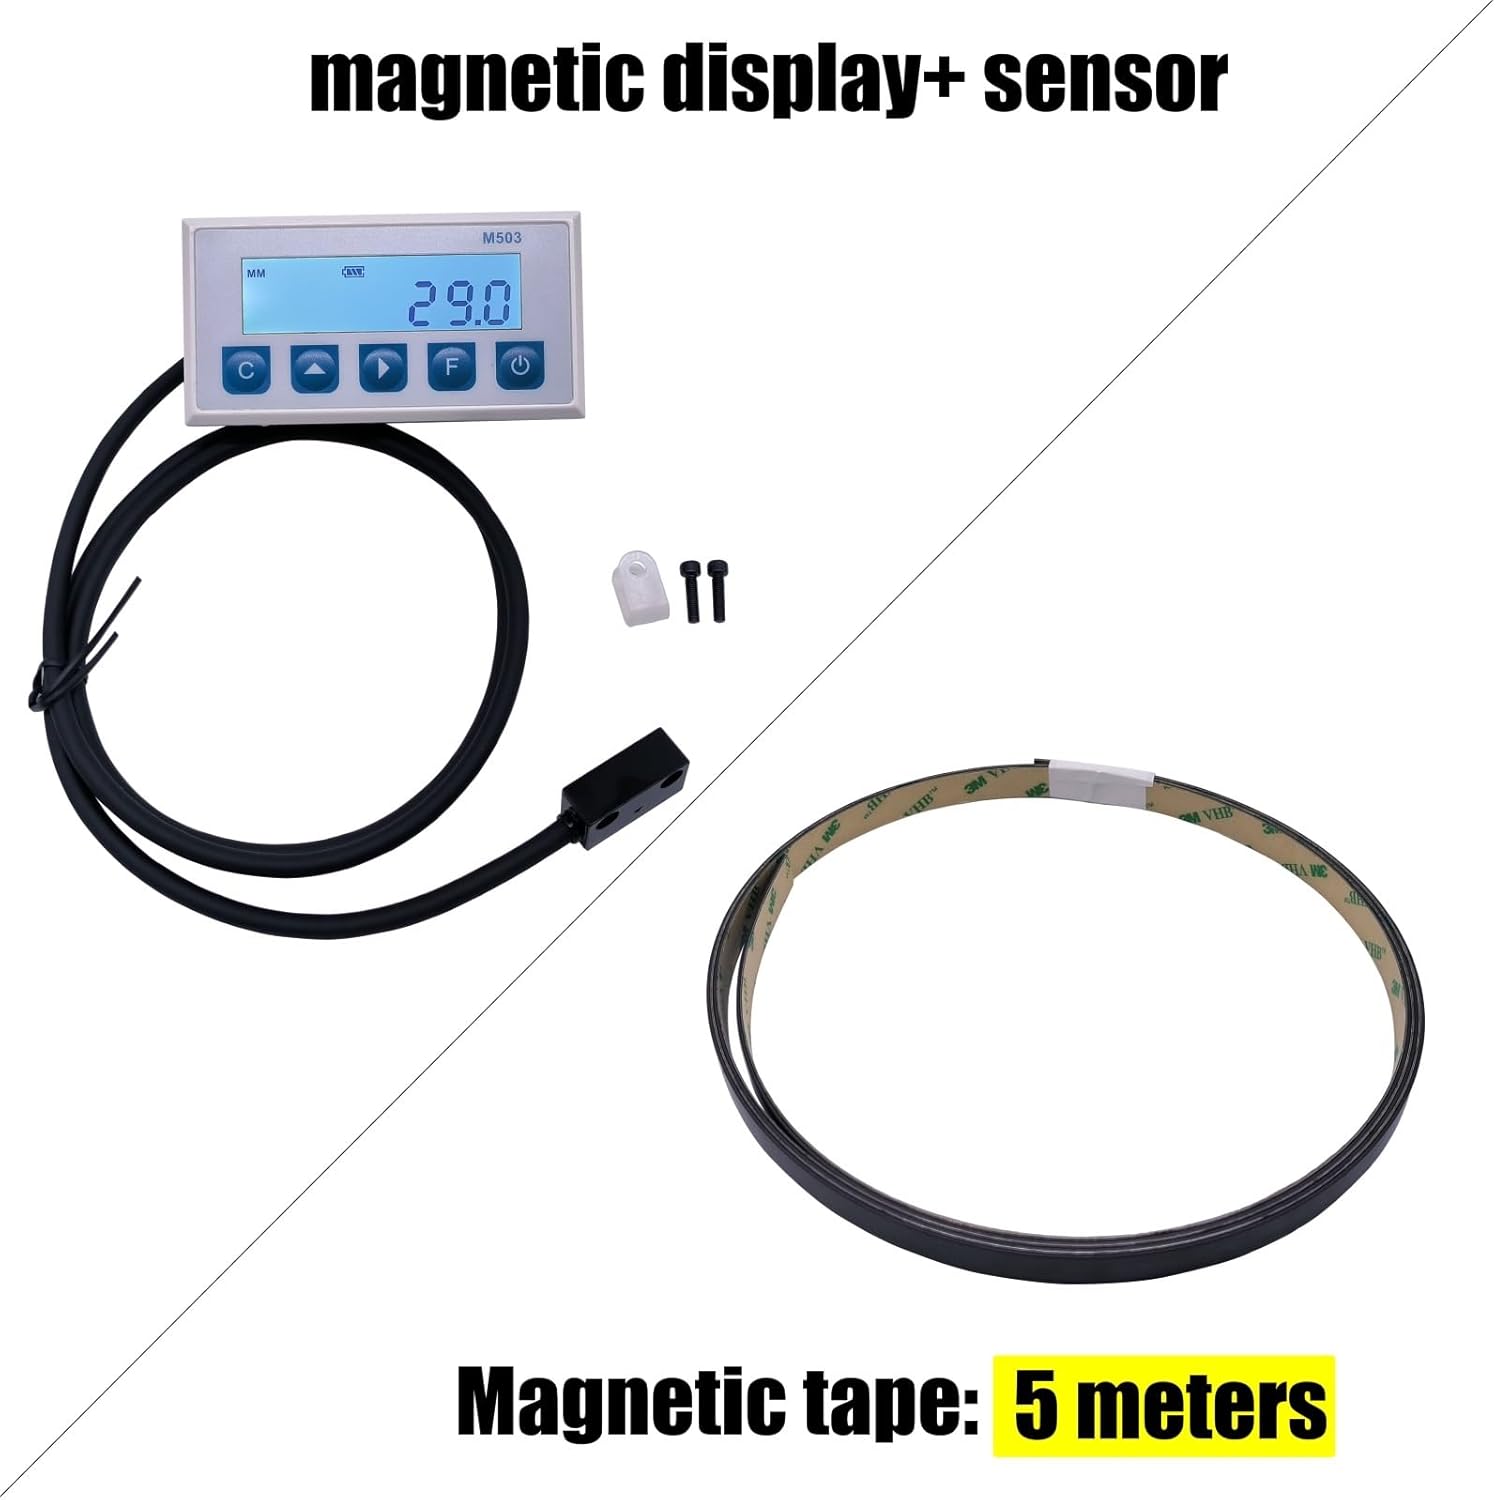
Figure 2.1: Overview of the M503 system components, including the digital display, magnetic sensor, and magnetic tape.

Figure 2.2: A closer view of the M503 digital display unit and the magnetic sensor.
2.1 Power Supply
The M503 digital display unit is powered by two AA batteries. Batteries are typically not included in the package.

Figure 2.3: The battery compartment for two AA batteries, located on the rear of the display unit.
3. Specifications
The following are the technical specifications for the VGVGV M503 Linear Scale Encoder:
- Model: M503 (Item model number: 1005004974616544)
- System Accuracy: ± (0.03 + 0.01*L) mm (where L is measuring length in meters)
- Repeatability: Max. ± 0.01mm
- Resolution: 0.01mm / 0.1mm / 1mm (selectable)
- Display Mode: MM / INCH (selectable)
- Display Range: -1999999 to 9999999
- Max. Speed: 5m/s
- Read Gap (Sensor to Tape): Max. 2.5mm, recommended 1.5mm
- Matching Magnetic Stripe: FT50
- Sensor Cable Length: 1 meter (customizable options available)
- Power Supply: 2 x AA batteries
- Consumption Current: Max. 500µA (backlight not opened)
- Operating Temperature: 0°C to 60°C
- Storage Temperature: -10°C to 70°C
- Digital Display Waterproof Grade: IP40
- Read Head (Sensor) Waterproof Grade: IP60
- Unit Weight: Max. 150g (display unit and sensor)
- Outline Size (Display Unit): 100mm x 52mm x 30mm (Length x Width x Depth)
- Opening Size (for panel mounting): 92mm x 42mm

Figure 3.1: Physical dimensions of the M503 digital display unit.
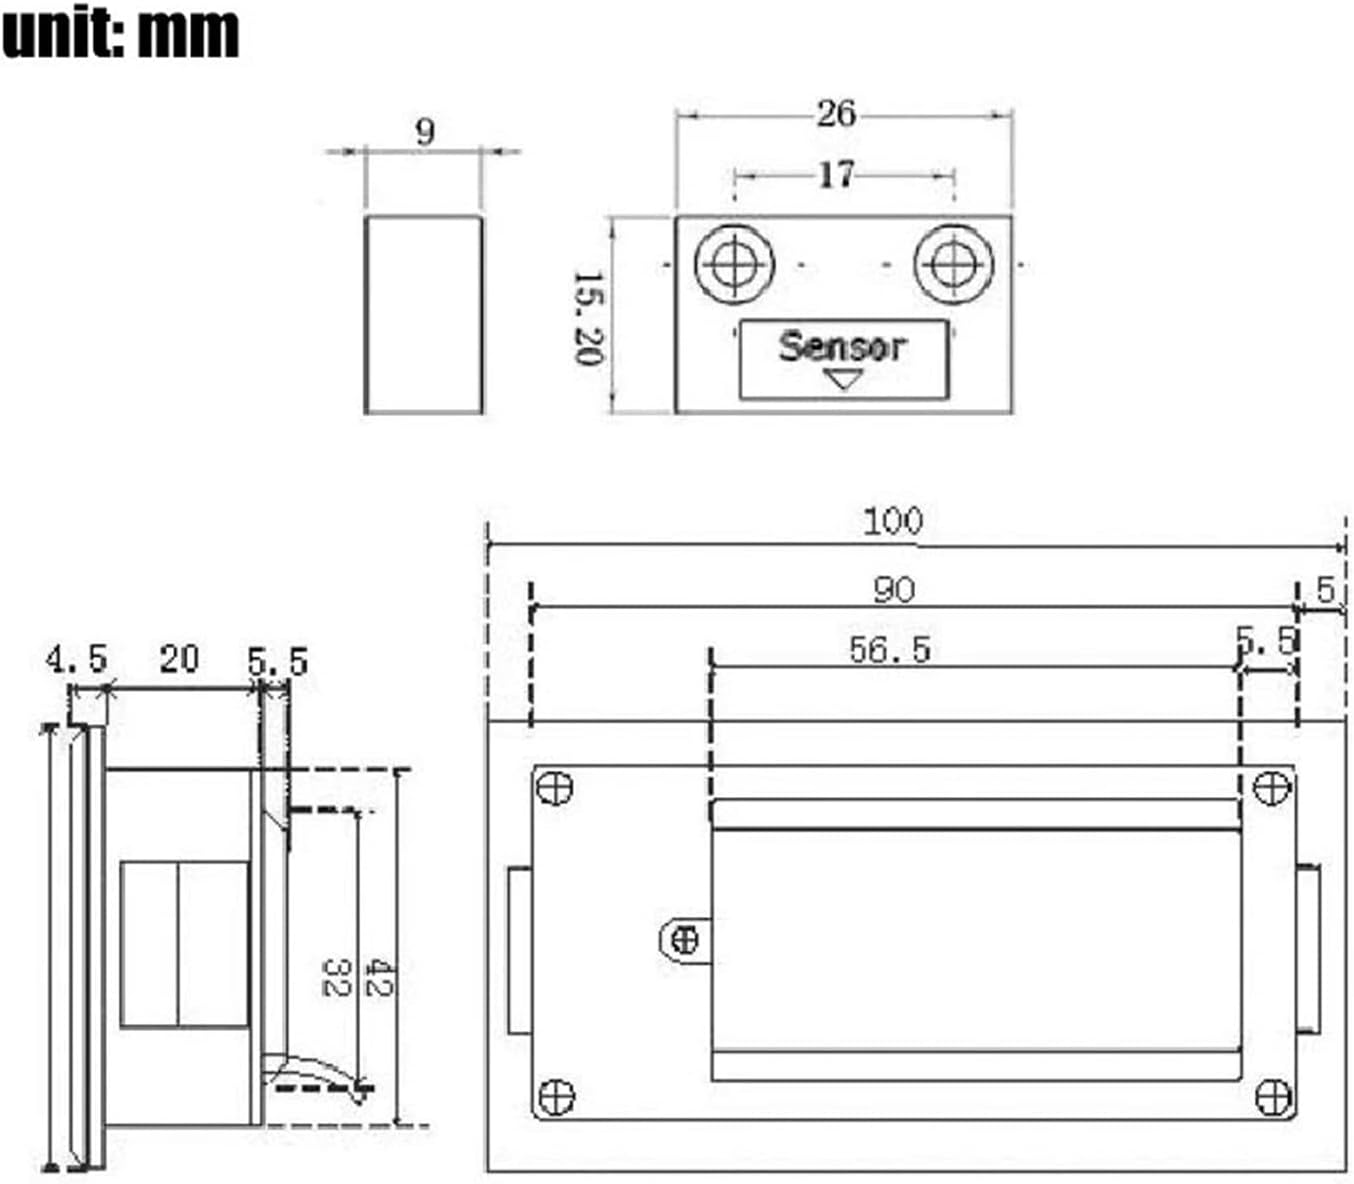
Figure 3.2: Detailed technical drawing with dimensions for both the display unit and the sensor.
4. Setup
Follow these steps to set up your M503 Linear Scale Encoder system:
- Install Batteries: Open the battery compartment on the back of the display unit (refer to Figure 2.3). Insert two AA batteries, ensuring correct polarity. Close the compartment securely.
- Mount the Magnetic Tape: Clean the surface where the magnetic tape will be installed. Ensure it is free of dust, oil, and debris. Carefully apply the magnetic tape along the desired measurement axis. Ensure it is straight and securely adhered.
- Mount the Sensor (Read Head): Mount the magnetic sensor parallel to the magnetic tape. The sensor should be positioned with a consistent gap of approximately 1.5mm from the magnetic tape for optimal performance. Use the provided mounting hardware or suitable fasteners to secure the sensor firmly.
- Mount the Display Unit: The display unit can be panel-mounted (using the 92mm x 42mm opening size) or surface-mounted. Secure the display unit in a location that is easily visible and accessible during operation.
- Connect the Sensor: Plug the sensor cable into the designated port on the display unit. Ensure the connection is firm.
5. Operating Instructions
Familiarize yourself with the display unit's buttons for effective operation:
- Power On/Off: Press the Power button () to turn the unit on or off.
- Unit Selection (MM/INCH): Press the MM/INCH button (often labeled 'C' or 'MM') to toggle between millimeters and inches.
- Zero Setting: Press the Zero button (often labeled 'F' or a triangle pointing down) to set the current position as zero.
- Incremental/Absolute Measurement: Some models may have a button to switch between incremental and absolute measurement modes. Refer to the display for indicators.
- Measurement: Once powered on and zeroed, move the sensor along the magnetic tape. The display will show the real-time linear displacement.
6. Maintenance
Proper maintenance ensures the longevity and accuracy of your M503 system:
- Battery Replacement: Replace AA batteries when the low battery indicator appears on the display. Always use fresh, high-quality batteries.
- Cleaning: Keep the display unit, sensor, and magnetic tape clean and free from dust, chips, and liquids. Use a soft, dry cloth for cleaning. Avoid abrasive cleaners or solvents.
- Sensor Gap Inspection: Periodically check the gap between the magnetic sensor and the tape. Ensure it remains within the recommended 1.5mm to 2.5mm range. Adjust mounting if necessary.
- Environmental Protection: While the sensor has an IP60 rating and the display IP40, avoid exposing the unit to excessive moisture, extreme temperatures, or corrosive environments.
7. Troubleshooting
If you encounter issues with your M503 system, refer to the following troubleshooting guide:
| Problem | Possible Cause | Solution |
|---|---|---|
| Display does not turn on | Dead or incorrectly installed batteries | Replace batteries, ensuring correct polarity. |
| Inaccurate readings | Incorrect sensor gap Dirty magnetic tape or sensor Magnetic interference | Adjust sensor gap to 1.5mm. Clean tape and sensor. Ensure no strong magnetic fields are nearby. |
| Intermittent readings | Loose sensor connection Damaged sensor cable Excessive vibration | Check sensor cable connection. Inspect cable for damage. Reduce vibration if possible. |
| Display shows 'Error' | Sensor not detecting tape Internal fault | Verify sensor is correctly positioned over the magnetic tape. If problem persists, contact support. |
8. Warranty and Support
For warranty information, please refer to the documentation provided at the time of purchase or contact your vendor directly. For technical support, please reach out to the manufacturer or authorized service center.