1. Introduction and Overview
This manual provides instructions for the installation, operation, and maintenance of your MekedeTech Android Car Stereo Head Unit, model 8-Core 4+64G. This unit is specifically designed for VW Golf 7 MK7 vehicles manufactured between 2013 and 2018, offering a seamless upgrade to your vehicle's infotainment system.
Key features include:
- Android 12 Operating System
- 8-Core A53 1.8GHz CPU with 4GB RAM and 64GB ROM
- 10-inch IPS Touch Screen with 1280x720 resolution
- Built-in 4G LTE and Wi-Fi module for internet access
- Wireless CarPlay and Android Auto support
- Integrated GPS navigation and AM/FM radio
- Support for original steering wheel controls
- 4x50W Power Output with built-in DSP sound system

Figure 1.1: Main view of the MekedeTech Android Car Stereo Head Unit.
2. Setup and Installation
The MekedeTech Android Car Stereo Head Unit is designed for a plug-and-play installation, utilizing your vehicle's existing wiring harness. No splicing of wires is typically required.
2.1 Package Contents
Before beginning installation, ensure all components are present:
- MekedeTech Android Car Stereo Head Unit
- Vehicle-specific frame kit
- Plug-and-play wiring harness
- GPS antenna
- 4G LTE antenna (if applicable)
- USB cables
- User Manual (this document)
2.2 Installation Steps
- Preparation: Turn off your vehicle's ignition and disconnect the negative terminal of the car battery to prevent electrical shorts.
- Remove Original Radio: Carefully remove the trim panels and screws securing the factory radio. Refer to your vehicle's service manual for specific instructions on removing the original head unit.
- Connect Wiring Harness: Connect the provided plug-and-play wiring harness to the vehicle's factory connectors and then to the new Android head unit. Ensure all connections are secure.
- Connect Antennas: Attach the GPS antenna and 4G LTE antenna (if using a SIM card) to their respective ports on the head unit. Position the antennas in a location with clear signal reception, away from metal obstructions.
- Install Head Unit: Mount the new head unit into the dashboard opening using the provided frame kit and screws. Ensure it is securely fastened.
- Reconnect Battery: Reconnect the negative terminal of the car battery.
- Initial Power On: Turn on the vehicle's ignition and power on the head unit. Follow any on-screen prompts for initial setup.

Figure 2.1: Visual comparison of the dashboard before and after installing the MekedeTech Android Car Stereo.

Figure 2.2: Illustration of cooling fan support and setup steps for the head unit.
3. Operating Instructions
3.1 Basic Operation
- Power On/Off: Press and hold the power button (usually located on the front panel) to turn the unit on or off. A short press typically mutes or unmutes the audio.
- Touch Screen: Navigate the Android interface by tapping, swiping, and pinching on the 10-inch IPS touch screen, similar to a smartphone or tablet.
- Volume Control: Adjust volume using the physical knobs/buttons on the unit or via the steering wheel controls.
3.2 Wireless CarPlay and Android Auto
The unit supports wireless CarPlay for iOS devices and wireless Android Auto for Android devices, allowing seamless integration of your smartphone's features.
- Enable Bluetooth: Ensure Bluetooth is enabled on both your smartphone and the head unit.
- Pair Devices: On the head unit, go to the Bluetooth settings and pair with your smartphone.
- Launch CarPlay/Android Auto: Once paired, select the CarPlay or Android Auto icon on the head unit's main screen. Follow any on-screen prompts to complete the connection.
- USB Connection (Optional): If wireless connection is unstable or unavailable, you can connect your phone via a USB cable to use CarPlay/Android Auto.

Figure 3.1: Steps for connecting to Wireless CarPlay (iOS) and Wireless Android Auto (Android).
3.3 4G LTE and Wi-Fi Connectivity
The head unit features built-in 4G LTE and Wi-Fi for internet access.
- Wi-Fi: Go to Settings > Network & Internet > Wi-Fi to connect to available Wi-Fi networks (e.g., a mobile hotspot).
- 4G LTE: Insert a compatible 4G SIM card into the designated slot on the unit. The unit will automatically connect to the cellular network for data access. This eliminates the need for a constant Wi-Fi hotspot from your phone.
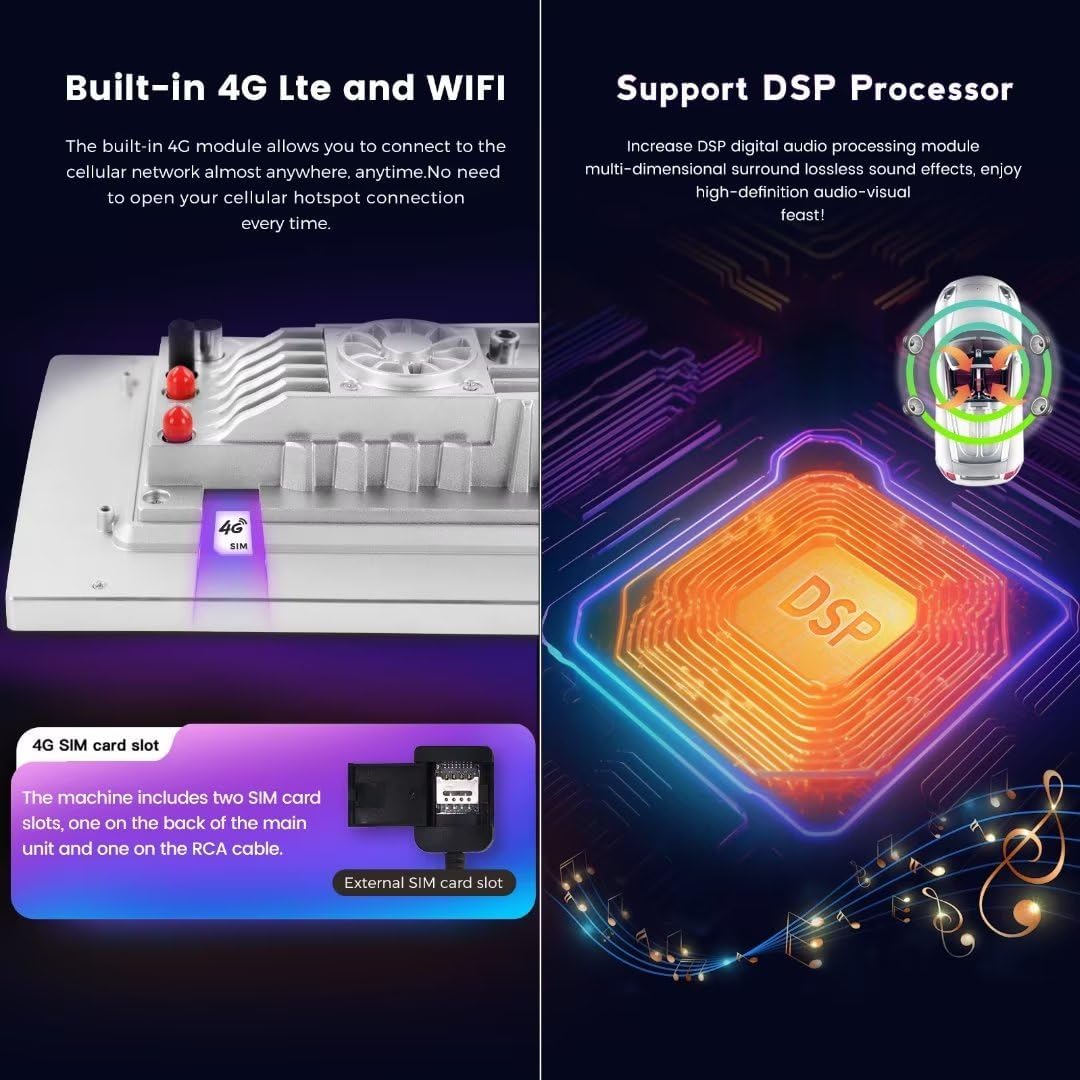
Figure 3.2: Location of the 4G SIM card slot and illustration of the DSP processor.
3.4 GPS Navigation
The unit comes with built-in GPS and supports various navigation applications. Ensure the GPS antenna is properly installed for optimal signal reception.
3.5 Audio and Video Playback
The unit supports a wide range of audio and video formats. The integrated DSP (Digital Signal Processor) enhances audio quality, providing a multi-dimensional surround sound experience.
- Audio Formats: APE, FLAC, WAV, MP3, WMA, etc.
- Video Formats: MKV, RMVB, AVI, MP4, MDV, etc.
- Picture Formats: PNG, JPEG, JPG, GIF, WBMP, BNP, etc.
3.6 Steering Wheel Controls
The unit retains compatibility with your vehicle's factory steering wheel controls, allowing you to manage audio, calls, and other functions without taking your hands off the wheel.
4. Maintenance
Proper maintenance ensures the longevity and optimal performance of your car stereo head unit.
- Screen Cleaning: Use a soft, lint-free cloth, slightly dampened with water or a screen-safe cleaner, to gently wipe the touch screen. Avoid abrasive materials or harsh chemicals.
- Dust Removal: Periodically use a soft brush or compressed air to remove dust from vents and button crevices.
- Software Updates: Check for available software updates through the unit's settings menu to ensure you have the latest features and bug fixes.
- Cooling System: The unit is equipped with a cooling fan to manage internal temperatures. Ensure the fan vents are not obstructed to allow proper airflow.
5. Troubleshooting
If you encounter issues with your head unit, refer to the following common troubleshooting steps:
| Problem | Possible Cause | Solution |
|---|---|---|
| Unit does not power on | Loose power connection, blown fuse, vehicle battery issue | Check wiring harness connections. Inspect vehicle fuses. Ensure car battery is charged. |
| No sound | Volume muted, speaker wires disconnected, incorrect audio settings | Check volume level and mute status. Verify speaker wire connections. Adjust audio output settings. |
| CarPlay/Android Auto not connecting | Bluetooth/Wi-Fi off, incorrect pairing, phone software issue | Ensure Bluetooth/Wi-Fi is on for both devices. Re-pair devices. Try connecting via USB. Restart phone and head unit. |
| GPS signal weak or inaccurate | GPS antenna improperly placed or faulty | Relocate GPS antenna to a position with a clear view of the sky. Check antenna connection. |
| Touch screen unresponsive | Software glitch, screen calibration issue | Restart the head unit. If issue persists, perform a factory reset (note: this will erase all user data). |
| Unit overheating | Obstructed cooling vents, prolonged heavy use | Ensure cooling vents are clear. Reduce usage of demanding applications. The built-in cooling fan should help regulate temperature. |
6. Specifications
Detailed technical specifications for the MekedeTech Android Car Stereo Head Unit (8-Core 4+64G):
| Feature | Specification |
|---|---|
| Brand | MekedeTech |
| Screen Size | 10 Inches |
| Operating System | Android 12 |
| CPU | 8-Core A53 1.8GHz |
| Memory (RAM) | 4 GB |
| Storage (ROM) | 64 GB |
| Screen Resolution | 1280*720 IPS |
| Touch Screen Type | Capacitive |
| Connectivity Technology | Wireless (Bluetooth, Wi-Fi, Cellular) |
| Special Features | 4G LTE, Bluetooth, Touchscreen, Wireless Android Auto, Wireless CarPlay, Built-in DSP |
| Power Output | 4*50W |
| Map Type | Worldwide |
| Human Interface Input | Buttons, Touchscreen |
| Manufacturer | Shenzhen Mekede Technology Co.,Ltd |
7. Warranty Information
The MekedeTech Android Car Stereo Head Unit comes with a 1-Year Warranty from the date of purchase. This warranty covers manufacturing defects and malfunctions under normal use. It does not cover damage caused by improper installation, accident, misuse, abuse, unauthorized modifications, or natural disasters.
Please retain your proof of purchase for warranty claims.
8. Support
For technical assistance, troubleshooting beyond this manual, or warranty inquiries, please contact MekedeTech customer support through the retailer where the product was purchased or visit the official MekedeTech website for contact information.
When contacting support, please have your product model (8-Core 4+64G) and proof of purchase readily available.