1. Introduction
This manual provides detailed instructions for the installation, operation, and maintenance of your MekedeTech Android Car Stereo Head Unit, model 8-Core 4+64G. This 9-inch touch screen stereo is specifically designed as an upgrade for VW Sharan vehicles manufactured between 2010 and 2018. It features an Android 12 OS, 8-Core A53 1.8GHz CPU, 4GB RAM, and 64GB ROM, offering a responsive and feature-rich in-car entertainment and navigation experience. Key functionalities include built-in 4G LTE, WiFi, wireless CarPlay, Android Auto, GPS navigation, and AM/FM radio.
2. Setup and Installation
The MekedeTech Android Car Stereo is designed for a straightforward installation process. The package includes a frame kit and a plug-and-play wiring harness, which retains factory steering wheel controls. No splicing of wires is typically required.
2.1 Pre-Installation Check
- Ensure the vehicle's ignition is off and the battery is disconnected before starting installation.
- Verify all components listed in the packing list are present.
- Familiarize yourself with the vehicle's existing radio removal procedure.
2.2 Installation Steps
- Carefully remove the original radio unit from your VW Sharan. Refer to your vehicle's service manual for specific instructions.
- Connect the provided plug-and-play wiring harness to the vehicle's existing wiring. Ensure all connections are secure.
- Connect the other end of the harness to the MekedeTech head unit.
- Install the new head unit into the dashboard opening, securing it with the provided frame kit.
- Reconnect the vehicle battery and turn on the ignition to test the unit.

This image illustrates the appearance of the VW Sharan dashboard before and after the installation of the MekedeTech Android Car Stereo. The top image shows the new 9-inch touch screen installed, while the bottom left shows the original radio, and the bottom right shows the new unit in place.
2.3 Cooling Fan Setup
The unit includes a cooling fan to manage internal temperatures, especially during prolonged use or in hot environments. Ensure the cooling fan is properly connected and configured.

This diagram shows the physical connection point for the cooling fan (1. Connect) and the software settings to enable it (2. Settings -> Device -> Sound, 3. Device -> AMP ON, 4. The cooling fan starts working). It also illustrates the difference in CPU temperature with and without the cooling fan.
3. Operating Instructions
3.1 Basic Functions
- Power On/Off: Press and hold the power button (usually located on the front panel) to turn the unit on or off. A short press typically mutes/unmutes audio.
- Touch Screen: Navigate the Android interface by tapping, swiping, and pinching on the 9-inch IPS touch screen.
- Volume Control: Adjust volume using the physical buttons on the unit or the steering wheel controls.
- Radio (AM/FM): Access the built-in AM/FM tuner application to scan for stations, save presets, and listen to broadcasts.
3.2 Wireless CarPlay and Android Auto
The unit supports wireless CarPlay for iOS devices and wireless Android Auto for Android devices, providing seamless integration of your smartphone's features.

This image displays the user interface for both Wireless CarPlay (iOS system) and Wireless Android Auto (Android system). Connection steps are provided: 1. Connect Bluetooth (BT), 2. Click on "Car Link" and wait for connection. Both systems can also be connected via USB cable.
3.3 4G LTE and WiFi Connectivity
The head unit features built-in 4G LTE and WiFi modules, allowing internet access directly from the unit or via a WiFi hotspot.
- 4G LTE: Insert a compatible SIM card into the designated 4G LTE card slot to access cellular data. The unit includes two SIM card slots: one on the back of the main unit and one on the RCA cable.
- WiFi: Connect to available WiFi networks by navigating to the settings menu and selecting your desired network.
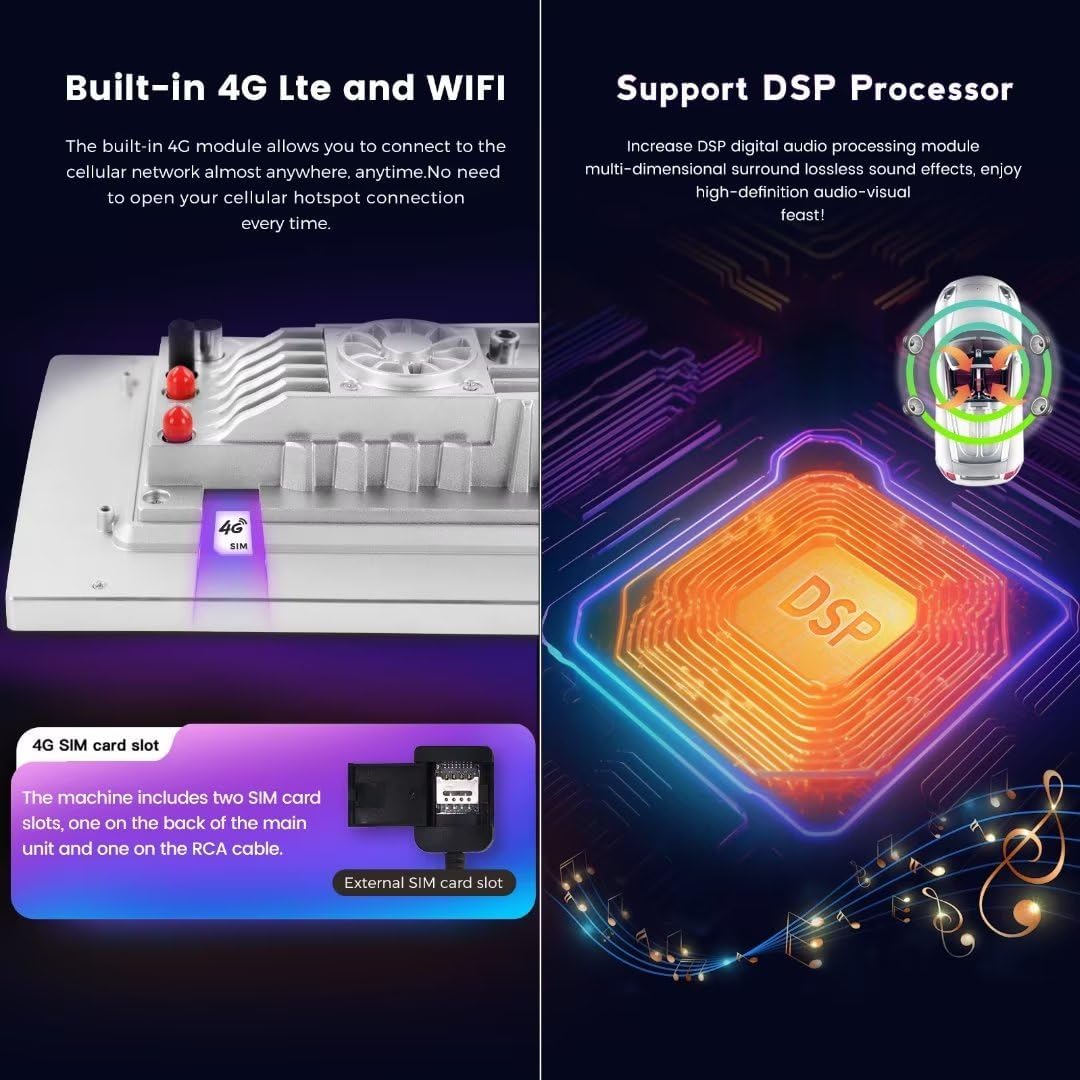
This image highlights the built-in 4G LTE functionality, showing the SIM card slot location. It also illustrates the DSP (Digital Signal Processor) for enhanced audio quality.
3.4 GPS Navigation
The unit comes with built-in GPS navigation and supports various map applications. Ensure the GPS antenna is properly installed for optimal signal reception.
3.5 DSP Sound System
The integrated DSP (Digital Signal Processor) provides multi-dimensional surround lossless sound effects, enhancing your audio experience with high-definition quality.
4. Maintenance
Proper maintenance ensures the longevity and optimal performance of your car stereo.
- Cleaning the Screen: Use a soft, lint-free cloth specifically designed for electronics screens. Dampen the cloth slightly with water or a screen cleaner if necessary. Avoid harsh chemicals or abrasive materials.
- General Cleaning: Keep the unit free from dust and debris. Use a soft brush or compressed air to clean vents and crevices.
- Software Updates: Periodically check for software updates through the unit's settings menu or the manufacturer's website to ensure you have the latest features and bug fixes.
- Avoid Extreme Temperatures: Do not expose the unit to extreme heat or cold for extended periods, as this can affect its performance and lifespan.
5. Troubleshooting
If you encounter issues with your MekedeTech Android Car Stereo, refer to the following common troubleshooting steps:
- No Power:
- Check all power connections and ensure they are secure.
- Verify the vehicle's fuse for the radio is intact.
- Ensure the vehicle battery is properly connected and charged.
- No Sound:
- Check speaker connections.
- Ensure the volume is not muted or set to minimum.
- Verify audio settings in the unit's menu.
- Touch Screen Unresponsive:
- Restart the unit by turning the vehicle ignition off and on, or by pressing and holding the power button.
- Ensure the screen is clean and free of debris.
- GPS Signal Loss:
- Ensure the GPS antenna is properly installed and has a clear view of the sky.
- Check for any obstructions that might block the signal.
- CarPlay/Android Auto Connection Issues:
- Ensure Bluetooth is enabled on both the head unit and your smartphone.
- Forget and re-pair the Bluetooth connection.
- Update your smartphone's operating system to the latest version.
6. Specifications
| Brand | MekedeTech |
| Model | 8-Core 4+64G |
| Screen Size | 9 Inches |
| Operating System | Android 12 |
| CPU | 8-Core A53 1.8GHz |
| Memory (RAM) | 4 GB |
| Storage (ROM) | 64 GB |
| Screen Resolution | 1280*720 IPS |
| Connectivity Technology | Wireless (Bluetooth, Cellular, Wi-Fi) |
| Special Features | 4G LTE, Bluetooth, Touchscreen, Wireless Android Auto, Wireless CarPlay, Built-in DSP |
| Power Output | 4*50W |
| Map Type | Worldwide |
| Human Interface Input | Buttons, Keyboard, Touchscreen |
| Manufacturer | Shenzhen Mekede Technology Co.,Ltd |
7. Warranty and Support
7.1 Warranty Information
This MekedeTech Android Car Stereo Head Unit comes with a 1-Year Warranty from the date of purchase. This warranty covers manufacturing defects and malfunctions under normal use. It does not cover damage caused by misuse, accidents, unauthorized modifications, or improper installation.
7.2 Customer Support
For technical assistance, warranty claims, or any questions regarding your product, please contact MekedeTech customer support. Refer to the contact information provided with your purchase or visit the official MekedeTech website for support resources.