
1. Introduction
This manual provides detailed instructions for the installation, operation, and maintenance of the XOLORspace 46420 8K 60Hz eARC HDMI Matrix Switch 4x2. Please read this manual thoroughly before using the product to ensure proper functionality and to prevent damage.
The XOLORspace 46420 is an advanced HDMI matrix switch designed to manage up to four HDMI input sources and distribute them to two HDMI displays simultaneously. It supports high-resolution video up to 8K@60Hz (4:2:0) and 4K@120Hz, along with eARC functionality on specific ports. This device also features audio de-embedding and advanced EDID management.
2. Safety Information
- Ensure the device is powered off before making any connections.
- Use only the provided power adapter.
- Do not expose the device to water, moisture, or extreme temperatures.
- Avoid placing the device near heat sources or in direct sunlight.
- Do not attempt to open or repair the device yourself. Refer all servicing to qualified personnel.
- Keep the device away from children.
3. Package Contents
Verify that all items are present in the package:
- XOLORspace 46420 8K 60Hz eARC HDMI Matrix Switch 4x2
- Power Adapter (DC 5V)
- IR Remote Control
- User Manual (this document)
4. Product Overview

Image: The XOLORspace 46420 8K 60Hz eARC HDMI Matrix Switch 4x2, shown with its included IR remote control. This device allows for flexible routing of HDMI signals.
The XOLORspace 46420 is a versatile HDMI matrix switch designed to manage and distribute high-resolution video and audio signals. It features four HDMI inputs and two HDMI outputs, supporting resolutions up to 8K@60Hz and 4K@120Hz. The device also includes advanced audio extraction capabilities and eARC support on specific ports.
4.1 Front Panel

Image: Front panel of the XOLORspace 46420 HDMI Matrix Switch, showing power indicator, output selection buttons, eARC buttons, CONFIG and EDID DIP switches, and a SERVICE port.
The front panel provides controls and indicators for basic operation:
- Power Indicator: Illuminates when the device is powered on.
- Output Selection Buttons (OUT 1, OUT 2): Used to select the input source for each respective output.
- eARC Buttons: Activates or deactivates the eARC function for the corresponding output.
- CONFIG DIP Switch: Used for advanced configuration settings.
- EDID DIP Switch: Used for EDID management settings.
- SERVICE Port: For firmware updates and maintenance.
4.2 Rear Panel

Image: Rear panel of the XOLORspace 46420 HDMI Matrix Switch, displaying HDMI input ports (1-4), HDMI output ports (OUT 1, OUT 2), optical audio output, L/R audio output, and DC 5V power input.
The rear panel contains all input and output connections:
- HDMI Inputs (1-4): Connect up to four HDMI source devices (e.g., Blu-ray player, game console, PC).
- HDMI Outputs (OUT 1, OUT 2): Connect to two HDMI display devices (e.g., TV, monitor, projector). OUT 1 supports eARC.
- Optical Audio Output: For digital audio extraction.
- L/R Audio Output (3.5mm): For analog stereo audio extraction.
- DC 5V Power Input: Connect the provided power adapter.
5. Setup
Follow these steps to set up your XOLORspace 46420 HDMI Matrix Switch:
- Power Off Devices: Ensure all HDMI source devices, display devices, and the matrix switch are powered off before making any connections.
- Connect HDMI Sources: Connect your HDMI source devices (e.g., media players, game consoles) to the HDMI INPUT ports (1-4) on the rear panel of the matrix switch using high-quality HDMI cables.
- Connect HDMI Displays: Connect your HDMI display devices (e.g., TVs, monitors) to the HDMI OUTPUT ports (OUT 1, OUT 2) on the rear panel of the matrix switch using high-quality HDMI cables.
- Connect Audio Devices (Optional): If you wish to extract audio, connect your audio receiver or soundbar to the Optical Audio Output or L/R Audio Output ports.
- Connect Power: Connect the provided DC 5V power adapter to the DC 5V input port on the matrix switch, then plug the adapter into a power outlet.
- Power On Devices: Power on the matrix switch, then power on your display devices, and finally your HDMI source devices.

Image: Diagram illustrating typical connections for the XOLORspace 46420 HDMI Matrix Switch. It shows four input devices connected to the HDMI IN ports and two display devices connected to the HDMI OUT ports. Audio output to a soundbar/headphones is also depicted when eARC is off.
6. Operating Instructions
6.1 Input/Output Switching
You can switch input sources for each output using the front panel buttons or the IR remote control.
- Front Panel: Press the "OUT 1" or "OUT 2" buttons repeatedly to cycle through the available HDMI input sources (1, 2, 3, 4) for the corresponding output. The indicator lights will show the currently selected input.
- IR Remote Control: Use the dedicated buttons on the remote control to directly select an input for OUT 1 (1, 2, 3, 4) or OUT 2 (1, 2, 3, 4).
6.2 eARC Functionality
The eARC (enhanced Audio Return Channel) function is supported on HDMI INPUT 1 and HDMI OUT 1. This allows audio from your display connected to OUT 1 to be sent back to an audio system connected to INPUT 1, or to the dedicated audio output ports of the matrix switch.
- Activation: Press the "eARC" button on the front panel or remote control for OUT 1 to enable or disable eARC.
- Usage: When eARC is active, audio from the display connected to OUT 1 can be routed to an eARC-compatible soundbar or AV receiver connected to HDMI INPUT 1, or extracted via the Optical/L/R audio outputs.
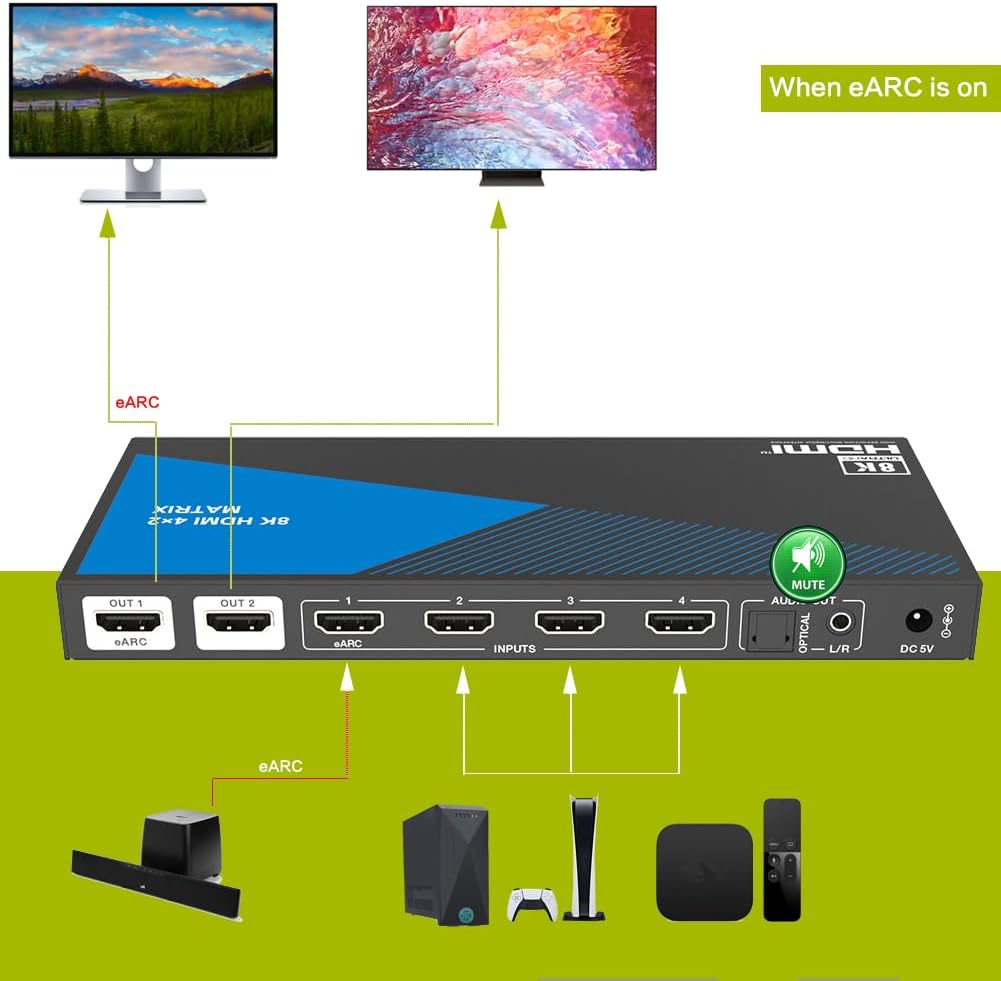
Image: Diagram illustrating eARC functionality. When eARC is enabled, audio from the display connected to OUT 1 is returned to the matrix switch and can be routed to an eARC-compatible sound system connected to HDMI INPUT 1, or extracted via the dedicated audio outputs.
6.3 Audio Extraction
The matrix switch can extract audio from the selected HDMI input source and output it through the dedicated audio ports.
- Optical Audio Output: Provides digital audio output (PCM2.0, Dolby Digital Audio Plus, DTS 2.0/5.1).
- L/R Audio Output (3.5mm): Provides analog stereo audio output (PCM2.0CH).
- Note: ARC audio is only returned to the coaxial output ports.
6.4 EDID Management
The built-in EDID DIP switch allows for advanced EDID management. EDID (Extended Display Identification Data) communicates display capabilities to the source device. Proper EDID settings ensure optimal video and audio compatibility.
- Refer to the detailed EDID settings in the appendix or advanced user guide for specific configurations using the DIP switches.
6.5 Control Methods
The device can be controlled via multiple methods:
- Front Panel Buttons: For direct control of input switching and eARC.
- IR Remote Control: Provides convenient wireless control over all primary functions.
- RS-232: For integration into professional control systems.
- TCP/IP (Web GUI): Built-in web interface for network-based control and advanced settings. Consult the advanced user guide for details on accessing and using the Web GUI.
7. Advanced Features
- 8K->4K Downscaling: The matrix switch supports downscaling from 8K to 4K, and from 8K/4K to 2K, allowing compatibility with various display resolutions.
- Individual Output Scaling: Each of the four outputs can be individually scaled from 4K to 1080p.
- Web GUI: Access the built-in web graphical user interface for comprehensive control and configuration via TCP/IP.
8. Specifications
| Feature | Description |
|---|---|
| HDMI Inputs | 4 x HDMI Type A (19-pin female) |
| HDMI Outputs | 2 x HDMI Type A (19-pin female) |
| Audio Outputs | 1 x Optical (COAX), 1 x L/R (3.5mm stereo mini female) |
| HDMI Standard | HDMI 2.0, HDCP 2.2 (compatible with HDCP 1.4, DVI 1.0) |
| Video Bandwidth | 18 Gbps |
| Supported Video Resolutions | 4K2K 50/60Hz 4:4:4, 4K2K 50/60Hz 4:2:0, 4K2K 30Hz 4:4:4, 1080p, 1080i, 720p, 720i, 480p, 480i, all HDMI 3D TV formats, all PC resolutions up to 1920x1200 |
| Color Space | RGB, YCbCr4:4:4, YCbCr4:2:2, YCbCr 4:2:0 |
| Color Depth | 8-bit, 10-bit, 12-bit (1080P, 4K30Hz, 4K60Hz YCbCr 4:2:0), 8-bit (4K60Hz YCbCr 4:4:4) |
| HDR Support | HDR10, HDR10+, Dolby Vision, HLG |
| HDMI Audio Formats | PCM2.0/5.1/7.1CH, Dolby Digital/Plus/EX, Dolby True HD, DTS, DTS-EX, DTS-96/24, DTS High Res, DTS-HD Master Audio, DSD |
| Coaxial Audio Formats | PCM2.0, Dolby Digital Audio Plus, DTS 2.0/5.1 |
| L/R Audio Formats | PCM2.0CH |
| eARC Support | Yes (INPUTS 1 and OUT 1 port only) |
| Control Methods | Front Panel, RS-232, IR Remote, TCP/IP (Web GUI) |
| Dimensions | 220 x 105 x 44 mm (8.66 x 4.13 x 1.73 inches) |
| Weight | 792 g (1.75 lbs) |
| Power Supply | DC 5V |
9. Troubleshooting
If you encounter issues, please refer to the following common problems and solutions:
- No Video/Audio Output:
- Ensure all HDMI cables are securely connected.
- Verify the power adapter is connected and the device is powered on.
- Check that the correct input source is selected for the desired output.
- Test with different HDMI cables or source devices.
- Adjust EDID settings using the DIP switches to match display capabilities.
- Intermittent Signal:
- Ensure HDMI cables are high-quality and rated for the resolution being used (e.g., 8K/4K).
- Check for electromagnetic interference from other devices.
- eARC Not Working:
- Confirm that your display and audio system support eARC/ARC.
- Ensure eARC is enabled on the matrix switch (OUT 1) and on your display/audio system.
- Verify that the audio system is connected to HDMI INPUT 1.
- Remote Control Not Responding:
- Check the battery in the remote control.
- Ensure there are no obstructions between the remote and the device's IR receiver.
10. Maintenance
- Cleaning: Use a soft, dry cloth to clean the exterior of the device. Do not use liquid or aerosol cleaners.
- Storage: Store the device in a cool, dry place away from direct sunlight and extreme temperatures when not in use for extended periods.
- Firmware Updates: Periodically check the manufacturer's website for firmware updates to ensure optimal performance and compatibility. Updates can typically be applied via the SERVICE port.
11. Warranty and Support
XOLORspace products are designed for reliability and performance. For warranty information, technical support, or service inquiries, please refer to the warranty card included with your product or visit the official XOLORspace website.
Please retain your proof of purchase for warranty claims.